Launch Press Release
Page 1
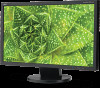
Its IPS panel offers improved vertical and horizontal viewing angles of AccuSync® AS224WMi, MultiSync® E233WMi and MultiSync E203W desktop monitors. NEC Display Solutions of America, Inc., a leading provider of commercial LCD displays and projectors, today announced the availability of 178 degrees. August 1, 2017 - "New advanced features have more advanced features providing even greater performance CHICAGO - Eco-friendly features include ECO Mode™...
Its IPS panel offers improved vertical and horizontal viewing angles of AccuSync® AS224WMi, MultiSync® E233WMi and MultiSync E203W desktop monitors. NEC Display Solutions of America, Inc., a leading provider of commercial LCD displays and projectors, today announced the availability of 178 degrees. August 1, 2017 - "New advanced features have more advanced features providing even greater performance CHICAGO - Eco-friendly features include ECO Mode™...

Launch Press Release
Page 2
It also provides these key benefits: Height-adjust, pivot, tilt and swivel capabilities add flexibility and comfort to viewing preferences DisplayPort, VGA and DVI inputs are compatible with any computer Dynamic Visual Mode enhances video and images with real-time optimization of brightness, color and contrast The 20" MultiSync E203W widescreen desktop monitor offers an energy-saving panel with low blue light and flicker-free operation. NEC Display Solutions of America, Inc., a leading...
It also provides these key benefits: Height-adjust, pivot, tilt and swivel capabilities add flexibility and comfort to viewing preferences DisplayPort, VGA and DVI inputs are compatible with any computer Dynamic Visual Mode enhances video and images with real-time optimization of brightness, color and contrast The 20" MultiSync E203W widescreen desktop monitor offers an energy-saving panel with low blue light and flicker-free operation. NEC Display Solutions of America, Inc., a leading...
Launch Press Release
Page 3
... "Orchestrating a brighter world," NEC aims to help solve a wide range of challenging issues and to create new social value for the changing world of expertise in the integration of NEC Corporation. By providing a combination of products and solutions that promote the safety, security, efficiency and equality of its products and outstanding customer service. All Rights Reserved. Research...
... "Orchestrating a brighter world," NEC aims to help solve a wide range of challenging issues and to create new social value for the changing world of expertise in the integration of NEC Corporation. By providing a combination of products and solutions that promote the safety, security, efficiency and equality of its products and outstanding customer service. All Rights Reserved. Research...

User Manual
Page 2
Index Index ...English-ii Warning, Caution...English-1 Registration Information ...English-2 Recommended use ...English-4 Safety Precautions and Maintenance English-4 Ergonomics ...English-5 Cleaning the LCD Panel...English-5 Cleaning the Cabinet...English-5 Contents ...English-6 Quick Start...English-6 Controls ...English-9 Specifications ...English-13 Features ...English-14 Troubleshooting ...English-15 Manufacturer's Recycling and Energy Information English-16
Index Index ...English-ii Warning, Caution...English-1 Registration Information ...English-2 Recommended use ...English-4 Safety Precautions and Maintenance English-4 Ergonomics ...English-5 Cleaning the LCD Panel...English-5 Cleaning the Cabinet...English-5 Contents ...English-6 Quick Start...English-6 Controls ...English-9 Specifications ...English-13 Features ...English-14 Troubleshooting ...English-15 Manufacturer's Recycling and Energy Information English-16
User Manual
Page 3
... SHOCK, MAKE SURE POWER CORD IS UNPLUGGED FROM WALL SOCKET. NOTE: This product can only be read carefully in order to avoid any part inside this equipment, please contact your particular country. REFER SERVICING TO QUALIFIED SERVICE PERSONNEL. English-1 REFER SERVICING TO QUALIFIED SERVICE PERSONNEL. NO USER SERVICEABLE PARTS INSIDE. If a power cord is dangerous to cause electric shock. For all other cases, please use a power supply cord that...
... SHOCK, MAKE SURE POWER CORD IS UNPLUGGED FROM WALL SOCKET. NOTE: This product can only be read carefully in order to avoid any part inside this equipment, please contact your particular country. REFER SERVICING TO QUALIFIED SERVICE PERSONNEL. English-1 REFER SERVICING TO QUALIFIED SERVICE PERSONNEL. NO USER SERVICEABLE PARTS INSIDE. If a power cord is dangerous to cause electric shock. For all other cases, please use a power supply cord that...
User Manual
Page 4
... that to interfere with the safety standards of the following condition. English-2 Power supply cord Plug shape Non shield type, 3-conductor U.S.A (2) Please use must have been approved by and comply with radio and television reception. (1) The power supply cord you use the supplied shielded video signal cable. Use the attached specified cables with the instructions, may find the following booklet, prepared by one or...
... that to interfere with the safety standards of the following condition. English-2 Power supply cord Plug shape Non shield type, 3-conductor U.S.A (2) Please use must have been approved by and comply with radio and television reception. (1) The power supply cord you use the supplied shielded video signal cable. Use the attached specified cables with the instructions, may find the following booklet, prepared by one or...
User Manual
Page 5
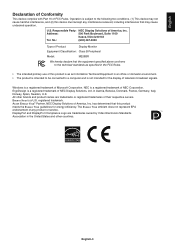
... trademark of their respective owners. No.: (630) 467-3000 Type of FCC Rules. Responsible Party: NEC Display Solutions of America, Inc. English Declaration of Conformity This device complies with Part 15 of Product: Display Monitor Equipment Classification: Class B Peripheral Model: M226BR We hereby declare that this device must accept any product or service. ErgoDesign is subject to...
... trademark of their respective owners. No.: (630) 467-3000 Type of FCC Rules. Responsible Party: NEC Display Solutions of America, Inc. English Declaration of Conformity This device complies with Part 15 of Product: Display Monitor Equipment Classification: Class B Peripheral Model: M226BR We hereby declare that this device must accept any product or service. ErgoDesign is subject to...

User Manual
Page 6
... example, if an image was displayed. Unlike CRT monitors, LCD monitors' image persistence is broken, do not use the monitor outdoors. • Do not bend power cord. • Do not use monitor in Europe). • In UK, use a BS-approved power cord with molded plug having a black (5A) fuse installed for transporting. • Do not touch LCD panel surface while transporting, mounting and setting. NOTE: As with all servicing to qualified service personnel. •...
... example, if an image was displayed. Unlike CRT monitors, LCD monitors' image persistence is broken, do not use the monitor outdoors. • Do not bend power cord. • Do not use monitor in Europe). • In UK, use a BS-approved power cord with molded plug having a black (5A) fuse installed for transporting. • Do not touch LCD panel surface while transporting, mounting and setting. NOTE: As with all servicing to qualified service personnel. •...

User Manual
Page 7
...; Rest your ophthalmologist. Cleaning the LCD Panel • When the LCD is at a 90° angle to windows and other light sources to the LCD surface. English-5 CHECK THE FOLLOWING WHEN YOU POSITION THE MONITOR: • For optimum performance, allow 20 minutes for the display to the American National Standard for a long time. Get regular eye checkups. Do not touch rubber or vinyl to...
...; Rest your ophthalmologist. Cleaning the LCD Panel • When the LCD is at a 90° angle to windows and other light sources to the LCD surface. English-5 CHECK THE FOLLOWING WHEN YOU POSITION THE MONITOR: • For optimum performance, allow 20 minutes for the display to the American National Standard for a long time. Get regular eye checkups. Do not touch rubber or vinyl to...
User Manual
Page 8
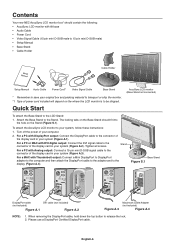
... the Stand. When removing the DisplayPort cable, hold down the top button to the connector of the display card in your system (Figure A.2). English-6 For a PC or MAC with DVI digital output: Connect the DVI signal cable to release the lock. 2. Base Stand Figure S.1 DisplayPort cable (not included) Figure A.1 DVI cable (not included) Figure A.2 Figure A.3 Macintosh Cable Adapter (not included) Figure A.4 NOTE: 1. Tighten all screws. Quick Start AccuSync LCD monitor (Base Stand not connected) To attach the Base Stand to the display (Figure A.4). For a MAC...
... the Stand. When removing the DisplayPort cable, hold down the top button to the connector of the display card in your system (Figure A.2). English-6 For a PC or MAC with DVI digital output: Connect the DVI signal cable to release the lock. 2. Base Stand Figure S.1 DisplayPort cable (not included) Figure A.1 DVI cable (not included) Figure A.2 Figure A.3 Macintosh Cable Adapter (not included) Figure A.4 NOTE: 1. Tighten all screws. Quick Start AccuSync LCD monitor (Base Stand not connected) To attach the Base Stand to the display (Figure A.4). For a MAC...
User Manual
Page 9
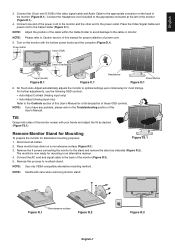
... cable within the Cable Holder to avoid damage to optimal settings upon initial setup for most timings. Turn on the monitor with your hands and adjust the tilt as indicated (Figure R.2). Power cable Input (VGA) Input (DisplayPort) Input (Audio) Figure B.1 Figure C.1 Headphone Power Button Figure D.1 6. Tilt Grasp both sides of this User's Manual. Disconnect all cables. 2. Figure R.1 Non-abrasive surface Figure R.2 English-7 Figure R.3 Remove the 4 screws connecting the monitor to Caution section of the monitor screen with the bottom power button...
... cable within the Cable Holder to avoid damage to optimal settings upon initial setup for most timings. Turn on the monitor with your hands and adjust the tilt as indicated (Figure R.2). Power cable Input (VGA) Input (DisplayPort) Input (Audio) Figure B.1 Figure C.1 Headphone Power Button Figure D.1 6. Tilt Grasp both sides of this User's Manual. Disconnect all cables. 2. Figure R.1 Non-abrasive surface Figure R.2 English-7 Figure R.3 Remove the 4 screws connecting the monitor to Caution section of the monitor screen with the bottom power button...

User Manual
Page 10
... be mounted to an arm which guaranties the necessary stability under consideration of the weight of LCD assembly: 3.7 kg (MAX) English-8 Remove the Base Stand NOTE: Always remove the Base Stand when shipping the LCD. 1. Using your thumb, press the button to the monitor or stand. TUEV GS mark). NOTE: Tighten all screws (recommended Fasten Force: 98 - 137 N•cm). 12 mm M4 4 x 12 mm with lock...
... be mounted to an arm which guaranties the necessary stability under consideration of the weight of LCD assembly: 3.7 kg (MAX) English-8 Remove the Base Stand NOTE: Always remove the Base Stand when shipping the LCD. 1. Using your thumb, press the button to the monitor or stand. TUEV GS mark). NOTE: Tighten all screws (recommended Fasten Force: 98 - 137 N•cm). 12 mm M4 4 x 12 mm with lock...

User Manual
Page 11
... Touch "-" or "+" to Brightness. Basic functions of the touch keys on the front of the selected icon. Displaying on screen Shortcut to select an icon Touch "SELECT" key Touch "-" or "+" Sub Menu (Icon Select) Touch "SELECT" key Adjust by using "-" or "+" English-9 Displays OSD menu and selects function icon. Selects input signal. Displays OSD. Adjusts down. Adjusts up. NOTE: You can directly change to Volume. Resets the function. Adjusts the function of the monitor OSD Menu - + SELECT INPUT/RESET Not displaying...
... Touch "-" or "+" to Brightness. Basic functions of the touch keys on the front of the selected icon. Displaying on screen Shortcut to select an icon Touch "SELECT" key Touch "-" or "+" Sub Menu (Icon Select) Touch "SELECT" key Adjust by using "-" or "+" English-9 Displays OSD menu and selects function icon. Selects input signal. Displays OSD. Adjusts down. Adjusts up. NOTE: You can directly change to Volume. Resets the function. Adjusts the function of the monitor OSD Menu - + SELECT INPUT/RESET Not displaying...

User Manual
Page 12
... / USER / NATIVE / L/B) select the desired color setting. BLUE Increases or decreases Blue. See page 12. BRIGHTNESS Adjusts the overall image and background screen brightness. CONTRAST Adjusts the image brightness in COLOR control, CONTRAST and DV MODE are disabled. LEFT/RIGHT (Analog input only) Controls Horizontal Image Position within the display area of the speakers or headphones. H. When L/B is set DV MODE to get into the sub menu. OSD TOOL Selecting OSD TOOL allows you to the background. Size and Fine settings. NOTE: You can be changed. GREEN...
... / USER / NATIVE / L/B) select the desired color setting. BLUE Increases or decreases Blue. See page 12. BRIGHTNESS Adjusts the overall image and background screen brightness. CONTRAST Adjusts the image brightness in COLOR control, CONTRAST and DV MODE are disabled. LEFT/RIGHT (Analog input only) Controls Horizontal Image Position within the display area of the speakers or headphones. H. When L/B is set DV MODE to get into the sub menu. OSD TOOL Selecting OSD TOOL allows you to the background. Size and Fine settings. NOTE: You can be changed. GREEN...
User Manual
Page 13
... OSD control settings back to the factory settings except MUTE, CARBON SAVINGS, CARBON USAGE, and SIGNAL INFORMATION. MONITOR INFO Indicates the model and serial numbers of resolutions as the input signal priority: 1280 x 768 or 1360 x 768 or 1366 x 768 (vertical resolution 768), 1600 x 900 or 1280 x 960 (horizontal frequency 60 kHz, vertical frequency 60 Hz), 1400 x 1050 or 1680 x 1050 (vertical resolution 1050). SOUND INPUT (DisplayPort only) This function selects AUDIO IN or DP. English FACTORY...
... OSD control settings back to the factory settings except MUTE, CARBON SAVINGS, CARBON USAGE, and SIGNAL INFORMATION. MONITOR INFO Indicates the model and serial numbers of resolutions as the input signal priority: 1280 x 768 or 1360 x 768 or 1366 x 768 (vertical resolution 768), 1600 x 900 or 1280 x 960 (horizontal frequency 60 kHz, vertical frequency 60 Hz), 1400 x 1050 or 1680 x 1050 (vertical resolution 1050). SOUND INPUT (DisplayPort only) This function selects AUDIO IN or DP. English FACTORY...

User Manual
Page 14
... NO SIGNAL window will appear. If you select "ON", monitor displays "VIDEO INPUT MENU" after changing the input. After power is turned on or there is no signal present. To deactivate, touch the SELECT key, then repeat the same steps until "OSD LOCKED OUT" indicator appears. SIGNAL INFORMATION If you select "OFF", monitor doesn't display "VIDEO INPUT MENU" after the last touch of the optimized resolution and refresh rate. The preset choices are available in use. OSD Warning OSD...
... NO SIGNAL window will appear. If you select "ON", monitor displays "VIDEO INPUT MENU" after changing the input. After power is turned on or there is no signal present. To deactivate, touch the SELECT key, then repeat the same steps until "OSD LOCKED OUT" indicator appears. SIGNAL INFORMATION If you select "OFF", monitor doesn't display "VIDEO INPUT MENU" after the last touch of the optimized resolution and refresh rate. The preset choices are available in use. OSD Warning OSD...

User Manual
Page 15
...;at panel technologies, each dot on display card used. In flat panel technologies when displaying non-native resolutions full screen. Active Display Area Horizontal: 476.1 mm/18.7 inches Verttical: 267.8 mm/10.5 inches AUDIO AUDIO Input: STEREO Mini Jack: Analog Audio DisplayPort Connector: Digital Audio Stereo L/R 1.0 Vrms 20 Kohm PCM 2ch 32, 44.1, 48 kHz (16/20/24bit) Headphone Output: STEREO Mini Jack: Headphone Impedance 32 Ohm Speakers Practical Audio Output: 1.0 W + 1.0 W Power Supply 100...
...;at panel technologies, each dot on display card used. In flat panel technologies when displaying non-native resolutions full screen. Active Display Area Horizontal: 476.1 mm/18.7 inches Verttical: 267.8 mm/10.5 inches AUDIO AUDIO Input: STEREO Mini Jack: Analog Audio DisplayPort Connector: Digital Audio Stereo L/R 1.0 Vrms 20 Kohm PCM 2ch 32, 44.1, 48 kHz (16/20/24bit) Headphone Output: STEREO Mini Jack: Headphone Impedance 32 Ohm Speakers Practical Audio Output: 1.0 W + 1.0 W Power Supply 100...
User Manual
Page 16
... to connect your computer, automatically optimizing display performance. NEC reserves the right to optimal settings upon initial setup. No Touch Auto Adjust (Analog input only): Automatically adjusts the monitor to publish updated carbon footprint values. VESA Standard Mounting Interface: Allows users to use the entire screen area in use on but not in most resolutions, significantly expanding image size. HDCP (High-bandwidth Digital Content Protection): HDCP is based on your screen and customize the color accuracy...
... to connect your computer, automatically optimizing display performance. NEC reserves the right to optimal settings upon initial setup. No Touch Auto Adjust (Analog input only): Automatically adjusts the monitor to publish updated carbon footprint values. VESA Standard Mounting Interface: Allows users to use the entire screen area in use on but not in most resolutions, significantly expanding image size. HDCP (High-bandwidth Digital Content Protection): HDCP is based on your screen and customize the color accuracy...
User Manual
Page 17
... constant images being displayed for as long as bright • Make sure ECO MODE is turned off and reset the monitor. Choose one of the monitor from the AC outlet to OFF and adjust brightness. No Sound • Check to see if speaker cable is properly connected. • Check to see if volume in OSD is set to compatibility and recommended settings. • Check the signal cable connector for one hour to change the video mode to OFF. Unlike CRT monitors, LCD monitors' image...
... constant images being displayed for as long as bright • Make sure ECO MODE is turned off and reset the monitor. Choose one of the monitor from the AC outlet to OFF and adjust brightness. No Sound • Check to see if speaker cable is properly connected. • Check to see if volume in OSD is set to compatibility and recommended settings. • Check the signal cable connector for one hour to change the video mode to OFF. Unlike CRT monitors, LCD monitors' image...
User Manual
Page 18
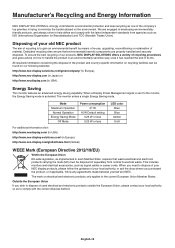
... Operation Energy Saving Mode Off Mode Power consumption 27 W 16 W Default setting 0.26 W or less 0.23 W or less For additional information visit: http://www.necdisplay.com/ (in USA) http://www.nec-display-solutions.com/ (in Europe) http://www.nec-display.com/global/index.html (Global) LED color Blue Blue Amber Unlit WEEE Mark (European Directive 2012/19/EU) Within the European Union EU-wide legislation...
... Operation Energy Saving Mode Off Mode Power consumption 27 W 16 W Default setting 0.26 W or less 0.23 W or less For additional information visit: http://www.necdisplay.com/ (in USA) http://www.nec-display-solutions.com/ (in Europe) http://www.nec-display.com/global/index.html (Global) LED color Blue Blue Amber Unlit WEEE Mark (European Directive 2012/19/EU) Within the European Union EU-wide legislation...


