User Manual
Page 4
... NiMH Battery 5 Charging 7 Installing AA Alkaline Batteries 8 Battery Meter 8 Setting the Battery Type 16 Lock Keypad 16 End-of-Transmission Tone 16 Keypad Tones 17 Settings and Functions Display 17 Programming Mode 18 Channel 20 Swivel Belt Holster 9 Interference Eliminator Code 20 Turning On/Off Your Radio 10 Frequency 20 Volume 10 Scramble Code 21 Operating Radio 11 Bandwidth 21 Talk Range 11 Manager Lock 21 Signal Strength Indicator/ Assigning Channels to Presets 22 Channel Busy 12 Cloning 22 Monitor 12 Resetting Factory Defaults 23 Features 12 Use and...
... NiMH Battery 5 Charging 7 Installing AA Alkaline Batteries 8 Battery Meter 8 Setting the Battery Type 16 Lock Keypad 16 End-of-Transmission Tone 16 Keypad Tones 17 Settings and Functions Display 17 Programming Mode 18 Channel 20 Swivel Belt Holster 9 Interference Eliminator Code 20 Turning On/Off Your Radio 10 Frequency 20 Volume 10 Scramble Code 21 Operating Radio 11 Bandwidth 21 Talk Range 11 Manager Lock 21 Signal Strength Indicator/ Assigning Channels to Presets 22 Channel Busy 12 Cloning 22 Monitor 12 Resetting Factory Defaults 23 Features 12 Use and...
User Manual
Page 7
... Before Using Your Radio The information provided in this capability. When it receives and transmits radio frequency (RF) energy. When you communicate with XU1100 or XV1100 radios the output power level is 1.0 watt, with other XTN Series radios, the output power level is 2.0 watts Exposure to Radio Frequency Energy Your Motorola radio is designed to comply with radio models that offer this document supersedes the general safety information contained in user guides published prior to radio frequency...
... Before Using Your Radio The information provided in this capability. When it receives and transmits radio frequency (RF) energy. When you communicate with XU1100 or XV1100 radios the output power level is 1.0 watt, with other XTN Series radios, the output power level is 2.0 watts Exposure to Radio Frequency Energy Your Motorola radio is designed to comply with radio models that offer this document supersedes the general safety information contained in user guides published prior to radio frequency...
User Manual
Page 8
...-Way Radio Operation When using your radio as a traditional two-way radio, hold the antenna when the radio is within the guidelines set forth in the above standards, always adhere to the following procedures: Portable Radio Operation and EME Exposure Antenna Care Use only the supplied or an approved replacement antenna. Limits of Health (Canada) Safety Code 6. DO NOT hold the radio in a vertical position with the microphone two...
...-Way Radio Operation When using your radio as a traditional two-way radio, hold the antenna when the radio is within the guidelines set forth in the above standards, always adhere to the following procedures: Portable Radio Operation and EME Exposure Antenna Care Use only the supplied or an approved replacement antenna. Limits of Health (Canada) Safety Code 6. DO NOT hold the radio in a vertical position with the microphone two...
User Manual
Page 9
... use a body-worn accessory, ensure the radio and its antenna at least one inch (2.5 cm) from your radio in accordance with applicable regulations per airline crew instructions. Hospitals or health care facilities may exceed FCC RF exposure guidelines. Aircraft When instructed to do so, turn off your radio when on your body when transmitting, always place the radio in a Motorola supplied or approved clip...
... use a body-worn accessory, ensure the radio and its antenna at least one inch (2.5 cm) from your radio in accordance with applicable regulations per airline crew instructions. Hospitals or health care facilities may exceed FCC RF exposure guidelines. Aircraft When instructed to do so, turn off your radio when on your body when transmitting, always place the radio in a Motorola supplied or approved clip...

User Manual
Page 16
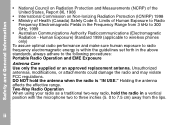
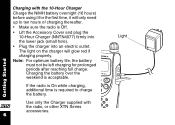
Diagram of Your New XSeries Radio and its Functions Getting Started X 4 Indicator Light Use B to: Transmit Call Tone Use M to: Talk Exit a menu Use \to: Scroll through menus Lock the keypad Use T / S to: *Access Presets Microphone Use P (Power) to: Turn power On/Off Adjust radio volume Accessory Jack Radio Plug-in Charging Audio Accessories Use J to: Turn Scan On/Off* Monitor the Frequency Use [ and ] to: Change Channels* Change menu settings Speaker * XU2600 and XV2600 Only
Diagram of Your New XSeries Radio and its Functions Getting Started X 4 Indicator Light Use B to: Transmit Call Tone Use M to: Talk Exit a menu Use \to: Scroll through menus Lock the keypad Use T / S to: *Access Presets Microphone Use P (Power) to: Turn power On/Off Adjust radio volume Accessory Jack Radio Plug-in Charging Audio Accessories Use J to: Turn Scan On/Off* Monitor the Frequency Use [ and ] to: Change Channels* Change menu settings Speaker * XU2600 and XV2600 Only
User Manual
Page 18
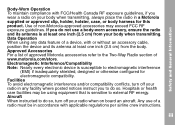
... charging, additional time is acceptable. Note: For optimum battery life, the battery must not be left charging for the first time, it will glow red if charging properly. The light on the charger will only need up to charge the battery. Charging with the radio, or other XTN Series accessories. X 6 Use only the Charger supplied with the 10-Hour Charger Charge the NiMH battery overnight (16 hours) before using it for prolonged periods after reaching full charge...
... charging, additional time is acceptable. Note: For optimum battery life, the battery must not be left charging for the first time, it will glow red if charging properly. The light on the charger will only need up to charge the battery. Charging with the radio, or other XTN Series accessories. X 6 Use only the Charger supplied with the 10-Hour Charger Charge the NiMH battery overnight (16 hours) before using it for prolonged periods after reaching full charge...
User Manual
Page 22
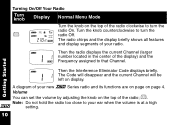
... the display) and the Frequency assigned to that Channel. Turning On/Off Your Radio Turn knob Display Normal Menu Mode Turn the knob on the top of the radio clockwise to turn the P k radio Off. 188 218 The radio chirps and the display briefly shows all features and display segments of your radio. P. Turn the knob counterclockwise to your ear when the volume is at a high X setting. 10 Getting Started Then the Interference Eliminator Code displays...
... the display) and the Frequency assigned to that Channel. Turning On/Off Your Radio Turn knob Display Normal Menu Mode Turn the knob on the top of the radio clockwise to turn the P k radio Off. 188 218 The radio chirps and the display briefly shows all features and display segments of your radio. P. Turn the knob counterclockwise to your ear when the volume is at a high X setting. 10 Getting Started Then the Interference Eliminator Code displays...
User Manual
Page 24
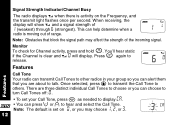
... the transmit light flashes once per second. Press J again to others. X • You can help determine when a radio is set your Call Tone, press \ as needed to hear and select the Call Tone. This can press [ or ] to display E. Note: The default is moving out of range. 6 1 Note: Obstacles that you can alert them that block the signal path may choose 1, 2, or 3. 12 Monitor...
... the transmit light flashes once per second. Press J again to others. X • You can help determine when a radio is set your Call Tone, press \ as needed to hear and select the Call Tone. This can press [ or ] to display E. Note: The default is moving out of range. 6 1 Note: Obstacles that you can alert them that block the signal path may choose 1, 2, or 3. 12 Monitor...

User Manual
Page 25
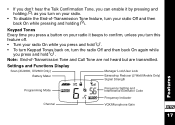
... : www.motorola.com/radios/professional Features X 13 Radio will display: g. To order accessories, please refer to page 14. Microphone Gain The sensitivity of audio accessory firmly into Accessory Microphone and to receive, stop talking. • VOX operation can be disabled by pressing Mor removing audio accessory. Note: There is a short delay between when you start talking and the radio transmits. Hands-Free Use/VOX With Compatible VOX Accessories • Turn radio Off. • Open Accessory Cover. • Insert plug of your radio's microphone can be adjusted to fit...
... : www.motorola.com/radios/professional Features X 13 Radio will display: g. To order accessories, please refer to page 14. Microphone Gain The sensitivity of audio accessory firmly into Accessory Microphone and to receive, stop talking. • VOX operation can be disabled by pressing Mor removing audio accessory. Note: There is a short delay between when you start talking and the radio transmits. Hands-Free Use/VOX With Compatible VOX Accessories • Turn radio Off. • Open Accessory Cover. • Insert plug of your radio's microphone can be adjusted to fit...

User Manual
Page 28
... n displays. Scan Advancement allows you to "skip" a busy Channel to check for other activity. • Press ] to use. Features Lock Keypad To maintain settings and lock keypad, press \ for three seconds. Scan Advancement/ Nuisance Delete Scan has several temporary features to make it will return the next time you use the Scan feature. • Depressing [ will not appear if the Motorola NiMH Battery is flashing. End-of-Transmission Tone When you turn...
... n displays. Scan Advancement allows you to "skip" a busy Channel to check for other activity. • Press ] to use. Features Lock Keypad To maintain settings and lock keypad, press \ for three seconds. Scan Advancement/ Nuisance Delete Scan has several temporary features to make it will return the next time you use the Scan feature. • Depressing [ will not appear if the Motorola NiMH Battery is flashing. End-of-Transmission Tone When you turn...
User Manual
Page 29
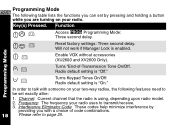
Settings and Functions Display Scan (XU2600, XV2600 Only) Battery Meter Manager Lock/User Lock Eavesdrop Reducer (2 Watt Models Only) Signal Strength Features Programming Mode Channel Frequency Setting and Interference Eliminator Code Frequency Indicator VOX/Microphone Gain X 17 Keypad Tones Every time you press a button on your radio it by pressing and holding ]. Note: End-of -Transmission Tone feature, turn your radio On while you press and hold [. • To turn Keypad Tones back on, turn the radio Off and then back On again while...
Settings and Functions Display Scan (XU2600, XV2600 Only) Battery Meter Manager Lock/User Lock Eavesdrop Reducer (2 Watt Models Only) Signal Strength Features Programming Mode Channel Frequency Setting and Interference Eliminator Code Frequency Indicator VOX/Microphone Gain X 17 Keypad Tones Every time you press a button on your radio it by pressing and holding ]. Note: End-of -Transmission Tone feature, turn your radio On while you press and hold [. • To turn Keypad Tones back on, turn the radio Off and then back On again while...
User Manual
Page 30
.... Radio default setting is enabled. In order to talk with a choice of -Transmission Tone On/Off. Reset factory settings: Three second delay. Channel: Current channel that the radio is "On." Programming Mode k The following table lists the functions you can set by providing you are turning on your two-way radios, the following features need to be set exactly alike: 1. Frequency: The frequency your radio uses to transmit/receive. 3. Function MJ P Access k Programming Mode: Three second delay. Radio default setting is using, depending upon radio model...
.... Radio default setting is enabled. In order to talk with a choice of -Transmission Tone On/Off. Reset factory settings: Three second delay. Channel: Current channel that the radio is "On." Programming Mode k The following table lists the functions you can set by providing you are turning on your two-way radios, the following features need to be set exactly alike: 1. Frequency: The frequency your radio uses to transmit/receive. 3. Function MJ P Access k Programming Mode: Three second delay. Radio default setting is using, depending upon radio model...
User Manual
Page 31
...; Exit k by turning the radio On while holding the M for three seconds to select features. Scramble Code: Codes that specific code. return to that make your radio's \ and [ or ] to exit programming mode. 19 4. Bandwidth: Some frequencies have selectable channel spacing, which must match other radios for multiple radio use your transmissions sound garbled to anyone listening who is not set to the beginning of the Programming Menu. Note: k does...
...; Exit k by turning the radio On while holding the M for three seconds to select features. Scramble Code: Codes that specific code. return to that make your radio's \ and [ or ] to exit programming mode. 19 4. Bandwidth: Some frequencies have selectable channel spacing, which must match other radios for multiple radio use your transmissions sound garbled to anyone listening who is not set to the beginning of the Programming Menu. Note: k does...

User Manual
Page 33
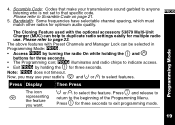
...) or C (low: 12.5 kHz) will display. Please refer to anyone listening without the same code. Scramble Code (2-watt models only) Your radio has the Scramble feature, which must match other radios for optimal radio quality. • Change the setting by pushing the \ until e is displayed. • Then press [ or ] to Off: 0. k Programming Mode Bandwidth (when FCC allowable) Some frequencies have selectable channel spacing, which makes your transmissions sound garbled to...
...) or C (low: 12.5 kHz) will display. Please refer to anyone listening without the same code. Scramble Code (2-watt models only) Your radio has the Scramble feature, which must match other radios for optimal radio quality. • Change the setting by pushing the \ until e is displayed. • Then press [ or ] to Off: 0. k Programming Mode Bandwidth (when FCC allowable) Some frequencies have selectable channel spacing, which makes your transmissions sound garbled to...
User Manual
Page 34
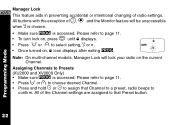
... Channel settings are assigned to select setting, Y or n. Please refer to page 11. • To turn lock on, press \ until f displays. • Press [ or ] to that Channel to a preset, radio beeps to Presets (XU2600 and XV2600 Only) • Make sure k is accessed. Assigning Channels to confirm. Programming Mode Manager Lock k This feature aids in preventing accidental or intentional changing of M, B and the Monitor feature will lock your radio on , f icon displays...
... Channel settings are assigned to select setting, Y or n. Please refer to page 11. • To turn lock on, press \ until f displays. • Press [ or ] to that Channel to a preset, radio beeps to Presets (XU2600 and XV2600 Only) • Make sure k is accessed. Assigning Channels to confirm. Programming Mode Manager Lock k This feature aids in preventing accidental or intentional changing of M, B and the Monitor feature will lock your radio on , f icon displays...

User Manual
Page 35
... features can Clone to use. • Pressing J again will light up. Multi-channel models can be reset if Manager Lock is accessed. Target Radio Display • The source radio enters Cloning Mode and clones through an extended press of the same band; Note: The radio cannot be reset to factory defaults by turning the radio On while holding M and \ buttons simultaneously for Cloning feature to the MUC User's Guide included with this accessory. • Make sure k is enabled. 23 UHF...
... features can Clone to use. • Pressing J again will light up. Multi-channel models can be reset if Manager Lock is accessed. Target Radio Display • The source radio enters Cloning Mode and clones through an extended press of the same band; Note: The radio cannot be reset to factory defaults by turning the radio On while holding M and \ buttons simultaneously for Cloning feature to the MUC User's Guide included with this accessory. • Make sure k is enabled. 23 UHF...
User Manual
Page 42
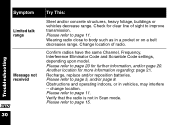
... Channel, Frequency, Interference Eliminator Code and Scramble Code settings, depending upon model. Please refer to body such as in a pocket or on a belt decreases range. Verify that the radio is not in vehicles, may interfere -- Check for clear line of radio. Wearing radio close to page 5, and/or page 8. Recharge, replace and/or reposition batteries. change location. Please refer to improve transmission. Change location of sight to page 15. Troubleshooting...
... Channel, Frequency, Interference Eliminator Code and Scramble Code settings, depending upon model. Please refer to body such as in a pocket or on a belt decreases range. Verify that the radio is not in vehicles, may interfere -- Check for clear line of radio. Wearing radio close to page 5, and/or page 8. Recharge, replace and/or reposition batteries. change location. Please refer to improve transmission. Change location of sight to page 15. Troubleshooting...

User Manual
Page 53
A Accessory 13 Cover 4 Adjust volume 4 Alkaline batteries 8 B Back Cover 5 Bandwidth 21 Battery Alkaline 8 Install 8 Charge NTN8971NiMH 6 Meter 8 Optimum life 6 Setting 16 Button Beeps 18 C Call Display 12 Call Done 4,12 Channel 10,18 Activity 12 Change 4 Setting 20 Charger 6 Desktop Drop-in 7 Multi-unit 19 Plug-in 7 Charging 11 Clean radio 24 Cloning 19,23 Code Interference Eliminator 18,20 Scrambling 19 D Default Settings 23 Diagram Function 4 Drop-in Charger 7 E Exit a Menu 4 External VOX 14 F FCC FAX 1-202-418-0177 1 FORMS 1-800-418-3676...
A Accessory 13 Cover 4 Adjust volume 4 Alkaline batteries 8 B Back Cover 5 Bandwidth 21 Battery Alkaline 8 Install 8 Charge NTN8971NiMH 6 Meter 8 Optimum life 6 Setting 16 Button Beeps 18 C Call Display 12 Call Done 4,12 Channel 10,18 Activity 12 Change 4 Setting 20 Charger 6 Desktop Drop-in 7 Multi-unit 19 Plug-in 7 Charging 11 Clean radio 24 Cloning 19,23 Code Interference Eliminator 18,20 Scrambling 19 D Default Settings 23 Diagram Function 4 Drop-in Charger 7 E Exit a Menu 4 External VOX 14 F FCC FAX 1-202-418-0177 1 FORMS 1-800-418-3676...
User Manual
Page 58
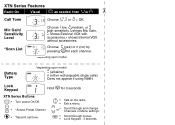
... \for 3 seconds XTN Series Buttons P • Turn power On/Off. T • *Access Preset Channe.l S B • Transmit call tone. • M• ] or • [ \ • • Talk on the radio. XTN Series Features Radio On Visual \as needed, then [or ] Call Tone Choose1,2,3 or 0 = Off. Lock Keypad - 3 seconds. Scroll through menus. Mic Gain/ Sensitivity Level *Scan List Choose1 low, 2 medium, or 3 high sensitivity. ?shows Mic Gain, ? H shows External VOX with accessories, I shows Internal VOX without accessories.| Y Choose...
... \for 3 seconds XTN Series Buttons P • Turn power On/Off. T • *Access Preset Channe.l S B • Transmit call tone. • M• ] or • [ \ • • Talk on the radio. XTN Series Features Radio On Visual \as needed, then [or ] Call Tone Choose1,2,3 or 0 = Off. Lock Keypad - 3 seconds. Scroll through menus. Mic Gain/ Sensitivity Level *Scan List Choose1 low, 2 medium, or 3 high sensitivity. ?shows Mic Gain, ? H shows External VOX with accessories, I shows Internal VOX without accessories.| Y Choose...
User Manual
Page 60
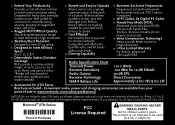
Well suited for business-only use . ecifica tion Ch 1 or 2 Watts -120 dBm for XTN Series Brochure included - Compatible with Motorola Spirit® radios and M Series audio accessories. • Cloning Capability Radio Specification Chart Transmit Power Receiver Sensitivity • Hands-Free Mode (VOX) Advanced voice activation (VOX) lets you talk hands-free; U.S. This product is required. communication at longer distances. • 1-Year Limited Warranty For details, please call: 1-800-448-6686. ft. Off. Printed in the...
Well suited for business-only use . ecifica tion Ch 1 or 2 Watts -120 dBm for XTN Series Brochure included - Compatible with Motorola Spirit® radios and M Series audio accessories. • Cloning Capability Radio Specification Chart Transmit Power Receiver Sensitivity • Hands-Free Mode (VOX) Advanced voice activation (VOX) lets you talk hands-free; U.S. This product is required. communication at longer distances. • 1-Year Limited Warranty For details, please call: 1-800-448-6686. ft. Off. Printed in the...


