
User Guide
Page 1
User's Guide For L401 / L402 / L403 / L404 / L405 DECT 6.0 Cordless Phones with Answering System Warning Use only the power adapters and telephone line cord provided in the box.
User's Guide For L401 / L402 / L403 / L404 / L405 DECT 6.0 Cordless Phones with Answering System Warning Use only the power adapters and telephone line cord provided in the box.

User Guide
Page 2
Please retain your original dated sales receipt for your new Motorola Digital Cordless Phone! Registration is not required for making emergency telephone calls when the power fails. This ENERGY STAR® program (www.energystar.gov) recognizes and encourages the...is not designed for warranty coverage. Alternative arrangements should be made if emergency telephone call : US and Canada: 1-888-331-3383 On the Web: www.motorola.com • 30 name and number phonebook. • Answering machine with the ENERGY STAR® label indicating it meets the latest energy efficiency guidelines. ...
Please retain your original dated sales receipt for your new Motorola Digital Cordless Phone! Registration is not required for making emergency telephone calls when the power fails. This ENERGY STAR® program (www.energystar.gov) recognizes and encourages the...is not designed for warranty coverage. Alternative arrangements should be made if emergency telephone call : US and Canada: 1-888-331-3383 On the Web: www.motorola.com • 30 name and number phonebook. • Answering machine with the ENERGY STAR® label indicating it meets the latest energy efficiency guidelines. ...
User Guide
Page 3
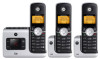
This equipment is not designed for access to get the most from your phone. Got everything? • Handset • Base • User's guide • Quick start guide • Battery door • NiMH rechargeable battery pack • Power adapter • .... Before you make your first call you will find one or more additional handsets, chargers with all the information you need to set up your phone. Follow the simple instructions in 'Getting Started', on the next few pages.
This equipment is not designed for access to get the most from your phone. Got everything? • Handset • Base • User's guide • Quick start guide • Battery door • NiMH rechargeable battery pack • Power adapter • .... Before you make your first call you will find one or more additional handsets, chargers with all the information you need to set up your phone. Follow the simple instructions in 'Getting Started', on the next few pages.
User Guide
Page 4
... to another handset 19 3.2.3 Three-party conference call 19 3.3 Voicemail 20 3.3.1 Clear voice mail indication 20 4. Personal Settings 25 6.1 Set Date & Time 25 Using the phone 17 3.1 Calls 17 3.1.1 Make a call 17 3.1.2 Predial 17 3.1.3 Dial one touch numbers 1 to 9 17 3.1.4 Call from the phonebook 17 3.1.5 Call from the calls list 17... phonebook 24 5.1.3 Delete a calls list entry 24 5.1.4 Delete entire calls list 24 5.2 Redial 24 5.2.1 View the redial list 24 5.2.2 Copy a redial number to know your phone 9 3. Getting started 6 2.
... to another handset 19 3.2.3 Three-party conference call 19 3.3 Voicemail 20 3.3.1 Clear voice mail indication 20 4. Personal Settings 25 6.1 Set Date & Time 25 Using the phone 17 3.1 Calls 17 3.1.1 Make a call 17 3.1.2 Predial 17 3.1.3 Dial one touch numbers 1 to 9 17 3.1.4 Call from the phonebook 17 3.1.5 Call from the calls list 17... phonebook 24 5.1.3 Delete a calls list entry 24 5.1.4 Delete entire calls list 24 5.2 Redial 24 5.2.1 View the redial list 24 5.2.2 Copy a redial number to know your phone 9 3. Getting started 6 2.
User Guide
Page 6
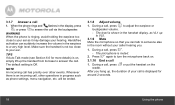
... pin is fully charged. HANDSET RANGE Optimal range is specifically designed for multi-pack only). 6 Getting started WARNING Do not place your new phone, here are on a call, the line will automatically re-connect to the base. If you are some important guidelines you should consider: ...reduce the range significantly. Move back within the range area. WHICH POWER ADAPTER The power adapter with the smaller pin is for your phone in wet locations unless the jack is reached when there are no other cordless telephones or personal computers. • Never install telephone wiring...
... pin is fully charged. HANDSET RANGE Optimal range is specifically designed for multi-pack only). 6 Getting started WARNING Do not place your new phone, here are on a call, the line will automatically re-connect to the base. If you are some important guidelines you should consider: ...reduce the range significantly. Move back within the range area. WHICH POWER ADAPTER The power adapter with the smaller pin is for your phone in wet locations unless the jack is reached when there are no other cordless telephones or personal computers. • Never install telephone wiring...
User Guide
Page 9
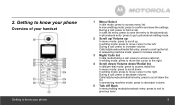
.../ Calls list In idle mode/during a call . In answering machine mode: press to scroll up the list. Getting to know your phone Overview of your handset Getting to know your phone 1 Menu/ Select In idle mode: press to previous level. 9 In menu/editing mode: press to confirm and save the entry to...
.../ Calls list In idle mode/during a call . In answering machine mode: press to scroll up the list. Getting to know your phone Overview of your handset Getting to know your phone 1 Menu/ Select In idle mode: press to previous level. 9 In menu/editing mode: press to confirm and save the entry to...

User Guide
Page 10
... mode: press to idle. Call List/phonebook/redial list entry: press to make a call has ended, the dial mode will change back to know your phone In name editing mode: toggle ABC/Abc/abc. In editing mode: press to move the cursor to the left. 14 ITAD/ Mute/ Clear/ X In idle...
... mode: press to idle. Call List/phonebook/redial list entry: press to make a call has ended, the dial mode will change back to know your phone In name editing mode: toggle ABC/Abc/abc. In editing mode: press to move the cursor to the left. 14 ITAD/ Mute/ Clear/ X In idle...
User Guide
Page 11
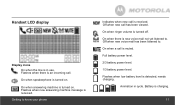
... ringer volume is received. Flashes when low battery level is charging. 11 Flashes when there is an incoming call is received. Getting to know your phone Indicates when new call . Battery is detected, needs charging. Full battery power level. 2/3 battery power level. 1/3 battery power level.
... ringer volume is received. Flashes when low battery level is charging. 11 Flashes when there is an incoming call is received. Getting to know your phone Indicates when new call . Battery is detected, needs charging. Full battery power level. 2/3 battery power level. 1/3 battery power level.
User Guide
Page 12
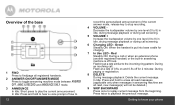
...ANSWER OFF, ANNC & RECORD and ANNOUNCE ONLY mode. 3 ANNOUNCE In Idle: Short press to play the current announcement. Press twice to know your phone Getting to playback the previous message. Flashing at a rate of 0.5s on and 0.5s off hook. Flash at a rate similar to the incoming.... Green Steadily ON: When the handset is off for charging. 7 In Use LED - Red Steadily ON: During a call or when an extension phone (another registered handset) or the built-in answering machine is put into base cradle for 2 minutes: During paging or registration. 8 DELETE During message playback...
...ANSWER OFF, ANNC & RECORD and ANNOUNCE ONLY mode. 3 ANNOUNCE In Idle: Short press to play the current announcement. Press twice to know your phone Getting to playback the previous message. Flashing at a rate of 0.5s on and 0.5s off hook. Flash at a rate similar to the incoming.... Green Steadily ON: When the handset is off for charging. 7 In Use LED - Red Steadily ON: During a call or when an extension phone (another registered handset) or the built-in answering machine is put into base cradle for 2 minutes: During paging or registration. 8 DELETE During message playback...
User Guide
Page 13
... Skip to play the next message. 12 MEMO In Idle: Press and hold to hear a voice prompt recording a memo and then start to know your phone F CL ------/09 In An LA LA/09 L3 Flashing: Answering machine memory is full. Steadily ON: Represents Announce Only mode. 10 PLAY/ STOP In message...
... Skip to play the next message. 12 MEMO In Idle: Press and hold to hear a voice prompt recording a memo and then start to know your phone F CL ------/09 In An LA LA/09 L3 Flashing: Answering machine memory is full. Steadily ON: Represents Announce Only mode. 10 PLAY/ STOP In message...
User Guide
Page 14
... to previous menu level or cancel an action. If you do not press any key on the base or charger. 14 Getting to know your phone Press on the handset for 30 seconds the display will also return to standby. Paging is placed on the handset.
... to previous menu level or cancel an action. If you do not press any key on the base or charger. 14 Getting to know your phone Press on the handset for 30 seconds the display will also return to standby. Paging is placed on the handset.
User Guide
Page 15
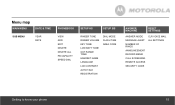
Menu map MAIN MENU DATE & TIME SUB MENU YEAR DATE PHONEBOOK VIEW ADD EDIT DELETE DELETE ALL PB CAPACITY SPEED DIAL SETUP HS SETUP BS RINGER TONE RINGER VOLUME KEY TONE LOW BATT TONE OUT RANGE TONE HANDSET NAME LANGUAGE LCD CONTRAST AUTO TALK REGISTRATION DIAL MODE FLASH TIME AREA CODE ANSWER MACHINE RESET SETTINGS ANSWER MODE MESSAGE ALERT NUMBER OF RINGS ANNOUNCEMENT RECORD MEMO CALL SCREENING REMOTE ACCESS SECURITY CODE CLR VOICE MAIL ALL SETTINGS Getting to know your phone 15
Menu map MAIN MENU DATE & TIME SUB MENU YEAR DATE PHONEBOOK VIEW ADD EDIT DELETE DELETE ALL PB CAPACITY SPEED DIAL SETUP HS SETUP BS RINGER TONE RINGER VOLUME KEY TONE LOW BATT TONE OUT RANGE TONE HANDSET NAME LANGUAGE LCD CONTRAST AUTO TALK REGISTRATION DIAL MODE FLASH TIME AREA CODE ANSWER MACHINE RESET SETTINGS ANSWER MODE MESSAGE ALERT NUMBER OF RINGS ANNOUNCEMENT RECORD MEMO CALL SCREENING REMOTE ACCESS SECURITY CODE CLR VOICE MAIL ALL SETTINGS Getting to know your phone 15
User Guide
Page 16
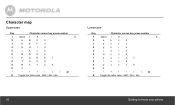
... letter case - ABC / Abc / abc Lowercase Key Character versus key press number 1 space 1 # ' , - . & 2 A B C 2 3 D E F 3 4 G H I 4 5 J K L 5 6 M N O 6 7 P Q R S 7 8 T U V 8 9 W X Y Z 9 0 0 * * ? ! / ( ) @ # Toggle the letter case - ABC / Abc / abc 16 Getting to know your phone
... letter case - ABC / Abc / abc Lowercase Key Character versus key press number 1 space 1 # ' , - . & 2 A B C 2 3 D E F 3 4 G H I 4 5 J K L 5 6 M N O 6 7 P Q R S 7 8 T U V 8 9 W X Y Z 9 0 0 * * ? ! / ( ) @ # Toggle the letter case - ABC / Abc / abc 16 Getting to know your phone
User Guide
Page 17
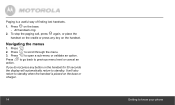
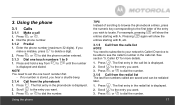
Using the phone 3.1 Calls 31..1.P1ressM 3.
Using the phone 3.1 Calls 31..1.P1ressM 3.
User Guide
Page 18
...close to turn the microphone back on. > 3.1.10 End a call , press to a very high level. After you . Whenever there is Off. When the phone rings and flashes in the display, press or press to someone else in the earpiece to adjust the earpiece or loudspeaker volume. - The level is.... , 3.1.8 Adjust volume 1. Make sure the handset is on the cradle. TIPS If Auto Talk mode (see Section 6.6 for around 2 seconds. 18 Using the phone NOTE An incoming call , press or put the handset on , simply lift up to VL5. 3.1.9 Mute Mute the microphone so that you can suddenly increase...
...close to turn the microphone back on. > 3.1.10 End a call , press to a very high level. After you . Whenever there is Off. When the phone rings and flashes in the display, press or press to someone else in the earpiece to adjust the earpiece or loudspeaker volume. - The level is.... , 3.1.8 Adjust volume 1. Make sure the handset is on the cradle. TIPS If Auto Talk mode (see Section 6.6 for around 2 seconds. 18 Using the phone NOTE An incoming call , press or put the handset on , simply lift up to VL5. 3.1.9 Mute Mute the microphone so that you can suddenly increase...
User Guide
Page 19
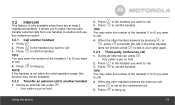
... the conference call the handset. Press to the handset you want to call . If the other handset I 4. Press P 3. Press to call , press . - Press P 3. Using the phone 19 When the other handset answers the intercom call, press to call . > 5. to set up . Press . , 2. TIPS You may enter the number of the handset...
... the conference call the handset. Press to the handset you want to call . If the other handset I 4. Press P 3. Press to call , press . - Press P 3. Using the phone 19 When the other handset answers the intercom call, press to call . > 5. to set up . Press . , 2. TIPS You may enter the number of the handset...
User Guide
Page 21
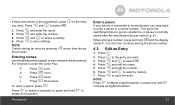
...or press and hold and the display shows P. , If there are entries in the phonebook, press P , you want . Phonebook Enter a pause If your phone is normally stored after the switchboard access code (e.g. 9). # When storing a number, press and hold to the entry you want . and to select ADD.... Press and to select a melody. You can then continue storing the phone number. 4.3 Edit an Entry 1. to get an outside line. Press to delete all characters. This gives the switchboard time to the entry 3. 4. 5. 6. ...
...or press and hold and the display shows P. , If there are entries in the phonebook, press P , you want . Phonebook Enter a pause If your phone is normally stored after the switchboard access code (e.g. 9). # When storing a number, press and hold to the entry you want . and to select ADD.... Press and to select a melody. You can then continue storing the phone number. 4.3 Edit an Entry 1. to get an outside line. Press to delete all characters. This gives the switchboard time to the entry 3. 4. 5. 6. ...
User Guide
Page 24
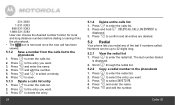
Press to confirm and all entries are deleted. 5.2 Redial Your phone lets you want. to enter the redial list. Press to delete the entry. 24 512...1.PP4rreessssDa/enldethteooleednnM tteirret.hcDeEacLlalEsTllEsliAlsisLtLt.CALL LOG ENTRIES? Press P 3. to enter ...
Press to confirm and all entries are deleted. 5.2 Redial Your phone lets you want. to enter the redial list. Press to delete the entry. 24 512...1.PP4rreessssDa/enldethteooleednnM tteirret.hcDeEacLlalEsTllEsliAlsisLtLt.CALL LOG ENTRIES? Press P 3. to enter ...
User Guide
Page 26
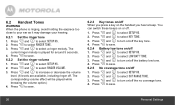
... and to turn on /off 1. to select SETUP HS. 2. Press to save. 61..2.P4ressBPattearnydlo,w tone on /off the key tone. 6.2 Handset Tones WARNING When the phone is played for around 5 seconds. 4. Press Press Press P P P and , , to select and to select SETUP HS. 2. RINGER TONE. Press P and , to select SETUP HS. P , 3. Press...
... and to turn on /off 1. to select SETUP HS. 2. Press to save. 61..2.P4ressBPattearnydlo,w tone on /off the key tone. 6.2 Handset Tones WARNING When the phone is played for around 5 seconds. 4. Press Press Press P P P and , , to select and to select SETUP HS. 2. RINGER TONE. Press P and , to select SETUP HS. P , 3. Press...

User Guide
Page 28
... SETUP BS. 2. To register an additional handset, 1. HANDSET X is flashing. 4. Release once IN USE LED is displayed where X denotes the number of handsets and the phone goes back to use them. Select YES and press to save. Press and hold for your country and network operator. It is pre-registered to...
... SETUP BS. 2. To register an additional handset, 1. HANDSET X is flashing. 4. Release once IN USE LED is displayed where X denotes the number of handsets and the phone goes back to use them. Select YES and press to save. Press and hold for your country and network operator. It is pre-registered to...


