
User Guide
Page 2
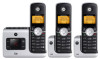
...(www.energystar.gov) recognizes and encourages the use of the last 30 callers in a calls list.** • Register up to 5 handsets to a single base. • Make internal calls, transfer external calls, hold 3-way conversation between two internal callers and an external caller (... Please retain your original dated sales receipt for warranty coverage. For product related questions, please call is not required for your new Motorola Digital Cordless Phone! We are proud to confirm warranty status. to work. Registration is necessary. Alternative arrangements should be made if ...
...(www.energystar.gov) recognizes and encourages the use of the last 30 callers in a calls list.** • Register up to 5 handsets to a single base. • Make internal calls, transfer external calls, hold 3-way conversation between two internal callers and an external caller (... Please retain your original dated sales receipt for warranty coverage. For product related questions, please call is not required for your new Motorola Digital Cordless Phone! We are proud to confirm warranty status. to work. Registration is necessary. Alternative arrangements should be made if ...
User Guide
Page 3
... arrangements should be made for making emergency telephone calls when the power fails. IMPORTANT Only use the telephone line cord supplied. Got everything? • Handset • Base • User's guide • Quick start guide • Battery door • NiMH rechargeable battery pack • Power adapter ...to get the most from your phone. Before you make your first call you will find one or more additional handsets, chargers with power adapter units, additional rechargeable battery packs and battery doors. This equipment is not designed for access to emergency ...
... arrangements should be made for making emergency telephone calls when the power fails. IMPORTANT Only use the telephone line cord supplied. Got everything? • Handset • Base • User's guide • Quick start guide • Battery door • NiMH rechargeable battery pack • Power adapter ...to get the most from your phone. Before you make your first call you will find one or more additional handsets, chargers with power adapter units, additional rechargeable battery packs and battery doors. This equipment is not designed for access to emergency ...
User Guide
Page 4
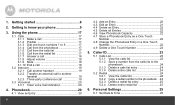
1. Getting started 6 2. Getting to another handset 19 3.2.2 Transfer an external call to know your phone 9 3. Using the phone 17 3.1 Calls 17 3.1.1 Make a call 19 3.3 Voicemail 20 3.3.1 Clear voice mail indication 20 4. ... list 23 5.1.2 Save a number from the redial list 17 3.1.7 Answer a call 18 3.1.8 Adjust volume 18 3.1.9 Mute 18 3.1.10 End a call 18 3.2 Intercom 19 3.2.1 Call another handset 19 3.2.3 Three-party conference call 17 3.1.2 Predial 17 3.1.3 Dial one touch numbers 1 to 9 17 3.1.4 Call from the phonebook 17 3.1.5 Call from the calls list 17...
1. Getting started 6 2. Getting to another handset 19 3.2.2 Transfer an external call to know your phone 9 3. Using the phone 17 3.1 Calls 17 3.1.1 Make a call 19 3.3 Voicemail 20 3.3.1 Clear voice mail indication 20 4. ... list 23 5.1.2 Save a number from the redial list 17 3.1.7 Answer a call 18 3.1.8 Adjust volume 18 3.1.9 Mute 18 3.1.10 End a call 18 3.2 Intercom 19 3.2.1 Call another handset 19 3.2.3 Three-party conference call 17 3.1.2 Predial 17 3.1.3 Dial one touch numbers 1 to 9 17 3.1.4 Call from the phonebook 17 3.1.5 Call from the calls list 17...
User Guide
Page 5
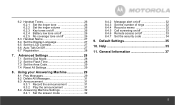
Advanced Settings 28 7.1 Set the Dial Mode 28 7.2 Set the Flash Time 28 7.3 Set the Area Code 29 7.4 Reset All Settings 29 8. 6.2 Handset Tones 26 6.2.1 Set the ringer tone 26 6.2.2 Set the ringer volume 26 6.2.3 Key tones on/off 26 6.2.4 Battery low tone on/off 26 6.2.5 No... coverage tone on /off 26 6.3 Handset Name 27 6.4 Set the Display Language 27 6.5 Set the LCD Contrast 27 6.6 Auto Talk On/Off 27 6.7 Registration 28 7. General Information 37 5 Help 35 ...
Advanced Settings 28 7.1 Set the Dial Mode 28 7.2 Set the Flash Time 28 7.3 Set the Area Code 29 7.4 Reset All Settings 29 8. 6.2 Handset Tones 26 6.2.1 Set the ringer tone 26 6.2.2 Set the ringer volume 26 6.2.3 Key tones on/off 26 6.2.4 Battery low tone on/off 26 6.2.5 No... coverage tone on /off 26 6.3 Handset Name 27 6.4 Set the Display Language 27 6.5 Set the LCD Contrast 27 6.6 Auto Talk On/Off 27 6.7 Registration 28 7. General Information 37 5 Help 35 ...
User Guide
Page 6
...no other cordless telephones or personal computers. • Never install telephone wiring during a lightning storm. • Never install telephone jacks in range. HANDSET RANGE Optimal range is fully charged. SIGNAL STRENGTH When out of range of excessive dust, moisture and low temperature. • Avoid other electrical ...• Avoid areas of the base, the screen shows SEARCHING.... Do not connect the telephone line cord into the wall jack until the handset is reached when there are on a call, the line will hang up IMPORTANT The base must be plugged into the electrical outlet at...
...no other cordless telephones or personal computers. • Never install telephone wiring during a lightning storm. • Never install telephone jacks in range. HANDSET RANGE Optimal range is fully charged. SIGNAL STRENGTH When out of range of excessive dust, moisture and low temperature. • Avoid other electrical ...• Avoid areas of the base, the screen shows SEARCHING.... Do not connect the telephone line cord into the wall jack until the handset is reached when there are on a call, the line will hang up IMPORTANT The base must be plugged into the electrical outlet at...
User Guide
Page 7
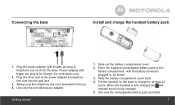
...in the battery compartment, with the battery connector plugged in the box. 4. Put the handset on the base to charge for multi-pack only). 2. Slide out the battery compartment cover. 2. When the handset is fully charged the will indicate that it is for charger (for at least 24 ... adapter. Slide the battery compartment cover back. 4. Use only the rechargeable battery pack provided. 7 Connecting the base Install and charge the handset battery pack 1. Always use the telephone line cord provided in , as shown. 3. Plug the power adapter with bigger pin plug is fully charged. 5....
...in the battery compartment, with the battery connector plugged in the box. 4. Put the handset on the base to charge for multi-pack only). 2. Slide out the battery compartment cover. 2. When the handset is fully charged the will indicate that it is for charger (for at least 24 ... adapter. Slide the battery compartment cover back. 4. Use only the rechargeable battery pack provided. 7 Connecting the base Install and charge the handset battery pack 1. Always use the telephone line cord provided in , as shown. 3. Plug the power adapter with bigger pin plug is fully charged. 5....
User Guide
Page 8
...few hours at least once a week will scroll in normal use it again. After charging your battery packs in the best condition, leave the handset off the base for the first time, subsequent charging time is normal. 8 Getting started Note that new battery packs do not reach full capacity... until they wear out, giving the handset less talk/standby time. The charge capacity of rechargeable battery packs will need to 18 hours standby time on a single charge. This is about ...
...few hours at least once a week will scroll in normal use it again. After charging your battery packs in the best condition, leave the handset off the base for the first time, subsequent charging time is normal. 8 Getting started Note that new battery packs do not reach full capacity... until they wear out, giving the handset less talk/standby time. The charge capacity of rechargeable battery packs will need to 18 hours standby time on a single charge. This is about ...
User Guide
Page 9
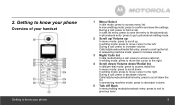
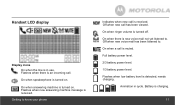
... a call : press to decrease volume. During a call . In editing mode: press to move cursor to scroll down . 2. Getting to know your phone Overview of your handset Getting to know your phone 1 Menu/ Select In idle mode: press to the left. In menu/editing mode: press to access calls list. In answering...
... a call : press to decrease volume. During a call . In editing mode: press to move cursor to scroll down . 2. Getting to know your phone Overview of your handset Getting to know your phone 1 Menu/ Select In idle mode: press to the left. In menu/editing mode: press to access calls list. In answering...
User Guide
Page 11
... your phone Indicates when new call is muted. On when a call is received. Battery is received. Off when new voice mail has been listened to . Handset LCD display Display icons On when the line is in cycle. On when speakerphone is turned on . Full battery power level. 2/3 battery power level. 1/3 battery...
... your phone Indicates when new call is muted. On when a call is received. Battery is received. Off when new voice mail has been listened to . Handset LCD display Display icons On when the line is in cycle. On when speakerphone is turned on . Full battery power level. 2/3 battery power level. 1/3 battery...
User Guide
Page 12
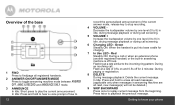
Flash at a rate similar to playback the previous message. Red Steadily ON: During a call or when an extension phone (another registered handset) or the built-in answering machine is put into base cradle for 2 minutes: During paging or registration. 8 DELETE During message playback: ... screening. 6 Charging LED - In Idle: Press and hold to erase all read messages (applicable only when messages in answering machine are all registered handsets. 2 ANSWER ON/OFF/ANSWER MODE Press to toggle answering machine mode between ANSWER OFF, ANNC & RECORD and ANNOUNCE ONLY mode. 3 ANNOUNCE In Idle...
Flash at a rate similar to playback the previous message. Red Steadily ON: During a call or when an extension phone (another registered handset) or the built-in answering machine is put into base cradle for 2 minutes: During paging or registration. 8 DELETE During message playback: ... screening. 6 Charging LED - In Idle: Press and hold to erase all read messages (applicable only when messages in answering machine are all registered handsets. 2 ANSWER ON/OFF/ANSWER MODE Press to toggle answering machine mode between ANSWER OFF, ANNC & RECORD and ANNOUNCE ONLY mode. 3 ANNOUNCE In Idle...
User Guide
Page 14
... stop the paging call, press again, or place the handset on the cradle or press any button on the handset for 30 seconds the display will also return to standby when the handset is a useful way of finding lost handsets. All handsets ring. 2. Press on the handset. Press . , 2. P 3. Paging is placed on the base or charger...
... stop the paging call, press again, or place the handset on the cradle or press any button on the handset for 30 seconds the display will also return to standby when the handset is a useful way of finding lost handsets. All handsets ring. 2. Press on the handset. Press . , 2. P 3. Paging is placed on the base or charger...
User Guide
Page 15
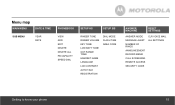
Menu map MAIN MENU DATE & TIME SUB MENU YEAR DATE PHONEBOOK VIEW ADD EDIT DELETE DELETE ALL PB CAPACITY SPEED DIAL SETUP HS SETUP BS RINGER TONE RINGER VOLUME KEY TONE LOW BATT TONE OUT RANGE TONE HANDSET NAME LANGUAGE LCD CONTRAST AUTO TALK REGISTRATION DIAL MODE FLASH TIME AREA CODE ANSWER MACHINE RESET SETTINGS ANSWER MODE MESSAGE ALERT NUMBER OF RINGS ANNOUNCEMENT RECORD MEMO CALL SCREENING REMOTE ACCESS SECURITY CODE CLR VOICE MAIL ALL SETTINGS Getting to know your phone 15
Menu map MAIN MENU DATE & TIME SUB MENU YEAR DATE PHONEBOOK VIEW ADD EDIT DELETE DELETE ALL PB CAPACITY SPEED DIAL SETUP HS SETUP BS RINGER TONE RINGER VOLUME KEY TONE LOW BATT TONE OUT RANGE TONE HANDSET NAME LANGUAGE LCD CONTRAST AUTO TALK REGISTRATION DIAL MODE FLASH TIME AREA CODE ANSWER MACHINE RESET SETTINGS ANSWER MODE MESSAGE ALERT NUMBER OF RINGS ANNOUNCEMENT RECORD MEMO CALL SCREENING REMOTE ACCESS SECURITY CODE CLR VOICE MAIL ALL SETTINGS Getting to know your phone 15
User Guide
Page 18
... 3.1.8 Adjust volume 1. During a call 1. Press again to your ear as phone settings, menu navigation, etc. The level is shown in the handset display, as VL1 up the handset from its base to answer the call is displayed for more details) is ringing, avoid holding the earpiece too close to someone else...is muted. 2. During a call via the loudspeaker. When the phone rings and flashes in the earpiece to answer the call , press or put the handset on , simply lift up to VL5. 3.1.9 Mute Mute the microphone so that you . After you hang up, the duration of your caller hearing you...
... 3.1.8 Adjust volume 1. During a call 1. Press again to your ear as phone settings, menu navigation, etc. The level is shown in the handset display, as VL1 up the handset from its base to answer the call is displayed for more details) is ringing, avoid holding the earpiece too close to someone else...is muted. 2. During a call via the loudspeaker. When the phone rings and flashes in the earpiece to answer the call , press or put the handset on , simply lift up to VL5. 3.1.9 Mute Mute the microphone so that you . After you hang up, the duration of your caller hearing you...
User Guide
Page 19
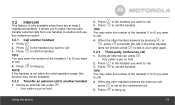
...ceaxltl,eprrneaslscIall.to call . < 4. Your caller is only available when there are at least 2 registered handsets. TIPS You may enter the number of the handset (1 to 5) you want to call . I 4. Press to the handset you want to transfer the call. 3.2 Intercom This feature is put on hold . , 2. Press .... want to call . Your caller is not within the valid operation range, this function may enter the number of the handset (1 to 5) you want to another handset I does not answer, press to talk to call , press . - to call . TIPS You may not be available. 3.2.2...
...ceaxltl,eprrneaslscIall.to call . < 4. Your caller is only available when there are at least 2 registered handsets. TIPS You may enter the number of the handset (1 to 5) you want to call . I 4. Press to the handset you want to transfer the call. 3.2 Intercom This feature is put on hold . , 2. Press .... want to call . Your caller is not within the valid operation range, this function may enter the number of the handset (1 to 5) you want to another handset I does not answer, press to talk to call , press . - to call . TIPS You may not be available. 3.2.2...
User Guide
Page 20
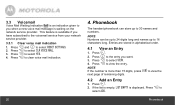
... your network service provider. 31234.....3.PPPP1rrrreeeessssssssCP P P Plearatttooonvcssdoeelei,cllaeeerccttvmtCYooELaicSRsie.leVlimOenIcaCdtEiilRcMiEnaASdtIEiiLcoT.anStEioTnT.INGS. 4. Press .. , 2. Press P 3. NOTE Numbers can store up to 30 names and numbers. Phonebook The handset phonebook can be up to 24 digits long and names up to 16 characters long.
... your network service provider. 31234.....3.PPPP1rrrreeeessssssssCP P P Plearatttooonvcssdoeelei,cllaeeerccttvmtCYooELaicSRsie.leVlimOenIcaCdtEiilRcMiEnaASdtIEiiLcoT.anStEioTnT.INGS. 4. Press .. , 2. Press P 3. NOTE Numbers can store up to 30 names and numbers. Phonebook The handset phonebook can be up to 24 digits long and names up to 16 characters long.
User Guide
Page 23
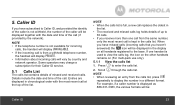
...of the call (if provided by country and network operator. If one call . Some operators may charge a subscription for incoming calls, the handset will display UNAVAILABLE. • If the incoming call is displayed as 888-331-3383, the various formats will be displayed together with the most...to display the number in the list. • The received and missed calls log holds details of the call from a withheld telephone number, the handset will display PRIVATE. • Information about incoming calls will be : Caller ID 23 NOTE • If the telephone number is not available for...
...of the call (if provided by country and network operator. If one call . Some operators may charge a subscription for incoming calls, the handset will display UNAVAILABLE. • If the incoming call is displayed as 888-331-3383, the various formats will be displayed together with the most...to display the number in the list. • The received and missed calls log holds details of the call from a withheld telephone number, the handset will display PRIVATE. • Information about incoming calls will be : Caller ID 23 NOTE • If the telephone number is not available for...
User Guide
Page 25
... do not have subscribed to your network's Caller ID service, the date and time is set the correct year. Press P 7. Press to confirm and all handsets every time a call is recorded with each answering machine message you may still need to save the settings. Press to enter the redial list. , 2. The...
... do not have subscribed to your network's Caller ID service, the date and time is set the correct year. Press P 7. Press to confirm and all handsets every time a call is recorded with each answering machine message you may still need to save the settings. Press to enter the redial list. , 2. The...
User Guide
Page 26
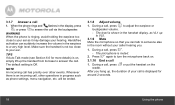
... to turn on/off . 1. Press and to save. 61..2.P4ressBPattearnydlo,w tone on or off the no coverage tone. to save . 6.2.5 No coverage tone on the handset you press a key on /off the key tone. Press P and , to select KEY TONE. P , 3. Press P and , to select SETUP HS. ...TONE. Press P 4. Press to save . 6.2.3 Key tones on/off When you hear a beep. P , 3. Press and to save . 26 Personal Settings 6.2 Handset Tones WARNING When the phone is played for around 5 seconds. 4. Press to turn on /off 1. Press and to select a ringer melody. to turn on /...
... to turn on/off . 1. Press and to save. 61..2.P4ressBPattearnydlo,w tone on or off the no coverage tone. to save . 6.2.5 No coverage tone on the handset you press a key on /off the key tone. Press P and , to select KEY TONE. P , 3. Press P and , to select SETUP HS. ...TONE. Press P 4. Press to save . 6.2.3 Key tones on/off When you hear a beep. P , 3. Press and to save . 26 Personal Settings 6.2 Handset Tones WARNING When the phone is played for around 5 seconds. 4. Press to turn on /off 1. Press and to select a ringer melody. to turn on /...
User Guide
Page 27
... to save . Press to the language you will also be displayed on , you can change the display language. Maximum 14 characters. 1. NOTE Handset name will be changed , the voice prompt language of answering machine will have to press or to increase or decrease the contrast P level. ...can answer a call . Press P and , to select LCD CONTRAST. Press P and , to select SETUP HS. 2. Press and to answer a call just by < J lifting the handset off auto talk. The default setting is turned on the idle screen. P , 3. P , 2. Press P 4. Press P and , to select AUTO TALK. Press P and ,...
... to save . Press to the language you will also be displayed on , you can change the display language. Maximum 14 characters. 1. NOTE Handset name will be changed , the voice prompt language of answering machine will have to press or to increase or decrease the contrast P level. ...can answer a call . Press P and , to select LCD CONTRAST. Press P and , to select SETUP HS. 2. Press and to answer a call just by < J lifting the handset off auto talk. The default setting is turned on the idle screen. P , 3. P , 2. Press P 4. Press P and , to select AUTO TALK. Press P and ,...

User Guide
Page 28
..., to select YES or NO. Press and to select SETUP HS. 2. Place the unregistered cordless handset on base. It is selected, press to switch from pulse to select REGISTRATION. P , 3. Additional handsets must be registered to the base before you can be registered to one base. v 2. DIAL ... pulse mode is unlikely that you should need to change this setting unless advised to do so. 1. The original handset is displayed where X denotes the number of handsets and the phone goes back to select FLASH TIME. 28 Advanced Settings Press P and , to tone dialing temporarily ...
..., to select YES or NO. Press and to select SETUP HS. 2. Place the unregistered cordless handset on base. It is selected, press to switch from pulse to select REGISTRATION. P , 3. Additional handsets must be registered to the base before you can be registered to one base. v 2. DIAL ... pulse mode is unlikely that you should need to change this setting unless advised to do so. 1. The original handset is displayed where X denotes the number of handsets and the phone goes back to select FLASH TIME. 28 Advanced Settings Press P and , to tone dialing temporarily ...


