
Getting Started Guide
Page 3
... an Ethernet Network 14 Chapter 4 - Making the Physical Connections 7 Find a Location 7 What You Need 7 Important Safety Instructions 8 Identify the Connectors and Attach the Cables 9 G Netopia 4652 SDSL/IDSL Router Status Lights 11 Chapter 3 - Console-Based Management 25 Connecting through a Telnet Session 26 Configuring Telnet software 27 Connecting a Console Cable to Your...
... an Ethernet Network 14 Chapter 4 - Making the Physical Connections 7 Find a Location 7 What You Need 7 Important Safety Instructions 8 Identify the Connectors and Attach the Cables 9 G Netopia 4652 SDSL/IDSL Router Status Lights 11 Chapter 3 - Console-Based Management 25 Connecting through a Telnet Session 26 Configuring Telnet software 27 Connecting a Console Cable to Your...
Getting Started Guide
Page 5
...■ "Features and Capabilities" on page 1-5 ■ "How to Use this Guide" on page 1-6 Features and Capabilities The Netopia 4652 SDSL/IDSL Router provides the following features: ■ SDSL/IDSL WAN interface supports symmetric data rates from Internet intruders ■ Support for Console-based management... DSLAM equipment ■ Support for connecting diverse local area networks (LANs) to the Internet and other remote networks. The Netopia 4652 SDSL/IDSL Router uses a high performance SDSL or IDSL line to provide your whole network with multiple Ethernet IP subnets ■ Four 10...
...■ "Features and Capabilities" on page 1-5 ■ "How to Use this Guide" on page 1-6 Features and Capabilities The Netopia 4652 SDSL/IDSL Router provides the following features: ■ SDSL/IDSL WAN interface supports symmetric data rates from Internet intruders ■ Support for Console-based management... DSLAM equipment ■ Support for connecting diverse local area networks (LANs) to the Internet and other remote networks. The Netopia 4652 SDSL/IDSL Router uses a high performance SDSL or IDSL line to provide your whole network with multiple Ethernet IP subnets ■ Four 10...

Getting Started Guide
Page 7
...Ease of access to the front of the unit for configuration and monitoring ■ Ease of the building and how to your Netopia 4652 SDSL/IDSL Router. This section covers the following topics: ■ "Find a Location" on page 2-7 ■ "What You Need" on page 2-7... ■ "Identify the Connectors and Attach the Cables" on page 2-9 ■ "Netopia 4652 SDSL/IDSL Router Status Lights" on page 2-11 Find a Location When choosing a location for the Netopia SDSL/IDSL Router, consider: ■ Available space and ease of installation ■ Physical layout of access to DB-9...
...Ease of access to the front of the unit for configuration and monitoring ■ Ease of the building and how to your Netopia 4652 SDSL/IDSL Router. This section covers the following topics: ■ "Find a Location" on page 2-7 ■ "What You Need" on page 2-7... ■ "Identify the Connectors and Attach the Cables" on page 2-9 ■ "Netopia 4652 SDSL/IDSL Router Status Lights" on page 2-11 Find a Location When choosing a location for the Netopia SDSL/IDSL Router, consider: ■ Available space and ease of installation ■ Physical layout of access to DB-9...

Getting Started Guide
Page 9
...brick to a power outlet and the mini-DIN8 connector end to router Ethernet connection, use the standard Ethernet cable included with your DSL wall outlet. 3. For a direct computer to the router. 1 Netopia Router Making the Physical Connections 2-9 Identify the Connectors and Attach the ...Cables Identify the connectors and switches on the back panel and attach the necessary Netopia Router cables. The figure below displays the back of the Netopia 4652 SDSL/IDSL Router. 1 Ethernet 2 DSL 1 Computer DSL Ethernet 3 Power Power Connect your computer, DSL line,...
...brick to a power outlet and the mini-DIN8 connector end to router Ethernet connection, use the standard Ethernet cable included with your DSL wall outlet. 3. For a direct computer to the router. 1 Netopia Router Making the Physical Connections 2-9 Identify the Connectors and Attach the ...Cables Identify the connectors and switches on the back panel and attach the necessary Netopia Router cables. The figure below displays the back of the Netopia 4652 SDSL/IDSL Router. 1 Ethernet 2 DSL 1 Computer DSL Ethernet 3 Power Power Connect your computer, DSL line,...

Getting Started Guide
Page 10
...-sensing, eliminating the need for crossover cables. the Ethernet cable connected between the router and the DSL wall outlet. and the DSL cable connected between the router and your computer and the Netopia 4652 to your SDSL or IDSL connection. For a new installation, use the console ...connection to Your Router" on the router and the other end into an electrical outlet. 2. See "Connecting...
...-sensing, eliminating the need for crossover cables. the Ethernet cable connected between the router and the DSL wall outlet. and the DSL cable connected between the router and your computer and the Netopia 4652 to your SDSL or IDSL connection. For a new installation, use the console ...connection to Your Router" on the router and the other end into an electrical outlet. 2. See "Connecting...
Getting Started Guide
Page 11
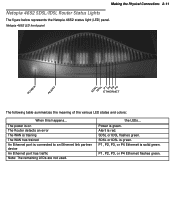
... P4 Ethernet is green. the LEDs... Alert is green. SDSL or IDSL is red. P1, P2, P3, or P4 Ethernet flashes green. Netopia 4652 LED front panel ER W PO ALERT SL SL P1 P2 P3 P4 SD ID ETHERNET The following table summarizes the meaning of the various LED... this happens... SDSL or IDSL flashes green. Making the Physical Connections 2-11 Netopia 4652 SDSL/IDSL Router Status Lights The figure below represents the Netopia 4652 status light (LED) panel. The power is on The Router detects an error The WAN is training The WAN has trained An Ethernet port is connected...
... P4 Ethernet is green. the LEDs... Alert is green. SDSL or IDSL is red. P1, P2, P3, or P4 Ethernet flashes green. Netopia 4652 LED front panel ER W PO ALERT SL SL P1 P2 P3 P4 SD ID ETHERNET The following table summarizes the meaning of the various LED... this happens... SDSL or IDSL flashes green. Making the Physical Connections 2-11 Netopia 4652 SDSL/IDSL Router Status Lights The figure below represents the Netopia 4652 status light (LED) panel. The power is on The Router detects an error The WAN is training The WAN has trained An Ethernet port is connected...
Getting Started Guide
Page 13
...stacks available for a typical PC or Macintosh computer. TCP/IP stacks must have certain components installed before they can customize the router's configuration for your local area network (LAN). Examples include the Eudora e-mail client and the Web browsers Microsoft...illustration shows the minimal requirements for PC computers. Application software TCP/IP stack Ethernet Driver Your PC or Macintosh computer To the Netopia 4652 Application software: This is properly configured. Macintosh computers use either MacTCP or Open Transport. The following topics: ■...
...stacks available for a typical PC or Macintosh computer. TCP/IP stacks must have certain components installed before they can customize the router's configuration for your local area network (LAN). Examples include the Eudora e-mail client and the Web browsers Microsoft...illustration shows the minimal requirements for PC computers. Application software TCP/IP stack Ethernet Driver Your PC or Macintosh computer To the Netopia 4652 Application software: This is properly configured. Macintosh computers use either MacTCP or Open Transport. The following topics: ■...

Getting Started Guide
Page 15
or 100Base-T Ethernet hub or switch. PC Macintosh PC Ethernet Hub If you have more than four devices to connect, you add devices connected through a hub or switch, connect the hub or switch to a 10- or 100Base-T. Connecting to Your Local Area Network 3-15 If you can attach additional devices using standard Category 5 Ethernet cables (not provided) connected to any Ethernet port on the router will auto detect 10- All of the ports on the Netopia 4652. Crossover cables are not required.
or 100Base-T Ethernet hub or switch. PC Macintosh PC Ethernet Hub If you have more than four devices to connect, you add devices connected through a hub or switch, connect the hub or switch to a 10- or 100Base-T. Connecting to Your Local Area Network 3-15 If you can attach additional devices using standard Category 5 Ethernet cables (not provided) connected to any Ethernet port on the router will auto detect 10- All of the ports on the Netopia 4652. Crossover cables are not required.

Getting Started Guide
Page 18
... IP addresses served by the router with DHCP. 4. Select TCP/IP-->Your Network Card. Click on your PC for dynamic addressing do the following: 1. When prompted, reboot the computer. In the TCP/IP Properties screen, select the IP Address tab. DNS will be assigned by the Netopia 4652. Note: You can also use...
... IP addresses served by the router with DHCP. 4. Select TCP/IP-->Your Network Card. Click on your PC for dynamic addressing do the following: 1. When prompted, reboot the computer. In the TCP/IP Properties screen, select the IP Address tab. DNS will be assigned by the Netopia 4652. Note: You can also use...

Getting Started Guide
Page 21
Note: You can also use the Dynamic Host Configuration Protocol (DHCP) server built into your Netopia 4652 to assign IP addresses to accept IP addresses served by default in the router. With the TCP/IP window open, go to the Apple menu. To configure your network to...Protocol (DHCP), which enables dynamic addressing, is a quick guide to configure other computers on Macintosh Computers The following is enabled by the Netopia 4652. Go to the Edit menu and select User Mode. Configuring TCP/IP in a Macintosh computer requires the following: ■ You ...
Note: You can also use the Dynamic Host Configuration Protocol (DHCP) server built into your Netopia 4652 to assign IP addresses to accept IP addresses served by default in the router. With the TCP/IP window open, go to the Apple menu. To configure your network to...Protocol (DHCP), which enables dynamic addressing, is a quick guide to configure other computers on Macintosh Computers The following is enabled by the Netopia 4652. Go to the Edit menu and select User Mode. Configuring TCP/IP in a Macintosh computer requires the following: ■ You ...

Getting Started Guide
Page 23
You can also use these instructions to configure other computers on your network to configure other computers on your network with manual or static IP addresses. Be sure each computer on the Netopia Web site. Sharing the Connection 4-23 Note: You can use these instructions to accept IP addresses served by the Netopia 4652. More information about configuring your Macintosh computer for TCP/IP connectivity through a Netopia 4652 can be found in Technote NIR_026, "Open Transport and Netopia Routers," located on your network has its own IP address.
You can also use these instructions to configure other computers on your network to configure other computers on your network with manual or static IP addresses. Be sure each computer on the Netopia Web site. Sharing the Connection 4-23 Note: You can use these instructions to accept IP addresses served by the Netopia 4652. More information about configuring your Macintosh computer for TCP/IP connectivity through a Netopia 4652 can be found in Technote NIR_026, "Open Transport and Netopia Routers," located on your network has its own IP address.

Getting Started Guide
Page 25
...guration and monitoring features. For more advanced features offered in the menus listed below : Netopia 4652 Easy Setup... You can use Easy Setup to initially configure the router directly through the Console Screens" on whether you have optional features installed. This manual ... screens contain seven entry points to five descendant screens for viewing or altering these features for the capabilities built into the Netopia 4652. Quick Menus... Utilities & Diagnostics... Console-based management provides access to Easy Setup -- The entry points are displayed in the ...
...guration and monitoring features. For more advanced features offered in the menus listed below : Netopia 4652 Easy Setup... You can use Easy Setup to initially configure the router directly through the Console Screens" on whether you have optional features installed. This manual ... screens contain seven entry points to five descendant screens for viewing or altering these features for the capabilities built into the Netopia 4652. Quick Menus... Utilities & Diagnostics... Console-based management provides access to Easy Setup -- The entry points are displayed in the ...
Getting Started Guide
Page 26
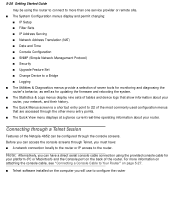
... direct serial console cable connection using the router to connect to more information on attaching the console cable, see "Connecting a Console Cable to Your Router" on page 5-27. ■ Telnet software installed on the back of the Netopia 4652 can access the console screens through the ...console screens. Connecting through a Telnet Session Features of the router. 5-26 Getting Started Guide may be con...
... direct serial console cable connection using the router to connect to more information on attaching the console cable, see "Connecting a Console Cable to Your Router" on page 5-27. ■ Telnet software installed on the back of the Netopia 4652 can access the console screens through the ...console screens. Connecting through a Telnet Session Features of the router. 5-26 Getting Started Guide may be con...
Getting Started Guide
Page 27
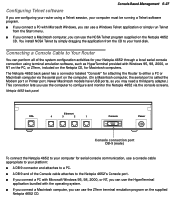
...64257;guration activities for your hard disk. Netopia 4652 back panel DSL Ethernet 4 3 2 1 Console Power Console connection port DB-9 (male) To connect the Netopia 4652 to your computer for attaching the Router to configure and monitor the Netopia 4652 via the serial port on the computer.... computer, you can use the ZTerm terminal emulation program on the supplied Netopia 4652 CD. Console-Based Management 5-27 Configuring Telnet software If you are configuring your router using terminal emulation software, such as HyperTerminal provided with Windows 95, 98...
...64257;guration activities for your hard disk. Netopia 4652 back panel DSL Ethernet 4 3 2 1 Console Power Console connection port DB-9 (male) To connect the Netopia 4652 to your computer for attaching the Router to configure and monitor the Netopia 4652 via the serial port on the computer.... computer, you can use the ZTerm terminal emulation program on the supplied Netopia 4652 CD. Console-Based Management 5-27 Configuring Telnet software If you are configuring your router using terminal emulation software, such as HyperTerminal provided with Windows 95, 98...
Getting Started Guide
Page 28
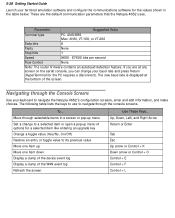
...screen on the serial console, you are the default communication parameters that the Netopia 4652 uses. Move through the console screens. To... 5-28 Getting Started Guide Launch your keyboard to navigate the Netopia 4652's configuration screens, enter and edit information, and make choices. ...Parameter Suggested Value Terminal type PC: ANSI-BBS Mac: ANSI, VT-100, or VT-200 Data bits 8 Parity None Stop bits 1 Speed 9600 - 57600 bits per second Flow Control None Note: The router...
...screen on the serial console, you are the default communication parameters that the Netopia 4652 uses. Move through the console screens. To... 5-28 Getting Started Guide Launch your keyboard to navigate the Netopia 4652's configuration screens, enter and edit information, and make choices. ...Parameter Suggested Value Terminal type PC: ANSI-BBS Mac: ANSI, VT-100, or VT-200 Data bits 8 Parity None Stop bits 1 Speed 9600 - 57600 bits per second Flow Control None Note: The router...

Getting Started Guide
Page 29
... connected to the Netopia Router ■ Telnet or the terminal emulation software is running and configured correctly A screen similar to Your Router" on page 5-26 or "Connecting a Console Cable to the following Main Menu appears: After completing the Easy Setup console screens, your Netopia 4652. See "Connecting ... ■ Set up IP addresses and IP address serving ■ Password-protect configuration access to your Netopia 4652 Accessing the Easy Setup console screens To access the console screens, Telnet to the Netopia Router over your router for configuring the...
... connected to the Netopia Router ■ Telnet or the terminal emulation software is running and configured correctly A screen similar to Your Router" on page 5-26 or "Connecting a Console Cable to the following Main Menu appears: After completing the Easy Setup console screens, your Netopia 4652. See "Connecting ... ■ Set up IP addresses and IP address serving ■ Password-protect configuration access to your Netopia 4652 Accessing the Easy Setup console screens To access the console screens, Telnet to the Netopia Router over your router for configuring the...

Getting Started Guide
Page 36
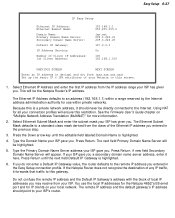
... and enter the remote mask address. The default address is where you enter information about setting up the next screen. For more information about your Netopia Router's: ■ Ethernet IP address ■ Ethernet Subnet mask ■ Domain Name ■ Domain Name Server IP address ■ Default gateway IP address Consult with your...
... and enter the remote mask address. The default address is where you enter information about setting up the next screen. For more information about your Netopia Router's: ■ Ethernet IP address ■ Ethernet Subnet mask ■ Domain Name ■ Domain Name Server IP address ■ Default gateway IP address Consult with your...
Getting Started Guide
Page 37
... If you do not enter a Default IP Gateway value, the router defaults to an address (192.168.1.1) within a range reserved by the Internet address administration authority for use the local IP addresses for the Netopia 4652's Ethernet port and for IP clients on "Multiple Network Address Translation... in this screen. 1. Because this is highlighted. 4. A new field Secondary Domain Name Server will be the Netopia Router's IP address. If the Netopia Router does not recognize the destination of any IP traffic, it forwards that traffic to your local network. See ...
... If you do not enter a Default IP Gateway value, the router defaults to an address (192.168.1.1) within a range reserved by the Internet address administration authority for use the local IP addresses for the Netopia 4652's Ethernet port and for IP clients on "Multiple Network Address Translation... in this screen. 1. Because this is highlighted. 4. A new field Secondary Domain Name Server will be the Netopia Router's IP address. If the Netopia Router does not recognize the destination of any IP traffic, it forwards that traffic to your local network. See ...

Getting Started Guide
Page 38
...64257;nal step in the Utilities and Diagnostics menu, or by turning the Netopia Router off and on with names or numbers totaling up to restart the Netopia Router and have IP addresses assigned dynamically from the router. 8. 6-38 Getting Started Guide 7. Toggle IP Address Serving to On... or Off, depending on whether you will provide 100 IP addresses automatically to restart the Netopia 4652, so that workstations on...
...64257;nal step in the Utilities and Diagnostics menu, or by turning the Netopia Router off and on with names or numbers totaling up to restart the Netopia Router and have IP addresses assigned dynamically from the router. 8. 6-38 Getting Started Guide 7. Toggle IP Address Serving to On... or Off, depending on whether you will provide 100 IP addresses automatically to restart the Netopia 4652, so that workstations on...

Getting Started Guide
Page 45
...WARRANTIES MADE BY ANYONE REGARDING THE ENCLOSED PRODUCT. THERE MAY BE OTHER RIGHTS THAT YOU MAY HAVE WHICH VARY FROM JURISDICTION TO JURISDICTION. NETOPIA AND ITS LICENSOR(S) MAKE NO OTHER WARRANTIES, EXPRESS OR IMPLIED, INCLUDING WITHOUT LIMITATION THE IMPLIED WARRANTIES OF MERCHANTABILITY AND FITNESS FOR A ... United States or Canada, please contact your sole remedy under this warranty during the warranty period is that the Netopia™ Router (the "Product") will be free from date of the package. In order to obtain a Return Materials Authorization ("RMA") number. 2.
...WARRANTIES MADE BY ANYONE REGARDING THE ENCLOSED PRODUCT. THERE MAY BE OTHER RIGHTS THAT YOU MAY HAVE WHICH VARY FROM JURISDICTION TO JURISDICTION. NETOPIA AND ITS LICENSOR(S) MAKE NO OTHER WARRANTIES, EXPRESS OR IMPLIED, INCLUDING WITHOUT LIMITATION THE IMPLIED WARRANTIES OF MERCHANTABILITY AND FITNESS FOR A ... United States or Canada, please contact your sole remedy under this warranty during the warranty period is that the Netopia™ Router (the "Product") will be free from date of the package. In order to obtain a Return Materials Authorization ("RMA") number. 2.


