
User Guide
Page 1
Mi4004 Suffix A User's Guide iWake Clock Radio with Dual Alarm Before operating this product, please read these instructions completely.
Mi4004 Suffix A User's Guide iWake Clock Radio with Dual Alarm Before operating this product, please read these instructions completely.
User Guide
Page 2
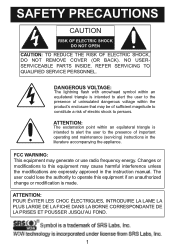
... operating and maintenance (servicing) instructions in the instruction manual. FCC WARNING: This equipment may cause harmful interference unless the modifications are expressly approved in the literature accompanying the appliance. DANGEROUS VOLTAGE: The lightning flash with arrowhead symbol within the product's enclosure that may be of sufficient magnitude to operate this equipment may generate or use radio...
... operating and maintenance (servicing) instructions in the instruction manual. FCC WARNING: This equipment may cause harmful interference unless the modifications are expressly approved in the literature accompanying the appliance. DANGEROUS VOLTAGE: The lightning flash with arrowhead symbol within the product's enclosure that may be of sufficient magnitude to operate this equipment may generate or use radio...
User Guide
Page 3
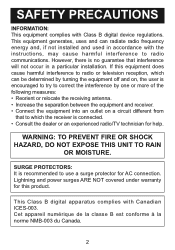
... INFORMATION: This equipment complies with Canadian ICES-003. This equipment generates, uses and can be determined by turning the equipment off and on, the user is encouraged to try to correct the interference by one or more...digital device regulations. Lightning and power surges ARE NOT covered under warranty for this equipment does cause harmful interference to use a surge protector for help. Cet appareil numérique de la classe B est conforme à la norme NMB-003 du Canada. 2 However, there is recommended to radio or television reception, which the receiver is connected...
... INFORMATION: This equipment complies with Canadian ICES-003. This equipment generates, uses and can be determined by turning the equipment off and on, the user is encouraged to try to correct the interference by one or more...digital device regulations. Lightning and power surges ARE NOT covered under warranty for this equipment does cause harmful interference to use a surge protector for help. Cet appareil numérique de la classe B est conforme à la norme NMB-003 du Canada. 2 However, there is recommended to radio or television reception, which the receiver is connected...
User Guide
Page 4
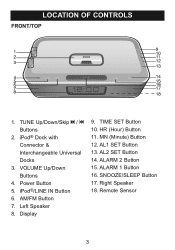
Left Speaker 8. HR (Hour) Button 11. SNOOZE/SLEEP Button 17. Remote Sensor 3 AM/FM Button 7. AL1 SET Button 13. TUNE Up/Down/Skip n / o Buttons 2. Display 9. iPod® Dock with Connector & Interchangeable Universal Docks 3. Power Button 5. ALARM 2 Button 15. TIME SET Button 10. LOCATION OF CONTROLS FRONT/TOP 1. ALARM 1 Button 16. Right Speaker 18. AL2 SET Button 14. VOLUME Up/Down Buttons 4. MN (Minute) Button 12. iPod®/LINE IN Button 6.
Left Speaker 8. HR (Hour) Button 11. SNOOZE/SLEEP Button 17. Remote Sensor 3 AM/FM Button 7. AL1 SET Button 13. TUNE Up/Down/Skip n / o Buttons 2. Display 9. iPod® Dock with Connector & Interchangeable Universal Docks 3. Power Button 5. ALARM 2 Button 15. TIME SET Button 10. LOCATION OF CONTROLS FRONT/TOP 1. ALARM 1 Button 16. Right Speaker 18. AL2 SET Button 14. VOLUME Up/Down Buttons 4. MN (Minute) Button 12. iPod®/LINE IN Button 6.
User Guide
Page 5
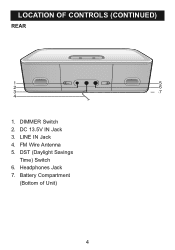
DC 13.5V IN Jack 3. LINE IN Jack 4. FM Wire Antenna 5. DST (Daylight Savings Time) Switch 6. Battery Compartment (Bottom of Unit) 4 DIMMER Switch 2. LOCATION OF CONTROLS (CONTINUED) REAR 1. Headphones Jack 7.
DC 13.5V IN Jack 3. LINE IN Jack 4. FM Wire Antenna 5. DST (Daylight Savings Time) Switch 6. Battery Compartment (Bottom of Unit) 4 DIMMER Switch 2. LOCATION OF CONTROLS (CONTINUED) REAR 1. Headphones Jack 7.
User Guide
Page 6
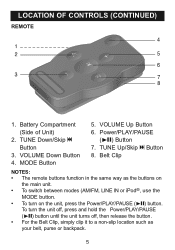
... and hold the Power/PLAY/PAUSE (®p) button until the unit turns off, then release the button. • For the Belt Clip, simply clip it to a non-slip location such as the buttons on the main unit. • To switch between modes (AM/FM, LINE IN or iPod®, use the MODE button. • To turn on the unit, press the Power/PLAY/PAUSE (®p) button. MODE Button 5. VOLUME Up Button 6. Battery Compartment...
... and hold the Power/PLAY/PAUSE (®p) button until the unit turns off, then release the button. • For the Belt Clip, simply clip it to a non-slip location such as the buttons on the main unit. • To switch between modes (AM/FM, LINE IN or iPod®, use the MODE button. • To turn on the unit, press the Power/PLAY/PAUSE (®p) button. MODE Button 5. VOLUME Up Button 6. Battery Compartment...
User Guide
Page 7
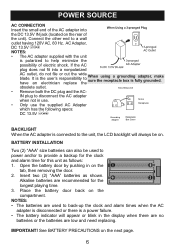
... two (2) "AAA" batteries as follows: 1. Open the battery door by pushing in use the supplied AC Adapter Receptacle which has the following specs: DC 13.5V Z Grounding Adapter Receptacle Box Cover BACKLIGHT When the AC adapter is a power failure. • The battery indicator will always be used to provide a backup for the clock and alarm time for the longest playing time. 3. POWER SOURCE AC CONNECTION Insert the small...
... two (2) "AAA" batteries as follows: 1. Open the battery door by pushing in use the supplied AC Adapter Receptacle which has the following specs: DC 13.5V Z Grounding Adapter Receptacle Box Cover BACKLIGHT When the AC adapter is a power failure. • The battery indicator will always be used to provide a backup for the clock and alarm time for the longest playing time. 3. POWER SOURCE AC CONNECTION Insert the small...
User Guide
Page 8
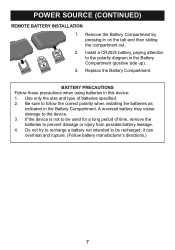
... installing the batteries as indicated in the Battery Compartment (positive side up). 3. Replace the Battery Compartment. Use only the size and type of time, remove the batteries to the polarity diagram in the Battery Compartment. If the device is not to be recharged; Be sure to the device. 3. Install a CR2025 battery, paying attention to prevent damage or injury from possible battery leakage. 4. POWER SOURCE (CONTINUED) REMOTE BATTERY INSTALLATION...
... installing the batteries as indicated in the Battery Compartment (positive side up). 3. Replace the Battery Compartment. Use only the size and type of time, remove the batteries to the polarity diagram in the Battery Compartment. If the device is not to be recharged; Be sure to the device. 3. Install a CR2025 battery, paying attention to prevent damage or injury from possible battery leakage. 4. POWER SOURCE (CONTINUED) REMOTE BATTERY INSTALLATION...
User Guide
Page 9
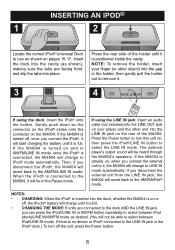
... jack, you connect the iPod®, it will start charging the battery until it . 3 4 If using the LINE IN jack: Insert an audio cable (not included) into the LINE OUT jack on your finger (or other end into the dock, whether the Mi4004 is turned off the unit, press the Power button. 8 If the Mi4004 is on the Mi4004. If using the dock: Insert...
... jack, you connect the iPod®, it will start charging the battery until it . 3 4 If using the LINE IN jack: Insert an audio cable (not included) into the LINE OUT jack on your finger (or other end into the dock, whether the Mi4004 is turned off the unit, press the Power button. 8 If the Mi4004 is on the Mi4004. If using the dock: Insert...
User Guide
Page 10
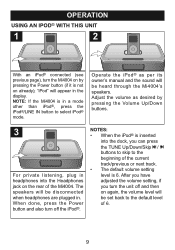
.... Operate the iPod® as per its owner's manual and the sound will be set back to the default level of 6. 9 After you have adjusted the volume setting, if you can press the TUNE Up/Down/Skip n / o buttons to skip to the beginning of the Mi4004. When done, press the Power button and also turn the Mi4004 on by pressing the Volume Up/Down buttons...
.... Operate the iPod® as per its owner's manual and the sound will be set back to the default level of 6. 9 After you have adjusted the volume setting, if you can press the TUNE Up/Down/Skip n / o buttons to skip to the beginning of the Mi4004. When done, press the Power button and also turn the Mi4004 on by pressing the Volume Up/Down buttons...
User Guide
Page 11
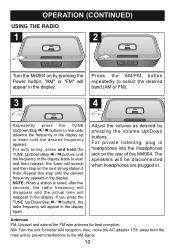
... to manually advance the frequency in the display. AM: Turn the unit for best reception. Also, move the AC adapter 1.5ft. "AM" 1or "FM" will appear in the display starts to scan and then release; OPERATION (CONTINUED) USING THE RADIO 1 2 Turn the Mi4004 on by pressing the Volume Up/Down buttons. Adjust the volume as desired by pressing the Power button; For auto tuning, press a1nd hold...
... to manually advance the frequency in the display. AM: Turn the unit for best reception. Also, move the AC adapter 1.5ft. "AM" 1or "FM" will appear in the display starts to scan and then release; OPERATION (CONTINUED) USING THE RADIO 1 2 Turn the Mi4004 on by pressing the Volume Up/Down buttons. Adjust the volume as desired by pressing the Power button; For auto tuning, press a1nd hold...
User Guide
Page 12
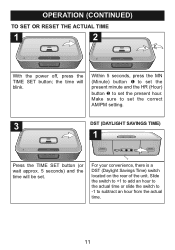
OPERATION (CONTINUED) TO SET OR RESET THE ACTUAL TIME 1 2 2 1 With the power off, press the TIME SET button; 1the time will be set. 1 For your convenience, there is a DST (Daylight Savings Time) switch located on the rear of the unit. Within 5 seconds, press the MN (Minute) button 1 to set the present minute and the HR (Hour) button 2 to set the correct AM/PM setting. 3 DST (DAYLIGHT SAVINGS TIME) 1 Press...
OPERATION (CONTINUED) TO SET OR RESET THE ACTUAL TIME 1 2 2 1 With the power off, press the TIME SET button; 1the time will be set. 1 For your convenience, there is a DST (Daylight Savings Time) switch located on the rear of the unit. Within 5 seconds, press the MN (Minute) button 1 to set the present minute and the HR (Hour) button 2 to set the correct AM/PM setting. 3 DST (DAYLIGHT SAVINGS TIME) 1 Press...
User Guide
Page 13
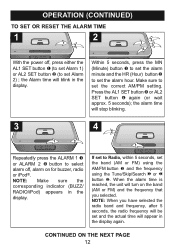
...) using the AM/FM button 1 and the frequency using the Tune/Skip/Search l or m button 2. If set to set the correct AM/PM setting. NOTE: When you selected. NOTE: Make sure the corresponding indicator (BUZZ/ RADIO/iPod) appears in the display. the Alarm time will blink in the display. CONTINUED ON THE NEXT PAGE 12 OPERATION (CONTINUED) TO SET OR RESET THE ALARM TIME 1 2 1 2 2 1 3 4 With the power...
...) using the AM/FM button 1 and the frequency using the Tune/Skip/Search l or m button 2. If set to set the correct AM/PM setting. NOTE: When you selected. NOTE: Make sure the corresponding indicator (BUZZ/ RADIO/iPod) appears in the display. the Alarm time will blink in the display. CONTINUED ON THE NEXT PAGE 12 OPERATION (CONTINUED) TO SET OR RESET THE ALARM TIME 1 2 1 2 2 1 3 4 With the power...
User Guide
Page 14
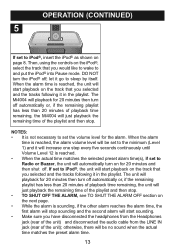
... turn off . If set to Radio or Buzzer, the unit will start playback on the track that you have disconnected the headphones from the Headphones jack (rear of the unit) and disconnected the audio cable from the LINE IN jack (rear of the playlist and then stop. The unit will be no sound when the actual time matches the preset alarm time...
... turn off . If set to Radio or Buzzer, the unit will start playback on the track that you have disconnected the headphones from the Headphones jack (rear of the unit) and disconnected the audio cable from the LINE IN jack (rear of the playlist and then stop. The unit will be no sound when the actual time matches the preset alarm time...
User Guide
Page 15
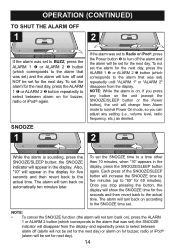
... the SNOOZE/SLEEP button or the Power button), the unit will change from Alarm mode to normal Power On mode, so you stop pressing the button, the display will turn back on for buzzer, radio or iPod® (alarm will increase the SNOOZE time by five minutes (up to the actual time. OPERATION (CONTINUED) TO SHUT THE ALARM OFF 1 1 2 If the alarm was set to BUZZ...
... the SNOOZE/SLEEP button or the Power button), the unit will change from Alarm mode to normal Power On mode, so you stop pressing the button, the display will turn back on for buzzer, radio or iPod® (alarm will increase the SNOOZE time by five minutes (up to the actual time. OPERATION (CONTINUED) TO SHUT THE ALARM OFF 1 1 2 If the alarm was set to BUZZ...
User Guide
Page 16
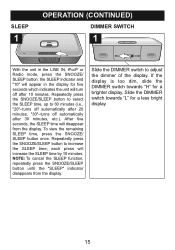
... Radio mode, press the SNOOZE/ SLEEP button; To view the remaining SLEEP time, press the SNOOZE/ SLEEP button once. NOTE: To cancel the SLEEP function, repeatedly press the SNOOZE/SLEEP button until the "SLEEP" indicator disappears from the display. Slide the DIMMER switch towards "H" for a brighter display. After five seconds, the SLEEP time will disappear from the display. Repeatedly press the SNOOZE/SLEEP button...
... Radio mode, press the SNOOZE/ SLEEP button; To view the remaining SLEEP time, press the SNOOZE/ SLEEP button once. NOTE: To cancel the SLEEP function, repeatedly press the SNOOZE/SLEEP button until the "SLEEP" indicator disappears from the display. Slide the DIMMER switch towards "H" for a brighter display. After five seconds, the SLEEP time will disappear from the display. Repeatedly press the SNOOZE/SLEEP button...
User Guide
Page 17
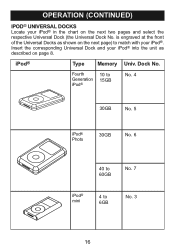
OPERATION (CONTINUED) IPOD® UNIVERSAL DOCKS Locate your iPod®. Insert the corresponding Universal Dock and your iPod® into the unit as shown on the next page) to 6GB No. 3 16 Dock No. iPod® Type Memory Univ. Fourth Generation iPod® 10 to 15GB No. 4 30GB No. 5 iPod® Photo 30GB No. 6 40 to 60GB No. 7 iPod® mini 4 to match with your iPod® in the chart on page 8. is engraved at the front of the Universal Docks as described on the next two pages and select the respective Universal Dock (the Universal Dock No.
OPERATION (CONTINUED) IPOD® UNIVERSAL DOCKS Locate your iPod®. Insert the corresponding Universal Dock and your iPod® into the unit as shown on the next page) to 6GB No. 3 16 Dock No. iPod® Type Memory Univ. Fourth Generation iPod® 10 to 15GB No. 4 30GB No. 5 iPod® Photo 30GB No. 6 40 to 60GB No. 7 iPod® mini 4 to match with your iPod® in the chart on page 8. is engraved at the front of the Universal Docks as described on the next two pages and select the respective Universal Dock (the Universal Dock No.
User Guide
Page 18
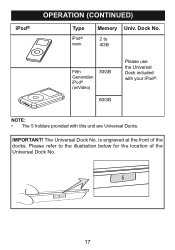
iPod® OPERATION (CONTINUED) Type iPod® nano Memory Univ. is engraved at the front of the Universal Dock No. 17 NOTE: • The 5 holders provided with your iPod®. IMPORTANT! Please refer to 4GB Fifth Generation iPod® (w/Video) 30GB 60GB Please use the Universal Dock included with this unit are Universal Docks. The Universal Dock No. Dock No. 2 to the illustration below for the location of the docks.
iPod® OPERATION (CONTINUED) Type iPod® nano Memory Univ. is engraved at the front of the Universal Dock No. 17 NOTE: • The 5 holders provided with your iPod®. IMPORTANT! Please refer to 4GB Fifth Generation iPod® (w/Video) 30GB 60GB Please use the Universal Dock included with this unit are Universal Docks. The Universal Dock No. Dock No. 2 to the illustration below for the location of the docks.
User Guide
Page 19
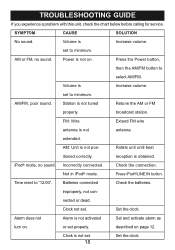
... sound. Not in iPod® mode. described on . Station is obtained. nected or dead. or set . Power is not antenna. FM: Wire Extend FM wire antenna is not on page 12. Time reset to select AM/FM. Clock is not set to minimum. TROUBLESHOOTING GUIDE If you experience a problem with this unit, check the chart below before calling for service. extended. Check the connection. Set...
... sound. Not in iPod® mode. described on . Station is obtained. nected or dead. or set . Power is not antenna. FM: Wire Extend FM wire antenna is not on page 12. Time reset to select AM/FM. Clock is not set to minimum. TROUBLESHOOTING GUIDE If you experience a problem with this unit, check the chart below before calling for service. extended. Check the connection. Set...
User Guide
Page 20
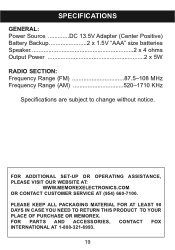
... OF PURCHASE OR MEMOREX. FOR ADDITIONAL SET-UP OR OPERATING ASSISTANCE, PLEASE VISIT OUR WEBSITE AT: WWW.MEMOREXELECTRONICS.COM OR CONTACT CUSTOMER SERVICE AT (954) 660-7100. FOR PARTS AND ACCESSORIES, CONTACT FOX INTERNATIONAL AT 1-800-321-6993. 19 SPECIFICATIONS GENERAL: Power Source DC 13.5V Adapter (Center Positive) Battery Backup 2 x 1.5V "AAA" size batteries Speaker 2 x 4 ohms Output Power 2 x 5W RADIO SECTION: Frequency Range...
... OF PURCHASE OR MEMOREX. FOR ADDITIONAL SET-UP OR OPERATING ASSISTANCE, PLEASE VISIT OUR WEBSITE AT: WWW.MEMOREXELECTRONICS.COM OR CONTACT CUSTOMER SERVICE AT (954) 660-7100. FOR PARTS AND ACCESSORIES, CONTACT FOX INTERNATIONAL AT 1-800-321-6993. 19 SPECIFICATIONS GENERAL: Power Source DC 13.5V Adapter (Center Positive) Battery Backup 2 x 1.5V "AAA" size batteries Speaker 2 x 4 ohms Output Power 2 x 5W RADIO SECTION: Frequency Range...


