
Manual
Page 2
... Distance of the Remote Control Transmitter 10 Antenna Connections 11 Connection 12 • Connection Using A/V Cables 12 Adjusting the Screen 12 About Discs 13 Setting the Time 15 Setting the Timer 16 Radio Operation 17 • Tuning Radio Stations 17 • Setting and Recalling Radio Presets 18 Closed ...8226; Video Setup Menu 38 • Speaker Setup Menu 38 • TVG (TV Guardian 39 Basic Operation 42 • Resume 42 • Volume 42 • Mute 42 • EQ/Bass 42 • Playback of a DVD 43 • Skip 44 • Fast Search 44 • Zoom 44 •...
... Distance of the Remote Control Transmitter 10 Antenna Connections 11 Connection 12 • Connection Using A/V Cables 12 Adjusting the Screen 12 About Discs 13 Setting the Time 15 Setting the Timer 16 Radio Operation 17 • Tuning Radio Stations 17 • Setting and Recalling Radio Presets 18 Closed ...8226; Video Setup Menu 38 • Speaker Setup Menu 38 • TVG (TV Guardian 39 Basic Operation 42 • Resume 42 • Volume 42 • Mute 42 • EQ/Bass 42 • Playback of a DVD 43 • Skip 44 • Fast Search 44 • Zoom 44 •...

Manual
Page 8
EXIT Button 9. Navigation √/Skip o Button 15. TIMER Button 7 FRONT LOCATION OF CONTROLS 1 2 3 4 5 6 7 8 9 10 1112 13 1415 16 171819 2021 1. Navigation π Button 16. CLOCK Button 19. STANDBY Indicator 4. SOURCE Button 5. Open/Close Button 12. Stop (X) Button 14. Navigation ®/Skip n Button 21. MENU Button 10. Power Button 17. Disc Compartment 2. Screen 3. Play/Pause (®p) Button 13. BAND Button 6. Display 8. SETUP Button 7. VOLUME Up/Down Buttons 11. Remote Sensor 18. Navigation † Button 20.
EXIT Button 9. Navigation √/Skip o Button 15. TIMER Button 7 FRONT LOCATION OF CONTROLS 1 2 3 4 5 6 7 8 9 10 1112 13 1415 16 171819 2021 1. Navigation π Button 16. CLOCK Button 19. STANDBY Indicator 4. SOURCE Button 5. Open/Close Button 12. Stop (X) Button 14. Navigation ®/Skip n Button 21. MENU Button 10. Power Button 17. Disc Compartment 2. Screen 3. Play/Pause (®p) Button 13. BAND Button 6. Display 8. SETUP Button 7. VOLUME Up/Down Buttons 11. Remote Sensor 18. Navigation † Button 20.
Manual
Page 10
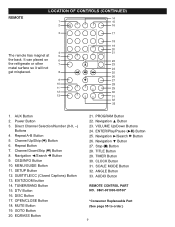
... Button 30. AUX Button 2. Repeat A-B Button 5. MENU/GUIDE Button 11. DISC Button 17. Direct Channel Selection/Number (0-9, -) Buttons 4. AUDIO Button REMOTE CONTROL PART NO. 0861-001000-00100* *Consumer Replaceable Part (See page 55 to order.) 9 EXIT/ZOOM button 14. ENTER/Play/Pause (®p) Button... 25. Channel Up/Skip (n) Button 6. Navigation √/Search m Button 9. Navigation π Button 23. CLOCK Button 31. SETUP Button 12. It can placed on 6 22 the refrigerate or other 7 23 metal surface so it will not 24 get misplaced....
... Button 30. AUX Button 2. Repeat A-B Button 5. MENU/GUIDE Button 11. DISC Button 17. Direct Channel Selection/Number (0-9, -) Buttons 4. AUDIO Button REMOTE CONTROL PART NO. 0861-001000-00100* *Consumer Replaceable Part (See page 55 to order.) 9 EXIT/ZOOM button 14. ENTER/Play/Pause (®p) Button... 25. Channel Up/Skip (n) Button 6. Navigation √/Search m Button 9. Navigation π Button 23. CLOCK Button 31. SETUP Button 12. It can placed on 6 22 the refrigerate or other 7 23 metal surface so it will not 24 get misplaced....

Manual
Page 11
... time, remove the battery to be recharged; it can overheat and rupture. (Follow battery manufacturer's directions.) EFFECTIVE DISTANCE OF THE REMOTE CONTROL TRANSMITTER 30 30 20ft NOTES: • When there is incorrectly replaced. Be sure to follow the correct polarity when installing .... 3. If the device is not to prevent damage or injury from possible battery leakage. 5. BATTERY INSTALLATION REMOTE CONTROL 1. Remove the Battery Compartment by pressing in on the REMOTE SENSOR of the unit, the remote operation may cause damage to the polarity diagram in this device: 1.
... time, remove the battery to be recharged; it can overheat and rupture. (Follow battery manufacturer's directions.) EFFECTIVE DISTANCE OF THE REMOTE CONTROL TRANSMITTER 30 30 20ft NOTES: • When there is incorrectly replaced. Be sure to follow the correct polarity when installing .... 3. If the device is not to prevent damage or injury from possible battery leakage. 5. BATTERY INSTALLATION REMOTE CONTROL 1. Remove the Battery Compartment by pressing in on the REMOTE SENSOR of the unit, the remote operation may cause damage to the polarity diagram in this device: 1.
Manual
Page 13
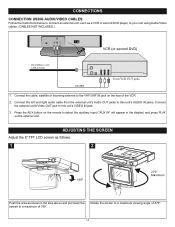
...unit using Audio/Video cables. (CABLES NOT INCLUDED.) INCOMING CATV CABLE (VCR) VCR (or second DVD) From VCR OUT jacks 1. Connect the left and right audio cable from the external unit's ...'s AUDIO IN jacks. ADJUSTING THE SCREEN Adjust the 8" TFT LCD screen as follows: 1 2 Push the area as a VCR or second DVD player, to the VHF/UHF IN jack on the external unit.... Connect the external unit's Video OUT jack to this unit's VIDEO IN jack. 3. Rotate the screen to a maximum of the VCR. 2. Press the AUX button on the remote...
...unit using Audio/Video cables. (CABLES NOT INCLUDED.) INCOMING CATV CABLE (VCR) VCR (or second DVD) From VCR OUT jacks 1. Connect the left and right audio cable from the external unit's ...'s AUDIO IN jacks. ADJUSTING THE SCREEN Adjust the 8" TFT LCD screen as follows: 1 2 Push the area as a VCR or second DVD player, to the VHF/UHF IN jack on the external unit.... Connect the external unit's Video OUT jack to this unit's VIDEO IN jack. 3. Rotate the screen to a maximum of the VCR. 2. Press the AUX button on the remote...
Manual
Page 18
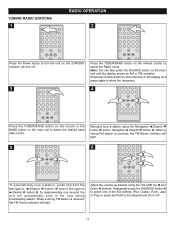
... Stereo indicator will turn the unit on; Repeatedly press the EQ/BASS button 3 to select one second; Press the CLOCK button to show the frequency. 4 1 2 Press the TUNER/BAND button on the remote or the BAND button on the main unit to select the desired band (AM or FM). When a strong FM..., Classic, Rock, Jazz or Pop) or press and hold the Navigation √/Search m button 1 and/or Navigation ®/Search l button 2. the unit will light. TUNING RADIO STATIONS 1 RADIO OPERATION 2 Press the Power button to turn off. 3 Press the TUNER/BAND button on the...
... Stereo indicator will turn the unit on; Repeatedly press the EQ/BASS button 3 to select one second; Press the CLOCK button to show the frequency. 4 1 2 Press the TUNER/BAND button on the remote or the BAND button on the main unit to select the desired band (AM or FM). When a strong FM..., Classic, Rock, Jazz or Pop) or press and hold the Navigation √/Search m button 1 and/or Navigation ®/Search l button 2. the unit will light. TUNING RADIO STATIONS 1 RADIO OPERATION 2 Press the Power button to turn off. 3 Press the TUNER/BAND button on the...

Manual
Page 19
Press the TUNER/BAND button on the previous page. Select a radio station as described on the remote control to select the Radio mode. NOTE: You can also press the SOURCE button on ; STORE 1 will appear in the display. STORED will turn the unit on the main unit ...until the display shows an AM or FM reception to select the Radio mode. 3 4 1 3 2 Press the PROGRAM button; RADIO OPERATION (CONTINUED...
Press the TUNER/BAND button on the previous page. Select a radio station as described on the remote control to select the Radio mode. NOTE: You can also press the SOURCE button on ; STORE 1 will appear in the display. STORED will turn the unit on the main unit ...until the display shows an AM or FM reception to select the Radio mode. 3 4 1 3 2 Press the PROGRAM button; RADIO OPERATION (CONTINUED...

Manual
Page 21
... the Navigation π 2 and/or † 3 button to enter the Setup menu. EDGE COLOR: Select the color of the service digital closed captions on your remote to select one of the font's edges for the captions. Then press the Navigation π 2 and/or † 3 button to set as shown below) by...
... the Navigation π 2 and/or † 3 button to enter the Setup menu. EDGE COLOR: Select the color of the service digital closed captions on your remote to select one of the font's edges for the captions. Then press the Navigation π 2 and/or † 3 button to set as shown below) by...
Manual
Page 33
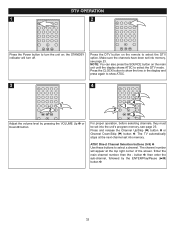
... the display and press again to turn off. Press the CLOCK button to show ATSC. 3 4 21 Adjust the volume level by the ENTER/Play/Pause (®p) button 5. 32 Press the DTV button on the remote to select the DTV mode. The TV automatically stops at the top right corner of the screen. NOTE...
... the display and press again to turn off. Press the CLOCK button to show ATSC. 3 4 21 Adjust the volume level by the ENTER/Play/Pause (®p) button 5. 32 Press the DTV button on the remote to select the DTV mode. The TV automatically stops at the top right corner of the screen. NOTE...

Manual
Page 34
... appear on the screen. Language, Channel Signal, Signal Strength etc.). Repeatedly press the EQ/BASS button to turn Bass Boost On or Off. 33 the TV's sound will be turned back on by pressing this button again; This screen will display on the top left coner of the screen showing the..., Rock, Jazz or Pop) or press and hold to adjust the sound level. OSD/INFO 1 DTV OPERATION (CONTINUED) VOLUME 1 21 Press OSD/INFO key on remote, a sub menu will disappear after few seconds.
... appear on the screen. Language, Channel Signal, Signal Strength etc.). Repeatedly press the EQ/BASS button to turn Bass Boost On or Off. 33 the TV's sound will be turned back on by pressing this button again; This screen will display on the top left coner of the screen showing the..., Rock, Jazz or Pop) or press and hold to adjust the sound level. OSD/INFO 1 DTV OPERATION (CONTINUED) VOLUME 1 21 Press OSD/INFO key on remote, a sub menu will disappear after few seconds.
Manual
Page 55
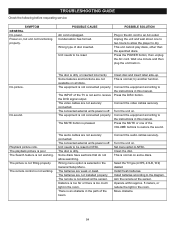
... discs. Some features and functions are not available on . The INPUT of the VOLUME buttons to receive the DVD signal output. This is dirty. Press the MUTE or one of the TV is selected in the room. The audio cables are not installed properly. Unit needs to dry. The disc ... Some discs have sections that do not allow the player to be reset. Turn the unit on some discs. The disc is pressed. Aim the remote at the sensor. The playback picture is not fitting properly. No picture. Press the DISC button. The picture is poor. Connect the audio cables ...
... discs. Some features and functions are not available on . The INPUT of the VOLUME buttons to receive the DVD signal output. This is dirty. Press the MUTE or one of the TV is selected in the room. The audio cables are not installed properly. Unit needs to dry. The disc ... Some discs have sections that do not allow the player to be reset. Turn the unit on some discs. The disc is pressed. Aim the remote at the sensor. The playback picture is not fitting properly. No picture. Press the DISC button. The picture is poor. Connect the audio cables ...
Info Sheet
Page 1
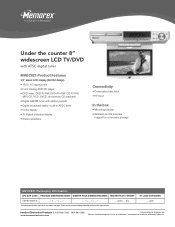
... remote includes magnet for convenient storage MVUC821 Packaging Information UPC BAR CODE PACKAGE DIMENSIONS (WDH) MASTER PACK DIMENSIONS (WDH) MASTER PACK / WEIGHT 749720-01273-2 ___" x ___" x ___" ___" x ___" x ___" __ units / __ lbs. Preliminary specifications and features are trademarks of the affiliates of Imation Enterprises Corp. Under the counter 8" widescreen LCD TV/DVD with...
... remote includes magnet for convenient storage MVUC821 Packaging Information UPC BAR CODE PACKAGE DIMENSIONS (WDH) MASTER PACK DIMENSIONS (WDH) MASTER PACK / WEIGHT 749720-01273-2 ___" x ___" x ___" ___" x ___" x ___" __ units / __ lbs. Preliminary specifications and features are trademarks of the affiliates of Imation Enterprises Corp. Under the counter 8" widescreen LCD TV/DVD with...


