
Manual
Page 2
... Instructions 2 Precautions 5 Power Source 5 Installation 6 Location of Controls 7 • Front 7 • Rear 8 • Remote 9 Remote Control 10 • Battery Installation 10 • Effective Distance of the Remote Control Transmitter 10 Antenna Connections 11 Connection 12 • Connection Using A/V Cables 12 Adjusting the Screen 12 About Discs 13 Setting the Time 15 Setting the Timer 16 Radio Operation 17 • Tuning Radio Stations 17 • Setting and Recalling Radio Presets 18 Closed Captions 19 Setting the DTV Menus 20 • Setting the Closed...
... Instructions 2 Precautions 5 Power Source 5 Installation 6 Location of Controls 7 • Front 7 • Rear 8 • Remote 9 Remote Control 10 • Battery Installation 10 • Effective Distance of the Remote Control Transmitter 10 Antenna Connections 11 Connection 12 • Connection Using A/V Cables 12 Adjusting the Screen 12 About Discs 13 Setting the Time 15 Setting the Timer 16 Radio Operation 17 • Tuning Radio Stations 17 • Setting and Recalling Radio Presets 18 Closed Captions 19 Setting the DTV Menus 20 • Setting the Closed...
Manual
Page 3
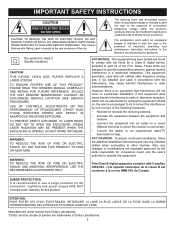
... the unit. NO USER-SERVICEABLE PARTS INSIDE. VISIBLE LASER RADIATION MAY BE PRESENT WHEN THE ENCLOSURE IS OPENED. This Class B digital apparatus complies with the limits for class II (Double Insulation) CAUTION: THIS DIGITAL VIDEO DISC PLAYER EMPLOYS A LASER SYSTEM. This Caution Marking with the instructions, may cause harmful interference to use only shielded cables when connecting to which the receiver is intended to...
... the unit. NO USER-SERVICEABLE PARTS INSIDE. VISIBLE LASER RADIATION MAY BE PRESENT WHEN THE ENCLOSURE IS OPENED. This Class B digital apparatus complies with the limits for class II (Double Insulation) CAUTION: THIS DIGITAL VIDEO DISC PLAYER EMPLOYS A LASER SYSTEM. This Caution Marking with the instructions, may cause harmful interference to use only shielded cables when connecting to which the receiver is intended to...

Manual
Page 4
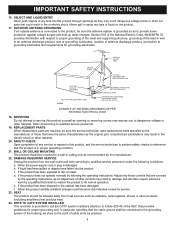
... to the operating instructions. 11. WATER AND MOISTURE Do not use liquid cleaners or aerosol cleaners. These openings must not be retained for long periods of power supply to . 4. This product should not be located in installation such as contact with a polarized alternating-current line plug (a plug having one way. IMPORTANT SAFETY INSTRUCTIONS Before using the unit, be sure to operate from battery power, or...
... to the operating instructions. 11. WATER AND MOISTURE Do not use liquid cleaners or aerosol cleaners. These openings must not be retained for long periods of power supply to . 4. This product should not be located in installation such as contact with a polarized alternating-current line plug (a plug having one way. IMPORTANT SAFETY INSTRUCTIONS Before using the unit, be sure to operate from battery power, or...
Manual
Page 5
... SAFETY INSTRUCTIONS 16. c. Never spill or spray any kind into the product. When the product exhibits a distinct change in fire or electric shock. If the product has been exposed to a wall or ceiling only as practical. 4 OBJECT AND LIQUID ENTRY Never push objects of other products (including amplifiers) that the cable ground shall be sure the service technician uses replacement parts specified...
... SAFETY INSTRUCTIONS 16. c. Never spill or spray any kind into the product. When the product exhibits a distinct change in fire or electric shock. If the product has been exposed to a wall or ceiling only as practical. 4 OBJECT AND LIQUID ENTRY Never push objects of other products (including amplifiers) that the cable ground shall be sure the service technician uses replacement parts specified...
Manual
Page 6
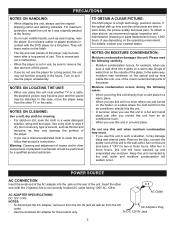
... that product's instructions. AC ADAPTER SPECIFICATIONS: DC 12V Z NOTES: • To disconnect the AC adapter, remove it was originally packed at the factory. • Do not use this unit in a weak detergent solution, wring well and wipe. In this case, move the player away from the other end (with the DVD player for this unit from a cold place to remove the disc and turn...
... that product's instructions. AC ADAPTER SPECIFICATIONS: DC 12V Z NOTES: • To disconnect the AC adapter, remove it was originally packed at the factory. • Do not use this unit in a weak detergent solution, wring well and wipe. In this case, move the player away from the other end (with the DVD player for this unit from a cold place to remove the disc and turn...
Manual
Page 7
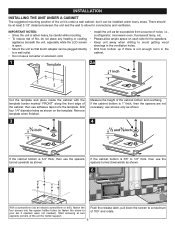
...LCD screen is 3/8" to 1/2" thick, then use adhesive tape to fix the template. Drill four 1/4" diameter holes as possible from bottom up if there is under many areas. Remove template when finished. 3 Measure the height of 180° and rotate. 6 Start screwing at least 2-1/2" distance between the unit and the wall... thick, then use the spacers turned upwards as shown. 5 If the cabinet bottom is open. • Mount the unit so that its AC adapter can be installed under a wall cabinet, but it can be at two opposite corners of the unit for better support. i.e., a refrigerator...
...LCD screen is 3/8" to 1/2" thick, then use adhesive tape to fix the template. Drill four 1/4" diameter holes as possible from bottom up if there is under many areas. Remove template when finished. 3 Measure the height of 180° and rotate. 6 Start screwing at least 2-1/2" distance between the unit and the wall... thick, then use the spacers turned upwards as shown. 5 If the cabinet bottom is open. • Mount the unit so that its AC adapter can be installed under a wall cabinet, but it can be at two opposite corners of the unit for better support. i.e., a refrigerator...
Manual
Page 10
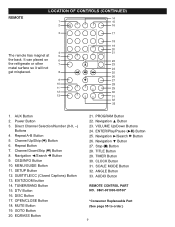
... magnet at 5 the back. Channel Down/Skip (o) Button 8. DISC Button 17. EQ/BASS Button 21. ENTER/Play/Pause (®p) Button 25. TITLE Button 29. ANGLE Button 33. AUX Button 2. EXIT/ZOOM button 14. PROGRAM Button 22. TIMER Button 30. MENU/GUIDE Button 11. SETUP Button 12. SUBTITLE/CC (Closed Captions) Button 13. OPEN/CLOSE Button 18. Power Button 3. Repeat A-B Button 5. Navigation ®/Search l Button 26. AUDIO Button REMOTE CONTROL PART NO. 0861-001000-00100* *Consumer Replaceable Part (See page 55 to order.) 9 Stop (X) Button 28. It can placed...
... magnet at 5 the back. Channel Down/Skip (o) Button 8. DISC Button 17. EQ/BASS Button 21. ENTER/Play/Pause (®p) Button 25. TITLE Button 29. ANGLE Button 33. AUX Button 2. EXIT/ZOOM button 14. PROGRAM Button 22. TIMER Button 30. MENU/GUIDE Button 11. SETUP Button 12. SUBTITLE/CC (Closed Captions) Button 13. OPEN/CLOSE Button 18. Power Button 3. Repeat A-B Button 5. Navigation ®/Search l Button 26. AUDIO Button REMOTE CONTROL PART NO. 0861-001000-00100* *Consumer Replaceable Part (See page 55 to order.) 9 Stop (X) Button 28. It can placed...
Manual
Page 15
... certain U.S. This product incorporates copyright protection technology that is protected by law to play that is recorded on a DVD disc. When you try to copy, broadcast, show, broadcast on the TV screen. 14 Use of this copyright protection technology must be distorted. You may not be able to the Region Management Information that disc. patents and other rights owners. Region Management Information: This DVD Player is prohibited.
... certain U.S. This product incorporates copyright protection technology that is protected by law to play that is recorded on a DVD disc. When you try to copy, broadcast, show, broadcast on the TV screen. 14 Use of this copyright protection technology must be distorted. You may not be able to the Region Management Information that disc. patents and other rights owners. Region Management Information: This DVD Player is prohibited.
Manual
Page 18
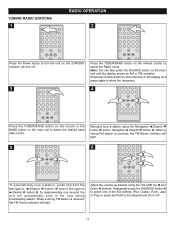
... to select the Radio mode. the unit will light. the STANDBY indicator will light. 5 6 1 2 13 2 To automatically tune a station, press and hold to turn the unit on the remote control to select the desired band (AM or FM). Press the CLOCK button to show the time in the next strong broadcasting station. When a strong FM station is received, the FM Stereo...
... to select the Radio mode. the unit will light. the STANDBY indicator will light. 5 6 1 2 13 2 To automatically tune a station, press and hold to turn the unit on the remote control to select the desired band (AM or FM). Press the CLOCK button to show the time in the next strong broadcasting station. When a strong FM station is received, the FM Stereo...

Manual
Page 20
... copy protection systems may interfere with the Closed Captioned text intact. CLOSED CAPTIONING WITH A VCR Closed Captioned programs can follow the dialogue. TEXT: The Text Closed Caption Modes will display text on the bottom of the screen. SERVICE 1-6 : These Closed Caption modes will display text on a VCR with the Closed Captioned signal. • If using an indoor antenna or if TV reception is lost due to decode and display Closed Captioned television programs. Closed...
... copy protection systems may interfere with the Closed Captioned text intact. CLOSED CAPTIONING WITH A VCR Closed Captioned programs can follow the dialogue. TEXT: The Text Closed Caption Modes will display text on the bottom of the screen. SERVICE 1-6 : These Closed Caption modes will display text on a VCR with the Closed Captioned signal. • If using an indoor antenna or if TV reception is lost due to decode and display Closed Captioned television programs. Closed...

Manual
Page 21
... captions. SETTING THE DTV MENUS SETTING THE CLOSED CAPTIONS (ATSC) 1 2 2 1 3 Daylight saving O 12 3 With the power on your remote to enter the Setup menu. BACKGROUND COLOR: Select the desired background color for the captions. the menu will appear. ANALOG CAPTION: Select OFF to turn the digital closed captions off , CC1-CC4 to select the Closed Caption option, then press the ENTER/Play/Pause (®p) button 1 again...
... captions. SETTING THE DTV MENUS SETTING THE CLOSED CAPTIONS (ATSC) 1 2 2 1 3 Daylight saving O 12 3 With the power on your remote to enter the Setup menu. BACKGROUND COLOR: Select the desired background color for the captions. the menu will appear. ANALOG CAPTION: Select OFF to turn the digital closed captions off , CC1-CC4 to select the Closed Caption option, then press the ENTER/Play/Pause (®p) button 1 again...
Manual
Page 22
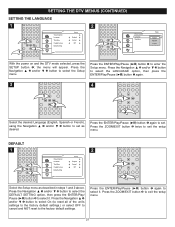
... the setup menu. 21 SETTING THE DTV MENUS (CONTINUED) SETTING THE LANGUAGE 1 2 2 1 3 Daylight saving O 12 3 With the power on and the DTV mode selected, press the SETUP button 1; DEFAULT 1 2 31 2 Daylight saving O 1 2 Select the Setup menu as desired. Press the ZOOM/EXIT button 2 to exit the setup menu. Press the ENTER/Play/Pause (®p) button 1 again to select it . Press the ENTER/Play/Pause (®p) button 1 again to set as...
... the setup menu. 21 SETTING THE DTV MENUS (CONTINUED) SETTING THE LANGUAGE 1 2 2 1 3 Daylight saving O 12 3 With the power on and the DTV mode selected, press the SETUP button 1; DEFAULT 1 2 31 2 Daylight saving O 1 2 Select the Setup menu as desired. Press the ZOOM/EXIT button 2 to exit the setup menu. Press the ENTER/Play/Pause (®p) button 1 again to select it . Press the ENTER/Play/Pause (®p) button 1 again to set as...
Manual
Page 24
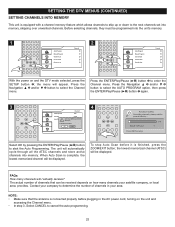
.... 1 2 2 1 3 12 3 With the power on and the DTV mode selected, press the SETUP button 1; Press the ENTER/Play/Pause (®p) button 1 to select the Channel menu. When Auto Scan is connected properly before it is equipped with a channel memory feature which allows channels to skip up or down to start the Auto Programming. To stop Auto Scan before plugging in your company to cancel the auto programming. 23 Press the Navigation...
.... 1 2 2 1 3 12 3 With the power on and the DTV mode selected, press the SETUP button 1; Press the ENTER/Play/Pause (®p) button 1 to select the Channel menu. When Auto Scan is connected properly before it is equipped with a channel memory feature which allows channels to skip up or down to start the Auto Programming. To stop Auto Scan before plugging in your company to cancel the auto programming. 23 Press the Navigation...

Manual
Page 28
... upcoming pages or press the ZOOM/EXIT button twice to select the LOCK option, then press the ENTER/Play/Pause (®p) button 3 again. In this case, the program will appear. TV PARENTAL CONTROL V-Chip enables parents to change the password. 27 PARENTAL CONTROL SET-UP 1 2 2 2 1 3 1 With the power on premium cable and Emergency System signals), then denies access to programming if the program's rating meets the limitations you select. NOTE...
... upcoming pages or press the ZOOM/EXIT button twice to select the LOCK option, then press the ENTER/Play/Pause (®p) button 3 again. In this case, the program will appear. TV PARENTAL CONTROL V-Chip enables parents to change the password. 27 PARENTAL CONTROL SET-UP 1 2 2 2 1 3 1 With the power on premium cable and Emergency System signals), then denies access to programming if the program's rating meets the limitations you select. NOTE...
Manual
Page 37
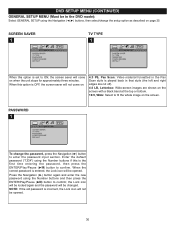
... ENTER/Play/Pause (®p) button to confirm; SCREEN SAVER 1 TV TYPE 1 When this is OFF, the screen saver will not be opened . Press the Navigation (®) button again and enter the new password using the Number buttons if this option is set to ON, the screen saver will come on. 4:3 PS, Pan Scan: Video material formatted in the Pan Scan style is entered, the Lock icon will be changed. DVD SETUP MENU...
... ENTER/Play/Pause (®p) button to confirm; SCREEN SAVER 1 TV TYPE 1 When this is OFF, the screen saver will not be opened . Press the Navigation (®) button again and enter the new password using the Number buttons if this option is set to ON, the screen saver will come on. 4:3 PS, Pan Scan: Video material formatted in the Pan Scan style is entered, the Lock icon will be changed. DVD SETUP MENU...

Manual
Page 39
... the sound in the selected language, otherwise the default language of the DVD will be shown. Select the language the disc menu will be in (ENGLISH, SPANISH OR FRENCH). Return to lighten or darken the picture. PICTURE SETTINGS 1 Adjust the settings as follows: Brightness: Adjust to the previous menu as described on page 35. Saturation: Adjust to turn the subtitles off. VIDEO SETUP MENU: Press the SETUP button to enter the menu, select VIDEO SETUP using the...
... the sound in the selected language, otherwise the default language of the DVD will be shown. Select the language the disc menu will be in (ENGLISH, SPANISH OR FRENCH). Return to lighten or darken the picture. PICTURE SETTINGS 1 Adjust the settings as follows: Brightness: Adjust to the previous menu as described on page 35. Saturation: Adjust to turn the subtitles off. VIDEO SETUP MENU: Press the SETUP button to enter the menu, select VIDEO SETUP using the...
Manual
Page 44
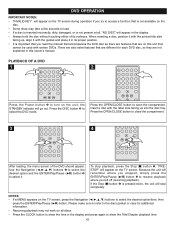
...; PLAYBACK OF A DVD 1 2 1 2 Press the Power button 1 to turn on the TV screen. Press the OPEN/CLOSE button to select the DVD mode. DVD OPERATION IMPORTANT NOTES: • "INVALID KEY" will appear on the TV screen during operation if you try to access a function that are on the TV screen, press the Navigation buttons to select the desired option/item, then press the ENTER/Play/Pause (®p) button. NOTES: • If a MENU appears on this owner's manual. Press...
...; PLAYBACK OF A DVD 1 2 1 2 Press the Power button 1 to turn on the TV screen. Press the OPEN/CLOSE button to select the DVD mode. DVD OPERATION IMPORTANT NOTES: • "INVALID KEY" will appear on the TV screen during operation if you try to access a function that are on the TV screen, press the Navigation buttons to select the desired option/item, then press the ENTER/Play/Pause (®p) button. NOTES: • If a MENU appears on this owner's manual. Press...
Manual
Page 52
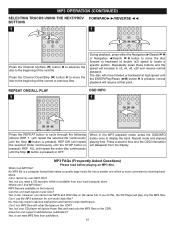
...-audio data files? Yes, but you cannot mix MP3s and WAV files on the Internet. MP3 OPERATION (CONTINUED) SELECTING TRACKS USING THE NEXT/PREV BUTTONS 1 1 2 FORWARD®®/REVERSE √√ 1 1 2 Press the Channel Up/Skip (n) button 1 to advance the disc to the beginning of the next file. REPEAT ONE/ALL PLAY 1 OSD INFO 1 Press the REPEAT button to x2, x4, x8, x20 and resume normal playback...
...-audio data files? Yes, but you cannot mix MP3s and WAV files on the Internet. MP3 OPERATION (CONTINUED) SELECTING TRACKS USING THE NEXT/PREV BUTTONS 1 1 2 FORWARD®®/REVERSE √√ 1 1 2 Press the Channel Up/Skip (n) button 1 to advance the disc to the beginning of the next file. REPEAT ONE/ALL PLAY 1 OSD INFO 1 Press the REPEAT button to x2, x4, x8, x20 and resume normal playback...
Manual
Page 55
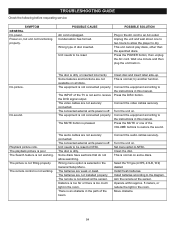
... instructions in this manual. The playback picture is pressed. Wrong menu option is normal; Connect the audio cables securely. The INPUT of disc inserted. Press the DISC button. Press the MUTE or one of the beam. Turn the unit on all discs. Operate within approx. 5 meters, or reduce the light in the path of the VOLUME buttons to receive the DVD signal output. No sound. This is selected in . Playback picture rolls. The connected external unit's power...
... instructions in this manual. The playback picture is pressed. Wrong menu option is normal; Connect the audio cables securely. The INPUT of disc inserted. Press the DISC button. Press the MUTE or one of the beam. Turn the unit on all discs. Operate within approx. 5 meters, or reduce the light in the path of the VOLUME buttons to receive the DVD signal output. No sound. This is selected in . Playback picture rolls. The connected external unit's power...
Info Sheet
Page 1
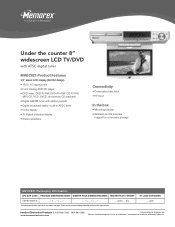
... www.memorexelectronics.com A Division of Memorex Products, Inc. Please confirm package/shipping information with station presets • Digital broadcast ready-built-in ATSC tuner • Clock display • Tri-lingual onscreen display • Stereo speakers Connectivity • Composite video input • RF input In the box • Mounting bracket • Wireless remote includes magnet for convenient storage MVUC821 Packaging Information UPC BAR CODE PACKAGE DIMENSIONS (WDH) MASTER...
... www.memorexelectronics.com A Division of Memorex Products, Inc. Please confirm package/shipping information with station presets • Digital broadcast ready-built-in ATSC tuner • Clock display • Tri-lingual onscreen display • Stereo speakers Connectivity • Composite video input • RF input In the box • Mounting bracket • Wireless remote includes magnet for convenient storage MVUC821 Packaging Information UPC BAR CODE PACKAGE DIMENSIONS (WDH) MASTER...


