User Guide
Page 2
CONTENTS Contents 1 Important Safety Instructions 2 Precautions 4 Power Source 4 Features 5 Location of Controls 6 • Front 6 • Rear 6 • Remote 7 Remote Control 8 • Battery Installation 8 • Effective Distance of the Remote Control Transmitter 8 Connection 9 • Connecting the Player to a TV Using the HDMI Output Jack 9 • Connecting the Player to a TV Using the Y/Pb/Pr Jacks...
CONTENTS Contents 1 Important Safety Instructions 2 Precautions 4 Power Source 4 Features 5 Location of Controls 6 • Front 6 • Rear 6 • Remote 7 Remote Control 8 • Battery Installation 8 • Effective Distance of the Remote Control Transmitter 8 Connection 9 • Connecting the Player to a TV Using the HDMI Output Jack 9 • Connecting the Player to a TV Using the Y/Pb/Pr Jacks...
User Guide
Page 7
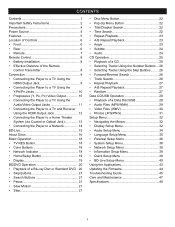
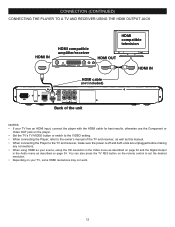
... Power Cord Jack 2. Component Video (Y, Pb, Pr) Output Jacks 6 Wi-Fi Skip (n) Button 10. HDMI Jack 5. Ethernet Jack 4. USB Jack (Inside Compartment) 2. Display 5. Network Indicator 1. Remote Sensor 6. Optical Output Jack 6. Stereo Audio Left/Right Output Jacks 8. FRONT LOCATION OF CONTROLS PRESS DOWN ON THE TABS AND THEN PULL OUT TO OPEN 1.
... Power Cord Jack 2. Component Video (Y, Pb, Pr) Output Jacks 6 Wi-Fi Skip (n) Button 10. HDMI Jack 5. Ethernet Jack 4. USB Jack (Inside Compartment) 2. Display 5. Network Indicator 1. Remote Sensor 6. Optical Output Jack 6. Stereo Audio Left/Right Output Jacks 8. FRONT LOCATION OF CONTROLS PRESS DOWN ON THE TABS AND THEN PULL OUT TO OPEN 1.
User Guide
Page 8
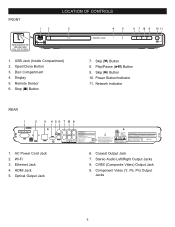
...17. PLAY ® Button 23 24. AUDIO Button 28 28. OPEN/CLOSE Button 19. DISC MENU Button 22 22. Repeat A-B Button REMOTE CONTROL PART NO. 0118020235* BATTERY COVER PART NO. 0118020235BR* A/V RCA CABLE PART NO. 0117030001* *Consumer Replaceable Part (See page 46 ... 16. RANDOM Button 21 18. POWER Button 2. HOME/SETUP Button 7. CLEAR Button 18 5. NEXT (Skip) n Button 26 26. LOCATION OF CONTROLS (CONTINUED) REMOTE POWER OPEN/CLOSE 1 2 A B C D 3 4 CLEAR SEARCH ANGLE TV RES. 5 HOME/SETUP 6 DISPLAY 7 DISC MENU 8 9 10 RETURN POP-...
...17. PLAY ® Button 23 24. AUDIO Button 28 28. OPEN/CLOSE Button 19. DISC MENU Button 22 22. Repeat A-B Button REMOTE CONTROL PART NO. 0118020235* BATTERY COVER PART NO. 0118020235BR* A/V RCA CABLE PART NO. 0117030001* *Consumer Replaceable Part (See page 46 ... 16. RANDOM Button 21 18. POWER Button 2. HOME/SETUP Button 7. CLEAR Button 18 5. NEXT (Skip) n Button 26 26. LOCATION OF CONTROLS (CONTINUED) REMOTE POWER OPEN/CLOSE 1 2 A B C D 3 4 CLEAR SEARCH ANGLE TV RES. 5 HOME/SETUP 6 DISPLAY 7 DISC MENU 8 9 10 RETURN POP-...
User Guide
Page 9
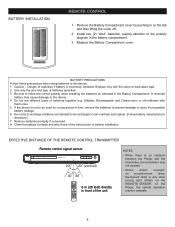
...Remove batteries promptly if consumed. 8. REW F.F NEXT STEP SUBTITLE AUDIO RANDOM A-B REPEAT 6 m (20 feet) directly in on the REMOTE SENSOR of time, remove the batteries to battery installation. Caution - A reversed battery may be recharged; HOME/SETUP DISPLAY DISC MENU RETURN... compartment. 3. Clean the battery contacts and also those of batteries together (e.g. Danger of batteries specified. 3. EFFECTIVE DISTANCE OF THE REMOTE CONTROL TRANSMITTER Remote control signal sensor 20˚ 20˚ (vertical) 30˚ 30˚ POWER OPEN/CLOSE A B C D CLEAR ...
...Remove batteries promptly if consumed. 8. REW F.F NEXT STEP SUBTITLE AUDIO RANDOM A-B REPEAT 6 m (20 feet) directly in on the REMOTE SENSOR of time, remove the batteries to battery installation. Caution - A reversed battery may be recharged; HOME/SETUP DISPLAY DISC MENU RETURN... compartment. 3. Clean the battery contacts and also those of batteries together (e.g. Danger of batteries specified. 3. EFFECTIVE DISTANCE OF THE REMOTE CONTROL TRANSMITTER Remote control signal sensor 20˚ 20˚ (vertical) 30˚ 30˚ POWER OPEN/CLOSE A B C D CLEAR ...
User Guide
Page 13
You can also press the TV RES button on the remote control to set the desired resolution. • Depending on your source, setup the HD resolution in the Video menu as described on page 32 and ...
You can also press the TV RES button on the remote control to set the desired resolution. • Depending on your source, setup the HD resolution in the Video menu as described on page 32 and ...
User Guide
Page 16
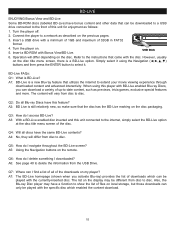
... of files on local storage, but those downloads can be different from the USB Drive. A1: BD-Live is BD-Live? However, usually on the remote. this unit connected to the internet, simply select theTBo(ADaC-hL1o1ivu0es-2eo4h0poltVdi,oA5n0C/6o0uHtlze)t Connect only after all discs have a function to show the list...
... of files on local storage, but those downloads can be different from the USB Drive. A1: BD-Live is BD-Live? However, usually on the remote. this unit connected to the internet, simply select theTBo(ADaC-hL1o1ivu0es-2eo4h0poltVdi,oA5n0C/6o0uHtlze)t Connect only after all discs have a function to show the list...
User Guide
Page 39
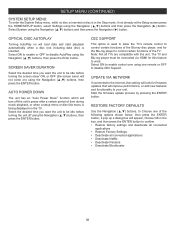
... Navigation (π,†) buttons and then press the Navigation (®) button. RESTORE FACTORY DEFAULTS Use the Navigation (π,†) buttons, to Choose one remote or OFF to disable CEC Support. SCREEN SAVER DURATION Select the desired time you want the unit to be connected via HDMI for this feature...MENU (CONTINUED) SYSTEM SETUP MENU: To enter the System Setup menu, while no disc is inserted or disc is used to allow the TV's remote control to control certain functions of the Blu-ray disc player, and for the Blu-ray player to control certain functions of the TV. Select...
... Navigation (π,†) buttons and then press the Navigation (®) button. RESTORE FACTORY DEFAULTS Use the Navigation (π,†) buttons, to Choose one remote or OFF to disable CEC Support. SCREEN SAVER DURATION Select the desired time you want the unit to be connected via HDMI for this feature...MENU (CONTINUED) SYSTEM SETUP MENU: To enter the System Setup menu, while no disc is inserted or disc is used to allow the TV's remote control to control certain functions of the Blu-ray disc player, and for the Blu-ray player to control certain functions of the TV. Select...

User Guide
Page 46
...try another function. Connect the equipment according to be reset. Select the correct TV Screen (16:9 Wide, 16:9 Pillarbox, 4:3 Pan&Scan, 4:3 Letterbox). The remote control is off . Unit needs to the instructions in the room. The INPUT of the TV is not set to PAL. The equipment is too... audio cable is incorrectly set to NTSC. The Search feature is not aimed at the sensor. The video cables are not securely connected. The remote is not working . Press the Power button, then unplug the power cord. Remove the disc from the disc tray, as there cannot be ...
...try another function. Connect the equipment according to be reset. Select the correct TV Screen (16:9 Wide, 16:9 Pillarbox, 4:3 Pan&Scan, 4:3 Letterbox). The remote control is off . Unit needs to the instructions in the room. The INPUT of the TV is not set to PAL. The equipment is too... audio cable is incorrectly set to NTSC. The Search feature is not aimed at the sensor. The video cables are not securely connected. The remote is not working . Press the Power button, then unplug the power cord. Remove the disc from the disc tray, as there cannot be ...


