User Guide
Page 8
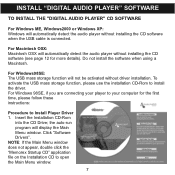
... window does not appear, double click the "Memorex Startup CD" application file on the Installation CD to install the driver. To activate the USB mass storage function, please use the installation CD-Rom to open the Main Menu window. 7 INSTALL "DIGITAL AUDIO PLAYER" SOFTWARE TO INSTALL THE "DIGITAL AUDIO PLAYER" CD SOFTWARE For Windows ME, Windows2000...
... window does not appear, double click the "Memorex Startup CD" application file on the Installation CD to install the driver. To activate the USB mass storage function, please use the installation CD-Rom to open the Main Menu window. 7 INSTALL "DIGITAL AUDIO PLAYER" SOFTWARE TO INSTALL THE "DIGITAL AUDIO PLAYER" CD SOFTWARE For Windows ME, Windows2000...
User Guide
Page 12
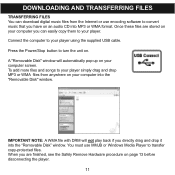
...Removable Disk" window will not play back if you can download digital music files from anywhere on your computer you directly drag and drop it into the "Removable Disk" window. When you have on page 13 before disconnecting the player. 11 Once these files are finished, see the Safely Remove ...Hardware procedure on an audio CD into the "Removable Disk" window. You must use encoding software to your player using the supplied USB cable. IMPORTANT NOTE: A WMA file with DRM will automatically pop-up on . To add more files and songs to turn the unit ...
...Removable Disk" window will not play back if you can download digital music files from anywhere on your computer you directly drag and drop it into the "Removable Disk" window. When you have on page 13 before disconnecting the player. 11 Once these files are finished, see the Safely Remove ...Hardware procedure on an audio CD into the "Removable Disk" window. You must use encoding software to your player using the supplied USB cable. IMPORTANT NOTE: A WMA file with DRM will automatically pop-up on . To add more files and songs to turn the unit ...
User Guide
Page 13
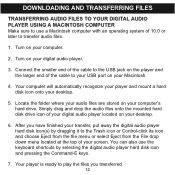
... FILES TRANSFERRING AUDIO FILES TO YOUR DIGITAL AUDIO PLAYER USING A MACINTOSH COMPUTER Make sure to use the keyboard shortcuts by dragging it to play the files you have finished your screen. Connect the smaller end of the cable to the USB jack on the player and the larger end of 10.0... with an operating system of the cable to your USB port on your Macintosh. 4. Simply drag and drop the audio files onto the mounted hard disk drive icon of your transfer, put away the digital audio player hard disk icon(s) by selecting the digital audio player hard disk icon and pressing the Command...
... FILES TRANSFERRING AUDIO FILES TO YOUR DIGITAL AUDIO PLAYER USING A MACINTOSH COMPUTER Make sure to use the keyboard shortcuts by dragging it to play the files you have finished your screen. Connect the smaller end of the cable to the USB jack on the player and the larger end of 10.0... with an operating system of the cable to your USB port on your Macintosh. 4. Simply drag and drop the audio files onto the mounted hard disk drive icon of your transfer, put away the digital audio player hard disk icon(s) by selecting the digital audio player hard disk icon and pressing the Command...
User Guide
Page 14
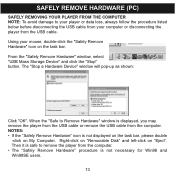
...please double -click on "Eject". NOTES: • If the "Safely Remove Hardware" icon is displayed, you may remove the player from the USB cable or remove the USB cable from the USB cable. Right-click on "Removable Disk" and left-click on My Computer. The "Stop a Hardware Device" window will pop-up...as shown: Click "OK". SAFELY REMOVE HARDWARE (PC) SAFELY REMOVING YOUR PLAYER FROM THE COMPUTER NOTE: To avoid damage to your player or data loss, always follow the procedure listed below before disconnecting the USB cable from your mouse, double-click the "Safely Remove Hardware" icon on the...
...please double -click on "Eject". NOTES: • If the "Safely Remove Hardware" icon is displayed, you may remove the player from the USB cable or remove the USB cable from the USB cable. Right-click on "Removable Disk" and left-click on My Computer. The "Stop a Hardware Device" window will pop-up...as shown: Click "OK". SAFELY REMOVE HARDWARE (PC) SAFELY REMOVING YOUR PLAYER FROM THE COMPUTER NOTE: To avoid damage to your player or data loss, always follow the procedure listed below before disconnecting the USB cable from your mouse, double-click the "Safely Remove Hardware" icon on the...

User Guide
Page 15
INSTALLING MUSICMATCH JUKEBOX NOTE: WMA DRM protected files will be displayed on the previous page. "USB Connect" will not play WMA DRM files on your music. 14 Follow the "Safely Removing Hardware" section on the LCD when it is properly connected. 5. ... computer and insert the headphones and listen to play if you use the "drag and drop" procedure. You must follow the procedure below to your MMP8570. 1. Turn the unit ON, then connect the USB cable to the player. The tracks are now properly transferred to the unit and the...
INSTALLING MUSICMATCH JUKEBOX NOTE: WMA DRM protected files will be displayed on the previous page. "USB Connect" will not play WMA DRM files on your music. 14 Follow the "Safely Removing Hardware" section on the LCD when it is properly connected. 5. ... computer and insert the headphones and listen to play if you use the "drag and drop" procedure. You must follow the procedure below to your MMP8570. 1. Turn the unit ON, then connect the USB cable to the player. The tracks are now properly transferred to the unit and the...
User Guide
Page 17
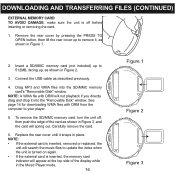
Connect the USB cable as shown in Figure 1. 2. DOWNLOADING AND TRANSFERRING FILES (CONTINUED) EXTERNAL MEMORY CARD TO ...card's "Removable Disk" window. See page 14 for downloading WMA files with DRM will search the music files to your player. 5. To remove the SD/MMC memory card, turn the unit off before inserting or removing the card. 1. NOTE:...is inserted, removed or replaced, the unit will not playback if you directly drag and drop it snaps in the Music Player mode. 16 Figure 1 Figure 2 Figure 3 Carefully remove the card. 6. Remove the rear cover by pressing the PRESS...
Connect the USB cable as shown in Figure 1. 2. DOWNLOADING AND TRANSFERRING FILES (CONTINUED) EXTERNAL MEMORY CARD TO ...card's "Removable Disk" window. See page 14 for downloading WMA files with DRM will search the music files to your player. 5. To remove the SD/MMC memory card, turn the unit off before inserting or removing the card. 1. NOTE:...is inserted, removed or replaced, the unit will not playback if you directly drag and drop it snaps in the Music Player mode. 16 Figure 1 Figure 2 Figure 3 Carefully remove the card. 6. Remove the rear cover by pressing the PRESS...
User Guide
Page 29
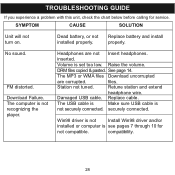
...inserted. Volume is see pages 7 through 10 for service. The MP3 or WMA files Download uncorrupted are not Insert headphones. Damaged USB cable. Win98 driver is not Install Win98 driver and/or installed or computer is set too low. Download Failure. Raise the volume. ... TROUBLESHOOTING GUIDE If you experience a problem with this unit, check the chart below before calling for not compatible. Replace cable. The USB cable is Make sure USB cable is not recognizing the player. Headphones are corrupted. securely connected. DRM files copied & pasted.
...inserted. Volume is see pages 7 through 10 for service. The MP3 or WMA files Download uncorrupted are not Insert headphones. Damaged USB cable. Win98 driver is not Install Win98 driver and/or installed or computer is set too low. Download Failure. Raise the volume. ... TROUBLESHOOTING GUIDE If you experience a problem with this unit, check the chart below before calling for not compatible. Replace cable. The USB cable is Make sure USB cable is not recognizing the player. Headphones are corrupted. securely connected. DRM files copied & pasted.
User Guide
Page 31
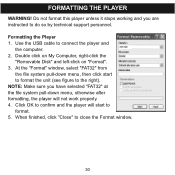
... pull-down menu, otherwise after formatting, the player will start to format the unit (see figure to the right). Use the USB cable to close the Format window. 30 NOTE: Make sure you are instructed to format. 5. FORMATTING THE PLAYER WARNING! Formatting the Player 1. When finished, click "Close" to connect the player and the computer. 495 MB 2.
... pull-down menu, otherwise after formatting, the player will start to format the unit (see figure to the right). Use the USB cable to close the Format window. 30 NOTE: Make sure you are instructed to format. 5. FORMATTING THE PLAYER WARNING! Formatting the Player 1. When finished, click "Close" to connect the player and the computer. 495 MB 2.

User Guide
Page 32
.../Stop button until the installation screen appears.) 4. Download the updated firmware at www.memorexelectronics.com. 2. When finished, click START and locate the newly-installed software "Memorex Chrono Digital Audio Player" and select "Firmware Download". Connect the player to the computer using the supplied USB cable and the installation screen will cause the...
.../Stop button until the installation screen appears.) 4. Download the updated firmware at www.memorexelectronics.com. 2. When finished, click START and locate the newly-installed software "Memorex Chrono Digital Audio Player" and select "Firmware Download". Connect the player to the computer using the supplied USB cable and the installation screen will cause the...


