Manual
Page 1
... Transferring Files 18 Using the Software 23 • Using the MyDJ Plug-In 23 • Using the MusicIP Mixer (Mac OS X). . . 25 • Using the MusicIP Mixer (Win XP) . . . . . 27 Safely Remove Hardware 30 Using an External Memory Card 31 Operation 32 • Turning the Power On/Off 32 • Lock Feature 32 • To Listen to the FM Radio 33 • To Add/Load Presets 34 • To Delete...
... Transferring Files 18 Using the Software 23 • Using the MyDJ Plug-In 23 • Using the MusicIP Mixer (Mac OS X). . . 25 • Using the MusicIP Mixer (Win XP) . . . . . 27 Safely Remove Hardware 30 Using an External Memory Card 31 Operation 32 • Turning the Power On/Off 32 • Lock Feature 32 • To Listen to the FM Radio 33 • To Add/Load Presets 34 • To Delete...
Manual
Page 57
... with the windows closed during walking or exercising will not affect the player. You should exercise extreme caution or discontinue use radio frequency energy. PRECAUTIONS COPYRIGHT: • Distributing copies of MP3, WMA with DRM or WAV tracks without permission is a violation of excessive heat. Changes or modifications to play your headset at a high volume while walking...
... with the windows closed during walking or exercising will not affect the player. You should exercise extreme caution or discontinue use radio frequency energy. PRECAUTIONS COPYRIGHT: • Distributing copies of MP3, WMA with DRM or WAV tracks without permission is a violation of excessive heat. Changes or modifications to play your headset at a high volume while walking...
Manual
Page 64
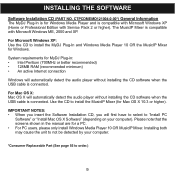
...; For PC users, please only install Windows Media Player 10 OR MusicIP Mixer. Use the CD to install the MyDJ Plug-In and Windows Media Player 10 OR the MusicIP Mixer for Windows Media Player and is compatible with Service Pack 2 or higher). The MusicIP Mixer is compatible with Microsoft Windows XP (Home or Professional Edition with Microsoft Windows ME, 2000 and XP. INSTALLING THE SOFTWARE Software Installation CD (PART NO. System requirements...
...; For PC users, please only install Windows Media Player 10 OR MusicIP Mixer. Use the CD to install the MyDJ Plug-In and Windows Media Player 10 OR the MusicIP Mixer for Windows Media Player and is compatible with Service Pack 2 or higher). The MusicIP Mixer is compatible with Microsoft Windows XP (Home or Professional Edition with Microsoft Windows ME, 2000 and XP. INSTALLING THE SOFTWARE Software Installation CD (PART NO. System requirements...
Manual
Page 72
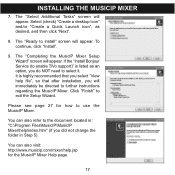
The "Ready to Install" screen will appear. If the "Install Bonjour Service (to the document located in: "C:\Program Files\MusicIP\MusicIP Mixer\help\index.htm" (if you did not change the folder in Step 5). Please see page 27 for the MusicIP Mixer Help page. 17 The "Select Additional Tasks" screen will appear. Click "Finish" to use the MusicIP Mixer. It is listed as desired...
The "Ready to Install" screen will appear. If the "Install Bonjour Service (to the document located in: "C:\Program Files\MusicIP\MusicIP Mixer\help\index.htm" (if you did not change the folder in Step 5). Please see page 27 for the MusicIP Mixer Help page. 17 The "Select Additional Tasks" screen will appear. Click "Finish" to use the MusicIP Mixer. It is listed as desired...
Manual
Page 73
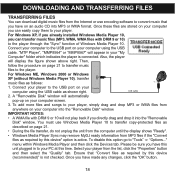
... "Removable Disk" window. For Windows XP, if you already installed Windows Media Player 10, you can transfer music files (MP3, WMA, WMA files with DRM 9 or 10 will display the figure shown above right. Connect your computer to the USB port on your computer into MP3 or WMA format. menu within Windows Media Player and then click the Devices tab. DOWNLOADING AND TRANSFERRING FILES TRANSFERRING FILES You can download digital music files from the Internet or use Windows Media Player 10 to transfer copy-protected files...
... "Removable Disk" window. For Windows XP, if you already installed Windows Media Player 10, you can transfer music files (MP3, WMA, WMA files with DRM 9 or 10 will display the figure shown above right. Connect your computer to the USB port on your computer into MP3 or WMA format. menu within Windows Media Player and then click the Devices tab. DOWNLOADING AND TRANSFERRING FILES TRANSFERRING FILES You can download digital music files from the Internet or use Windows Media Player 10 to transfer copy-protected files...
Manual
Page 74
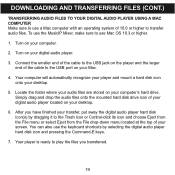
... play the files you have finished your screen. Simply drag and drop the audio files onto the mounted hard disk drive icon of 10.0 or higher to transfer audio files. Turn on your desktop. 5. To use the MusicIP Mixer, make sure to use a Mac computer with an operating system of your digital audio player located on your computer. 2. Your computer will automatically recognize your player and mount a hard disk icon onto your digital audio player. 3. Turn...
... play the files you have finished your screen. Simply drag and drop the audio files onto the mounted hard disk drive icon of 10.0 or higher to transfer audio files. Turn on your desktop. 5. To use the MusicIP Mixer, make sure to use a Mac computer with an operating system of your digital audio player located on your computer. 2. Your computer will automatically recognize your player and mount a hard disk icon onto your digital audio player. 3. Turn...
Manual
Page 75
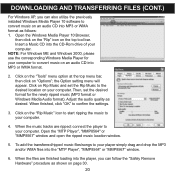
... the files are ripped; Open the "MTP Player", "MMP8564" or "MMP8567" window and open the ripped music location window. 5. Insert a Music CD into the "MTP Player", "MMP8564" or "MMP8567" window. 6. DOWNLOADING AND TRANSFERRING FILES (CONT.) For Windows XP, you can also utilize the previously installed Windows Media Player 10 software to convert music on an audio CD into the player, you can follow the "Safely Remove Hardware" procedure as desired. Then, set the Rip Music to confirm the settings. 3. Open the Windows Media Player...
... the files are ripped; Open the "MTP Player", "MMP8564" or "MMP8567" window and open the ripped music location window. 5. Insert a Music CD into the "MTP Player", "MMP8564" or "MMP8567" window. 6. DOWNLOADING AND TRANSFERRING FILES (CONT.) For Windows XP, you can also utilize the previously installed Windows Media Player 10 software to convert music on an audio CD into the player, you can follow the "Safely Remove Hardware" procedure as desired. Then, set the Rip Music to confirm the settings. 3. Open the Windows Media Player...
Manual
Page 76
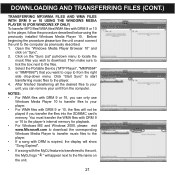
... "Sync List" pull-down menu. Then make sure to tick the box next to the player. 4. Click "Start Sync" to start transferring music files to the files. 3. DOWNLOADING AND TRANSFERRING FILES (CONT.) TRANSFERRING MP3/WMA FILES AND WMA FILES WITH DRM 9 or 10 USING THE WINDOWS MEDIA PLAYER 10 (FOR WINDOWS XP ONLY) To transfer MP3 files/WMA files/WMA files with DRM 9 or 10 to download. Before beginning the procedure please turn the unit on "Sync". 2. Select the Portable Device ("MTP Player", "MMP8564...
... "Sync List" pull-down menu. Then make sure to tick the box next to the player. 4. Click "Start Sync" to start transferring music files to the files. 3. DOWNLOADING AND TRANSFERRING FILES (CONT.) TRANSFERRING MP3/WMA FILES AND WMA FILES WITH DRM 9 or 10 USING THE WINDOWS MEDIA PLAYER 10 (FOR WINDOWS XP ONLY) To transfer MP3 files/WMA files/WMA files with DRM 9 or 10 to download. Before beginning the procedure please turn the unit on "Sync". 2. Select the Portable Device ("MTP Player", "MMP8564...

Manual
Page 77
There you can set up the specific synchronization for this unit automatically. 4. WMP 10 will be a new playlist which you can find in the Browse Music menu (under "Playlists"), using WMP (Windows Media Player) 10: 1. DOWNLOADING AND TRANSFERRING FILES (CONT.) CREATING A PLAYLIST USING WINDOWS MEDIA PLAYER 10 (FOR WINDOWS XP ONLY) Follow the steps below to create a playlist in the Browse Music menu (under "Playlists"). 22 Go to the USB port on your computer as shown on page...
There you can set up the specific synchronization for this unit automatically. 4. WMP 10 will be a new playlist which you can find in the Browse Music menu (under "Playlists"), using WMP (Windows Media Player) 10: 1. DOWNLOADING AND TRANSFERRING FILES (CONT.) CREATING A PLAYLIST USING WINDOWS MEDIA PLAYER 10 (FOR WINDOWS XP ONLY) Follow the steps below to create a playlist in the Browse Music menu (under "Playlists"). 22 Go to the USB port on your computer as shown on page...
Manual
Page 78
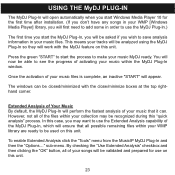
... remaining files within your WMP library are ready to make your music MyDJ ready. In this case, you may be used on this unit. USING THE MyDJ PLUG-IN The MyDJ Plug-In will open automatically when you start Windows Media Player 10 for use on this "quick analysis" process. Press the green "START" to start the process to be recognized during this unit. sub-menu. Extended...
... remaining files within your WMP library are ready to make your music MyDJ ready. In this case, you may be used on this unit. USING THE MyDJ PLUG-IN The MyDJ Plug-In will open automatically when you start Windows Media Player 10 for use on this "quick analysis" process. Press the green "START" to start the process to be recognized during this unit. sub-menu. Extended...
Manual
Page 86
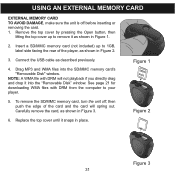
... NOTE: A WMA file with DRM from the computer to your player. To remove the SD/MMC memory card, turn the unit off before inserting or removing the card. 1. Remove the top cover by pressing the Open button, then lifting the top cover up to remove it snaps in Figure 3. Figure 1 sliadbeel 5. USING AN EXTERNAL MEMORY CARD EXTERNAL MEMORY CARD TO AVOID DAMAGE, make sure the unit...
... NOTE: A WMA file with DRM from the computer to your player. To remove the SD/MMC memory card, turn the unit off before inserting or removing the card. 1. Remove the top cover by pressing the Open button, then lifting the top cover up to remove it snaps in Figure 3. Figure 1 sliadbeel 5. USING AN EXTERNAL MEMORY CARD EXTERNAL MEMORY CARD TO AVOID DAMAGE, make sure the unit...
Manual
Page 87
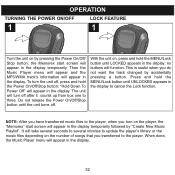
... have transferred music files to the player. Do not release the Power On/Off/Stop button until LOCKED appears in the display. 32 Press and hold the Power On/Off/Stop button; With the unit on, press and hold the MENU/Lock button until the unit turns off , press and hold the MENU/Lock button until UNLOCKED appears in the display temporarily followed by "Create New Music Playlist". the Memorex start screen will appear in the display temporarily. "Hold Down To Power...
... have transferred music files to the player. Do not release the Power On/Off/Stop button until LOCKED appears in the display. 32 Press and hold the Power On/Off/Stop button; With the unit on, press and hold the MENU/Lock button until the unit turns off , press and hold the MENU/Lock button until UNLOCKED appears in the display temporarily followed by "Create New Music Playlist". the Memorex start screen will appear in the display temporarily. "Hold Down To Power...

Manual
Page 88
... Menu/Lock button 1; When a station is broadcasting in stereo, "STEREO" will appear in the display. the unit will appear in . 3 41 1 2 1 Select a station by pressing the Power On/Off/Stop button; buttons 2 to select FM Tuner, then press the Navigation control 2; Then Preset 1 will appear. Push the Navigation control towards √/m or ®/l; Press the VOLUME +/- the Memorex start screen will automatically search for the first time...
... Menu/Lock button 1; When a station is broadcasting in stereo, "STEREO" will appear in the display. the unit will appear in . 3 41 1 2 1 Select a station by pressing the Power On/Off/Stop button; buttons 2 to select FM Tuner, then press the Navigation control 2; Then Preset 1 will appear. Push the Navigation control towards √/m or ®/l; Press the VOLUME +/- the Memorex start screen will automatically search for the first time...
Manual
Page 91
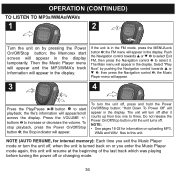
... last track which was playing before turning the power off or changing mode. 36 OPERATION (CONTINUED) TO LISTEN TO MP3s/WMAs/WAVs 1 2 1 2 Turn the unit on or you exit the Music Player mode or turn the unit off, when the unit is in the FM mode, press the MENU/Lock button ‚; the Memorex start playback; The Main menu will appear in the display. the FM menu will appear/scroll across...
... last track which was playing before turning the power off or changing mode. 36 OPERATION (CONTINUED) TO LISTEN TO MP3s/WMAs/WAVs 1 2 1 2 Turn the unit on or you exit the Music Player mode or turn the unit off, when the unit is in the FM mode, press the MENU/Lock button ‚; the Memorex start playback; The Main menu will appear in the display. the FM menu will appear/scroll across...
Manual
Page 92
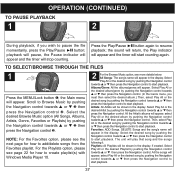
... press the Navigation control to start playback. All the songs will appear. Scroll to Browse Music by pushing the Navigation control towards v or w 2 then press the Navigation control 2. For the Playlists option, please see page 22 for how to create playlist(s) with Windows Media Player 10. 2 For the Browse Music option, see the next page for how to add/delete songs from the Favorites playlist. Albums/Genre: All...
... press the Navigation control to start playback. All the songs will appear. Scroll to Browse Music by pushing the Navigation control towards v or w 2 then press the Navigation control 2. For the Playlists option, please see page 22 for how to create playlist(s) with Windows Media Player 10. 2 For the Browse Music option, see the next page for how to add/delete songs from the Favorites playlist. Albums/Genre: All...
Manual
Page 93
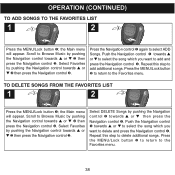
... the Navigation control 2. Scroll to add additional songs. Press the MENU/Lock button 2 to return to select ADD Songs. TO DELETE SONGS FROM THE FAVORITES LIST 1 1 2 2 2 1 Press the MENU/Lock button 1; Push the Navigation control 1 towards v or w to select the song which you want to the Favorites menu. Repeat this step to add and press the Navigation control 1. Press the MENU/Lock button 2 to return to delete and press the Navigation control 1. the Main menu will...
... the Navigation control 2. Scroll to add additional songs. Press the MENU/Lock button 2 to return to select ADD Songs. TO DELETE SONGS FROM THE FAVORITES LIST 1 1 2 2 2 1 Press the MENU/Lock button 1; Push the Navigation control 1 towards v or w to select the song which you want to the Favorites menu. Repeat this step to add and press the Navigation control 1. Press the MENU/Lock button 2 to return to delete and press the Navigation control 1. the Main menu will...
Manual
Page 95
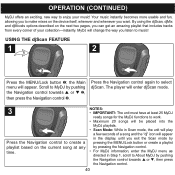
... functions to work. • Maximum 20 songs will be placed into the MyDJ playlists. • Scan Mode: While in Scan mode, the unit will play a few seconds of your music! The player will enter djScan mode. 3 Press the Navigation control to create a playlist based on the next two pages, you exit the Scan mode by pressing the MENU/Lock button or create a playlist by pressing the Navigation control. •...
... functions to work. • Maximum 20 songs will be placed into the MyDJ playlists. • Scan Mode: While in Scan mode, the unit will play a few seconds of your music! The player will enter djScan mode. 3 Press the Navigation control to create a playlist based on the next two pages, you exit the Scan mode by pressing the MENU/Lock button or create a playlist by pressing the Navigation control. •...
Manual
Page 98
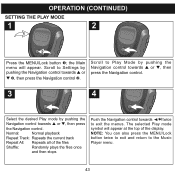
OPERATION (CONTINUED) SETTING THE PLAY MODE 1 2 1 2 Press the MENU/Lock button 1; The selected Play mode symbol will appear. Normal: Normal playback Repeat Track: Repeats the current track Repeat All: Repeats all of the display. NOTE: You can also press the MENU/Lock button twice to exit and return to Play Mode by pushing the Navigation control towards v or w, then press the Navigation control. 3 4 Select the desired Play mode by pushing the Navigation control towards v or w, then...
OPERATION (CONTINUED) SETTING THE PLAY MODE 1 2 1 2 Press the MENU/Lock button 1; The selected Play mode symbol will appear. Normal: Normal playback Repeat Track: Repeats the current track Repeat All: Repeats all of the display. NOTE: You can also press the MENU/Lock button twice to exit and return to Play Mode by pushing the Navigation control towards v or w, then press the Navigation control. 3 4 Select the desired Play mode by pushing the Navigation control towards v or w, then...
Manual
Page 105
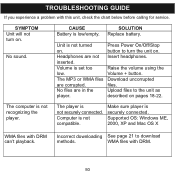
... files Download uncorrupted are not Insert headphones. Computer is not securely connected. WMA files with DRM can't playback. Supported OS: Windows ME, 2000, XP and Mac OS X WMA files with DRM. 50 Unit is not turned Press Power On/Off/Stop on . Headphones are corrupted. The player is not compatible. SYMPTOM Unit will not turn the unit on pages 18-22. Volume + button. Replace battery. TROUBLESHOOTING GUIDE If you experience a problem...
... files Download uncorrupted are not Insert headphones. Computer is not securely connected. WMA files with DRM can't playback. Supported OS: Windows ME, 2000, XP and Mac OS X WMA files with DRM. 50 Unit is not turned Press Power On/Off/Stop on . Headphones are corrupted. The player is not compatible. SYMPTOM Unit will not turn the unit on pages 18-22. Volume + button. Replace battery. TROUBLESHOOTING GUIDE If you experience a problem...
Manual
Page 108
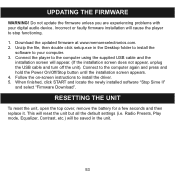
... reset the unit, open the top cover, remove the battery for a few seconds and then replace it. This will be saved in the Desktop folder to install the software to your digital audio device. Incorrect or faulty firmware installation will cause the player to the computer using the supplied USB cable and the installation screen will appear. (If the installation screen does not appear, unplug the USB cable and turn off the unit). Connect to install the driver...
... reset the unit, open the top cover, remove the battery for a few seconds and then replace it. This will be saved in the Desktop folder to install the software to your digital audio device. Incorrect or faulty firmware installation will cause the player to the computer using the supplied USB cable and the installation screen will appear. (If the installation screen does not appear, unplug the USB cable and turn off the unit). Connect to install the driver...


