User Guide
Page 2
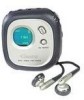
... unauthorized change or modification is made. 1 in a car with the windows closed during walking or exercising will not affect the player. PRECAUTIONS COPYRIGHT: • Distributing copies of MP3 or WMA tracks without permission is a violation of excessive heat. It may generate or use in the instruction manual. ROAD SAFETY: • Do not use headphones while driving, cycling or operating...
... unauthorized change or modification is made. 1 in a car with the windows closed during walking or exercising will not affect the player. PRECAUTIONS COPYRIGHT: • Distributing copies of MP3 or WMA tracks without permission is a violation of excessive heat. It may generate or use in the instruction manual. ROAD SAFETY: • Do not use headphones while driving, cycling or operating...
User Guide
Page 3
... Customer: Selecting fine audio equipment such as the unit you've just purchased is included for a lifetime. Since hearing damage from loud noise is often undetectable until you can maximize the fun and excitement your new sound equipment will help to consider how you to higher volumes of fun and enjoyment. Guard against this by playing it 's time...
... Customer: Selecting fine audio equipment such as the unit you've just purchased is included for a lifetime. Since hearing damage from loud noise is often undetectable until you can maximize the fun and excitement your new sound equipment will help to consider how you to higher volumes of fun and enjoyment. Guard against this by playing it 's time...
User Guide
Page 5
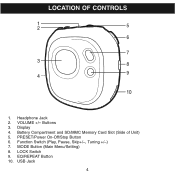
Buttons 3. USB Jack 4 LOCATION OF CONTROLS 1 2 5 6 7 3 8 4 9 10 1. LOCK Switch 9. Headphone Jack 2. Display 4. Battery Compartment and SD/MMC Memory Card Slot (Side of Unit) 5. Function Switch (Play, Pause, Skip+/-, Tuning +/-) 7. EQ/REPEAT Button 10. PRESET/Power On-Off/Stop Button 6. MODE Button (Main Menu/Setting) 8. VOLUME +/-
Buttons 3. USB Jack 4 LOCATION OF CONTROLS 1 2 5 6 7 3 8 4 9 10 1. LOCK Switch 9. Headphone Jack 2. Display 4. Battery Compartment and SD/MMC Memory Card Slot (Side of Unit) 5. Function Switch (Play, Pause, Skip+/-, Tuning +/-) 7. EQ/REPEAT Button 10. PRESET/Power On-Off/Stop Button 6. MODE Button (Main Menu/Setting) 8. VOLUME +/-

User Guide
Page 8
... install the software when using a Macintosh. NOTE: If the setup does not start to install the driver automatically. To activate the USB mass storage function, please use the installation CD-Rom to Install Player Driver 1. DOWNLOADING AND TRANSFERRING FILES TO INSTALL THE "DIGITAL AUDIO PLAYER" CD SOFTWARE For Windows98 or 98SE: The USB mass storage function will start , please run program will not be activated without installing the CD software when the USB cable is connected. But to Format the player, update...
... install the software when using a Macintosh. NOTE: If the setup does not start to install the driver automatically. To activate the USB mass storage function, please use the installation CD-Rom to Install Player Driver 1. DOWNLOADING AND TRANSFERRING FILES TO INSTALL THE "DIGITAL AUDIO PLAYER" CD SOFTWARE For Windows98 or 98SE: The USB mass storage function will start , please run program will not be activated without installing the CD software when the USB cable is connected. But to Format the player, update...
User Guide
Page 9
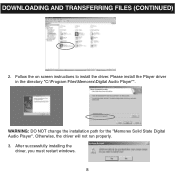
Otherwise, the driver will not run properly. 3. After successfully installing the driver, you must restart windows. 8 WARNING: DO NOT change the installation path for the "Memorex Solid State Digital Audio Player". Please install the Player driver in the directory "C:\Program Files\Memorex\Digital Audio Player"". DOWNLOADING AND TRANSFERRING FILES (CONTINUED) 2. Follow the on screen instructions to install the driver.
Otherwise, the driver will not run properly. 3. After successfully installing the driver, you must restart windows. 8 WARNING: DO NOT change the installation path for the "Memorex Solid State Digital Audio Player". Please install the Player driver in the directory "C:\Program Files\Memorex\Digital Audio Player"". DOWNLOADING AND TRANSFERRING FILES (CONTINUED) 2. Follow the on screen instructions to install the driver.
User Guide
Page 10
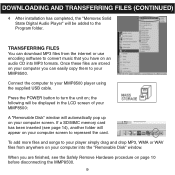
... card. To add more files and songs to your player simply drag and drop MP3, WMA or WAV files from the internet or use encoding software to convert music that you can download MP3 files from anywhere on your MMP8500 player using the supplied USB cable. DOWNLOADING AND TRANSFERRING FILES (CONTINUED) 4 After installation has completed, the "Memorex Solid State Digital Audio Player" will be displayed in the LCD screen of your MMP8500: A "Removable Disk" window will automatically pop...
... card. To add more files and songs to your player simply drag and drop MP3, WMA or WAV files from the internet or use encoding software to convert music that you can download MP3 files from anywhere on your MMP8500 player using the supplied USB cable. DOWNLOADING AND TRANSFERRING FILES (CONTINUED) 4 After installation has completed, the "Memorex Solid State Digital Audio Player" will be displayed in the LCD screen of your MMP8500: A "Removable Disk" window will automatically pop...
User Guide
Page 11
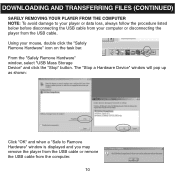
..." button. The "Stop a Hardware Device" window will pop up as shown: Click "OK" and when a "Safe to your player or data loss, always follow the procedure listed below before disconnecting the USB cable from your mouse, double click the "Safely Remove Hardware" icon on the task bar. Using your computer or disconnecting the player from the computer. 10 DOWNLOADING AND TRANSFERRING FILES (CONTINUED) SAFELY REMOVING...
..." button. The "Stop a Hardware Device" window will pop up as shown: Click "OK" and when a "Safe to your player or data loss, always follow the procedure listed below before disconnecting the USB cable from your mouse, double click the "Safely Remove Hardware" icon on the task bar. Using your computer or disconnecting the player from the computer. 10 DOWNLOADING AND TRANSFERRING FILES (CONTINUED) SAFELY REMOVING...

User Guide
Page 12
... remove the player from the USB cable or remove the USB cable from the computer. 11 Press the POWER button to remove and click the "Stop" button. TO SAFELY REMOVE YOUR PLAYER Double click the "Safe Removal" icon to display the "Unplug or Eject Hardware" window. From the Program menu, select "Memorex Solid State Digital Audio Player", and then click "Format"; Click "Start" on . Click "OK" and when a "Safe to Remove Hardware" window is formatted. DOWNLOADING AND TRANSFERRING FILES (CONTINUED) FORMATTING...
... remove the player from the USB cable or remove the USB cable from the computer. 11 Press the POWER button to remove and click the "Stop" button. TO SAFELY REMOVE YOUR PLAYER Double click the "Safe Removal" icon to display the "Unplug or Eject Hardware" window. From the Program menu, select "Memorex Solid State Digital Audio Player", and then click "Format"; Click "Start" on . Click "OK" and when a "Safe to Remove Hardware" window is formatted. DOWNLOADING AND TRANSFERRING FILES (CONTINUED) FORMATTING...
User Guide
Page 13
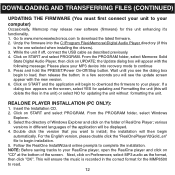
... load, then release the button; Press and hold the PRESET/Power On-Off/Stop button. the installation will appear with the new version. 6. select MP3 audio as described previously. 4. the Update dialog box will then begin installation. 5. in different languages of RealOne Player; various versions in a few seconds you want to install; DOWNLOADING AND TRANSFERRING FILES (CONTINUED) UPDATING THE FIRMWARE (You must first connect your unit to your MP3 device into the C:\Program Files\Memorex\Digital Audio Player...
... load, then release the button; Press and hold the PRESET/Power On-Off/Stop button. the installation will appear with the new version. 6. select MP3 audio as described previously. 4. the Update dialog box will then begin installation. 5. in different languages of RealOne Player; various versions in a few seconds you want to install; DOWNLOADING AND TRANSFERRING FILES (CONTINUED) UPDATING THE FIRMWARE (You must first connect your unit to your MP3 device into the C:\Program Files\Memorex\Digital Audio Player...

User Guide
Page 14
... the bottom menu bar to open another dialog box will appear on your screen, double click on the name of the computer. DOWNLOADING AND TRANSFERRING FILES (CONTINUED) INSTRUCTIONS FOR DOWNLOADING SONGS FROM THE COMPUTER USING REALONE SOFTWARE 1 Install the Real One Software. 2 When the unit is on, connect the USB cable to the player "Mass Storage" will be displayed on the LCD display for approximately three seconds. 3 To make sure...
... the bottom menu bar to open another dialog box will appear on your screen, double click on the name of the computer. DOWNLOADING AND TRANSFERRING FILES (CONTINUED) INSTRUCTIONS FOR DOWNLOADING SONGS FROM THE COMPUTER USING REALONE SOFTWARE 1 Install the Real One Software. 2 When the unit is on, connect the USB cable to the player "Mass Storage" will be displayed on the LCD display for approximately three seconds. 3 To make sure...
User Guide
Page 16
... the PRESET/Power button. Slide the LOCK switch to the Unlock (up) position to select the desired EQ setting: NORM (Normal), ROCK, UBAS (Ultra Bass), JAZZ, CLAS (Classical) or POP. TURNING THE POWER ON 1 OPERATION LOCK SWITCH 1 Turn the unit on while the LOCK switch is only available when playing MP3/WMA files. 15 To turn the power on by accidentally pressing a button. the Memorex start screen will exit EQ setting mode. Then, repeatedly press the EQ/REPEAT button...
... the PRESET/Power button. Slide the LOCK switch to the Unlock (up) position to select the desired EQ setting: NORM (Normal), ROCK, UBAS (Ultra Bass), JAZZ, CLAS (Classical) or POP. TURNING THE POWER ON 1 OPERATION LOCK SWITCH 1 Turn the unit on while the LOCK switch is only available when playing MP3/WMA files. 15 To turn the power on by accidentally pressing a button. the Memorex start screen will exit EQ setting mode. Then, repeatedly press the EQ/REPEAT button...
User Guide
Page 17
... on by pressing the PRESET/Power button; OPERATION (CONTINUED) TO LISTEN TO THE FM RADIO 1 2 23 1 Turn the unit on the next strongest station. the Main menu will appear in the display. Push and release the Function switch towards ‚ or ƒ for one second, then release; Press the MODE button ‚; the unit will not appear. the Memorex start screen will appear in the...
... on by pressing the PRESET/Power button; OPERATION (CONTINUED) TO LISTEN TO THE FM RADIO 1 2 23 1 Turn the unit on the next strongest station. the Main menu will appear in the display. Push and release the Function switch towards ‚ or ƒ for one second, then release; Press the MODE button ‚; the unit will not appear. the Memorex start screen will appear in the...
User Guide
Page 20
... been scanned into memory. OPERATION (CONTINUED) TO AUTOMATICALLY SET STATIONS INTO MEMORY 1 2 Make sure the PRESET indicator does not appear in the display. New FM Stations will automatically store the ten next strong stations into the memory, the memory will disappear. Press and hold the Function switch until "AUTO SCAN" appears in the display. The unit will overwrite previous presets. Select a preset number by pushing the Function switch towards ƒ...
... been scanned into memory. OPERATION (CONTINUED) TO AUTOMATICALLY SET STATIONS INTO MEMORY 1 2 Make sure the PRESET indicator does not appear in the display. New FM Stations will automatically store the ten next strong stations into the memory, the memory will disappear. Press and hold the Function switch until "AUTO SCAN" appears in the display. The unit will overwrite previous presets. Select a preset number by pushing the Function switch towards ƒ...

User Guide
Page 21
... the display. Then, repeatedly press the EQ/REPEAT button to decrease the volume. OPERATION (CONTINUED) TO LISTEN TO MP3s/WMAs 1 1 2 2 23 1 Turn the unit on by pressing the PRESET/Power button ‚; If the unit is selected, then press the Function switch „ to increase the volume or the VOLUME - Press the Function switch ‚ to the Play/Pause position to start screen will exit EQ setting mode. button ƒ...
... the display. Then, repeatedly press the EQ/REPEAT button to decrease the volume. OPERATION (CONTINUED) TO LISTEN TO MP3s/WMAs 1 1 2 2 23 1 Turn the unit on by pressing the PRESET/Power button ‚; If the unit is selected, then press the Function switch „ to increase the volume or the VOLUME - Press the Function switch ‚ to the Play/Pause position to start screen will exit EQ setting mode. button ƒ...

User Guide
Page 24
... Mode indicator disappears. 2 To repeat all files, press the EQ/REPEAT button twice while playing a file; " 1 " will appear in the display. Press the Skip/Search ƒ or „ button to repeat. REPEAT PLAYBACK OF ALL FILES 1 The specific track you wish to select the specific track that you selected will be repeated continuously. All tracks on the disc will be repeated continuously. OPERATION (CONTINUED) REPEAT PLAYBACK OF A FILE 1 23 2 1 To repeat a single file...
... Mode indicator disappears. 2 To repeat all files, press the EQ/REPEAT button twice while playing a file; " 1 " will appear in the display. Press the Skip/Search ƒ or „ button to repeat. REPEAT PLAYBACK OF ALL FILES 1 The specific track you wish to select the specific track that you selected will be repeated continuously. All tracks on the disc will be repeated continuously. OPERATION (CONTINUED) REPEAT PLAYBACK OF A FILE 1 23 2 1 To repeat a single file...

User Guide
Page 26
... Stop watch . • To turn off the unit or change the unit back to turn off MP3/WMA playback when in the display temporarily. Press the Function switch to stop watch mode, you need to MP3 mode. 25 Press the Function switch to "00:00:000". OPERATION (CONTINUED) USING THE STOP WATCH 1 2 23 1 Turn the unit on by pressing the PRESET/Power button; Press the MODE button ‚;
... Stop watch . • To turn off the unit or change the unit back to turn off MP3/WMA playback when in the display temporarily. Press the Function switch to stop watch mode, you need to MP3 mode. 25 Press the Function switch to "00:00:000". OPERATION (CONTINUED) USING THE STOP WATCH 1 2 23 1 Turn the unit on by pressing the PRESET/Power button; Press the MODE button ‚;
User Guide
Page 27
...: Set the time the backlight will appear when playing a file. When the desired setting is done, push the Function switch ‚ again to select the setting; Adjust the setting by pushing the Function switch towards ƒ or „. CONTRAST: Adjust the contrast. the respective menu will appear. EQUALIZER: Select the EQ setting. OPERATION (CONTINUED) TO CHANGE THE SETTINGS 1 2 2 1 Press and hold the MODE button until the Setting menu appears...
...: Set the time the backlight will appear when playing a file. When the desired setting is done, push the Function switch ‚ again to select the setting; Adjust the setting by pushing the Function switch towards ƒ or „. CONTRAST: Adjust the contrast. the respective menu will appear. EQUALIZER: Select the EQ setting. OPERATION (CONTINUED) TO CHANGE THE SETTINGS 1 2 2 1 Press and hold the MODE button until the Setting menu appears...
User Guide
Page 28
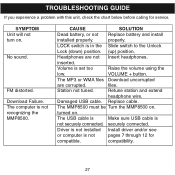
... compatible. files. SYMPTOM Unit will not turn on . FM distorted. Replace cable. The USB cable is Make sure USB cable is set too Raise the volume using the low. The MP3 or WMA files Download uncorrupted are not Insert headphones. Download Failure. The computer is in the Slide switch to the Unlock Lock (down) position. (up) position. properly. LOCK switch is not recognizing the MMP8500. Station not tuned. The MMP8500 must be Turn the MMP8500 on. securely connected. Driver...
... compatible. files. SYMPTOM Unit will not turn on . FM distorted. Replace cable. The USB cable is Make sure USB cable is set too Raise the volume using the low. The MP3 or WMA files Download uncorrupted are not Insert headphones. Download Failure. The computer is in the Slide switch to the Unlock Lock (down) position. (up) position. properly. LOCK switch is not recognizing the MMP8500. Station not tuned. The MMP8500 must be Turn the MMP8500 on. securely connected. Driver...
User Guide
Page 29
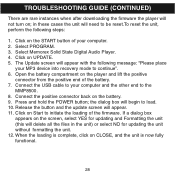
... on UPDATE. 5. Connect the positive connector back on Start to initiate the loading of the firmware. Press and hold the POWER button; Select Memorex Solid State Digital Audio Player. 4. Click on the battery. 9. TROUBLESHOOTING GUIDE (CONTINUED) There are rare instances when after downloading the firmware the player will not turn on the player and lift the positive connector from the positive end of the battery. 7. Select PROGRAM. 3. Release the button and the update screen will need...
... on UPDATE. 5. Connect the positive connector back on Start to initiate the loading of the firmware. Press and hold the POWER button; Select Memorex Solid State Digital Audio Player. 4. Click on the battery. 9. TROUBLESHOOTING GUIDE (CONTINUED) There are rare instances when after downloading the firmware the player will not turn on the player and lift the positive connector from the positive end of the battery. 7. Select PROGRAM. 3. Release the button and the update screen will need...
User Guide
Page 30
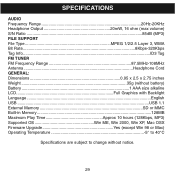
... inches Weight 35g (without battery) Battery 1 AAA size alkaline LCD Full Graphics with Backlight Language ...English USB ...USB 1.1 External Memory SD or MMC Built-in Memory...128MB Maximum Play Time Approx 10 hours (128Kbps, MP3) Supported OS Win ME, Win 2000, Win XP, Mac OSX Firmware Upgrade Yes (except Win 98 or Mac) Operating Temperature 5° to 40°C Specifications are subject to change without notice. 29
... inches Weight 35g (without battery) Battery 1 AAA size alkaline LCD Full Graphics with Backlight Language ...English USB ...USB 1.1 External Memory SD or MMC Built-in Memory...128MB Maximum Play Time Approx 10 hours (128Kbps, MP3) Supported OS Win ME, Win 2000, Win XP, Mac OSX Firmware Upgrade Yes (except Win 98 or Mac) Operating Temperature 5° to 40°C Specifications are subject to change without notice. 29


