
User Guide
Page 2
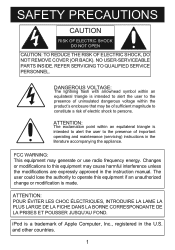
...the literature accompanying the appliance. iPod is intended to alert the user to the presence of uninsulated dangerous voltage within an equilateral triangle is made...user could lose the authority to operate this equipment if an unauthorized change or modification is intended to alert the user to this equipment may generate or use radio frequency energy. NO USER-SERVICEABLE PARTS INSIDE. REFER SERVICING TO QUALIFIED SERVICE PERSONNEL. Changes or modifications to the presence of important operating and maintenance (servicing) instructions in the instruction manual...
...the literature accompanying the appliance. iPod is intended to alert the user to the presence of uninsulated dangerous voltage within an equilateral triangle is made...user could lose the authority to operate this equipment if an unauthorized change or modification is intended to alert the user to this equipment may generate or use radio frequency energy. NO USER-SERVICEABLE PARTS INSIDE. REFER SERVICING TO QUALIFIED SERVICE PERSONNEL. Changes or modifications to the presence of important operating and maintenance (servicing) instructions in the instruction manual...
User Guide
Page 3
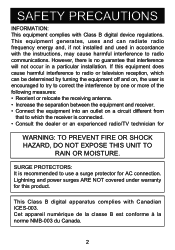
.... 2 However, there is connected. • Consult the dealer or an experienced radio/TV technician for this equipment does cause harmful interference to radio or television reception, which can radiate radio frequency energy and, if not installed and used in a particular installation. This equipment generates, uses and can be determined by turning the equipment off and on, the user is encouraged to...
.... 2 However, there is connected. • Consult the dealer or an experienced radio/TV technician for this equipment does cause harmful interference to radio or television reception, which can radiate radio frequency energy and, if not installed and used in a particular installation. This equipment generates, uses and can be determined by turning the equipment off and on, the user is encouraged to...
User Guide
Page 4
... EST. 1924 S SO C I A TIO Sound can actually be deceiving. Over time your hearing adapts. This list of sound levels is included for a lifetime. Since hearing damage from traffic Light traffic, normal conversation, quiet office Air conditioner at 20 feet, sewing machine Vacuum cleaner, hair dryer, noisy restaurant Average city traffic, garbage disposals, alarm clock at two feet THE...
... EST. 1924 S SO C I A TIO Sound can actually be deceiving. Over time your hearing adapts. This list of sound levels is included for a lifetime. Since hearing damage from traffic Light traffic, normal conversation, quiet office Air conditioner at 20 feet, sewing machine Vacuum cleaner, hair dryer, noisy restaurant Average city traffic, garbage disposals, alarm clock at two feet THE...
User Guide
Page 5
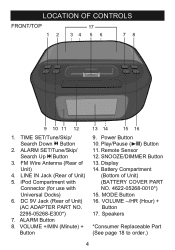
Power Button 10. MODE Button 16. TIME SET/Tune/Skip/ Search Down o Button 2. ALARM SET/Tune/Skip/ Search Up n Button 3. Play/Pause (®p) Button 11. Display 14. iPod Compartment with Connector (for use with Universal Docks) 6. ALARM Button 8. Remote Sensor 12. LINE IN Jack (Rear of Unit) (AC Adapter Part No. 2295-05268-E300*) 7. LOCATION OF CONTROLS FRONT/TOP 17 1 2 34 5 6 78 9 10 11 12 1. DC 9V Jack (Rear of Unit) 5. Volume +/MIN (Minute) + Button 13 14 15...
Power Button 10. MODE Button 16. TIME SET/Tune/Skip/ Search Down o Button 2. ALARM SET/Tune/Skip/ Search Up n Button 3. Play/Pause (®p) Button 11. Display 14. iPod Compartment with Connector (for use with Universal Docks) 6. ALARM Button 8. Remote Sensor 12. LINE IN Jack (Rear of Unit) (AC Adapter Part No. 2295-05268-E300*) 7. LOCATION OF CONTROLS FRONT/TOP 17 1 2 34 5 6 78 9 10 11 12 1. DC 9V Jack (Rear of Unit) 5. Volume +/MIN (Minute) + Button 13 14 15...
User Guide
Page 6
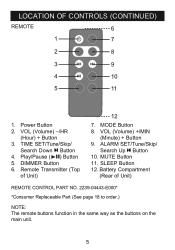
... 1. Power Button 2. TIME SET/Tune/Skip/ Search Down o Button 4. Play/Pause (®p) Button 5. SLEEP Button 12. VOL (Volume) -/HR (Hour) + Button 3. ALARM SET/Tune/Skip/ Search Up n Button 10. Remote Transmitter (Top of Unit) Remote control Part No. 2239-04443-E000* *Consumer Replaceable Part (See page 18 to order.) NOTE: The remote buttons function in the same way as the buttons on the main unit. 5 MUTE Button 11. VOL (Volume) +/MIN (Minute) + Button 9. MODE Button 8. Battery Compartment (Rear of Unit) 12 7. DIMMER Button 6.
... 1. Power Button 2. TIME SET/Tune/Skip/ Search Down o Button 4. Play/Pause (®p) Button 5. SLEEP Button 12. VOL (Volume) -/HR (Hour) + Button 3. ALARM SET/Tune/Skip/ Search Up n Button 10. Remote Transmitter (Top of Unit) Remote control Part No. 2239-04443-E000* *Consumer Replaceable Part (See page 18 to order.) NOTE: The remote buttons function in the same way as the buttons on the main unit. 5 MUTE Button 11. VOL (Volume) +/MIN (Minute) + Button 9. MODE Button 8. Battery Compartment (Rear of Unit) 12 7. DIMMER Button 6.
User Guide
Page 7
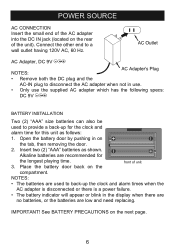
... plug to disconnect the AC adapter when not in use. • Only use the supplied AC adapter which has the following specs: DC 9V Z BATTERY INSTALLATION Two (2) "AAA" size batteries can also be used to back-up for the clock and alarm time for the longest playing time. IMPORTANT! Connect the other end to provide a back-up the clock and alarm times when the AC adapter is disconnected or there is a power...
... plug to disconnect the AC adapter when not in use. • Only use the supplied AC adapter which has the following specs: DC 9V Z BATTERY INSTALLATION Two (2) "AAA" size batteries can also be used to back-up for the clock and alarm time for the longest playing time. IMPORTANT! Connect the other end to provide a back-up the clock and alarm times when the AC adapter is disconnected or there is a power...
User Guide
Page 8
... indicated in the display. CR 2 0 2 5 2. BATTERY PRECAUTIONS Follow these precautions when using the Power button, and turn on using batteries in the display. To listen to be heard through the back of explosion if battery is connected, this unit. "LINE IN" will appear in the Battery Compartment. Replace only with fresh ones. 5. A reversed battery may cause damage to select LINE IN mode; Repeatedly press the MODE button to the device...
... indicated in the display. CR 2 0 2 5 2. BATTERY PRECAUTIONS Follow these precautions when using the Power button, and turn on using batteries in the display. To listen to be heard through the back of explosion if battery is connected, this unit. "LINE IN" will appear in the Battery Compartment. Replace only with fresh ones. 5. A reversed battery may cause damage to select LINE IN mode; Repeatedly press the MODE button to the device...
User Guide
Page 9
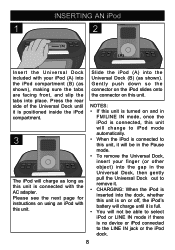
... unit is turned on or off, the iPod's battery will charge until it is connected with the AC adapter. INSERTING AN iPod 1 2 (B) (A) (A) (B) Insert the Universal Dock included with your finger (or other object) into the gap in the Pause mode. • To remove the Universal Dock, insert your iPod (A) into the iPod compartment (B) (as shown). Please see the next page for instructions on...
... unit is turned on or off, the iPod's battery will charge until it is connected with the AC adapter. INSERTING AN iPod 1 2 (B) (A) (A) (B) Insert the Universal Dock included with your finger (or other object) into the gap in the Pause mode. • To remove the Universal Dock, insert your iPod (A) into the iPod compartment (B) (as shown). Please see the next page for instructions on...
User Guide
Page 10
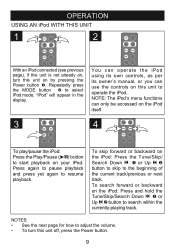
.... OPERATION USING AN iPod WITH THIS UNIT 1 1 2 2 With an iPod connected (see previous page), if this unit is not already on, turn this unit off, press the Power button. 9 Repeatedly press the MODE button 2 to resume playback. You can operate the iPod using its own controls, as per its owner's manual, or you can only be accessed on the iPod itself. 3 4 1 2 To play/pause the iPod: Press the Play/Pause (®p) button...
.... OPERATION USING AN iPod WITH THIS UNIT 1 1 2 2 With an iPod connected (see previous page), if this unit is not already on, turn this unit off, press the Power button. 9 Repeatedly press the MODE button 2 to resume playback. You can operate the iPod using its own controls, as per its owner's manual, or you can only be accessed on the iPod itself. 3 4 1 2 To play/pause the iPod: Press the Play/Pause (®p) button...
User Guide
Page 11
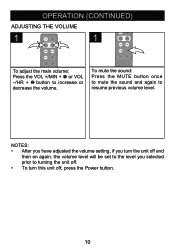
OPERATION (CONTINUED) ADJUSTING THE VOLUME 1 1 2 1 To adjust the main volume: Press the VOL +/MIN + 1 or VOL -/HR + 2 button to resume previous volume level. To mute the sound: Press the MUTE button once to mute the sound and again to increase or decrease the volume. NOTES: • After you have adjusted the volume setting, if you turn the unit off and then on again, the volume level will be set to the level you selected prior to turning the unit off. • To turn this unit off, press the Power button. 10
OPERATION (CONTINUED) ADJUSTING THE VOLUME 1 1 2 1 To adjust the main volume: Press the VOL +/MIN + 1 or VOL -/HR + 2 button to resume previous volume level. To mute the sound: Press the MUTE button once to mute the sound and again to increase or decrease the volume. NOTES: • After you have adjusted the volume setting, if you turn the unit off and then on again, the volume level will be set to the level you selected prior to turning the unit off. • To turn this unit off, press the Power button. 10
User Guide
Page 12
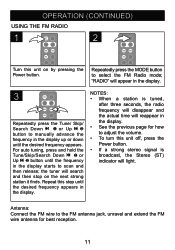
... reception. 11 Antenna: Connect the FM wire to the FM antenna jack, unravel and extend the FM wire antenna for how to select the FM Radio mode; For auto tuning, press and hold the Tune/Skip/Search Down o 1 or Up n 2 button until the desired frequency appears. Repeatedly press the MODE button to adjust the volume. • To turn this unit off, press the Power button. • If a strong stereo...
... reception. 11 Antenna: Connect the FM wire to the FM antenna jack, unravel and extend the FM wire antenna for how to select the FM Radio mode; For auto tuning, press and hold the Tune/Skip/Search Down o 1 or Up n 2 button until the desired frequency appears. Repeatedly press the MODE button to adjust the volume. • To turn this unit off, press the Power button. • If a strong stereo...
User Guide
Page 13
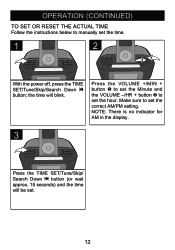
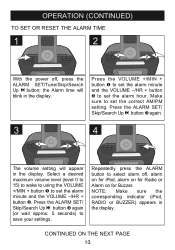
the time will be set the hour. Make sure to set . 12 NOTE: There is no indicator for AM in the display. 3 Press the TIME SET/Tune/Skip/ Search Down o button (or wait approx. 15 seconds) and the time will blink. Press the Volume +/MIN + button 1 to set the Minute and the Volume -/HR + button 2 to set the time. 1 2 21 With the power off, press the TIME SET/Tune/Skip/Search Down o button; OPERATION (CONTINUED) TO SET OR RESET THE ACTUAL TIME Follow the instructions below to manually set the correct AM/PM setting.
the time will be set the hour. Make sure to set . 12 NOTE: There is no indicator for AM in the display. 3 Press the TIME SET/Tune/Skip/ Search Down o button (or wait approx. 15 seconds) and the time will blink. Press the Volume +/MIN + button 1 to set the Minute and the Volume -/HR + button 2 to set the time. 1 2 21 With the power off, press the TIME SET/Tune/Skip/Search Down o button; OPERATION (CONTINUED) TO SET OR RESET THE ACTUAL TIME Follow the instructions below to manually set the correct AM/PM setting.
User Guide
Page 14
... volume setting will blink in the display. Repeatedly press the ALARM button to set the alarm hour. CONTINUED ON THE NEXT PAGE 13 OPERATION (CONTINUED) TO SET OR RESET THE ALARM TIME 1 2 3 21 With the power off , alarm on for iPod, alarm on for Radio or Alarm on for Buzzer. Select a desired maximum volume level (level 0 to 15) to wake to using the Volume +/MIN + button 1 to select alarm off , press the ALARM SET/Tune/Skip/Search Up n button; Make sure to save...
... volume setting will blink in the display. Repeatedly press the ALARM button to set the alarm hour. CONTINUED ON THE NEXT PAGE 13 OPERATION (CONTINUED) TO SET OR RESET THE ALARM TIME 1 2 3 21 With the power off , alarm on for iPod, alarm on for Radio or Alarm on for Buzzer. Select a desired maximum volume level (level 0 to 15) to wake to using the Volume +/MIN + button 1 to select alarm off , press the ALARM SET/Tune/Skip/Search Up n button; Make sure to save...
User Guide
Page 15
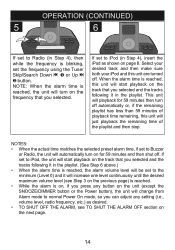
... reached, the alarm volume level will be set to the minimum (Level 0) and it will automatically turn on for 59 minutes then turn on page 8. OPERATION (CONTINUED) 5 6 1 2 If set to normal Power On mode, so you can adjust any button on the unit (except the SNOOZE/DIMMER button or the Power button), the unit will change from Alarm mode to Radio (in Step 4), then while the frequency is blinking, set to iPod, the unit...
... reached, the alarm volume level will be set to the minimum (Level 0) and it will automatically turn on for 59 minutes then turn on page 8. OPERATION (CONTINUED) 5 6 1 2 If set to normal Power On mode, so you can adjust any button on the unit (except the SNOOZE/DIMMER button or the Power button), the unit will change from Alarm mode to Radio (in Step 4), then while the frequency is blinking, set to iPod, the unit...
User Guide
Page 16
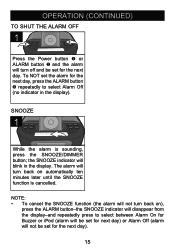
... the ALARM button-the SNOOZE indicator will disappear from the display-and repeatedly press to select between Alarm On for Buzzer or iPod (alarm will be set for next day) or Alarm Off (alarm will not be set the alarm for the next day, press the ALARM button 2 repeatedly to select Alarm Off (no indicator in the display. the SNOOZE indicator will turn back on automatically ten minutes later until the SNOOZE function is sounding, press the SNOOZE/DIMMER button; SNOOZE...
... the ALARM button-the SNOOZE indicator will disappear from the display-and repeatedly press to select between Alarm On for Buzzer or iPod (alarm will be set for next day) or Alarm Off (alarm will not be set the alarm for the next day, press the ALARM button 2 repeatedly to select Alarm Off (no indicator in the display. the SNOOZE indicator will turn back on automatically ten minutes later until the SNOOZE function is sounding, press the SNOOZE/DIMMER button; SNOOZE...
User Guide
Page 17
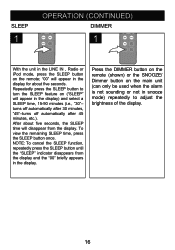
... SNOOZE/ Dimmer button on the remote; Repeatedly press the SLEEP button to adjust the brightness of the display. 16 SLEEP 1 OPERATION (CONTINUED) DIMMER 1 With the unit in the LINE IN , Radio or iPod mode, press the SLEEP button on the main unit (can only be used when the alarm is not sounding or not in snooze mode) repeatedly to turn the SLEEP feature on ("SLEEP" will appear in the display for about five seconds, the SLEEP time will disappear from the display...
... SNOOZE/ Dimmer button on the remote; Repeatedly press the SLEEP button to adjust the brightness of the display. 16 SLEEP 1 OPERATION (CONTINUED) DIMMER 1 With the unit in the LINE IN , Radio or iPod mode, press the SLEEP button on the main unit (can only be used when the alarm is not sounding or not in snooze mode) repeatedly to turn the SLEEP feature on ("SLEEP" will appear in the display for about five seconds, the SLEEP time will disappear from the display...
User Guide
Page 18
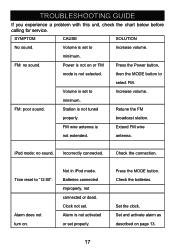
... set to Increase volume. Station is Extend FM wire not extended. Time reset to select FM. Press the MODE button. Set and activate alarm as described on . TROUBLESHOOTING GUIDE If you experience a problem with this unit, check the chart below before calling for service. Power is not on or FM Press the Power button, mode is set . FM: poor sound. Incorrectly connected. iPod mode: no sound. Clock not set to Increase volume. Volume is not selected. Set the clock...
... set to Increase volume. Station is Extend FM wire not extended. Time reset to select FM. Press the MODE button. Set and activate alarm as described on . TROUBLESHOOTING GUIDE If you experience a problem with this unit, check the chart below before calling for service. Power is not on or FM Press the Power button, mode is set . FM: poor sound. Incorrectly connected. iPod mode: no sound. Clock not set to Increase volume. Volume is not selected. Set the clock...
User Guide
Page 19
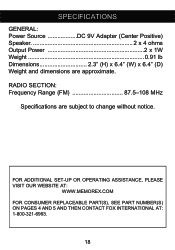
RADIO SECTION: Frequency Range (FM 87.5-108 MHz Specifications are approximate. SPECIFICATIONS GENERAL: Power Source DC 9V Adapter (Center Positive) Speaker 2 x 4 ohms Output Power 2 x 1W Weight 0.91 lb Dimensions 2.3" (H) x 6.4" (W) x 6.4" (D) Weight and dimensions are subject to change without notice. For additional set-up or operating assistance, please visit our WEBSITE at: WWW.MEMOREX.COM FOR CONSUMER REPLACEABLE PART(S), SEE PART NUMBER(S) ON PAGES 4 AND 5 AND THEN CONTACT FOX INTERNATIONAL AT: 1-800-321-6993. 18
RADIO SECTION: Frequency Range (FM 87.5-108 MHz Specifications are approximate. SPECIFICATIONS GENERAL: Power Source DC 9V Adapter (Center Positive) Speaker 2 x 4 ohms Output Power 2 x 1W Weight 0.91 lb Dimensions 2.3" (H) x 6.4" (W) x 6.4" (D) Weight and dimensions are subject to change without notice. For additional set-up or operating assistance, please visit our WEBSITE at: WWW.MEMOREX.COM FOR CONSUMER REPLACEABLE PART(S), SEE PART NUMBER(S) ON PAGES 4 AND 5 AND THEN CONTACT FOX INTERNATIONAL AT: 1-800-321-6993. 18


