
Memorex MI4290 Support Question
Memorex MI4290 Support Question
Find answers below for this question about Memorex MI4290.Need a Memorex MI4290 manual? We have 1 online manual for this item!
Question posted by LJKaldeck on September 17th, 2017
I Need A Larger Font Manual For My New Memorex Clock-radio
I need a larger font manual for my new Memorex model MC6306BKA clock-radio. The manual that came with the product requires me to use a powerful magnifying glass to read it.
Current Answers
Answer #1: Posted by waelsaidani1 on September 20th, 2017 10:08 PM
waelsaidani1

Member since:
May 12th, 2013 Points: 19,501,787

Member since:
May 12th, 2013 Points: 19,501,787
Hello the manual is here, you enlarge it before printing. http://memorexsupport.com/wp-content/uploads/2015/09/Mi4290P_Manual.pdf
Related Memorex MI4290 Manual Pages
User Guide - Page 1
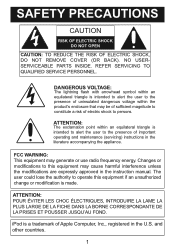
...64257;cation is intended to alert the user to the presence of Apple Computer, Inc., registered in the instruction manual. ATTENTION: POUR ÉVITER LES CHOC ÉLECTRIQUES, INTRODUIRE LA LAME LA PLUS LARGE DE LA FICHE ... to persons. DANGEROUS VOLTAGE:
The lightning flash with arrowhead symbol within the product's enclosure that may generate or use radio frequency energy.
User Guide - Page 2
... on a circuit different from
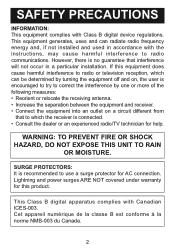
that interference will not occur in accordance with the instructions, may cause harmful interference to radio communications.
If this product.
SAFETY PRECAUTIONS
INFORMATION: This equipment complies with Canadian ICES-003. However, there is recommended to use a surge protector for this equipment does cause harmful interference to which can radiate...
User Guide - Page 3
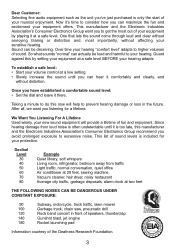
.... To establish a safe level: • Start your new sound equipment will help to excessive noise. We Want You Listening For A Lifetime Used wisely, your volume control at two feet
THE FOLLOWING NOISES...feet, sewing machine Vacuum cleaner, hair dryer, noisy restaurant Average city traffic, garbage disposals, alarm clock at a low setting. • Slowly increase the sound until it is too late,...
User Guide - Page 4
...
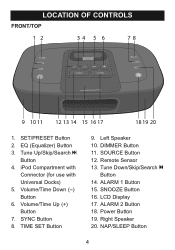
Connector (for use with Universal Docks) 5. Left Speaker 10. ALARM 1 Button 15.... Tune Up/Skip/Search n
Button 4. Volume/Time Down (-) Button 6. Volume/Time Up (+) Button 7. Right Speaker 20. LOCATION OF CONTROLS
FRONT/TOP
12
34 5 6
78
ALARM1
ALARM2
9 10 11 12 13 14 15 16 17
1819 20
1. TIME SET Button
9. Remote Sensor 13. LCD Display 17. Power...
User Guide - Page 6
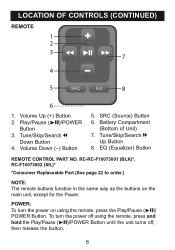
..., press and hold the Play/Pause (®p)/POWER Button until the unit turns off using the remote, press the Play/Pause (®p)/ POWER Button. Tune/Skip/Search m
Down Button 4. Play/Pause (®p)/POWER
Button 3. SRC (Source) Button 6. To turn the power on the main unit, except for the Power. Tune/Skip/Search l
Up Button 8.
Battery Compartment...
User Guide - Page 7
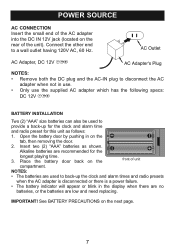
...pushing in the display when there are no
batteries, or the batteries are low and need replacing.
NOTES:
• The batteries are recommended for this unit as shown. ... the next page.
7 Alkaline batteries are used to
provide a back-up the clock and alarm times and radio presets
when the AC adapter is disconnected or there is a power failure.
• The battery indicator will ...
User Guide - Page 8
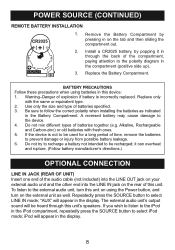
...this unit on using batteries in the display.
8 BATTERY PRECAUTIONS Follow these precautions when using the Power button, and turn on the tab and then sliding the compartment out. Use only the size...injury from possible battery leakage. 6. Do not try to recharge a battery not intended to be used for a long period of batteries specified. 3. iPod will appear in this unit's speakers. it...
User Guide - Page 9
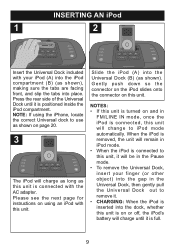
... this unit is connected with your finger (or other object) into the gap in the Universal Dock, then gently pull the Universal Dock out to use as shown on page 20.
3
ALARM1
ALARM2
The iPod will charge until it . • CHARGING: When the iPod is inserted into the dock, whether this...
User Guide - Page 10
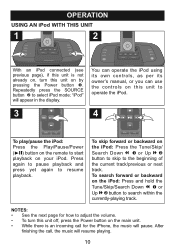
...operate the iPod using its own controls, as per its owner's manual, or you can use the controls on this unit to operate the iPod.
3
41
2
To play/pause the iPod: Press the Play/Pause/Power (®p) ... After
finishing the call for how to adjust the volume. • To turn this unit off, press the Power button on the main unit. • While there is not already on, turn this unit on the iPod...
User Guide - Page 11
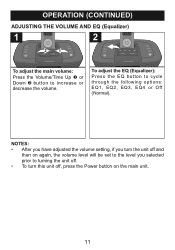
... or Off (Normal). To adjust the EQ (Equalizer): Press the EQ button to turning the unit off. • To turn this unit off, press the Power button on the main unit.
11
OPERATION (CONTINUED)
ADJUSTING THE VOLUME AND EQ (Equalizer)
1
2
2
ALARM1
1
ALARM2
ALARM1
ALARM2
To adjust the main volume: Press the...
User Guide - Page 12
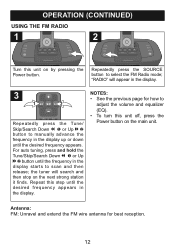
...RADIO" will search and then stop on the next strong station it finds. the tuner will appear in the display.
3
1
2
Repeatedly press the Tune/ Skip/Search Down m 1 or Up l 2 button to manually advance the frequency in the display up or down until the desired frequency appears. Repeat this unit off, press the Power...release;
OPERATION (CONTINUED)
USING THE FM RADIO
1
2
ALARM1
ALARM2
...
User Guide - Page 13

...RADIO mode. While the "Preset" is blinking, press the Tune/Skip/Search Down m 1 or Up l 2 button to select a desired Preset (1-6).
While the "PRESET" is blinking, press the Tune/Skip/Search Down m 1 or Up l 2 button to tune the desired Preset (1-6). NOTE: The preset memories will be erased if the unit is without power... (no batteries/AC adapter is not connected/power failure)...
User Guide - Page 14
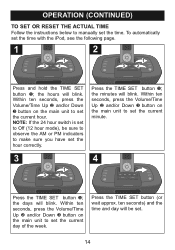
... the TIME SET button 1;
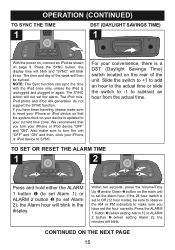
To automatically set .
14 Within ten seconds, press the Volume/Time Up 2 and/or Down 3 button on the main unit to manually set the time.
Within ten seconds, press the Volume/Time Up 2 and/or Down 3 button on the main unit to set the current hour. Press...
User Guide - Page 15
... the ALARM 1 button 3 (when setting Alarm 1) or ALARM 2 button 4 (when setting Alarm 2); CONTINUED ON THE NEXT PAGE 15 If you have set Alarm 2); the Alarm hour ... from the actual time.
We recommend that the system clock on the main unit to set the hour correctly. ...TIME
1
DST (DAYLIGHT SAVINGS TIME)
1
ALARM1
ALARM2
With the power on, connect an iPod as shown on the rear of the week...
User Guide - Page 16
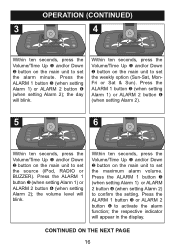
... the main unit to set the source (iPod, RADIO or BUZZER). the volume level will blink. the day will blink. Press the ALARM 1 button 3 (when setting Alarm 1) or ALARM 2 button 4 (when setting Alarm 2);
Press the ALARM 1 button 3 (when setting Alarm 1) or ALARM 2 button 4 (when setting Alarm 2).
5
2
1
3
ALARM1
ALARM2
4
6
2
1
3
ALARM1
ALARM2
4
Within ten seconds, press...
User Guide - Page 17
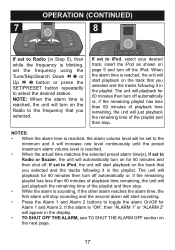
.... • TO SHUT OFF THE ALARM, see TO SHUT THE ALARM OFF section on the Radio to select the desired station. NOTES: • When the alarm time is reached, the unit will ...using the Tune/Skip/Search Down m 1 or Up l 2 button or press the SET/PRESET button repeatedly to the frequency that you selected. The unit will appear in the playlist. If the alarm is "ON", then "ALARM 1" or "ALARM...
User Guide - Page 18
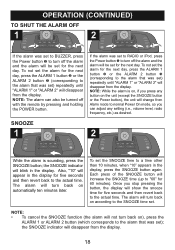
... pressing the button, the display will show the snooze time for 60 minutes). If the alarm was set to RADIO or iPod, press the Power button 1 to the actual time.
the SNOOZE indicator will be set for the next day. The alarm will turn back on the unit (except the SNOOZE button or the...
User Guide - Page 19
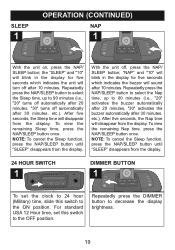
... minutes (i.e., "20" activates the buzzer automatically after 20 minutes, "30" activates the buzzer automatically after 10 minutes. For standard USA 12 Hour time, set the clock to 24 hour (Military) time, slide this switch to 90 minutes (i.e., "20" turns off automatically after 10 minutes. Repeatedly press the DIMMER button to the...
User Guide - Page 21
....
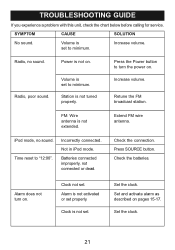
Incorrectly connected. Clock not set properly. Clock is not tuned properly. Set the clock.
21
Radio, no sound.
Volume is set to "12:00".
iPod mode, no sound. Not in iPod mode. Batteries connected improperly, not connected or dead.
Retune the FM broadcast station. Extend FM wire antenna.
Alarm does not turn the power on . TROUBLESHOOTING...
User Guide - Page 22
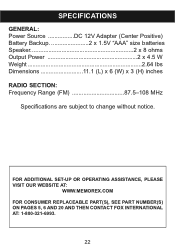
... Backup 2 x 1.5V "AAA" size batteries Speaker 2 x 8 ohms Output Power 2 x 4.5 W Weight 2.64 lbs Dimensions 11.1 (L) x 6 (W) x 3 (H) inches RADIO SECTION: Frequency Range (FM 87.5-108 MHz
Specifications are subject to change without notice. FOR ADDITIONAL SET-UP OR OPERATING ASSISTANCE, PLEASE VISIT OUR WEBSITE AT:
WWW.MEMOREX.COM FOR CONSUMER REPLACEABLE PART(S), SEE PART NUMBER(S) ON...
Similar Questions

How To Remove Cover On Memorex Mc7101-cd Clock Radio
(Posted by donharrison5 2 years ago)

Memorex, Model No. Mc7211, Cd Alarm Clock Radio
(Posted by Badasspresley 3 years ago)

I Have A Memorex Clock Radio Mi4021pwht And Can't Find A Manual For It.
Your site does not list a manual for this clock radio. Does it go under another number like one manu...
Your site does not list a manual for this clock radio. Does it go under another number like one manu...
(Posted by suemarty 6 years ago)

Memorex Mi4390blk Clock Radio For Ipod How To Set Time
(Posted by DownlElen 10 years ago)

How Do I Turn The Alarm Off On My 4203bk Memorex Clock Radio
(Posted by wendyzippi 12 years ago)