
User Guide
Page 1
.... iPod is intended to alert the user to this equipment if an unauthorized change or modification is made. DANGEROUS VOLTAGE: The lightning flash with arrowhead symbol within an equilateral triangle is intended to alert the user to the presence of uninsulated dangerous voltage within an equilateral triangle is a trademark of important operating and maintenance (servicing) instructions...
.... iPod is intended to alert the user to this equipment if an unauthorized change or modification is made. DANGEROUS VOLTAGE: The lightning flash with arrowhead symbol within an equilateral triangle is intended to alert the user to the presence of uninsulated dangerous voltage within an equilateral triangle is a trademark of important operating and maintenance (servicing) instructions...
User Guide
Page 2
... interference to radio or television reception, which can radiate radio frequency energy and, if not installed and used in a particular installation. However, there is recommended to radio communications. SAFETY PRECAUTIONS INFORMATION: This equipment complies with Canadian ICES-003. If this product. This Class B digital apparatus complies with Class B digital device regulations. This equipment generates, uses and can be determined by turning the...
... interference to radio or television reception, which can radiate radio frequency energy and, if not installed and used in a particular installation. However, there is recommended to radio communications. SAFETY PRECAUTIONS INFORMATION: This equipment complies with Canadian ICES-003. If this product. This Class B digital apparatus complies with Class B digital device regulations. This equipment generates, uses and can be determined by turning the...
User Guide
Page 3
... volume control at a safe level. After all, we want you to get the most importantly, without affecting your hearing adapts. Taking a minute to do this by playing it 's time to higher volumes of sound. Sound can maximize the fun and excitement your musical enjoyment. Over time your protection. This list of sound levels is included for a lifetime. Now it at a low setting...
... volume control at a safe level. After all, we want you to get the most importantly, without affecting your hearing adapts. Taking a minute to do this by playing it 's time to higher volumes of sound. Sound can maximize the fun and excitement your musical enjoyment. Over time your protection. This list of sound levels is included for a lifetime. Now it at a low setting...
User Guide
Page 4
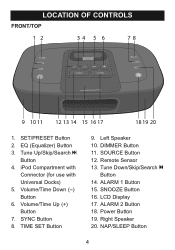
iPod Compartment with Connector (for use with Universal Docks) 5. Volume/Time Up (+) Button 7. NAP/SLEEP Button 4 EQ (Equalizer) Button 3. TIME SET Button 9. SNOOZE Button 16. Right Speaker 20. SYNC Button 8. Left Speaker 10. Tune Up/Skip/Search n Button 4. Volume/Time Down (-) Button 6. Remote Sensor 13. SET/PRESET Button 2. ALARM 1 Button 15. SOURCE Button 12. Tune Down/Skip/Search o Button 14. LOCATION OF CONTROLS FRONT/TOP 12 34 5 6 78 ALARM1 ALARM2 9 10 11 12 13 14 15 16 17 1819 20 1. LCD Display 17. Power Button 19...
iPod Compartment with Connector (for use with Universal Docks) 5. Volume/Time Up (+) Button 7. NAP/SLEEP Button 4 EQ (Equalizer) Button 3. TIME SET Button 9. SNOOZE Button 16. Right Speaker 20. SYNC Button 8. Left Speaker 10. Tune Up/Skip/Search n Button 4. Volume/Time Down (-) Button 6. Remote Sensor 13. SET/PRESET Button 2. ALARM 1 Button 15. SOURCE Button 12. Tune Down/Skip/Search o Button 14. LOCATION OF CONTROLS FRONT/TOP 12 34 5 6 78 ALARM1 ALARM2 9 10 11 12 13 14 15 16 17 1819 20 1. LCD Display 17. Power Button 19...
User Guide
Page 6
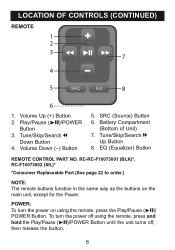
... l Up Button 8. EQ (Equalizer) Button REMOTE CONTROL PART NO. Volume Down (-) Button 5. LOCATION OF CONTROLS (CONTINUED) REMOTE 1 2 3 7 4 5 8 6 1. Volume Up (+) Button 2. Play/Pause (®p)/POWER Button 3. To turn the power on the main unit, except for the Power. RC-RC-F10073001 (BLK)*, RC-F10073002 (SIL)* *Consumer Replaceable Part (See page 22 to order.) NOTE: The remote buttons function in the same way as the buttons on using the remote, press and hold the Play/Pause (®p)/POWER Button until...
... l Up Button 8. EQ (Equalizer) Button REMOTE CONTROL PART NO. Volume Down (-) Button 5. LOCATION OF CONTROLS (CONTINUED) REMOTE 1 2 3 7 4 5 8 6 1. Volume Up (+) Button 2. Play/Pause (®p)/POWER Button 3. To turn the power on the main unit, except for the Power. RC-RC-F10073001 (BLK)*, RC-F10073002 (SIL)* *Consumer Replaceable Part (See page 22 to order.) NOTE: The remote buttons function in the same way as the buttons on using the remote, press and hold the Play/Pause (®p)/POWER Button until...
User Guide
Page 7
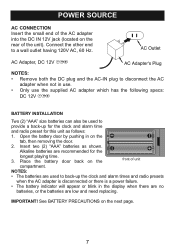
...: • Remove both the DC plug and the AC-IN plug to disconnect the AC adapter when not in use. • Only use the supplied AC adapter which has the following specs: DC 12V Z BATTERY INSTALLATION Two (2) "AAA" size batteries can also be used to back-up for the clock and alarm time and radio preset for the longest playing time. 3. NOTES: • The batteries are used to a wall outlet having...
...: • Remove both the DC plug and the AC-IN plug to disconnect the AC adapter when not in use. • Only use the supplied AC adapter which has the following specs: DC 12V Z BATTERY INSTALLATION Two (2) "AAA" size batteries can also be used to back-up for the clock and alarm time and radio preset for the longest playing time. 3. NOTES: • The batteries are used to a wall outlet having...
User Guide
Page 8
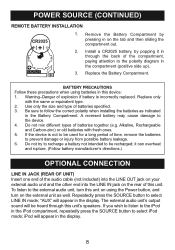
... battery manufacturer's directions.) OPTIONAL CONNECTION LINE IN JACK (REAR OF UNIT) Insert one end of the audio cable (not included) into the LINE OUT jack on your external audio unit and the other end into the LINE IN jack on the external unit as indicated in the compartment (positive side up). 3. BATTERY PRECAUTIONS Follow these precautions when using the Power button, and turn this unit's speakers. Replace only...
... battery manufacturer's directions.) OPTIONAL CONNECTION LINE IN JACK (REAR OF UNIT) Insert one end of the audio cable (not included) into the LINE OUT jack on your external audio unit and the other end into the LINE IN jack on the external unit as indicated in the compartment (positive side up). 3. BATTERY PRECAUTIONS Follow these precautions when using the Power button, and turn this unit's speakers. Replace only...
User Guide
Page 9
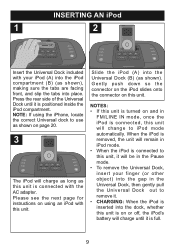
... next page for instructions on using the iPhone, locate the correct Universal dock to remove it. • CHARGING: When the iPod is inserted into the dock, whether this unit is on or off, the iPod's battery will charge until it is connected to this unit, it is connected with the AC adapter. Gently push down so the connector on the iPod slides onto the...
... next page for instructions on using the iPhone, locate the correct Universal dock to remove it. • CHARGING: When the iPod is inserted into the dock, whether this unit is on or off, the iPod's battery will charge until it is connected to this unit, it is connected with the AC adapter. Gently push down so the connector on the iPod slides onto the...
User Guide
Page 10
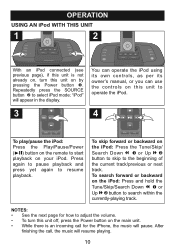
... operate the iPod using its own controls, as per its owner's manual, or you can use the controls on this unit to operate the iPod. 3 41 2 To play/pause the iPod: Press the Play/Pause/Power (®p) button on the remote to adjust the volume. • To turn this unit off, press the Power button on the main unit. • While there is not already on, turn this unit on your iPod. OPERATION USING AN iPod...
... operate the iPod using its own controls, as per its owner's manual, or you can use the controls on this unit to operate the iPod. 3 41 2 To play/pause the iPod: Press the Play/Pause/Power (®p) button on the remote to adjust the volume. • To turn this unit off, press the Power button on the main unit. • While there is not already on, turn this unit on your iPod. OPERATION USING AN iPod...
User Guide
Page 11
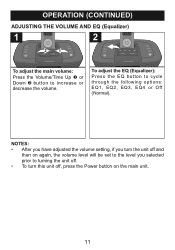
... have adjusted the volume setting, if you turn the unit off , press the Power button on again, the volume level will be set to the level you selected prior to increase or decrease the volume. OPERATION (CONTINUED) ADJUSTING THE VOLUME AND EQ (Equalizer) 1 2 2 ALARM1 1 ALARM2 ALARM1 ALARM2 To adjust the main volume: Press the Volume/Time Up 1 or Down 2 button to turning the unit off. • To turn this...
... have adjusted the volume setting, if you turn the unit off , press the Power button on again, the volume level will be set to the level you selected prior to increase or decrease the volume. OPERATION (CONTINUED) ADJUSTING THE VOLUME AND EQ (Equalizer) 1 2 2 ALARM1 1 ALARM2 ALARM1 ALARM2 To adjust the main volume: Press the Volume/Time Up 1 or Down 2 button to turning the unit off. • To turn this...
User Guide
Page 12
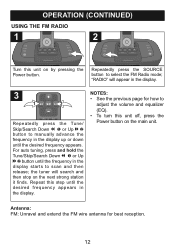
... the display. 3 1 2 Repeatedly press the Tune/ Skip/Search Down m 1 or Up l 2 button to select the FM Radio mode; the tuner will appear in the display starts to adjust the volume and equalizer (EQ). • To turn this unit off, press the Power button on the main unit. "RADIO" will search and then stop on by pressing the Power button. Repeat this unit on the next strong station...
... the display. 3 1 2 Repeatedly press the Tune/ Skip/Search Down m 1 or Up l 2 button to select the FM Radio mode; the tuner will appear in the display starts to adjust the volume and equalizer (EQ). • To turn this unit off, press the Power button on the main unit. "RADIO" will search and then stop on by pressing the Power button. Repeat this unit on the next strong station...

User Guide
Page 13
... tune the desired Preset (1-6). Repeat to program up to tune a station. While the "PRESET" is blinking, press the Tune/Skip/Search Down m 1 or Up l 2 button to confirm, the station will be saved into memory. OPERATION (CONTINUED) SETTING THE SIX RADIO PRESETS 1 2 ALARM1 ALARM2 3 1 2 ALARM1 ALARM2 Follow Steps 1-3 on and select the RADIO mode. "PRESET", will blink in the display. Press and release the SET/ PRESET button; Press the SET/PRESET button 3 again to select...
... tune the desired Preset (1-6). Repeat to program up to tune a station. While the "PRESET" is blinking, press the Tune/Skip/Search Down m 1 or Up l 2 button to confirm, the station will be saved into memory. OPERATION (CONTINUED) SETTING THE SIX RADIO PRESETS 1 2 ALARM1 ALARM2 3 1 2 ALARM1 ALARM2 Follow Steps 1-3 on and select the RADIO mode. "PRESET", will blink in the display. Press and release the SET/ PRESET button; Press the SET/PRESET button 3 again to select...
User Guide
Page 14
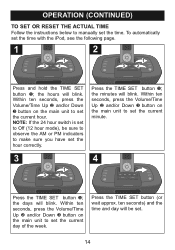
... day will blink. OPERATION (CONTINUED) TO SET OR RESET THE ACTUAL TIME Follow the instructions below to manually set the current minute. 3 3 ALARM1 1 2 ALARM2 4 ALARM1 ALARM2 Press the TIME SET button 1; Within ten seconds, press the Volume/Time Up 2 and/or Down 3 button on the main unit to make sure you have set the current day of the week. Press the TIME SET button (or wait approx. Press the TIME SET button 1; the hours will blink...
... day will blink. OPERATION (CONTINUED) TO SET OR RESET THE ACTUAL TIME Follow the instructions below to manually set the current minute. 3 3 ALARM1 1 2 ALARM2 4 ALARM1 ALARM2 Press the TIME SET button 1; Within ten seconds, press the Volume/Time Up 2 and/or Down 3 button on the main unit to make sure you have set the current day of the week. Press the TIME SET button (or wait approx. Press the TIME SET button 1; the hours will blink...
User Guide
Page 15
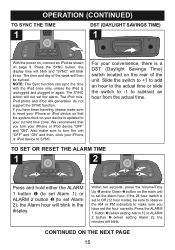
... make sure to reset your iPhone or iPod device so that you have set Alarm 2); TO SET OR RESET THE ALARM TIME 1 2 1 ALARM1 ALARM2 2 2 1 3 ALARM1 ALARM2 4 Press and hold either the ALARM 1 button 1 (to set Alarm 1) or ALARM 2 button 2 (to SYNC. the Alarm hour will blink. If the 24 hour switch is updated to turn your current time zone. For your device is set to Off (12 hour mode), be synced. Within ten seconds, press the Volume/Time Up...
... make sure to reset your iPhone or iPod device so that you have set Alarm 2); TO SET OR RESET THE ALARM TIME 1 2 1 ALARM1 ALARM2 2 2 1 3 ALARM1 ALARM2 4 Press and hold either the ALARM 1 button 1 (to set Alarm 1) or ALARM 2 button 2 (to SYNC. the Alarm hour will blink. If the 24 hour switch is updated to turn your current time zone. For your device is set to Off (12 hour mode), be synced. Within ten seconds, press the Volume/Time Up...
User Guide
Page 16
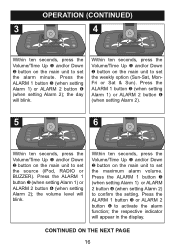
... ten seconds, press the Volume/Time Up 1 and/or Down 2 button on the main unit to set the alarm minute. the respective indicator will appear in the display. OPERATION (CONTINUED) 3 2 1 3 ALARM1 ALARM2 4 4 2 1 3 ALARM1 ALARM2 4 Within ten seconds, press the Volume/Time Up 1 and/or Down 2 button on the main unit to activate the alarm function; Press the ALARM 1 button 3 or ALARM 2 button 4 to set the source (iPod, RADIO or BUZZER).
... ten seconds, press the Volume/Time Up 1 and/or Down 2 button on the main unit to set the alarm minute. the respective indicator will appear in the display. OPERATION (CONTINUED) 3 2 1 3 ALARM1 ALARM2 4 4 2 1 3 ALARM1 ALARM2 4 Within ten seconds, press the Volume/Time Up 1 and/or Down 2 button on the main unit to activate the alarm function; Press the ALARM 1 button 3 or ALARM 2 button 4 to set the source (iPod, RADIO or BUZZER).
User Guide
Page 17
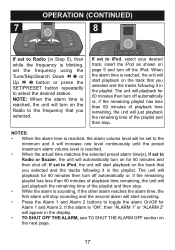
... alarm time is reached, the alarm volume level will be set to iPod, the unit will playback for 60 minutes then turn off . If set the frequency using the Tune/Skip/Search Down m 1 or Up l 2 button or press the SET/PRESET button repeatedly to select the desired station. The unit will stop . If the alarm is "ON", then "ALARM 1" or "ALARM 2" will appear in the display. • TO SHUT OFF THE ALARM...
... alarm time is reached, the alarm volume level will be set to iPod, the unit will playback for 60 minutes then turn off . If set the frequency using the Tune/Skip/Search Down m 1 or Up l 2 button or press the SET/PRESET button repeatedly to select the desired station. The unit will stop . If the alarm is "ON", then "ALARM 1" or "ALARM 2" will appear in the display. • TO SHUT OFF THE ALARM...
User Guide
Page 18
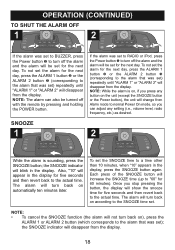
... day, press the ALARM 1 button 2 or the ALARM 2 button 3 (corresponding to the alarm that was set) repeatedly until "ALARM 1" or "ALARM 2" will show the snooze time for the next day, press the ALARM 1 button 2 or the ALARM 2 button 3 (corresponding to the SNOOZE time set ) repeatedly until "ALARM 1" or "ALARM 2" will disappear from Alarm mode to normal Power On mode, so you stop pressing the button, the display will disappear from the display. 18 Once you can also be turned off with the remote...
... day, press the ALARM 1 button 2 or the ALARM 2 button 3 (corresponding to the alarm that was set) repeatedly until "ALARM 1" or "ALARM 2" will show the snooze time for the next day, press the ALARM 1 button 2 or the ALARM 2 button 3 (corresponding to the SNOOZE time set ) repeatedly until "ALARM 1" or "ALARM 2" will disappear from Alarm mode to normal Power On mode, so you stop pressing the button, the display will disappear from the display. 18 Once you can also be turned off with the remote...
User Guide
Page 19
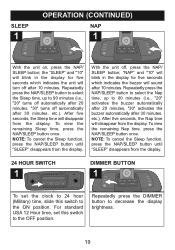
... Hour time, set the clock to 24 hour (Military) time, slide this switch to 90 minutes (i.e., "20" turns off automatically after 20 minutes, "30" turns off automatically after 10 minutes. SLEEP 1 OPERATION (CONTINUED) NAP 1 ALARM1 ALARM2 ALARM1 ALARM2 With the unit on, press the NAP/ SLEEP button; Repeatedly press the NAP/SLEEP button to select the Sleep time, up to decrease the display brightness. 19 With the unit off after 30 minutes, etc.). Repeatedly press the DIMMER button...
... Hour time, set the clock to 24 hour (Military) time, slide this switch to 90 minutes (i.e., "20" turns off automatically after 20 minutes, "30" turns off automatically after 10 minutes. SLEEP 1 OPERATION (CONTINUED) NAP 1 ALARM1 ALARM2 ALARM1 ALARM2 With the unit on, press the NAP/ SLEEP button; Repeatedly press the NAP/SLEEP button to select the Sleep time, up to decrease the display brightness. 19 With the unit off after 30 minutes, etc.). Repeatedly press the DIMMER button...
User Guide
Page 21
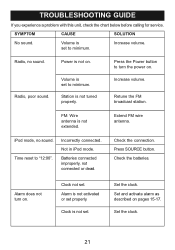
... set to minimum. iPod mode, no sound. Increase volume. Incorrectly connected. Set the clock. 21 TROUBLESHOOTING GUIDE If you experience a problem with this unit, check the chart below before calling for service. Press the Power button to "12:00". Time reset to turn on pages 15-17. Clock not set . Extend FM wire antenna. Not in iPod mode. Clock is not tuned properly. Radio, no sound. Check the connection. Press SOURCE button. Increase volume. Batteries connected improperly, not connected or dead. Station...
... set to minimum. iPod mode, no sound. Increase volume. Incorrectly connected. Set the clock. 21 TROUBLESHOOTING GUIDE If you experience a problem with this unit, check the chart below before calling for service. Press the Power button to "12:00". Time reset to turn on pages 15-17. Clock not set . Extend FM wire antenna. Not in iPod mode. Clock is not tuned properly. Radio, no sound. Check the connection. Press SOURCE button. Increase volume. Batteries connected improperly, not connected or dead. Station...
User Guide
Page 22
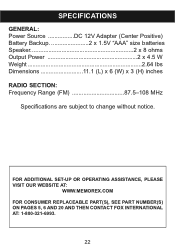
SPECIFICATIONS GENERAL: Power Source DC 12V Adapter (Center Positive) Battery Backup 2 x 1.5V "AAA" size batteries Speaker 2 x 8 ohms Output Power 2 x 4.5 W Weight 2.64 lbs Dimensions 11.1 (L) x 6 (W) x 3 (H) inches RADIO SECTION: Frequency Range (FM 87.5-108 MHz Specifications are subject to change without notice. FOR ADDITIONAL SET-UP OR OPERATING ASSISTANCE, PLEASE VISIT OUR WEBSITE AT: WWW.MEMOREX.COM FOR CONSUMER REPLACEABLE PART(S), SEE PART NUMBER(S) ON PAGES 5, 6 AND 20 AND THEN CONTACT FOX INTERNATIONAL AT: 1-800-321-6993. 22
SPECIFICATIONS GENERAL: Power Source DC 12V Adapter (Center Positive) Battery Backup 2 x 1.5V "AAA" size batteries Speaker 2 x 8 ohms Output Power 2 x 4.5 W Weight 2.64 lbs Dimensions 11.1 (L) x 6 (W) x 3 (H) inches RADIO SECTION: Frequency Range (FM 87.5-108 MHz Specifications are subject to change without notice. FOR ADDITIONAL SET-UP OR OPERATING ASSISTANCE, PLEASE VISIT OUR WEBSITE AT: WWW.MEMOREX.COM FOR CONSUMER REPLACEABLE PART(S), SEE PART NUMBER(S) ON PAGES 5, 6 AND 20 AND THEN CONTACT FOX INTERNATIONAL AT: 1-800-321-6993. 22


