
User Guide
Page 4
...One that lets the sound come through loud and clear without annoying blaring or distortion and, most out of your musical enjoyment. Over time your new sound equipment will help to consider how you 've just purchased is only the start of your equipment by..., quiet office Air conditioner at 20 feet, sewing machine Vacuum cleaner, hair dryer, noisy restaurant Average city traffic, garbage disposals, alarm clock at a low setting. • Slowly increase the sound until it there. To establish a safe level: • Start your hearing. Sound can actually be deceiving. We Want...
...One that lets the sound come through loud and clear without annoying blaring or distortion and, most out of your musical enjoyment. Over time your new sound equipment will help to consider how you 've just purchased is only the start of your equipment by..., quiet office Air conditioner at 20 feet, sewing machine Vacuum cleaner, hair dryer, noisy restaurant Average city traffic, garbage disposals, alarm clock at a low setting. • Slowly increase the sound until it there. To establish a safe level: • Start your hearing. Sound can actually be deceiving. We Want...
User Guide
Page 5
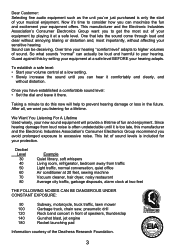
TIME SET/Tune/Skip/ Search Down o Button 2. FM Wire Antenna (Rear of Unit) (AC Adapter Part No. 2295-05268-E300*) 7. Play/Pause (®p) Button 11. MODE Button ... to order.) 4 iPod Compartment with Connector (for use with Universal Docks) 6. ALARM Button 8. LOCATION OF CONTROLS FRONT/TOP 17 1 2 34 5 6 78 9 10 11 12 1. ALARM SET/Tune/Skip/ Search Up n Button 3. Remote Sensor 12. Power Button 10.
TIME SET/Tune/Skip/ Search Down o Button 2. FM Wire Antenna (Rear of Unit) (AC Adapter Part No. 2295-05268-E300*) 7. Play/Pause (®p) Button 11. MODE Button ... to order.) 4 iPod Compartment with Connector (for use with Universal Docks) 6. ALARM Button 8. LOCATION OF CONTROLS FRONT/TOP 17 1 2 34 5 6 78 9 10 11 12 1. ALARM SET/Tune/Skip/ Search Up n Button 3. Remote Sensor 12. Power Button 10.
User Guide
Page 6
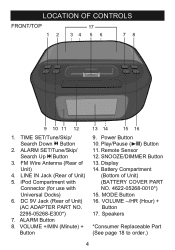
... unit. 5 Battery Compartment (Rear of Unit) 12 7. VOL (Volume) -/HR (Hour) + Button 3. Play/Pause (®p) Button 5. LOCATION OF CONTROLS (CONTINUED) REMOTE 6 1 7 2 8 3 9 4 10 5 11 1. MODE Button 8. TIME SET/Tune/Skip/ Search Down o Button 4. MUTE Button 11. SLEEP Button 12. Power Button 2. VOL (Volume) +/MIN (Minute) + Button 9. ALARM...
... unit. 5 Battery Compartment (Rear of Unit) 12 7. VOL (Volume) -/HR (Hour) + Button 3. Play/Pause (®p) Button 5. LOCATION OF CONTROLS (CONTINUED) REMOTE 6 1 7 2 8 3 9 4 10 5 11 1. MODE Button 8. TIME SET/Tune/Skip/ Search Down o Button 4. MUTE Button 11. SLEEP Button 12. Power Button 2. VOL (Volume) +/MIN (Minute) + Button 9. ALARM...
User Guide
Page 13
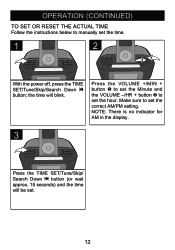
the time will be set the time. 1 2 21 With the power off, press the TIME SET/Tune/Skip/Search Down o button; Make sure to set the correct AM/PM setting. Press the Volume +/MIN + button 1 to set the Minute and the Volume -/HR + button 2 to set the hour. NOTE: There is no indicator for AM in the display. 3 Press the TIME SET/Tune/Skip/ Search Down o button (or wait approx. 15 seconds) and the time will blink. OPERATION (CONTINUED) TO SET OR RESET THE ACTUAL TIME Follow the instructions below to manually set . 12
the time will be set the time. 1 2 21 With the power off, press the TIME SET/Tune/Skip/Search Down o button; Make sure to set the correct AM/PM setting. Press the Volume +/MIN + button 1 to set the Minute and the Volume -/HR + button 2 to set the hour. NOTE: There is no indicator for AM in the display. 3 Press the TIME SET/Tune/Skip/ Search Down o button (or wait approx. 15 seconds) and the time will blink. OPERATION (CONTINUED) TO SET OR RESET THE ACTUAL TIME Follow the instructions below to manually set . 12
User Guide
Page 14
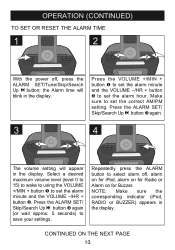
...button 2 to select alarm off , press the ALARM SET/Tune/Skip/Search Up n button; Press the ALARM SET/ Skip/Search Up n button 3 again (or wait approx. 5 seconds) to set the alarm minute and the Volume -/HR + button 2. the Alarm time will appear in the display. Repeatedly press the ALARM ...button to set the correct AM/PM setting. Select a desired maximum volume level (level 0 to 15) to wake to using the Volume +/MIN + button 1 to save your settings. OPERATION (CONTINUED) TO SET OR RESET THE ALARM TIME 1 2 3 21 With the power off , alarm...
...button 2 to select alarm off , press the ALARM SET/Tune/Skip/Search Up n button; Press the ALARM SET/ Skip/Search Up n button 3 again (or wait approx. 5 seconds) to set the alarm minute and the Volume -/HR + button 2. the Alarm time will appear in the display. Repeatedly press the ALARM ...button to set the correct AM/PM setting. Select a desired maximum volume level (level 0 to 15) to wake to using the Volume +/MIN + button 1 to save your settings. OPERATION (CONTINUED) TO SET OR RESET THE ALARM TIME 1 2 3 21 With the power off , alarm...
User Guide
Page 15
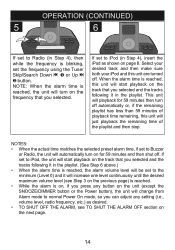
... page 8. This unit will start playback on the track that you selected and the tracks following it in the playlist. NOTES: • When the actual time matches the selected preset alarm time, if set to the minimum (Level 0) and it in the playlist. (See Step 6 above.) • When the alarm... time is reached, the alarm volume level will be set to Buzzer or Radio, the unit will turn on for 59 minutes then turn off . Select your desired track and then make sure both your ...
... page 8. This unit will start playback on the track that you selected and the tracks following it in the playlist. NOTES: • When the actual time matches the selected preset alarm time, if set to the minimum (Level 0) and it in the playlist. (See Step 6 above.) • When the alarm... time is reached, the alarm volume level will be set to Buzzer or Radio, the unit will turn on for 59 minutes then turn off . Select your desired track and then make sure both your ...
User Guide
Page 18
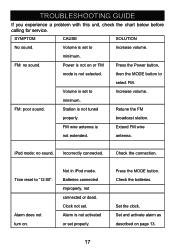
... Increase volume. minimum. broadcast station. Time reset to select FM. Clock not set properly. Check the batteries. Set and activate alarm as described on . Volume is set to Increase volume. iPod mode: no sound. Incorrectly connected. Set the clock. TROUBLESHOOTING GUIDE If you ... Check the connection. Alarm does not turn on page 13. 17 Press the MODE button. Station is not activated or set . then the MODE button to "12:00". Not in iPod mode. Alarm is not tuned Retune the FM properly....
... Increase volume. minimum. broadcast station. Time reset to select FM. Clock not set properly. Check the batteries. Set and activate alarm as described on . Volume is set to Increase volume. iPod mode: no sound. Incorrectly connected. Set the clock. TROUBLESHOOTING GUIDE If you ... Check the connection. Alarm does not turn on page 13. 17 Press the MODE button. Station is not activated or set . then the MODE button to "12:00". Not in iPod mode. Alarm is not tuned Retune the FM properly....


