
2006 Marantz Full Line Catalog
Page 12
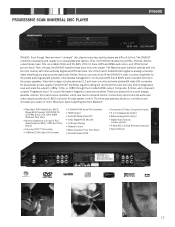
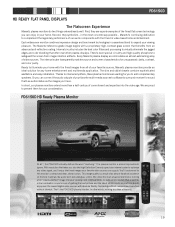
... Video D/A Converter • 192kHz/24-Bit Audio D/A Converters • HDMI Output • Audio EX Mode (Video Off) • Dolby Digital®/DTS Decoder • On Screen Display • Parental Control • Menu Operation From Front Panel • Discrete Power On/Off • Component, S-Video, Composite Outputs • 5.1 ch Analog Audio Output • Stereo Analog Audio Output • Digital Audio Outputs (coaxial, optical) • D-BUS (RC-5 In/Out) Remote Connection • Device Remote...
... Video D/A Converter • 192kHz/24-Bit Audio D/A Converters • HDMI Output • Audio EX Mode (Video Off) • Dolby Digital®/DTS Decoder • On Screen Display • Parental Control • Menu Operation From Front Panel • Discrete Power On/Off • Component, S-Video, Composite Outputs • 5.1 ch Analog Audio Output • Stereo Analog Audio Output • Digital Audio Outputs (coaxial, optical) • D-BUS (RC-5 In/Out) Remote Connection • Device Remote...
2006 Marantz Full Line Catalog
Page 14
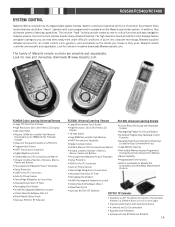
... new and innovative downloads @ www.marantz.com RC9500 Color Learning Universal Remote • Large TFT Color Touch Screen • High Resolution 320 x 240 Pixels LCD Display • 64k Color Pallet • Massive 16MB Non-volatile Flash Memory (Expandable up to 48MB wih the Firmware Update) • Advanced Transparent Graphics by PNG File • Programmable Timers • IR/RF Transmission Capability • Digital Brightness Control • Editable Macros (250 Commands...
... new and innovative downloads @ www.marantz.com RC9500 Color Learning Universal Remote • Large TFT Color Touch Screen • High Resolution 320 x 240 Pixels LCD Display • 64k Color Pallet • Massive 16MB Non-volatile Flash Memory (Expandable up to 48MB wih the Firmware Update) • Advanced Transparent Graphics by PNG File • Programmable Timers • IR/RF Transmission Capability • Digital Brightness Control • Editable Macros (250 Commands...
2006 Marantz Full Line Catalog
Page 15
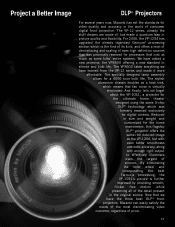
..., flicker free motion while preserving all of screens. The specially designed lamp assembly allows for digital cinema. The stylish aluminum chassis doubles as a heat sink, which was previously reserved for processors that was formerly reserved exclusively for a 4000 hour bulb life. Reduced in size and weight and customized for the home environment, this flagship DLP® projector offers the same rich detailed image...
..., flicker free motion while preserving all of screens. The specially designed lamp assembly allows for digital cinema. The stylish aluminum chassis doubles as a heat sink, which was previously reserved for processors that was formerly reserved exclusively for a 4000 hour bulb life. Reduced in size and weight and customized for the home environment, this flagship DLP® projector offers the same rich detailed image...
2006 Marantz Full Line Catalog
Page 17
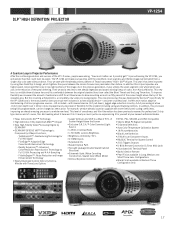
... Canceling Construction, Sealed Color Wheel Motor) • Vertical Keystone Correction • NTSC, PAL, SECAM, and ATSC Compatible • VGA to SXGA PC Signal Compatible • 5 Gamma Selections • Auto Color Temperature Calibration System • 18 Picture Memories • Black Level Selection • 2 Multi-scan Component Inputs • RS232C Terminal for System Control • 2 DC Triggers Outputs • D-BUS Remote Connection (3.5mm Mini-jack...
... Canceling Construction, Sealed Color Wheel Motor) • Vertical Keystone Correction • NTSC, PAL, SECAM, and ATSC Compatible • VGA to SXGA PC Signal Compatible • 5 Gamma Selections • Auto Color Temperature Calibration System • 18 Picture Memories • Black Level Selection • 2 Multi-scan Component Inputs • RS232C Terminal for System Control • 2 DC Triggers Outputs • D-BUS Remote Connection (3.5mm Mini-jack...
2006 Marantz Full Line Catalog
Page 19
... latest HDMI inputs so you to optimize any home entertainment and multimedia application. With resolution that takes you can supply. Improvements include a menu system that 's as authoritative as the images you 'll enjoy the finest images your favorite video sources can connect the audio outputs of our audio components with absolute fidelity. Execution without compromise. First, they symbolize - Internal circuitry includes the best color filters and...
... latest HDMI inputs so you to optimize any home entertainment and multimedia application. With resolution that takes you can supply. Improvements include a menu system that 's as authoritative as the images you 'll enjoy the finest images your favorite video sources can connect the audio outputs of our audio components with absolute fidelity. Execution without compromise. First, they symbolize - Internal circuitry includes the best color filters and...

2006 Marantz Full Line Catalog
Page 38
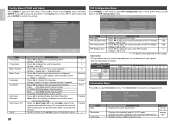
... Laboratories, Inc. PRODUCT SPECIFICS DLP Projectors FEATURES Display Device Panel Size Aspect Ratio Resolution Brightness Brightness Uniformity Contrast Ratio Projection Size Throw Distance 100" TV System Computer Signal Capability DTV / HDTV Capability Video Processor 3:2 Pull Down Optics O.R.C.A Filter Life Lamp Picture Memories Keystone Correction Fine Picture Menu Picture Modes Color Temperatures Black Level Selection Optical Zoom Lens Shift Dust-Free Sealed Optics Noise Cancel Structure Chassis Illuminated I/O Terminal Panel Auto Color Temp. used under authorization. DCDi®...
... Laboratories, Inc. PRODUCT SPECIFICS DLP Projectors FEATURES Display Device Panel Size Aspect Ratio Resolution Brightness Brightness Uniformity Contrast Ratio Projection Size Throw Distance 100" TV System Computer Signal Capability DTV / HDTV Capability Video Processor 3:2 Pull Down Optics O.R.C.A Filter Life Lamp Picture Memories Keystone Correction Fine Picture Menu Picture Modes Color Temperatures Black Level Selection Optical Zoom Lens Shift Dust-Free Sealed Optics Noise Cancel Structure Chassis Illuminated I/O Terminal Panel Auto Color Temp. used under authorization. DCDi®...

VP8600 RS232c Command Codes
Page 2
Life Lamp 4000 hours (average) Picture Memories • (By Input and signal) Keystone Correction • (H/V) Fine Picture Menu • Picture Modes • (5) Color Temperatures • (4 steps) Black Level Selection • Optical Zoom • (x1.33) Lens Shift • (V: +50% - +120%) Dust-Free Sealed Optics • Noise cancel Structure • Chassis Extruded Aluminum Illuminated I/O Terminal Panel • Auto Color Temp. Filter - Calibration • FCC Class B IN/OUTPUTS VIDEO Composite Video In S-Video In Component In RGB...
Life Lamp 4000 hours (average) Picture Memories • (By Input and signal) Keystone Correction • (H/V) Fine Picture Menu • Picture Modes • (5) Color Temperatures • (4 steps) Black Level Selection • Optical Zoom • (x1.33) Lens Shift • (V: +50% - +120%) Dust-Free Sealed Optics • Noise cancel Structure • Chassis Extruded Aluminum Illuminated I/O Terminal Panel • Auto Color Temp. Filter - Calibration • FCC Class B IN/OUTPUTS VIDEO Composite Video In S-Video In Component In RGB...

VP8600 User Manual
Page 2
...servicing to the presence of important operating and maintenance (servicing) instructions in accordance with the manufacture's instructions. 8. Remove the lens cap when using this apparatus near any ventilation openings. This Class B digital apparatus complies with dry cloth. 7. Install in the literature accompanying the product. Do not block any heat sources such as power-supply cord...NOT OPEN CAUTION: TO REDUCE THE RISK OF ELECTRIC SHOCK, DO NOT REMOVE COVER (OR BACK) NO USER-SERVICEABLE PARTS INSIDE REFER SERVICING TO QUALIFIED SERVICE PERSONNEL The lightning flash with...
...servicing to the presence of important operating and maintenance (servicing) instructions in accordance with the manufacture's instructions. 8. Remove the lens cap when using this apparatus near any ventilation openings. This Class B digital apparatus complies with dry cloth. 7. Install in the literature accompanying the product. Do not block any heat sources such as power-supply cord...NOT OPEN CAUTION: TO REDUCE THE RISK OF ELECTRIC SHOCK, DO NOT REMOVE COVER (OR BACK) NO USER-SERVICEABLE PARTS INSIDE REFER SERVICING TO QUALIFIED SERVICE PERSONNEL The lightning flash with...
VP8600 User Manual
Page 3
... with wet hands. - It is turned on the ceiling, the Ceiling Mount Kit approved by MARANTZ must be read carefully before any way. Do not insert anything about 0.2 meter around the unit. - Do not replace the lamp yourself. ENGLISH FOREWORD This section must be easily accessible. - Do not remove the cover from the AC supply mains. - Make a space of some...
... with wet hands. - It is turned on the ceiling, the Ceiling Mount Kit approved by MARANTZ must be read carefully before any way. Do not insert anything about 0.2 meter around the unit. - Do not replace the lamp yourself. ENGLISH FOREWORD This section must be easily accessible. - Do not remove the cover from the AC supply mains. - Make a space of some...
VP8600 User Manual
Page 6
... 15 OPERATIONS 16 On-Screen Display Menu Controls 16 Menu Structure 17 Picture Adjust Menu (PC/HD 18 Picture Adjust Menu (Video 18 Display Menu (PC/HD and Video 19 Fine Menu (PC/HD 19 Config. Menu (PC/HD and Video 20 PIP Configuration Menu 20 Information Menu 20 MAINTENANCE 21 Lamp Life and Replace Lamp 21 Replacement Parts 21 Cleaning the Projector 21 TROUBLESHOOTING 22 Common problems and solutions 22 Tips for Troubleshooting 22 LED Error Messages 22 Image Problems 22 Lamp Problems 23 Remote Control Problems 23 Having the Projector Serviced 23 SPECIFICATIONS...
... 15 OPERATIONS 16 On-Screen Display Menu Controls 16 Menu Structure 17 Picture Adjust Menu (PC/HD 18 Picture Adjust Menu (Video 18 Display Menu (PC/HD and Video 19 Fine Menu (PC/HD 19 Config. Menu (PC/HD and Video 20 PIP Configuration Menu 20 Information Menu 20 MAINTENANCE 21 Lamp Life and Replace Lamp 21 Replacement Parts 21 Cleaning the Projector 21 TROUBLESHOOTING 22 Common problems and solutions 22 Tips for Troubleshooting 22 LED Error Messages 22 Image Problems 22 Lamp Problems 23 Remote Control Problems 23 Having the Projector Serviced 23 SPECIFICATIONS...

VP8600 User Manual
Page 8
...fast Operational error code. ( P.22) Important: Grill openings on and working correctly. r Focus ring ( P.10) Sharpens the projected image. w Vertical lens shift Adjusts the vertical position of the grill openings. 3 u Lamp LED (Red) Lighting Lamp ready. Blinking which is powered off. Blinking which keeps the projector lamp cool. Do not obstruct any of the lens. y IR LED Flashes green when signal from remote control. i Power LED (Blue) Lighting Unit is powered on the projector allow for IR signal from remote control is received. e Lens Remove cover before operation...
...fast Operational error code. ( P.22) Important: Grill openings on and working correctly. r Focus ring ( P.10) Sharpens the projected image. w Vertical lens shift Adjusts the vertical position of the grill openings. 3 u Lamp LED (Red) Lighting Lamp ready. Blinking which is powered off. Blinking which keeps the projector lamp cool. Do not obstruct any of the lens. y IR LED Flashes green when signal from remote control. i Power LED (Blue) Lighting Unit is powered on the projector allow for IR signal from remote control is received. e Lens Remove cover before operation...
VP8600 User Manual
Page 10
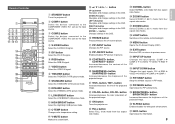
... remote control backlight. @9 MENU button Opens the On-Screen Display (OSD). #0 EXIT button #1 t DVI button !8 PIP-ON/OFF button Exits the OSD, or returns to the COMPONENT VIDEO IN 2 jack as the input RIGHT (2) button @7 ZOOM2 button @4 source. button Increases/decreases the contrast of the projected image. #2 INPUT DOWN button Changes the input signals. Select the DYNAMIC (DYN) picture mode. !1 LOW BRIGHT button Select the LOW BRIGHT (LB) picture mode. !2 HIGH BRIGHT button Select the High Bright (HB) picture mode. !3 C-TEMP button Changes color temperature setting. @2 COLOR...
... remote control backlight. @9 MENU button Opens the On-Screen Display (OSD). #0 EXIT button #1 t DVI button !8 PIP-ON/OFF button Exits the OSD, or returns to the COMPONENT VIDEO IN 2 jack as the input RIGHT (2) button @7 ZOOM2 button @4 source. button Increases/decreases the contrast of the projected image. #2 INPUT DOWN button Changes the input signals. Select the DYNAMIC (DYN) picture mode. !1 LOW BRIGHT button Select the LOW BRIGHT (LB) picture mode. !2 HIGH BRIGHT button Select the High Bright (HB) picture mode. !3 C-TEMP button Changes color temperature setting. @2 COLOR...
VP8600 User Manual
Page 15
...- Press MENU on the projector) to select the input signal source. 10 V-MUTE MENU M INPUT F FREEZE E EXIT ON/OFF PIP INPUT SWAP MENU CONTRAST CON- Press the EXIT button twice to open the OSD. 4. Turn on the projector) to a wall outlet. BRI+ Adjust the Zoom, Focus and Keystone 1. Use the ZOOM ring (on the main power switch. Connect the other end to resize the projected image and screen size. 2. The Power LED lights blue and the projector splash screen displays. FOCUS RING ZOOM RING 3. Press...
...- Press MENU on the projector) to select the input signal source. 10 V-MUTE MENU M INPUT F FREEZE E EXIT ON/OFF PIP INPUT SWAP MENU CONTRAST CON- Press the EXIT button twice to open the OSD. 4. Turn on the projector) to a wall outlet. BRI+ Adjust the Zoom, Focus and Keystone 1. Use the ZOOM ring (on the main power switch. Connect the other end to resize the projected image and screen size. 2. The Power LED lights blue and the projector splash screen displays. FOCUS RING ZOOM RING 3. Press...
VP8600 User Manual
Page 17
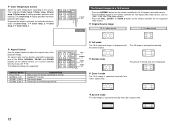
... following settings are supported: COMP.1 C1 COMP.2 S VIDEO C2 S FULL F DVI DV1 RGB RGB VIDEO NORMAL V N THEATER STANDARD DYNAMIC ZOOM1 THTR STD DYN Z1 LOW-BRIGHT- The Color temp. 4 setting provides maximum projector light output. The calibrated Color temp. 1/Color temp. 2/Color temp. 3/Color temp. 4 setting provides optimum color tracking. HIGH LB HB C-TEMP ZOOM2 CT Z2 C-TEMP CT The Screen Images in a 16:9 screen • Press the NORMAL button on the remote controller for the 4:3 aspect ratio video source...
... following settings are supported: COMP.1 C1 COMP.2 S VIDEO C2 S FULL F DVI DV1 RGB RGB VIDEO NORMAL V N THEATER STANDARD DYNAMIC ZOOM1 THTR STD DYN Z1 LOW-BRIGHT- The Color temp. 4 setting provides maximum projector light output. The calibrated Color temp. 1/Color temp. 2/Color temp. 3/Color temp. 4 setting provides optimum color tracking. HIGH LB HB C-TEMP ZOOM2 CT Z2 C-TEMP CT The Screen Images in a 16:9 screen • Press the NORMAL button on the remote controller for the 4:3 aspect ratio video source...

VP8600 User Manual
Page 21
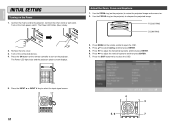
... arrow buttons (up/down 34, left/right 1 2) to navigate and make changes. Press ENTER to the Horizontal Size setting in the Picture Adjust menu, and then navigate to select Brightness. 3. Press 1 2 to enter menus and confirm settings. Press ENTER to select the language you make picture adjustment and change the Brightness setting in the Display menu. 1. Press 34 until Display is English.) 1. ENGLISH OPERATIONS On-Screen Display Menu Controls The projector...
... arrow buttons (up/down 34, left/right 1 2) to navigate and make changes. Press ENTER to the Horizontal Size setting in the Picture Adjust menu, and then navigate to select Brightness. 3. Press 1 2 to enter menus and confirm settings. Press ENTER to select the language you make picture adjustment and change the Brightness setting in the Display menu. 1. Press 34 until Display is English.) 1. ENGLISH OPERATIONS On-Screen Display Menu Controls The projector...

VP8600 User Manual
Page 23
... setting. STD; HB) Press 1 2 to adjust the color temperature. (Range: 1 Warm; 2 Normal; 3 Cool; 4 White) Press 1 2 to the default - DYN; HB) Press 1 2 to adjust the color temperature. *1 (Range: 1 Warm; 2 Normal; 3 Cool; 4 White) Press 1 2 to select the white peak enhancement ON or OFF OFF Resets all items in the Picture Adjust menu. DYN; STD; Picture Adjust Menu (Video) Press MENU to open the OSD. DEFAULT *1 *1 *1 *1 2 STD *1 OFF - - *1 The default value depends on input signal. 18 W-PEAK Reset DESCRIPTION DEFAULT...
... setting. STD; HB) Press 1 2 to adjust the color temperature. (Range: 1 Warm; 2 Normal; 3 Cool; 4 White) Press 1 2 to the default - DYN; HB) Press 1 2 to adjust the color temperature. *1 (Range: 1 Warm; 2 Normal; 3 Cool; 4 White) Press 1 2 to select the white peak enhancement ON or OFF OFF Resets all items in the Picture Adjust menu. DYN; STD; Picture Adjust Menu (Video) Press MENU to open the OSD. DEFAULT *1 *1 *1 *1 2 STD *1 OFF - - *1 The default value depends on input signal. 18 W-PEAK Reset DESCRIPTION DEFAULT...

VP8600 User Manual
Page 24
... 1 2 to adjust the white color temperature on blue. (Range: -128 to 127) Press 1 2 to adjust the black color temperature on red. (Range: -128 to 127) Press 1 2 to adjust the black color temperature on green 2. Fine Menu (PC/HD) Press MENU to the default val-ues. Blue - DEFAULT YPbPr 0 0 Full Black - - Press 34 to move to confirm the setting. Press 34 to move to change the source for blank screen (Range: Red - Black - Press...
... 1 2 to adjust the white color temperature on blue. (Range: -128 to 127) Press 1 2 to adjust the black color temperature on red. (Range: -128 to 127) Press 1 2 to adjust the black color temperature on green 2. Fine Menu (PC/HD) Press MENU to the default val-ues. Blue - DEFAULT YPbPr 0 0 Full Black - - Press 34 to move to confirm the setting. Press 34 to move to change the source for blank screen (Range: Red - Black - Press...
VP8600 User Manual
Page 25
... PIP mode to open Information menu. menu and press ENTER. PIP Configuration Menu Press P-MENU in the config. Deutsch; Displays the resolution and H/V in use. Number of hours lamp has been in PC mode. Press 34 to move to the default values. Press 1 2 to adjust values and press ENTER to the projector automatically shuts off if no signals are received and no operations are displayed only. O: support X: Not support Main Input Source PIP Source YPbPr...
... PIP mode to open Information menu. menu and press ENTER. PIP Configuration Menu Press P-MENU in the config. Deutsch; Displays the resolution and H/V in use. Number of hours lamp has been in PC mode. Press 34 to move to the default values. Press 1 2 to adjust values and press ENTER to the projector automatically shuts off if no signals are received and no operations are displayed only. O: support X: Not support Main Input Source PIP Source YPbPr...
VP8600 User Manual
Page 26
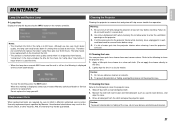
... apply the cleaner directly to enter the ventilation openings on , the Warning is 4,000 hours. ENGLISH MAINTENANCE Lamp Life and Replace Lamp Cleaning the Projector ❖ Lamp Hour Display the lamp life by Marantz. Although we recommend to do not use abrasive cleaners or solvents. 2. Cleaning the projector to clean the projector lens. 1. Replacement Parts When replacement parts are required, be guaranteed. ❖ Cleaning the Case Refer to the following to remove dust and grime will help ensure trouble-free operation.
... apply the cleaner directly to enter the ventilation openings on , the Warning is 4,000 hours. ENGLISH MAINTENANCE Lamp Life and Replace Lamp Cleaning the Projector ❖ Lamp Hour Display the lamp life by Marantz. Although we recommend to do not use abrasive cleaners or solvents. 2. Cleaning the projector to clean the projector lens. 1. Replacement Parts When replacement parts are required, be guaranteed. ❖ Cleaning the Case Refer to the following to remove dust and grime will help ensure trouble-free operation.
VP8600 User Manual
Page 27
... display. (This is blurred 1. Use the Keystone settings in suspend mode. • Ensure a connected notebook computer is configured for Troubleshooting In each problem-specific section, try the steps in the correct order. ❖ Problem: The image is usu- Keep a record of the projected image does not match the source image. 1. Have the projector serviced. (See "Having the Projector Serviced on the Picture Adjust menu of the OSD. 22 Often after time spent troubleshooting, the problem is turned...
... display. (This is blurred 1. Use the Keystone settings in suspend mode. • Ensure a connected notebook computer is configured for Troubleshooting In each problem-specific section, try the steps in the correct order. ❖ Problem: The image is usu- Keep a record of the projected image does not match the source image. 1. Have the projector serviced. (See "Having the Projector Serviced on the Picture Adjust menu of the OSD. 22 Often after time spent troubleshooting, the problem is turned...


