
ST7001 Spec Sheet
Page 1
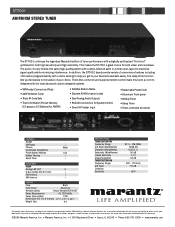
... station of tuner performance with custom-selected parts in a meticulous layout to maximize signal quality while minimizing interference. ST7001 AM/FM/XM STEREO TUNER The ST7001 continues the legendary Marantz tradition of your favorite broadcasts easily. The sleep timer function lets you get to change without notice. This makes the ST7001 a great choice for System Control • Direct IR Flasher Input • Detachable Power Code • Aluminum Front panel...
... station of tuner performance with custom-selected parts in a meticulous layout to maximize signal quality while minimizing interference. ST7001 AM/FM/XM STEREO TUNER The ST7001 continues the legendary Marantz tradition of your favorite broadcasts easily. The sleep timer function lets you get to change without notice. This makes the ST7001 a great choice for System Control • Direct IR Flasher Input • Detachable Power Code • Aluminum Front panel...

ST7001 User Manual
Page 3
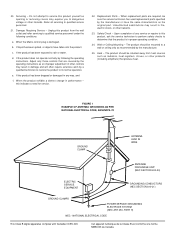
... of power supply to be sure the antenna or cable system is required, be placed in a built-in wire to an antenna discharge unit, size of grounding conductors, location of antenna-discharge unit, connection to grounding electrodes, and requirements for ventilation and to ensure reliable operation of protective device. Do not use instructions should not be sure the service technician has used a replacement plug specified...
... of power supply to be sure the antenna or cable system is required, be placed in a built-in wire to an antenna discharge unit, size of grounding conductors, location of antenna-discharge unit, connection to grounding electrodes, and requirements for ventilation and to ensure reliable operation of protective device. Do not use instructions should not be sure the service technician has used a replacement plug specified...
ST7001 User Manual
Page 4
... ELECTRICAL CODE This Class B digital apparatus complies with Canadian ICES-003. If the product has been exposed to its normal operation. Upon completion of other products (including amplifiers) that the product is damaged. The product should be mounted to qualified service personnel under the following the operating instructions. this product from heat sources such as the original part. If...
... ELECTRICAL CODE This Class B digital apparatus complies with Canadian ICES-003. If the product has been exposed to its normal operation. Upon completion of other products (including amplifiers) that the product is damaged. The product should be mounted to qualified service personnel under the following the operating instructions. this product from heat sources such as the original part. If...

ST7001 User Manual
Page 5
... PANEL ...4 REAR PANEL ...5 REMOTE CONTROL UNIT ...6 CONNECTIONS...8 CONNECTING THE ANTENNA TERMINALS ...8 CONNECTING THE AMPLIFIER ...9 OPERATION ...10 LISTENING TO FM/AM ...10 LISTENING TO XM SATELLITE RADIO ...14 SEARCH MODE ...17 OTHER OPERATION ...19 SETTING THE CLOCK ...19 TIMER PROGRAMS ...20 LAST FUNCTION MEMORY ...22 INITIALIZATION OF THE MICROPROCESSOR 22 TROUBLESHOOTING ...23 SPECIFICATIONS & DIMENSIONAL DRAWINGS 24 OTHERS ...25 FEATURES • XM Satellite Radio Ready • High Performance D/A Converter • 200 Channels, Group Presets...
... PANEL ...4 REAR PANEL ...5 REMOTE CONTROL UNIT ...6 CONNECTIONS...8 CONNECTING THE ANTENNA TERMINALS ...8 CONNECTING THE AMPLIFIER ...9 OPERATION ...10 LISTENING TO FM/AM ...10 LISTENING TO XM SATELLITE RADIO ...14 SEARCH MODE ...17 OTHER OPERATION ...19 SETTING THE CLOCK ...19 TIMER PROGRAMS ...20 LAST FUNCTION MEMORY ...22 INITIALIZATION OF THE MICROPROCESSOR 22 TROUBLESHOOTING ...23 SPECIFICATIONS & DIMENSIONAL DRAWINGS 24 OTHERS ...25 FEATURES • XM Satellite Radio Ready • High Performance D/A Converter • 200 Channels, Group Presets...
ST7001 User Manual
Page 6
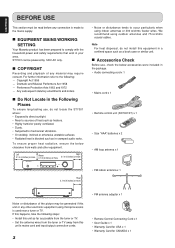
... is made to the mains supply. 7 EQUIPMENT MAINS WORKING SETTING Your Marantz product has been prepared to occur particularly when using outdoor antennas and 75 Ω/ohms coaxial cables. Left 0.1 m (4 inches) or more STANDBY POWER ON/STANDBY FM/AM TUNER ST7001 Above 0.1 m (4 inches) or more Right 0.1 m (4 inches) or more TUNING/PRESET CATEGORY DISPLAY MENU A-PRESET SLEEP TIMER TUNED STEREO BAND SELECT PUSH ENTER Rear 0.1 m (4 inches) or more • Noise or disturbance tends...
... is made to the mains supply. 7 EQUIPMENT MAINS WORKING SETTING Your Marantz product has been prepared to occur particularly when using outdoor antennas and 75 Ω/ohms coaxial cables. Left 0.1 m (4 inches) or more STANDBY POWER ON/STANDBY FM/AM TUNER ST7001 Above 0.1 m (4 inches) or more Right 0.1 m (4 inches) or more TUNING/PRESET CATEGORY DISPLAY MENU A-PRESET SLEEP TIMER TUNED STEREO BAND SELECT PUSH ENTER Rear 0.1 m (4 inches) or more • Noise or disturbance tends...
ST7001 User Manual
Page 8
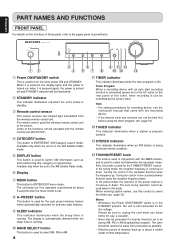
... standby. y Display u MENU button This button to unplug the cord when you leave home for and sets radio stations. Memo • Whenever the Power ON/STANDBY switch is in the clockwise direction tunes the frequency up or down. The tuner should be illuminated. Tuning the control in the XM Satelite Radio mode. When it is pressed again, the power is used to select the letters ( page 13). i A-PRESET button This button is turned off and STANDBY indicator will be used...
... standby. y Display u MENU button This button to unplug the cord when you leave home for and sets radio stations. Memo • Whenever the Power ON/STANDBY switch is in the clockwise direction tunes the frequency up or down. The tuner should be illuminated. Tuning the control in the XM Satelite Radio mode. When it is pressed again, the power is used to select the letters ( page 13). i A-PRESET button This button is turned off and STANDBY indicator will be used...
ST7001 User Manual
Page 9
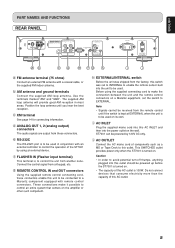
... potential turn-off thumps, anything plugged into this outlet should be powered by using the supplied connecting cord to EXTERNAL. ST7001 ANALOG OUT 1 2 L L XM R R RS-232C FLASHER IN REMOTE CONTROL IN OUT EXTERNAL INTERNAL AC IN AC OUTLET SWITCHED 100W MAX ab c d e fg h i j a FM antenna terminal (75 ohms) Connect an external FM antenna with remote control connectors. d ANALOG OUT 1, 2 (analog output) connectors The audio signals are output from the remote control unit if the switch is...
... potential turn-off thumps, anything plugged into this outlet should be powered by using the supplied connecting cord to EXTERNAL. ST7001 ANALOG OUT 1 2 L L XM R R RS-232C FLASHER IN REMOTE CONTROL IN OUT EXTERNAL INTERNAL AC IN AC OUTLET SWITCHED 100W MAX ab c d e fg h i j a FM antenna terminal (75 ohms) Connect an external FM antenna with remote control connectors. d ANALOG OUT 1, 2 (analog output) connectors The audio signals are output from the remote control unit if the switch is...

ST7001 User Manual
Page 10
...the operating mode. . DISPLAY button This button is pressed. ⁄1 TUNING buttons Use these parts, refer to the pages given in three levels) each time this button to switch from the standby mode to switch the preset channel's shift mode directly. z x c v b n m STANDBY ON 1 2 3 4 5 6 7 8 9 DIMMER DISPLAY 10 TUNING BAND ENTER MENU A-PRESET /A-TUNE SHIFT CHANNEL/ CONTROL A/B C/D E/F G/H I /J) Use these when presenting and recalling stations. v ENTER button This button is used to switch XM information such as artist name/song title, category or signal...
...the operating mode. . DISPLAY button This button is pressed. ⁄1 TUNING buttons Use these parts, refer to the pages given in three levels) each time this button to switch from the standby mode to switch the preset channel's shift mode directly. z x c v b n m STANDBY ON 1 2 3 4 5 6 7 8 9 DIMMER DISPLAY 10 TUNING BAND ENTER MENU A-PRESET /A-TUNE SHIFT CHANNEL/ CONTROL A/B C/D E/F G/H I /J) Use these when presenting and recalling stations. v ENTER button This button is used to switch XM information such as artist name/song title, category or signal...

ST7001 User Manual
Page 11
...be changed same setting as remote control. TUNER3 To set the remote control to the same setting as explained below. BAND ENTER MENU A-PRESET /A-TUNE SHIFT CHANNEL/ CONTROL A/B C/D E/F G/H I/J T-MODE SLEEP TIMER MEMO ⁄3 REMOTE CONTROLLER RC7001ST 7 To control a second or third tuner, select the remote control code as the remote control. STANDBY ON x 1 2 3 4 5 6 7 8 9 DIMMER DISPLAY 10 TUNING . Also set the remote control to TUNER1. To change main unit's remote control setting, hold down both the SHIFT button ⁄3 and 3 number button...
...be changed same setting as remote control. TUNER3 To set the remote control to the same setting as explained below. BAND ENTER MENU A-PRESET /A-TUNE SHIFT CHANNEL/ CONTROL A/B C/D E/F G/H I/J T-MODE SLEEP TIMER MEMO ⁄3 REMOTE CONTROLLER RC7001ST 7 To control a second or third tuner, select the remote control code as the remote control. STANDBY ON x 1 2 3 4 5 6 7 8 9 DIMMER DISPLAY 10 TUNING . Also set the remote control to TUNER1. To change main unit's remote control setting, hold down both the SHIFT button ⁄3 and 3 number button...
ST7001 User Manual
Page 13
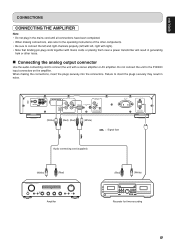
... MODEL NO. ST7001 ANALOG OUT 1 2 L L XM R R RS-232C FLASHER IN REMOTE CONTROL IN OUT EXTERNAL INTERNAL AC IN (White) (Red) (Red) (White) : Signal flow AC OUTLET SWITCHED 100W MAX Audio connecting cord (supplied) (White) (Red) (Red) (White) Amplifier Recorder for timer recording 9 Failure to the PHONO input connectors on the amplifier. When making connections, also refer to the operating instructions of the other components. • Be sure to connect the left and right channels...
... MODEL NO. ST7001 ANALOG OUT 1 2 L L XM R R RS-232C FLASHER IN REMOTE CONTROL IN OUT EXTERNAL INTERNAL AC IN (White) (Red) (Red) (White) : Signal flow AC OUTLET SWITCHED 100W MAX Audio connecting cord (supplied) (White) (Red) (Red) (White) Amplifier Recorder for timer recording 9 Failure to the PHONO input connectors on the amplifier. When making connections, also refer to the operating instructions of the other components. • Be sure to connect the left and right channels...

ST7001 User Manual
Page 14
... the desired station. At open frequencies, the noise is muted and the "TUNED" and "STEREO" indicators tuned off. • If the signal is completed. Either turn on the panel when the stereo broadcast is not illuminated. Either turn on the remote control. Press the POWER ON/STANDBY switch q or ON button , to turn the TUNING/PRESET knob !4 or press the CHANNEL/CONTROL button ⁄4 to select menu. 4. ENGLISH OPERATION LISTENING TO FM/AM 7 FM Auto preset memory 1.
... the desired station. At open frequencies, the noise is muted and the "TUNED" and "STEREO" indicators tuned off. • If the signal is completed. Either turn on the panel when the stereo broadcast is not illuminated. Either turn on the remote control. Press the POWER ON/STANDBY switch q or ON button , to turn the TUNING/PRESET knob !4 or press the CHANNEL/CONTROL button ⁄4 to select menu. 4. ENGLISH OPERATION LISTENING TO FM/AM 7 FM Auto preset memory 1.

ST7001 User Manual
Page 16
...BAND button c to select menu. 3. Press the TUNING/PRESET knob !4 or ENTER button v to 10). ENGLISH OPERATION 7 Preset stations (FM/AM) 1. When this button is pressed, the preset memory standby mode is set the preset mode and make the preset channel number flash. 4. Use the "Auto tuning" or "Manual tuning" operation to tune in the station to J. 6. Press the TUNING/PRESET knob !4 or ENTER v button and set the preset mode. 7-1.Watching the display, turn the TUNING/ PRESET knob !4, or press the CHANNEL/CONTROL button ⁄4 to select the desired preset channel. 7-2.Press...
...BAND button c to select menu. 3. Press the TUNING/PRESET knob !4 or ENTER button v to 10). ENGLISH OPERATION 7 Preset stations (FM/AM) 1. When this button is pressed, the preset memory standby mode is set the preset mode and make the preset channel number flash. 4. Use the "Auto tuning" or "Manual tuning" operation to tune in the station to J. 6. Press the TUNING/PRESET knob !4 or ENTER v button and set the preset mode. 7-1.Watching the display, turn the TUNING/ PRESET knob !4, or press the CHANNEL/CONTROL button ⁄4 to select the desired preset channel. 7-2.Press...
ST7001 User Manual
Page 17
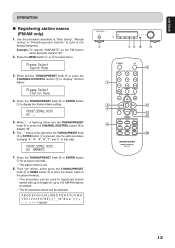
... desired frequency. Either turn the TUNING/PRESET knob !4 or press the CHANNEL/CONTROL button ⁄4 to tune in that order. 7. Use the same procedure to display "Station Name". 4. Example: To register "MARANTZ" as the FM station name at random. • The 63 characters below can be used to registered station names with up to select menu. 3. A B C D E F G H I J K L M N O P Q R S T U V W X * Y Z 0 1 2 3 4 5 6 7 8 9 space) STANDBY POWER ON/STANDBY FM/AM TUNER ST7001 q TUNING/PRESET CATEGORY DISPLAY MENU A-PRESET SLEEP TIMER TUNED STEREO BAND SELECT PUSH ENTER...
... desired frequency. Either turn the TUNING/PRESET knob !4 or press the CHANNEL/CONTROL button ⁄4 to tune in that order. 7. Use the same procedure to display "Station Name". 4. Example: To register "MARANTZ" as the FM station name at random. • The 63 characters below can be used to registered station names with up to select menu. 3. A B C D E F G H I J K L M N O P Q R S T U V W X * Y Z 0 1 2 3 4 5 6 7 8 9 space) STANDBY POWER ON/STANDBY FM/AM TUNER ST7001 q TUNING/PRESET CATEGORY DISPLAY MENU A-PRESET SLEEP TIMER TUNED STEREO BAND SELECT PUSH ENTER...
ST7001 User Manual
Page 18
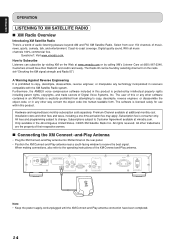
...Ω) GND AM MODEL NO. ST7001 ANALOG OUT 1 2 L L XM R R RS-232C FLASHER IN REMOTE CONTROL IN OUT EXTERNAL INTERNAL AC IN AC OUTLET SWITCHED 100W MAX Note • Keep the power supply cord unplugged until the XM Connect-and-Play antenna connection have their respective owners. 7 Connecting the XM Connect -and-Play Antenna • Plug the XM Connect-and-Play antenna into human-readable form. With all music channels 100% commercial free. Subscription fee...
...Ω) GND AM MODEL NO. ST7001 ANALOG OUT 1 2 L L XM R R RS-232C FLASHER IN REMOTE CONTROL IN OUT EXTERNAL INTERNAL AC IN AC OUTLET SWITCHED 100W MAX Note • Keep the power supply cord unplugged until the XM Connect-and-Play antenna connection have their respective owners. 7 Connecting the XM Connect -and-Play Antenna • Plug the XM Connect-and-Play antenna into human-readable form. With all music channels 100% commercial free. Subscription fee...

ST7001 User Manual
Page 23
... program, you want to set the hours and press the TUNING/PRESET knob !4 or ENTER button v. The clock time can be set 12-hour or 24-hour system. The clock now starts. • In the event of the week flashes. 3. STANDBY POWER ON/STANDBY FM/AM TUNER ST7001 TUNING/PRESET CATEGORY DISPLAY MENU A-PRESET SLEEP TIMER TUNED STEREO BAND SELECT PUSH ENTER !4 STANDBY ON v 1 2 3 4 5 6 7 8 9 DIMMER DISPLAY 10 TUNING BAND ENTER MENU A-PRESET /A-TUNE SHIFT CHANNEL/ CONTROL A/B C/D E/F G/H I/J T-MODE SLEEP TIMER MEMO REMOTE CONTROLLER...
... program, you want to set the hours and press the TUNING/PRESET knob !4 or ENTER button v. The clock time can be set 12-hour or 24-hour system. The clock now starts. • In the event of the week flashes. 3. STANDBY POWER ON/STANDBY FM/AM TUNER ST7001 TUNING/PRESET CATEGORY DISPLAY MENU A-PRESET SLEEP TIMER TUNED STEREO BAND SELECT PUSH ENTER !4 STANDBY ON v 1 2 3 4 5 6 7 8 9 DIMMER DISPLAY 10 TUNING BAND ENTER MENU A-PRESET /A-TUNE SHIFT CHANNEL/ CONTROL A/B C/D E/F G/H I/J T-MODE SLEEP TIMER MEMO REMOTE CONTROLLER...

ST7001 User Manual
Page 24
... display indicate "TIMER PROGRAM x SET". Either turn the TUNING/PRESET knob !4 or press the CHANNEL/CONTROL button ⁄4 to select Preset station to scroll the timer setting contents. • If timer program is displayed. 2. Select the Operation method. Press the TUNING/PRESET knob !4 or ENTER button v to decide the operation. When you select "ONCE" or "EVERYWEEK", you can use the TUNING/PRESET knob !4 or pressing the CHANNEL/CONTROL button ⁄4 to select the first day, and then press the TUNING/PRESET...
... display indicate "TIMER PROGRAM x SET". Either turn the TUNING/PRESET knob !4 or press the CHANNEL/CONTROL button ⁄4 to select Preset station to scroll the timer setting contents. • If timer program is displayed. 2. Select the Operation method. Press the TUNING/PRESET knob !4 or ENTER button v to decide the operation. When you select "ONCE" or "EVERYWEEK", you can use the TUNING/PRESET knob !4 or pressing the CHANNEL/CONTROL button ⁄4 to select the first day, and then press the TUNING/PRESET...

ST7001 User Manual
Page 25
... program number. 3. Either turn the TUNING/PRESET knob !4 or press the CHANNEL/CONTROL button ⁄4 to standby mode. • You can cancel the Timer program setting procedure at any time by pressing the TIMER button ⁄7. 7 Confirm and change timer program • You can activate regardless of power on again, repeat this procedure and select "TIMER PROGRAM x ON". STANDBY POWER ON/STANDBY FM/AM TUNER ST7001 TUNING/PRESET CATEGORY DISPLAY MENU A-PRESET SLEEP TIMER TUNED STEREO BAND SELECT PUSH ENTER !4 STANDBY ON v 1 2 3 4 5 6 7 8 9 DIMMER DISPLAY...
... program number. 3. Either turn the TUNING/PRESET knob !4 or press the CHANNEL/CONTROL button ⁄4 to standby mode. • You can cancel the Timer program setting procedure at any time by pressing the TIMER button ⁄7. 7 Confirm and change timer program • You can activate regardless of power on again, repeat this procedure and select "TIMER PROGRAM x ON". STANDBY POWER ON/STANDBY FM/AM TUNER ST7001 TUNING/PRESET CATEGORY DISPLAY MENU A-PRESET SLEEP TIMER TUNED STEREO BAND SELECT PUSH ENTER !4 STANDBY ON v 1 2 3 4 5 6 7 8 9 DIMMER DISPLAY...

ST7001 User Manual
Page 26
... is turned on the remote control. 2. Unplug the mains cord from the power outlet after specific period of time. 1. STANDBY POWER ON/STANDBY FM/AM TUNER ST7001 q TUNING/PRESET CATEGORY DISPLAY MENU A-PRESET SLEEP TIMER TUNED STEREO BAND SELECT PUSH ENTER ru REMOTE CONTROLLER RC7001ST 22 Note that the entire display is equipped with a back-up memory. OFF 10 20 30 60 90 120 3. Press the SLEEP button m. STANDBY ON m 1 2 3 4 5 6 7 8 9 DIMMER DISPLAY 10 TUNING BAND ENTER MENU A-PRESET /A-TUNE SHIFT CHANNEL/ CONTROL A/B C/D E/F G/H I/J T-MODE...
... is turned on the remote control. 2. Unplug the mains cord from the power outlet after specific period of time. 1. STANDBY POWER ON/STANDBY FM/AM TUNER ST7001 q TUNING/PRESET CATEGORY DISPLAY MENU A-PRESET SLEEP TIMER TUNED STEREO BAND SELECT PUSH ENTER ru REMOTE CONTROLLER RC7001ST 22 Note that the entire display is equipped with a back-up memory. OFF 10 20 30 60 90 120 3. Press the SLEEP button m. STANDBY ON m 1 2 3 4 5 6 7 8 9 DIMMER DISPLAY 10 TUNING BAND ENTER MENU A-PRESET /A-TUNE SHIFT CHANNEL/ CONTROL A/B C/D E/F G/H I/J T-MODE...
ST7001 User Manual
Page 27
...; Turn off the TV. 8 heard on when POWER ON/STANDBY switch is pressed. • Mains cord's plug is displayed. • The signal cannot be a malfunction. switch to the operating instructions? 3. Measures • Plug the mains cord in the opposite direction. 9 • Install an outdoor antenna. 8 Nothing happens when remote • Are the batteries dead? • Replace the batteries with new ones. 3 control buttons are modulated by the power source frequency. • Insert the plug...
...; Turn off the TV. 8 heard on when POWER ON/STANDBY switch is pressed. • Mains cord's plug is displayed. • The signal cannot be a malfunction. switch to the operating instructions? 3. Measures • Plug the mains cord in the opposite direction. 9 • Install an outdoor antenna. 8 Nothing happens when remote • Are the batteries dead? • Replace the batteries with new ones. 3 control buttons are modulated by the power source frequency. • Insert the plug...
ST7001 User Manual Addendum Shee
Page 1
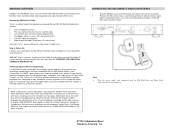
... Digital Channels • The most sports play • Major league Baseball. Subscriptions subject to the operating instructions of XM Satellite Radio Inc. © 2006 XM Satellite Radio Inc. ST7001 Addendum Sheet Marantz America, Inc. Note • Keep the power supply cord unplugged until the XM Mini-Tuner and Home Dock connection have their Radio ID and credit card ready.The Radio ID can receive XM Satellite Radio® by -play...
... Digital Channels • The most sports play • Major league Baseball. Subscriptions subject to the operating instructions of XM Satellite Radio Inc. © 2006 XM Satellite Radio Inc. ST7001 Addendum Sheet Marantz America, Inc. Note • Keep the power supply cord unplugged until the XM Mini-Tuner and Home Dock connection have their Radio ID and credit card ready.The Radio ID can receive XM Satellite Radio® by -play...


