Owners Manual English
Page 3
Contents Connections Playback Basic operation Turning the power on Switching the power to standby Selecting the input source Adjusting the volume Turning off the sound temporarily (Muting) Listening to Internet Radio Listening to Internet Radio Playing back files stored on PC or NAS Playing back files stored on PC or NAS Playing a USB memory device Playing files stored on USB memory devices Listening to music on a Bluetooth device Listening to music on a Bluetooth...
Contents Connections Playback Basic operation Turning the power on Switching the power to standby Selecting the input source Adjusting the volume Turning off the sound temporarily (Muting) Listening to Internet Radio Listening to Internet Radio Playing back files stored on PC or NAS Playing back files stored on PC or NAS Playing a USB memory device Playing files stored on USB memory devices Listening to music on a Bluetooth device Listening to music on a Bluetooth...
Owners Manual English
Page 16
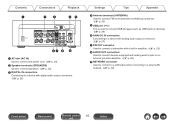
... used to connect USB storages (such as USB memory devices). (v p. 29) F ANALOG IN connectors Connecting to a device with analog audio output connectors. (v p. 27) G SW OUT connector Used to connect a subwoofer with a built-in amplifier. (v p. 23) H AUDIO OUT connectors Used to connect devices equipped with analog audio inputs or an external pre-main amplifier. (v p. 28) I NETWORK connector Used to connect to a LAN cable when connecting to a wired LAN network. (v p. 32) Front panel Rear panel Remote control 16 unit Index Contents q Connections...
... used to connect USB storages (such as USB memory devices). (v p. 29) F ANALOG IN connectors Connecting to a device with analog audio output connectors. (v p. 27) G SW OUT connector Used to connect a subwoofer with a built-in amplifier. (v p. 23) H AUDIO OUT connectors Used to connect devices equipped with analog audio inputs or an external pre-main amplifier. (v p. 28) I NETWORK connector Used to connect to a LAN cable when connecting to a wired LAN network. (v p. 32) Front panel Rear panel Remote control 16 unit Index Contents q Connections...
Owners Manual English
Page 19
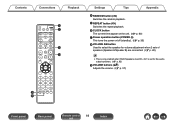
P CLOCK button The current time appear on the unit. (v p. 80) Q Power operation button (POWER X) This turns the power on/off (standby). (v p. 36) R VOLUME A/B button Used to select the speaker for volume adjustment when 2 sets of speakers (Speaker A/Speaker B) are connected. (v p. 82) 0 This is only enabled when "Both Speakers A and B = On" is set for the audio output speakers. (v p. 82) S VOLUME buttons (df) Adjusts the volume. (v p. 37) Q4 Q5 Front panel Rear panel Remote control 19 unit Index O REPEAT button (L) Switches the repeat playback. Contents Connections Playback Q6 Q7...
P CLOCK button The current time appear on the unit. (v p. 80) Q Power operation button (POWER X) This turns the power on/off (standby). (v p. 36) R VOLUME A/B button Used to select the speaker for volume adjustment when 2 sets of speakers (Speaker A/Speaker B) are connected. (v p. 82) 0 This is only enabled when "Both Speakers A and B = On" is set for the audio output speakers. (v p. 82) S VOLUME buttons (df) Adjusts the volume. (v p. 37) Q4 Q5 Front panel Rear panel Remote control 19 unit Index O REPEAT button (L) Switches the repeat playback. Contents Connections Playback Q6 Q7...
Owners Manual English
Page 22
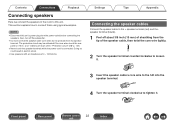
... how to connect them using typical examples. "Protection circuit" (v p. 145) 0 Never touch the speaker terminals while the power cord is connected. NOTE 0 Disconnect this unit. Contents Connections Playback Connecting speakers Here we connect the speakers in electric shock. 0 Use speakers with an impedance of 4 - 16 Ω/ohms. Settings Tips Appendix Connecting the speaker cables Connect the speaker cable to the + speaker terminal (red) and the speaker terminal (black). 1 Peel off the subwoofer. 0 Connect so that the speaker cable core wires do...
... how to connect them using typical examples. "Protection circuit" (v p. 145) 0 Never touch the speaker terminals while the power cord is connected. NOTE 0 Disconnect this unit. Contents Connections Playback Connecting speakers Here we connect the speakers in electric shock. 0 Use speakers with an impedance of 4 - 16 Ω/ohms. Settings Tips Appendix Connecting the speaker cables Connect the speaker cable to the + speaker terminal (red) and the speaker terminal (black). 1 Peel off the subwoofer. 0 Connect so that the speaker cable core wires do...
Owners Manual English
Page 23
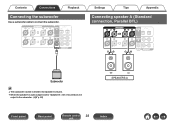
Contents Connections Connecting the subwoofer Use a subwoofer cable to the subwoofer. (v p. 82) (R) (L) SPEAKERS A Front panel Rear panel Remote control 23 unit Index Subwoofer 0 The subwoofer volume is linked to the Speaker A volume. 0 When the speaker for audio output is set to "Speaker B = On", this unit does not output to connect the subwoofer. Playback Settings Tips Appendix Connecting speaker A (Standard connection, Parallel BTL) wq wq ..
Contents Connections Connecting the subwoofer Use a subwoofer cable to the subwoofer. (v p. 82) (R) (L) SPEAKERS A Front panel Rear panel Remote control 23 unit Index Subwoofer 0 The subwoofer volume is linked to the Speaker A volume. 0 When the speaker for audio output is set to "Speaker B = On", this unit does not output to connect the subwoofer. Playback Settings Tips Appendix Connecting speaker A (Standard connection, Parallel BTL) wq wq ..
Owners Manual English
Page 70
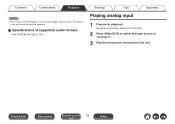
This causes noise and could damage the speakers. Front panel Rear panel Remote control 70 unit Index Check the connection, then turn on this units. 2 Press ANALOG IN to switch the input source to "Analog In". 3 Play the component connected to this unit. Contents Connections Playback NOTE 0 Do not input non-PCM signals, such as Dolby Digital, DTS and AAC. Settings Tips Appendix Playing analog input 1 Prepare for playback. o Specifications of supported audio formats See "DIGITAL IN" (v p. 139).
This causes noise and could damage the speakers. Front panel Rear panel Remote control 70 unit Index Check the connection, then turn on this units. 2 Press ANALOG IN to switch the input source to "Analog In". 3 Play the component connected to this unit. Contents Connections Playback NOTE 0 Do not input non-PCM signals, such as Dolby Digital, DTS and AAC. Settings Tips Appendix Playing analog input 1 Prepare for playback. o Specifications of supported audio formats See "DIGITAL IN" (v p. 139).
Owners Manual English
Page 72
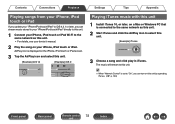
... details, see your device's manual. 2 Play the song on this unit by operating iTunes. (v p. 104) Front panel Rear panel Remote control 72 unit Index The music will stream to the same network as this unit. 2 Start iTunes and click the AirPlay icon to select this unit. [Example] iTunes 3 Choose a song and click play in your "iPhone/iPod touch/iPad" directly to this unit. ..
... details, see your device's manual. 2 Play the song on this unit by operating iTunes. (v p. 104) Front panel Rear panel Remote control 72 unit Index The music will stream to the same network as this unit. 2 Start iTunes and click the AirPlay icon to select this unit. [Example] iTunes 3 Choose a song and click play in your "iPhone/iPod touch/iPad" directly to this unit. ..
Owners Manual English
Page 80
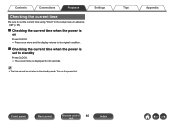
Settings Tips Appendix Front panel Rear panel Remote control 80 unit Index Turn on Press CLOCK. 0 Press once more and the display returns to standby Press CLOCK. 0 The current time is on the power first. Contents Connections Playback Checking the current time Be sure to set the current time using "Clock" in the setup menu in the standby mode. o Checking the current time when the power is set when in advance. (v p. 95) o Checking the current time when the power is displayed for 30 seconds. 0 The time cannot be set to its original condition.
Settings Tips Appendix Front panel Rear panel Remote control 80 unit Index Turn on Press CLOCK. 0 Press once more and the display returns to standby Press CLOCK. 0 The current time is on the power first. Contents Connections Playback Checking the current time Be sure to set the current time using "Clock" in the setup menu in the standby mode. o Checking the current time when the power is set when in advance. (v p. 95) o Checking the current time when the power is displayed for 30 seconds. 0 The time cannot be set to its original condition.
Owners Manual English
Page 82
...Selecting speakers to output audio You can be selected for the audio output speakers. 0 When using the multi-drive connection, set "Speaker Configuration" - The current setting is displayed. 2 Press SPEAKER A/B repeatedly to adjust the volume. 0 This is only enabled when "Both Speakers A and B = On" is pressed. Speaker B = On : Outputs audio from Speaker A only. "Amplifier Mode" in the unit display. 2 Use VOLUME df to select the setting. 0 The setting changes each time SPEAKER A/B is set for volume adjustment. 1 Press VOLUME A/B. Speaker A = On : Outputs audio from Speaker...
...Selecting speakers to output audio You can be selected for the audio output speakers. 0 When using the multi-drive connection, set "Speaker Configuration" - The current setting is displayed. 2 Press SPEAKER A/B repeatedly to adjust the volume. 0 This is only enabled when "Both Speakers A and B = On" is pressed. Speaker B = On : Outputs audio from Speaker A only. "Amplifier Mode" in the unit display. 2 Use VOLUME df to select the setting. 0 The setting changes each time SPEAKER A/B is set for volume adjustment. 1 Press VOLUME A/B. Speaker A = On : Outputs audio from Speaker...

Owners Manual English
Page 84
... 102 102 102 Front panel Rear panel Remote control 84 unit Index Contents Connections Playback Setting items General Detailed items Alarm Clock Clock Mode TV Input IR Control CD Auto Play Illumination Language Auto-Standby Usage Data Firmware Information Reset Settings Tips Appendix Description/Detailed items Sets the timer playback. Set this unit to the factory default values. Assign operations on this when playing audio from a TV on . Sets the unit power to Marantz. Selects whether or not to...
... 102 102 102 Front panel Rear panel Remote control 84 unit Index Contents Connections Playback Setting items General Detailed items Alarm Clock Clock Mode TV Input IR Control CD Auto Play Illumination Language Auto-Standby Usage Data Firmware Information Reset Settings Tips Appendix Description/Detailed items Sets the timer playback. Set this unit to the factory default values. Assign operations on this when playing audio from a TV on . Sets the unit power to Marantz. Selects whether or not to...
Owners Manual English
Page 93
... can adjust the analog audio output level using the VOLUME df buttons. Adjusting the volume of speaker B will not alter analog audio output volume. (v p. 82) 0 When the speaker for audio output is set individually. 0 The "Response" setting is changed from "Variable" to "Fixed". 0 Before changing the settings, turn the volume of the speaker output. Contents Connections Playback o Response Switches the frequency characteristics of the amp connected to the AUDIO OUT connectors and headphones connected to the unit to the minimum volume. Variable (Default): You can be set to "Speaker...
... can adjust the analog audio output level using the VOLUME df buttons. Adjusting the volume of speaker B will not alter analog audio output volume. (v p. 82) 0 When the speaker for audio output is set individually. 0 The "Response" setting is changed from "Variable" to "Fixed". 0 Before changing the settings, turn the volume of the speaker output. Contents Connections Playback o Response Switches the frequency characteristics of the amp connected to the AUDIO OUT connectors and headphones connected to the unit to the minimum volume. Variable (Default): You can be set to "Speaker...

Owners Manual English
Page 97
... are already assigned to the TV remote control. CD Auto Play When the disc tray is closed, the unit can detect the CD, automatically switch the input source to the remote control of your TV and press ENTER. English / Français / Español (Default : English) Front panel Rear panel Remote control 97 unit Index Volume Up / Volume Down / Mute / Power Toggle / Power On / Power Off / Input Optical In 1 / Input Optical In 2 / Input Analog In 0 The operations indicated...
... are already assigned to the TV remote control. CD Auto Play When the disc tray is closed, the unit can detect the CD, automatically switch the input source to the remote control of your TV and press ENTER. English / Français / Español (Default : English) Front panel Rear panel Remote control 97 unit Index Volume Up / Volume Down / Mute / Power Toggle / Power On / Power Off / Input Optical In 1 / Input Optical In 2 / Input Analog In 0 The operations indicated...
Owners Manual English
Page 99
... "Update Error" message appears in standby mode. Update Later: Update later. 0 This unit automatically retries updating if updating fails. Settings Tips Appendix o Auto-Update This unit will automatically update to the newest firmware when in the menu changes too. (v p. 95) Front panel Rear panel Remote control 99 unit Index On: Off (Default): Turns on the display. See "Troubleshooting" - "Update/upgrade error messages" for "Clock" in standby mode. Set the time zone that matches the area where you live. 0 This menu cannot be selected when...
... "Update Error" message appears in standby mode. Update Later: Update later. 0 This unit automatically retries updating if updating fails. Settings Tips Appendix o Auto-Update This unit will automatically update to the newest firmware when in the menu changes too. (v p. 95) Front panel Rear panel Remote control 99 unit Index On: Off (Default): Turns on the display. See "Troubleshooting" - "Update/upgrade error messages" for "Clock" in standby mode. Set the time zone that matches the area where you live. 0 This menu cannot be selected when...

Owners Manual English
Page 100
... this setting is displayed on the display of this unit at power on . o Upgrade Notification When the latest Upgrade firmware is available, a notification message is set to receive updates and upgrades. The notification message is displayed for this unit to "Off". On (Default): Off: Enables this unit. On (Default): Off: Display upgrade message. Do not display upgrade message. 0 This menu cannot be selected when "Allow Update" is turned on . Settings Tips Appendix Front panel Rear panel Remote control...
... this setting is displayed on the display of this unit at power on . o Upgrade Notification When the latest Upgrade firmware is available, a notification message is set to receive updates and upgrades. The notification message is displayed for this unit to "Off". On (Default): Off: Enables this unit. On (Default): Off: Display upgrade message. Do not display upgrade message. 0 This menu cannot be selected when "Allow Update" is turned on . Settings Tips Appendix Front panel Rear panel Remote control...
Owners Manual English
Page 108
... in the default settings of this unit. 0 Set up the IP Address, Subnet Mask, Gateway and DNS server information only when assigning a fixed IP address or when connecting to the Internet, recheck the connections and settings. (v p. 32) 0 If you do not understand about Internet connection, contact your ISP (Internet Service Provider) or the store from your provider. Front panel Rear panel Remote control 108 unit...
... in the default settings of this unit. 0 Set up the IP Address, Subnet Mask, Gateway and DNS server information only when assigning a fixed IP address or when connecting to the Internet, recheck the connections and settings. (v p. 32) 0 If you do not understand about Internet connection, contact your ISP (Internet Service Provider) or the store from your provider. Front panel Rear panel Remote control 108 unit...

Owners Manual English
Page 131
... when the power is on. Network settings are reset to select "Internet Radio", "Music Servers" or "USB Music". 3 Press and hold the BACK and X buttons on the display. 5 "Completed" is shown in the display when reset is complete. Make settings again. Front panel Rear panel Remote control 131 unit Index BACK INPUT 4 Remove your fingers from the two buttons when "Please wait..." Contents Connections Playback Settings Tips Appendix Resetting network settings If network...
... when the power is on. Network settings are reset to select "Internet Radio", "Music Servers" or "USB Music". 3 Press and hold the BACK and X buttons on the display. 5 "Completed" is shown in the display when reset is complete. Make settings again. Front panel Rear panel Remote control 131 unit Index BACK INPUT 4 Remove your fingers from the two buttons when "Please wait..." Contents Connections Playback Settings Tips Appendix Resetting network settings If network...
Owners Manual English
Page 147
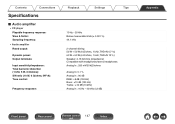
Contents Connections Specifications o Audio amplifier 0 CD player Playable frequency response: Wow & flutter: Sampling frequency: 0 Audio amplifier Rated output: Dynamic power: Output terminals: Input sensitivity/impedance: Total harmonic distortion (1 kHz, 5 W, 6 Ω/ohms): S/N ratio (10 W, 6 Ω/ohms, IHF-A): Tone control: Frequency response: Playback Settings Tips 10 Hz - 20 kHz Below measurable limits (± 0.001 %) 44.1 kHz 2-channel driving 50 W + 50 W (6 Ω/ohms, 1 kHz, THD+N 0.7 %) 60 W + 60 W (6 Ω/ohms, 1 kHz, THD+N 10 %) Speaker: 4-16 Ω/ohms (impedance) ...
Contents Connections Specifications o Audio amplifier 0 CD player Playable frequency response: Wow & flutter: Sampling frequency: 0 Audio amplifier Rated output: Dynamic power: Output terminals: Input sensitivity/impedance: Total harmonic distortion (1 kHz, 5 W, 6 Ω/ohms): S/N ratio (10 W, 6 Ω/ohms, IHF-A): Tone control: Frequency response: Playback Settings Tips 10 Hz - 20 kHz Below measurable limits (± 0.001 %) 44.1 kHz 2-channel driving 50 W + 50 W (6 Ω/ohms, 1 kHz, THD+N 0.7 %) 60 W + 60 W (6 Ω/ohms, 1 kHz, THD+N 10 %) Speaker: 4-16 Ω/ohms (impedance) ...

Owners Manual English
Page 154
... 2015.01 29 Version Front panel Rear panel Remote control 154 unit Index However, note that we do not offer support for this product, you may procure, modify or distribute the source code of the source code. Please also understand that we make no guarantees concerning the source code. Contents Connections Playback License o License information for the software used for the contents of the...
... 2015.01 29 Version Front panel Rear panel Remote control 154 unit Index However, note that we do not offer support for this product, you may procure, modify or distribute the source code of the source code. Please also understand that we make no guarantees concerning the source code. Contents Connections Playback License o License information for the software used for the contents of the...

Product Information Sheet
Page 1
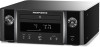
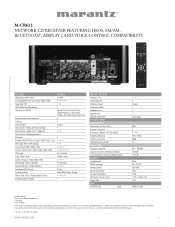
... erasable discs, and is equipped with your TV remote and easily adjust volume up, volume down, mute and source selection Highlights • Power and connectivity to suit your audio preference: 60W x 2ch (6 ohms), or 4x 30W for speaker A/B with individual volume setting • Plays CD, WMA/MP3 (CD-R/RW) and features an AM/FM tuner: No matter how you listen, enjoy your music with elevated Marantz sound • Stream music...
... erasable discs, and is equipped with your TV remote and easily adjust volume up, volume down, mute and source selection Highlights • Power and connectivity to suit your audio preference: 60W x 2ch (6 ohms), or 4x 30W for speaker A/B with individual volume setting • Plays CD, WMA/MP3 (CD-R/RW) and features an AM/FM tuner: No matter how you listen, enjoy your music with elevated Marantz sound • Stream music...
Product Information Sheet
Page 2
... use of channels Bi-Amping / Speaker A+B / Parallel BTL Frequency Response Signal to noise ratio Total Harmonic Distortion FM SECTION Frequency range FM Signal to third party licenses found here: www.spotify.com/connect/third-party-licenses. is a trademark or registered trademark of their respective owners. www.marantz.com |V01| Microphone Built-in / Out Digital optical In USB input: type A Subwoofer PreOut Headphone Out Speaker A / B Speaker binding Post SPECIFICATIONS AUDIO SECTION Power Output (6 ohm, 1kHz) Number...
... use of channels Bi-Amping / Speaker A+B / Parallel BTL Frequency Response Signal to noise ratio Total Harmonic Distortion FM SECTION Frequency range FM Signal to third party licenses found here: www.spotify.com/connect/third-party-licenses. is a trademark or registered trademark of their respective owners. www.marantz.com |V01| Microphone Built-in / Out Digital optical In USB input: type A Subwoofer PreOut Headphone Out Speaker A / B Speaker binding Post SPECIFICATIONS AUDIO SECTION Power Output (6 ohm, 1kHz) Number...


