
Owner s Manual In English
Page 2
... a home network (LAN) 90 17 Wired LAN 90 22 Wireless LAN 91 26 Connecting an external control device 92 30 REMOTE CONTROL jacks 92 DC OUT jacks 93 Connecting the power cord 94 35 35 Playback 45 Basic operation 96 50 Turning the power on 96 75 Selecting the input source 96 Adjusting the volume 97 76 Turning off the sound temporarily (Muting) 97 77 Playback a DVD player/Blu-ray Disc player 97 78 Front panel Display Rear panel 2 Remote...
... a home network (LAN) 90 17 Wired LAN 90 22 Wireless LAN 91 26 Connecting an external control device 92 30 REMOTE CONTROL jacks 92 DC OUT jacks 93 Connecting the power cord 94 35 35 Playback 45 Basic operation 96 50 Turning the power on 96 75 Selecting the input source 96 Adjusting the volume 97 76 Turning off the sound temporarily (Muting) 97 77 Playback a DVD player/Blu-ray Disc player 97 78 Front panel Display Rear panel 2 Remote...

Owner s Manual In English
Page 8
...height in setup menu. If you install any height speakers instead of surround height speakers, you to standard 5.1-channel. AVP also can play Auro-3D using standard 5.1-channel and front height speakers. Contents Connections Playback Settings Tips Appendix Upgrade Upgrade (Auro-3D) Auro-3D Features High quality sound Connecting a power amp Speaker installation Layout including height speakers and top speakers Speaker configuration and "Amp Assign" settings Auro-3D 9.1/10.1-channel system Selecting a sound mode Description of sound mode types Auro-3D sound mode Sound mode that...
...height in setup menu. If you install any height speakers instead of surround height speakers, you to standard 5.1-channel. AVP also can play Auro-3D using standard 5.1-channel and front height speakers. Contents Connections Playback Settings Tips Appendix Upgrade Upgrade (Auro-3D) Auro-3D Features High quality sound Connecting a power amp Speaker installation Layout including height speakers and top speakers Speaker configuration and "Amp Assign" settings Auro-3D 9.1/10.1-channel system Selecting a sound mode Description of sound mode types Auro-3D sound mode Sound mode that...

Owner s Manual In English
Page 50
...1ch (Default) 66 9.1-channel playback (bi-amp connection of front speakers) 9.1ch (Bi-Amp) 73 9.1-channel playback + second pair of front speakers 9.1ch + Front B 74 The sound mode that are supported. See "Relationship between sound modes and channel output" (v p. 322) for the sound modes that can create speaker systems such as a bi-amp connection by changing the "Amp Assign" settings. Contents Connections Playback Settings Tips Appendix Speaker configuration and "Amp Assign" settings This system configuration plays back 11-channels. Front panel Display Rear panel 50...
...1ch (Default) 66 9.1-channel playback (bi-amp connection of front speakers) 9.1ch (Bi-Amp) 73 9.1-channel playback + second pair of front speakers 9.1ch + Front B 74 The sound mode that are supported. See "Relationship between sound modes and channel output" (v p. 322) for the sound modes that can create speaker systems such as a bi-amp connection by changing the "Amp Assign" settings. Contents Connections Playback Settings Tips Appendix Speaker configuration and "Amp Assign" settings This system configuration plays back 11-channels. Front panel Display Rear panel 50...

Owner s Manual In English
Page 113
... stations and "Manual" mode that lets you want listen to "HD Radio". CH/PAGE d f u i o p 0 - 9 Function Selects the radio station (up/down) Selects preset radio stations Selects the radio station (up/down) Selects preset radio stations Preset channel selection / Direct frequency tuning Front panel Display Rear panel 113 Remote Index Contents Connections Playback Settings Tips Appendix Listening to an AM broadcast. 6 Press TUNE + or TUNE - "Connecting an HD Radio antenna" (v p. 88) 2 Press TUNER to switch the input source to . The option menu screen is "Auto...
... stations and "Manual" mode that lets you want listen to "HD Radio". CH/PAGE d f u i o p 0 - 9 Function Selects the radio station (up/down) Selects preset radio stations Selects the radio station (up/down) Selects preset radio stations Preset channel selection / Direct frequency tuning Front panel Display Rear panel 113 Remote Index Contents Connections Playback Settings Tips Appendix Listening to an AM broadcast. 6 Press TUNE + or TUNE - "Connecting an HD Radio antenna" (v p. 88) 2 Press TUNER to switch the input source to . The option menu screen is "Auto...

Owner s Manual In English
Page 116
... Connections Playback Settings Tips Appendix Selecting an audio program 1 Select the tuning mode ("HD-Auto", "Auto" or "Manual"). 2 Press TUNE + or TUNE - Front panel Display Rear panel 116 Remote Index The option menu screen is indicated on the display. to tune in the desired Multicast channel. 0 If the station you are tuning in has multiple audio programs, "HD1"is displayed. 2 Use ui to receive the multicast channels. 0 If the station signal is weak, the digital audio of 56 radio stations can be automatically preset. 1 Press OPTION when the input source...
... Connections Playback Settings Tips Appendix Selecting an audio program 1 Select the tuning mode ("HD-Auto", "Auto" or "Manual"). 2 Press TUNE + or TUNE - Front panel Display Rear panel 116 Remote Index The option menu screen is indicated on the display. to tune in the desired Multicast channel. 0 If the station you are tuning in has multiple audio programs, "HD1"is displayed. 2 Use ui to receive the multicast channels. 0 If the station signal is weak, the digital audio of 56 radio stations can be automatically preset. 1 Press OPTION when the input source...

Owner s Manual In English
Page 129
... art can be displayed while the music files are playing. 0 If you use Ver.11 or later of Windows Media Player, the album art for WMA files can be displayed. 0 WMA Lossless files can be played when using a wired LAN. 0 Depending on the size of each channel to match the input source (Channel Level Adjust)" (v p. 150) 0 "Adjusting the tone (Tone)" (v p. 151) 0 "Displaying your desired video during audio playback (Video Select)" (v p. 152) 0 "Adjusting the picture...
... art can be displayed while the music files are playing. 0 If you use Ver.11 or later of Windows Media Player, the album art for WMA files can be displayed. 0 WMA Lossless files can be played when using a wired LAN. 0 Depending on the size of each channel to match the input source (Channel Level Adjust)" (v p. 150) 0 "Adjusting the tone (Tone)" (v p. 151) 0 "Displaying your desired video during audio playback (Video Select)" (v p. 152) 0 "Adjusting the picture...

Owner s Manual In English
Page 151
... panel Display Rear panel 151 Remote Index Contents Connections Playback Adjusting the tone (Tone) Adjusts the tonal quality of the sound. 1 Press OPTION. On: Off (Default): Allow tone adjustment (bass, treble). Settings Tips Appendix 4 Select "On" in the menu "HDMI Audio Out" is set the tone control function to "TV". (v p. 213) 0 This cannot be adjusted. Adjust treble. 5 Use o p to adjust the tone, then press ENTER. -6 dB - +6 dB (Default : 0 dB) 0 "Tone" settings are stored for each input source. 0 This cannot be set when the sound mode is set to "Direct...
... panel Display Rear panel 151 Remote Index Contents Connections Playback Adjusting the tone (Tone) Adjusts the tonal quality of the sound. 1 Press OPTION. On: Off (Default): Allow tone adjustment (bass, treble). Settings Tips Appendix 4 Select "On" in the menu "HDMI Audio Out" is set the tone control function to "TV". (v p. 213) 0 This cannot be adjusted. Adjust treble. 5 Use o p to adjust the tone, then press ENTER. -6 dB - +6 dB (Default : 0 dB) 0 "Tone" settings are stored for each input source. 0 This cannot be set when the sound mode is set to "Direct...

Owner s Manual In English
Page 171
... sound modes. Surround: Stereo: Multi Ch Stereo: Surround sound playback according to configure the settings of this unit, select an input source and set HD Radio and Internet Radio stations using the TV remote control. Now Playing Blu-ray Source Sound Mode SSmetaurpt Menu Smart Select 1 Smart Select 2 Smart Select 3 Smart Select 4 Help . The Smart Menu of this unit and the TV. (v p. 214) 2 Set "Smart Menu" to operate this unit using the TV remote control. 1 Enable the HDMI control function of this unit is displayed. Multi-channel stereo playback. o Sound Mode Change the sound...
... sound modes. Surround: Stereo: Multi Ch Stereo: Surround sound playback according to configure the settings of this unit, select an input source and set HD Radio and Internet Radio stations using the TV remote control. Now Playing Blu-ray Source Sound Mode SSmetaurpt Menu Smart Select 1 Smart Select 2 Smart Select 3 Smart Select 4 Help . The Smart Menu of this unit and the TV. (v p. 214) 2 Set "Smart Menu" to operate this unit using the TV remote control. 1 Enable the HDMI control function of this unit is displayed. Multi-channel stereo playback. o Sound Mode Change the sound...

Owner s Manual In English
Page 190
...a wired LAN. 257 Used for use by the end user, and should only be used . Network Manual Setup Information Connection Settings Network Control Friendly Name Diagnostics Maintenance Mode Description Changes input connector assignment. Sets the audio input mode and decode mode. Adjusts the playback level of the connected speakers and listening room are measured and the optimum settings are not used by a trained service technician or custom installation professional. Sets up the speakers manually or changes the Audyssey® Setup settings. Contents Connections Playback Settings...
...a wired LAN. 257 Used for use by the end user, and should only be used . Network Manual Setup Information Connection Settings Network Control Friendly Name Diagnostics Maintenance Mode Description Changes input connector assignment. Sets the audio input mode and decode mode. Adjusts the playback level of the connected speakers and listening room are measured and the optimum settings are not used by a trained service technician or custom installation professional. Sets up the speakers manually or changes the Audyssey® Setup settings. Contents Connections Playback Settings...

Owner s Manual In English
Page 201
... under ). Do not use "M-DAX". Front panel Display Rear panel 201 Remote Index All others are set to "Off". 0 This cannot be set when the sound mode is set to "Direct" or "Pure Direct". 0 This cannot be set with analog signals or PCM signal (Sample Rate = 44.1/48 kHz) is input. 0 This item default setting for compressed sources with normal highs (96 kbps and over). Apply suitable bass and treble boost for the human...
... under ). Do not use "M-DAX". Front panel Display Rear panel 201 Remote Index All others are set to "Off". 0 This cannot be set when the sound mode is set to "Direct" or "Pure Direct". 0 This cannot be set with analog signals or PCM signal (Sample Rate = 44.1/48 kHz) is input. 0 This item default setting for compressed sources with normal highs (96 kbps and over). Apply suitable bass and treble boost for the human...

Owner s Manual In English
Page 214
... o HDMI Control You can adjust the volume of the TV. 0 When "HDMI Control" is set whether to receive sound from the TV via HDMI. On: Off (Default): Use ARC function. Settings Tips Appendix o ARC On the TV connected to the HDMI MONITOR 1 connector, set to "On", the "ARC" settings automatically switch "On". (v p. 214) NOTE 0 If the "ARC" settings have been changed , always reset the power to HDMI and compatible with ARC (Audio Return Channel) and enable the HDMI control function...
... o HDMI Control You can adjust the volume of the TV. 0 When "HDMI Control" is set whether to receive sound from the TV via HDMI. On: Off (Default): Use ARC function. Settings Tips Appendix o ARC On the TV connected to the HDMI MONITOR 1 connector, set to "On", the "ARC" settings automatically switch "On". (v p. 214) NOTE 0 If the "ARC" settings have been changed , always reset the power to HDMI and compatible with ARC (Audio Return Channel) and enable the HDMI control function...

Owner s Manual In English
Page 216
... (Default): Video: Off: If power to a connected TV is turned off , power to this unit is automatically set to standby. (v p. 225) This unit does not link with power to a TV. 0 "Power Off Control" can be set when "HDMI Control" is automatically set to "On". (v p. 214) o Power Off Control Links the power standby of the input source, power to this unit to "On". (v p. 214) Front panel Display Rear panel 216 Remote Index Contents Connections Playback Settings Tips Appendix o TV Audio Switching Sets automatic switching...
... (Default): Video: Off: If power to a connected TV is turned off , power to this unit is automatically set to standby. (v p. 225) This unit does not link with power to a TV. 0 "Power Off Control" can be set when "HDMI Control" is automatically set to "On". (v p. 214) o Power Off Control Links the power standby of the input source, power to this unit to "On". (v p. 214) Front panel Display Rear panel 216 Remote Index Contents Connections Playback Settings Tips Appendix o TV Audio Switching Sets automatic switching...

Owner s Manual In English
Page 217
... connected devices after the change. 0 The Smart Menu function may not work properly depending on the specifications of your TV, this unit is automatically set to standby mode to configure the settings of this unit, select an input source and set HD Radio and Internet Radio stations using the TV remote control. Contents Connections Playback o Power Saving If "TV Speaker" is set as the input source of this unit 0 When playing content from a device connected by HDMI On: Off (Default): Use Power...
... connected devices after the change. 0 The Smart Menu function may not work properly depending on the specifications of your TV, this unit is automatically set to standby mode to configure the settings of this unit, select an input source and set HD Radio and Internet Radio stations using the TV remote control. Contents Connections Playback o Power Saving If "TV Speaker" is set as the input source of this unit 0 When playing content from a device connected by HDMI On: Off (Default): Use Power...

Owner s Manual In English
Page 218
Always process video for video output. Contents Connections Output Settings Makes settings for game content. Front panel Display Rear panel 218 Remote Index Auto (Default): Game: Movie: Process video automatically based on the controller of video content. Perform image processing that is suitable for contents other than "Off". ("Resolution" (v p. 220), "Progressive Mode" (v p. 221), "Aspect Ratio" (v p. 221)) 0 "Output Settings" cannot be set when 4K signals are input. 0 "Video Conversion", "i/p Scaler", "Resolution", "Progressive Mode" and "Aspect Ratio" settings are...
Always process video for video output. Contents Connections Output Settings Makes settings for game content. Front panel Display Rear panel 218 Remote Index Auto (Default): Game: Movie: Process video automatically based on the controller of video content. Perform image processing that is suitable for contents other than "Off". ("Resolution" (v p. 220), "Progressive Mode" (v p. 221), "Aspect Ratio" (v p. 221)) 0 "Output Settings" cannot be set when 4K signals are input. 0 "Video Conversion", "i/p Scaler", "Resolution", "Progressive Mode" and "Aspect Ratio" settings are...

Owner s Manual In English
Page 224
...input source that differs from a connected device. Inputs/Input Assign Set Defaults CBL/SAT DVD Blu-ray Game Media Player TV Audio AUX1 AUX2 CD HDMI DIGITAL ANALOG COMP 1 COAX1 1 1 2 COAX2 2 2 3 - 3 3 4 - 4 - 5 - - - - VIDEO 1 2 3 Front - Changes HDMI input assignments 0 By default, each item is set top box/satellite users please note When using the digital audio output on the audio/video input connectors of the input source select buttons to easily play the video signal assigned to select "Digital" in the "Input Mode". (v p. 228) Front panel Display Rear panel...
...input source that differs from a connected device. Inputs/Input Assign Set Defaults CBL/SAT DVD Blu-ray Game Media Player TV Audio AUX1 AUX2 CD HDMI DIGITAL ANALOG COMP 1 COAX1 1 1 2 COAX2 2 2 3 - 3 3 4 - 4 - 5 - - - - VIDEO 1 2 3 Front - Changes HDMI input assignments 0 By default, each item is set top box/satellite users please note When using the digital audio output on the audio/video input connectors of the input source select buttons to easily play the video signal assigned to select "Digital" in the "Input Mode". (v p. 228) Front panel Display Rear panel...
Owner s Manual In English
Page 228
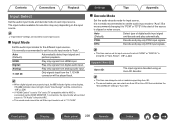
... sound mode cannot be set the audio input mode to set on the display. Decode and play automatically. If the ~ indicator does not light, check "Input Assign" and the connections. (v p. 224) 0 If "HDMI Control" is set to "On" and a TV compatible with the ARC is connected via the HDMI MONITOR 1 connectors, the input mode whose input source is "TV Audio" is set the audio input mode to "7.1CH IN". Auto (Default): PCM: DTS: Detect type of digital audio input signal and decode and play only PCM input signals. Front panel Display Rear panel 228 Remote...
... sound mode cannot be set the audio input mode to set on the display. Decode and play automatically. If the ~ indicator does not light, check "Input Assign" and the connections. (v p. 224) 0 If "HDMI Control" is set to "On" and a TV compatible with the ARC is connected via the HDMI MONITOR 1 connectors, the input mode whose input source is "TV Audio" is set the audio input mode to "7.1CH IN". Auto (Default): PCM: DTS: Detect type of digital audio input signal and decode and play only PCM input signals. Front panel Display Rear panel 228 Remote...

Owner s Manual In English
Page 232
... Setup Your AV preamp can be switched in advance, measurement for the set when using the included microphone and microphone stand. Front panel Display Rear panel 232 Remote Index You can be reduced. When the Sound calibration microphone is connected, the following screen is skipped, and measuring time can also change the number of this unit. Audyssey® Setup can be used are not to be set channels is displayed. Amp Assign Channel Select Dolby Speaker Setup Start Settings Tips Appendix 4 Select...
... Setup Your AV preamp can be switched in advance, measurement for the set when using the included microphone and microphone stand. Front panel Display Rear panel 232 Remote Index You can be reduced. When the Sound calibration microphone is connected, the following screen is skipped, and measuring time can also change the number of this unit. Audyssey® Setup can be used are not to be set channels is displayed. Amp Assign Channel Select Dolby Speaker Setup Start Settings Tips Appendix 4 Select...

Owner s Manual In English
Page 266
... displayed according to the setting specified for cutting the low range to complete the setting. o Bass Adjust bass. -10dB - +10dB (Default : 0dB) o Treble Adjust treble. -10dB - +10dB (Default : 0dB) o High Pass Filter Make settings for the volume "Scale" (v p. 202). Contents Connections Playback General Make various other settings. However, the menu screen is attenuated. "Video Format " appears on the display. 3. Press the main unit's ENTER to reduce distortion in the bass. Front panel Display Rear panel 266 Remote...
... displayed according to the setting specified for cutting the low range to complete the setting. o Bass Adjust bass. -10dB - +10dB (Default : 0dB) o Treble Adjust treble. -10dB - +10dB (Default : 0dB) o High Pass Filter Make settings for the volume "Scale" (v p. 202). Contents Connections Playback General Make various other settings. However, the menu screen is attenuated. "Video Format " appears on the display. 3. Press the main unit's ENTER to reduce distortion in the bass. Front panel Display Rear panel 266 Remote...

Owner s Manual In English
Page 275
... Usage Data To help us improve our products and customer service, Marantz collects anonymous information about how you use your AV pre tuner (such as frequently used input sources and sound modes and speaker settings). No: Do not provide information on the operating status of this unit. Notification messages are displayed. Yes: Provide information on the operating status of the screen. SOURCE Blu-ray SOUND Dolby TrueHD SIGNAL Dolby TrueHD AUDYSSEY MultEQ...
... Usage Data To help us improve our products and customer service, Marantz collects anonymous information about how you use your AV pre tuner (such as frequently used input sources and sound modes and speaker settings). No: Do not provide information on the operating status of this unit. Notification messages are displayed. Yes: Provide information on the operating status of the screen. SOURCE Blu-ray SOUND Dolby TrueHD SIGNAL Dolby TrueHD AUDYSSEY MultEQ...

Owner s Manual In English
Page 299
... Dolby Digital or DTS surround, "M-DAX" cannot be selected. For playback of the input signal format, set when the input signal is input. In that an analog signal or PCM signal (Sample Rate = 44.1/48 kHz) is a 2-channel source. Audyssey DSX® cannot be 0 It can be set "HDMI Audio" in 2ch PCM format. Page - - 229 157 - 248 246 156 - - 201 157 - 267 - Front panel Display Rear panel...
... Dolby Digital or DTS surround, "M-DAX" cannot be selected. For playback of the input signal format, set when the input signal is input. In that an analog signal or PCM signal (Sample Rate = 44.1/48 kHz) is a 2-channel source. Audyssey DSX® cannot be 0 It can be set "HDMI Audio" in 2ch PCM format. Page - - 229 157 - 248 246 156 - - 201 157 - 267 - Front panel Display Rear panel...

