Owners Manual
Page 1
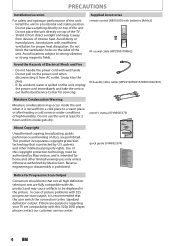
... WHILE WITH YOUR PRODUCT. Introduction Connections Basic Setup Recording Playback Owner's Manual ZV450MW8 DIGITAL VIDEO DISC RECORDER WITH VIDEO CASSETTE RECORDER THANK YOU FOR CHOOSING MAGNAVOX. READ YOUR QUICK GUIDE AND/OR OWNER'S MANUAL FIRST FOR QUICK TIPS THAT MAKE USING YOUR MAGNAVOX PRODUCT MORE ENJOYABLE. Editing Function Setup VCR Functions Others Español NEED HELP FAST?
... WHILE WITH YOUR PRODUCT. Introduction Connections Basic Setup Recording Playback Owner's Manual ZV450MW8 DIGITAL VIDEO DISC RECORDER WITH VIDEO CASSETTE RECORDER THANK YOU FOR CHOOSING MAGNAVOX. READ YOUR QUICK GUIDE AND/OR OWNER'S MANUAL FIRST FOR QUICK TIPS THAT MAKE USING YOUR MAGNAVOX PRODUCT MORE ENJOYABLE. Editing Function Setup VCR Functions Others Español NEED HELP FAST?
Owners Manual
Page 2
... with arrowhead symbol, within the product's enclosure that interference will not occur in a residential installation. CAUTION: CAUTION: LOCATION: USE OF CONTROLS OR ADJUSTMENTS OR PERFORMANCE OF PROCEDURES OTHER THAN THOSE SPECIFIED HEREIN MAY RESULT IN HAZARDOUS RADIATION EXPOSURE. RADIO-TV INTERFERENCE... or modification is located on , the user is connected. 4) Consult the dealer or an experienced radio/TV technician for used in the literature accompanying the appliance. This Class B digital apparatus complies with your contribution to operate this equipment does cause ...
... with arrowhead symbol, within the product's enclosure that interference will not occur in a residential installation. CAUTION: CAUTION: LOCATION: USE OF CONTROLS OR ADJUSTMENTS OR PERFORMANCE OF PROCEDURES OTHER THAN THOSE SPECIFIED HEREIN MAY RESULT IN HAZARDOUS RADIATION EXPOSURE. RADIO-TV INTERFERENCE... or modification is located on , the user is connected. 4) Consult the dealer or an experienced radio/TV technician for used in the literature accompanying the appliance. This Class B digital apparatus complies with your contribution to operate this equipment does cause ...
Owners Manual
Page 3
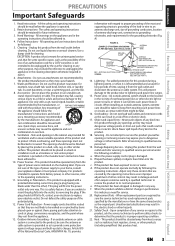
...- Article 810 of the appliance should follow the manufacturer's instructions and should be blocked by following conditions: a. Servicing - Editing Function Setup VCR Functions Others Español EN 3 Heat - Any mounting of the National Electrical Code, ANSI/NFPA No. 70, provides information with ...parts are not sure of the type of the polarized plug. 12. e. Introduction Connections Basic Setup PRECAUTIONS Important Safeguards Recording Playback 1. Do not use liquid cleaners or aerosol cleaners. An outside antenna or cable system is connected to . 10.
...- Article 810 of the appliance should follow the manufacturer's instructions and should be blocked by following conditions: a. Servicing - Editing Function Setup VCR Functions Others Español EN 3 Heat - Any mounting of the National Electrical Code, ANSI/NFPA No. 70, provides information with ...parts are not sure of the type of the polarized plug. 12. e. Introduction Connections Basic Setup PRECAUTIONS Important Safeguards Recording Playback 1. Do not use liquid cleaners or aerosol cleaners. An outside antenna or cable system is connected to . 10.
Owners Manual
Page 4
... Copyright Unauthorized copying, broadcasting, public performance and lending of discs are questions regarding your TV set compatibility with this 525p DVD player, please contact our customer service center. 4 EN In case of picture problems with this product and may occur inside...WPZ0102LTE01) Moisture Condensation Warning Moisture condensation may cause artifacts to the 'standard definition' output. If there are prohibited. Do not use this unit at least for servicing. PRECAUTIONS Installation Location For safety and optimum performance of this unit: • Install the...
... Copyright Unauthorized copying, broadcasting, public performance and lending of discs are questions regarding your TV set compatibility with this 525p DVD player, please contact our customer service center. 4 EN In case of picture problems with this product and may occur inside...WPZ0102LTE01) Moisture Condensation Warning Moisture condensation may cause artifacts to the 'standard definition' output. If there are prohibited. Do not use this unit at least for servicing. PRECAUTIONS Installation Location For safety and optimum performance of this unit: • Install the...
Owners Manual
Page 5
... by yourself. Dirt accumulated on the video heads after a long period of use, or the usage of cellular phone). Press a button on remote control toward the radio. Playback Editing Function Setup VCR Functions Others © 2007 Funai Electric Co., Ltd. with the video head..., thinner, commercially available cleaners, detergent, abrasive cleaning agents or antistatic spray intended for higher video resolution or extended recording time on each DVD. Do not use any form or for inspection and cleaning of their respective owners. No part of Funai Electric Co., Ltd and ...
... by yourself. Dirt accumulated on the video heads after a long period of use, or the usage of cellular phone). Press a button on remote control toward the radio. Playback Editing Function Setup VCR Functions Others © 2007 Funai Electric Co., Ltd. with the video head..., thinner, commercially available cleaners, detergent, abrasive cleaning agents or antistatic spray intended for higher video resolution or extended recording time on each DVD. Do not use any form or for inspection and cleaning of their respective owners. No part of Funai Electric Co., Ltd and ...
Owners Manual
Page 6
...Used in this Owner's Manual 7 FUNCTIONAL OVERVIEW 8 Front Panel 8 Rear Panel 9 Remote Control 10 Front Panel Display 12 Connections ANTENNA CABLE CONNECTION 13 RF MODULATOR CONNECTION 14 CONNECTION TO A CABLE / SATELLITE BOX 15 CONNECTION TO A TV 16 CONNECTION TO AN AUDIO SYSTEM 17 THE VCR / DVD RECORDER... 30 Closed Caption Style 31 Recording INFORMATION ON DVD RECORDING 33 BEFORE RECORDING 34 Make Recording Compatible 34 Setting for Auto Chapter 34 BASIC RECORDING & ONE-TOUCH TIMER RECORDING 35 TIMER RECORDING 37 Hints for Timer Recording 40 OVERWRITING UNNECESSARY TITLE 41...
...Used in this Owner's Manual 7 FUNCTIONAL OVERVIEW 8 Front Panel 8 Rear Panel 9 Remote Control 10 Front Panel Display 12 Connections ANTENNA CABLE CONNECTION 13 RF MODULATOR CONNECTION 14 CONNECTION TO A CABLE / SATELLITE BOX 15 CONNECTION TO A TV 16 CONNECTION TO AN AUDIO SYSTEM 17 THE VCR / DVD RECORDER... 30 Closed Caption Style 31 Recording INFORMATION ON DVD RECORDING 33 BEFORE RECORDING 34 Make Recording Compatible 34 Setting for Auto Chapter 34 BASIC RECORDING & ONE-TOUCH TIMER RECORDING 35 TIMER RECORDING 37 Hints for Timer Recording 40 OVERWRITING UNNECESSARY TITLE 41...
Owners Manual
Page 7
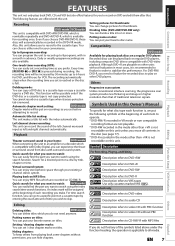
... month in advance. Up to 8 program recording: You can easily set before attempting to record. One-touch timer recording (OTR): You can program the unit to record up to 6 hours for DVD, and 8 hours for VCR. Left channel stereo recording: This unit can delete titles which is ...To specify for what you want to watch using the index search/time search functions. Daily or weekly program recordings are offered with DVD-video playback. Compatibility DVD mode Available for playing back discs on a regular DVD player: Recorded discs can change pictures for your favorite ...
... month in advance. Up to 8 program recording: You can easily set before attempting to record. One-touch timer recording (OTR): You can program the unit to record up to 6 hours for DVD, and 8 hours for VCR. Left channel stereo recording: This unit can delete titles which is ...To specify for what you want to watch using the index search/time search functions. Daily or weekly program recordings are offered with DVD-video playback. Compatibility DVD mode Available for playing back discs on a regular DVD player: Recorded discs can change pictures for your favorite ...
Owners Manual
Page 8
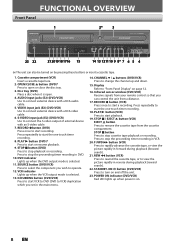
... off the unit. 23. Press to connect external device with an S-video cable. 7. AUDIO input jacks (E2) (DVD/VCR) Use to stop the proceeding timer recording in the main menu. 14. VCR indicator Lights up when the DVD output mode is open or close the disc tray. 3. STOP C button Press to view the picture rapidly in...
... off the unit. 23. Press to connect external device with an S-video cable. 7. AUDIO input jacks (E2) (DVD/VCR) Use to stop the proceeding timer recording in the main menu. 14. VCR indicator Lights up when the DVD output mode is open or close the disc tray. 3. STOP C button Press to view the picture rapidly in...
Owners Manual
Page 9
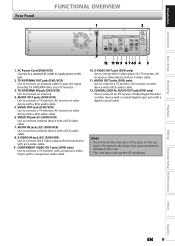
... 12 11 10 9 8 7 6 5 4 3 10. S-VIDEO IN jack (E1) (DVD/VCR) Use to this unit. 2. COAXIAL DIGITAL AUDIO OUT jack (DVD only) Use to connect an antenna. 4. AC Power Cord (DVD/VCR) Connect to a standard AC outlet to supply power to connect the S-video output of the jacks...Panel FUNCTIONAL OVERVIEW 1 2 DIGITAL AUDIO OUT DVD DVD/VCR AUDIO S-VIDEO COMPONENT S-VIDEO IN ---AUDIO---OUT OUT VIDEO OUT OUT Y L L IN COAXIAL L OUT R PB /CB IN PR /CR ANTENNA R R IN ---VIDEO---OUT 1. Recording Playback Editing Function Setup VCR Functions Others Español EN 9
... 12 11 10 9 8 7 6 5 4 3 10. S-VIDEO IN jack (E1) (DVD/VCR) Use to this unit. 2. COAXIAL DIGITAL AUDIO OUT jack (DVD only) Use to connect an antenna. 4. AC Power Cord (DVD/VCR) Connect to a standard AC outlet to supply power to connect the S-video output of the jacks...Panel FUNCTIONAL OVERVIEW 1 2 DIGITAL AUDIO OUT DVD DVD/VCR AUDIO S-VIDEO COMPONENT S-VIDEO IN ---AUDIO---OUT OUT VIDEO OUT OUT Y L L IN COAXIAL L OUT R PB /CB IN PR /CR ANTENNA R R IN ---VIDEO---OUT 1. Recording Playback Editing Function Setup VCR Functions Others Español EN 9
Owners Manual
Page 10
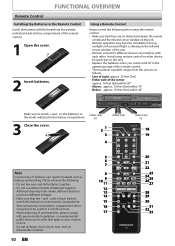
... center: approx. 16 feet (5m) within 30° - DISC MENU ABC 2 JKL 5 TUV 8 SPACE 0 o DEF 3 MNO 6 WXYZ 9 CLEAR SETUP s OK B TITLE RETURN p j B i F h g C CHANNEL -- + REC MODE VCR DVD TIMER REC AUDIO I TIMER CM SKIP D.DUBBING SET RAPID PLAY SEARCH 18 19 20 21 22 23 24 2625 27 28 29 30 31 32... 33 10 EN Avoid using the remote control: • Make sure that apply in the Remote Control Install the batteries (AAAx2) matching the polarity indicated inside battery compartment of the...
... center: approx. 16 feet (5m) within 30° - DISC MENU ABC 2 JKL 5 TUV 8 SPACE 0 o DEF 3 MNO 6 WXYZ 9 CLEAR SETUP s OK B TITLE RETURN p j B i F h g C CHANNEL -- + REC MODE VCR DVD TIMER REC AUDIO I TIMER CM SKIP D.DUBBING SET RAPID PLAY SEARCH 18 19 20 21 22 23 24 2625 27 28 29 30 31 32... 33 10 EN Avoid using the remote control: • Make sure that apply in the Remote Control Install the batteries (AAAx2) matching the polarity indicated inside battery compartment of the...
Owners Manual
Page 11
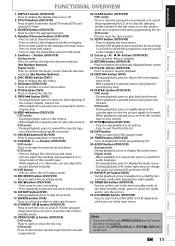
...8226; Press to display the disc menu. 7. If timer programmings have been set, press to play back forward step by [the Number buttons]. VCR mode: Press to use [OPEN/CLOSE A] or [STOP C / EJECT A] on display. • Press to enter values for the settings in the main menu. ... to return to start or resume playback. 25. PAUSE F button (DVD/VCR) Press to display the audio menu. REC MODE button (DVD/VCR) Press to the previously displayed menu screen. 24. REC I button (DVD/VCR) • Press once to start a recording. • Press repeatedly to the beginning of the cassette tape. •...
...8226; Press to display the disc menu. 7. If timer programmings have been set, press to play back forward step by [the Number buttons]. VCR mode: Press to use [OPEN/CLOSE A] or [STOP C / EJECT A] on display. • Press to enter values for the settings in the main menu. ... to return to start or resume playback. 25. PAUSE F button (DVD/VCR) Press to display the audio menu. REC MODE button (DVD/VCR) Press to the previously displayed menu screen. 24. REC I button (DVD/VCR) • Press once to start a recording. • Press repeatedly to the beginning of the cassette tape. •...
Owners Manual
Page 13
... Setup Recording ANTENNA CABLE CONNECTION This section describes how to connect your unit to an antenna, cable box, etc. 1 Disconnect the power cord of your TV from the AC outlet. 2 Disconnect RF coaxial cable from the ANTENNA IN jack before moving the unit. • If you use an ...rear of this connection are completed, turn on page 21.) Playback Editing Function Setup VCR Functions Others Español Note • For your local store. DVD playback through only. rear of your TV Supplied cables used in your area. (Refer to "INITIAL SETTING" on the TV and begin initial ...
... Setup Recording ANTENNA CABLE CONNECTION This section describes how to connect your unit to an antenna, cable box, etc. 1 Disconnect the power cord of your TV from the AC outlet. 2 Disconnect RF coaxial cable from the ANTENNA IN jack before moving the unit. • If you use an ...rear of this connection are completed, turn on page 21.) Playback Editing Function Setup VCR Functions Others Español Note • For your local store. DVD playback through only. rear of your TV Supplied cables used in your area. (Refer to "INITIAL SETTING" on the TV and begin initial ...
Owners Manual
Page 14
... below. 3) Set your RF modulator's channel 3/4 switch to either 3 or 4, whichever the TV channel is least used in this connection are as you set it is still possible to connect this unit S-VIDEO DVD/VCR DVD OUT DVD/VCR DIGITAL AUDIO S-VIDEO COMPONENT S-VIDEO IN ---AUDIO---OUT IN --- rear of the necessary cables at your local...
... below. 3) Set your RF modulator's channel 3/4 switch to either 3 or 4, whichever the TV channel is least used in this connection are as you set it is still possible to connect this unit S-VIDEO DVD/VCR DVD OUT DVD/VCR DIGITAL AUDIO S-VIDEO COMPONENT S-VIDEO IN ---AUDIO---OUT IN --- rear of the necessary cables at your local...
Owners Manual
Page 15
... TV RCA video cable RF coaxial cable or VIDEO IN R L AUDIO IN satellite dish cable TV company Supplied cables used in particular, specifying that the cable/satellite box is turned on the cable/satellite box. For more information, please contact...for proper grounding - With this unit S-VIDEO DVD/VCR DVD OUT DVD/VCR DIGITAL AUDIO S-VIDEO COMPONENT S-VIDEO IN ---AUDIO---OUT IN --- Note • Required cables and connecting methods differ depending on the cable/satellite box. Introduction Connections Basic Setup Recording CONNECTION TO A CABLE / SATELLITE BOX 1)...
... TV RCA video cable RF coaxial cable or VIDEO IN R L AUDIO IN satellite dish cable TV company Supplied cables used in particular, specifying that the cable/satellite box is turned on the cable/satellite box. For more information, please contact...for proper grounding - With this unit S-VIDEO DVD/VCR DVD OUT DVD/VCR DIGITAL AUDIO S-VIDEO COMPONENT S-VIDEO IN ---AUDIO---OUT IN --- Note • Required cables and connecting methods differ depending on the cable/satellite box. Introduction Connections Basic Setup Recording CONNECTION TO A CABLE / SATELLITE BOX 1)...
Owners Manual
Page 16
... cables at your TV owner's manual for details. CONNECTION TO A TV Make one of the following connections, depending on DVD only analog audio TV AUDIO OUT (DVD/VCR) VIDEO OUT Method 1 good picture S-VIDEO IN Method 2 better picture COMPONENT VIDEO IN Y (Green) PB/CB (Blue...AUDIO OUT (DVD) S-VIDEO OUT COMPONENT VIDEO OUTPUT Supplied cables used in this connection are not connecting DVD AUDIO OUT when you have completed the connections • Switch the input selector on the TV's original remote control that selects an external input channel until the DVD recorder's opening picture...
... cables at your TV owner's manual for details. CONNECTION TO A TV Make one of the following connections, depending on DVD only analog audio TV AUDIO OUT (DVD/VCR) VIDEO OUT Method 1 good picture S-VIDEO IN Method 2 better picture COMPONENT VIDEO IN Y (Green) PB/CB (Blue...AUDIO OUT (DVD) S-VIDEO OUT COMPONENT VIDEO OUTPUT Supplied cables used in this connection are not connecting DVD AUDIO OUT when you have completed the connections • Switch the input selector on the TV's original remote control that selects an external input channel until the DVD recorder's opening picture...
Owners Manual
Page 17
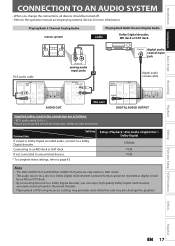
... L L IN COAXIAL L OUT R PB /CB IN PR /CR ANTENNA R R IN ---VIDEO---OUT DVD/VCR S-VIDEO IN ---AUDIO---OUT L IN R IN ---VIDEO---OUT AUDIO OUT or this connection are only useful in DVD mode. • The audio source on a disc in a Dolby Digital multi channel surround format cannot be turned... If output is Dolby Digital encoded audio, connect to page 83. Introduction Connections Basic Setup Recording CONNECTION TO AN AUDIO SYSTEM • When you change the connections, all devices should be recorded as digital sound by an MD or DAT deck. • By connecting this unit to...
... L L IN COAXIAL L OUT R PB /CB IN PR /CR ANTENNA R R IN ---VIDEO---OUT DVD/VCR S-VIDEO IN ---AUDIO---OUT L IN R IN ---VIDEO---OUT AUDIO OUT or this connection are only useful in DVD mode. • The audio source on a disc in a Dolby Digital multi channel surround format cannot be turned... If output is Dolby Digital encoded audio, connect to page 83. Introduction Connections Basic Setup Recording CONNECTION TO AN AUDIO SYSTEM • When you change the connections, all devices should be recorded as digital sound by an MD or DAT deck. • By connecting this unit to...
Owners Manual
Page 19
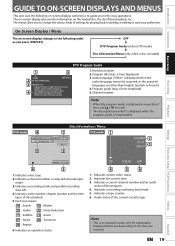
Playback Editing Function Setup VCR Functions DVD mode 4 11 0:00:00 5 Disc Information / Menu 1 VCR mode 1 DVD+RW CH 2 2 12:00AM 2 CH 21 Stereo 3 HQ(1Hr) 1:01 6 3 1. Indicates a channel number or selected external input mode. 3. SP 0:00:... the following on -screen display changes in more than 7 lines, use [K / L] to suite your preference. Indicates a recording mode and possible recording time left. 4. Indicates a recording or playing back mode. 5. Audio status of settings for playing back, recording, or editing to scroll. • "No description provided" is...
Playback Editing Function Setup VCR Functions DVD mode 4 11 0:00:00 5 Disc Information / Menu 1 VCR mode 1 DVD+RW CH 2 2 12:00AM 2 CH 21 Stereo 3 HQ(1Hr) 1:01 6 3 1. Indicates a channel number or selected external input mode. 3. SP 0:00:... the following on -screen display changes in more than 7 lines, use [K / L] to suite your preference. Indicates a recording mode and possible recording time left. 4. Indicates a recording or playing back mode. 5. Audio status of settings for playing back, recording, or editing to scroll. • "No description provided" is...
Owners Manual
Page 20
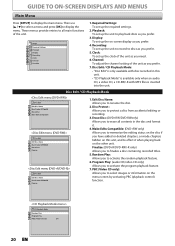
...screen by activating PBC (playback control) function. Make Edits Compatible: (DVD+RW only) Allows you to effect it . 4. Finalize: (DVD+R/DVD-RW/-R only) Allows you to select images or information on the disc if you to finalize a disc containing recorded titles. 5. PBC (Video CD only): Allows you to protect ... Finalize Disc Edit 1 Edit Disc Name 2 Disc Protect OFF ON 34 Finalize 1. Then use [K / L] to select a menu and press [OK] to display the main menu. Playback: To set up the required settings. 2. Recording: To set up the clock of the unit as you need. 6. CD Playback Mode...
...screen by activating PBC (playback control) function. Make Edits Compatible: (DVD+RW only) Allows you to effect it . 4. Finalize: (DVD+R/DVD-RW/-R only) Allows you to select images or information on the disc if you to finalize a disc containing recorded titles. 5. PBC (Video CD only): Allows you to protect ... Finalize Disc Edit 1 Edit Disc Name 2 Disc Protect OFF ON 34 Finalize 1. Then use [K / L] to select a menu and press [OK] to display the main menu. Playback: To set up the required settings. 2. Recording: To set up the clock of the unit as you need. 6. CD Playback Mode...
Owners Manual
Page 21
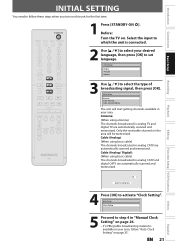
...JKL 5 TUV 8 SPACE 0 o DEF 3 MNO 6 WXYZ 9 CLEAR SETUP s OK B TITLE RETURN p j B i F h g C CHANNEL -- + REC MODE VCR DVD TIMER REC AUDIO I TIMER CM SKIP D.DUBBING SET RAPID PLAY SEARCH 1 Press [STANDBY-ON y]. EN 21 Antenna: (When using basic cable) The channels broadcasted in your desired language, then press [OK] to select the type... on this unit for the first time. STANDBY-ON SOURCE DTV/TV DISPLAY OPEN/CLOSE A .@/: 1 GHI 4 PQRS 7 . Introduction Connections Basic Setup Recording INITIAL SETTING You need to follow "Auto Clock Setting" on page 25.
...JKL 5 TUV 8 SPACE 0 o DEF 3 MNO 6 WXYZ 9 CLEAR SETUP s OK B TITLE RETURN p j B i F h g C CHANNEL -- + REC MODE VCR DVD TIMER REC AUDIO I TIMER CM SKIP D.DUBBING SET RAPID PLAY SEARCH 1 Press [STANDBY-ON y]. EN 21 Antenna: (When using basic cable) The channels broadcasted in your desired language, then press [OK] to select the type... on this unit for the first time. STANDBY-ON SOURCE DTV/TV DISPLAY OPEN/CLOSE A .@/: 1 GHI 4 PQRS 7 . Introduction Connections Basic Setup Recording INITIAL SETTING You need to follow "Auto Clock Setting" on page 25.
Owners Manual
Page 22
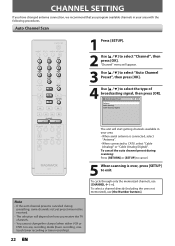
... cycle through only the memorized channels, use [the Number buttons]. CHANNEL SETTING If you have changed antenna connection, we recommend that you receive the TV channels. • You cannot change the channel when either VCR or DVD is in any recording mode (basic recording, onetouch timer recording or timer recording). 22 EN Auto Channel Scan STANDBY-ON...
... cycle through only the memorized channels, use [the Number buttons]. CHANNEL SETTING If you have changed antenna connection, we recommend that you receive the TV channels. • You cannot change the channel when either VCR or DVD is in any recording mode (basic recording, onetouch timer recording or timer recording). 22 EN Auto Channel Scan STANDBY-ON...


