
User manual, English (US)
Page 10
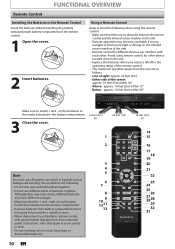
... leakage and bursting. Please observe the following when using remote control for other . Using a Remote Control Keep in mind the following : • Do not mix new and old batteries together. • Do not use of sight: approx. 23 feet (7m) - Although they may look similar, different batteries may become unreliable if...
... leakage and bursting. Please observe the following when using remote control for other . Using a Remote Control Keep in mind the following : • Do not mix new and old batteries together. • Do not use of sight: approx. 23 feet (7m) - Although they may look similar, different batteries may become unreliable if...
User manual, English (US)
Page 26
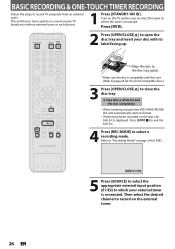
... disc to the disc tray guide. * Make sure the disc is connected. It may take a while to load the disc completely. • When inserting a brand-new DVD+RW/DVD-RW, the unit automatically starts to record on page 24 for the list of compatible discs.) 3 Press [OPEN/CLOSE A] to open the...
... disc to the disc tray guide. * Make sure the disc is connected. It may take a while to load the disc completely. • When inserting a brand-new DVD+RW/DVD-RW, the unit automatically starts to record on page 24 for the list of compatible discs.) 3 Press [OPEN/CLOSE A] to open the...

User manual, English (US)
Page 28
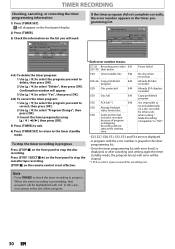
... will change the external tuner's channel while you are also available. Timer Programming Date TUE JAN/01 11:00AM Start End New Program E1/E2 1/1 3 Use [K / L] to select "New Program", then press [OK]. Daily or weekly program recordings are recording. Guide to Timer Programming Display 3 1 2 Timer ...Programming JAN/ 2/08 12:00 AM E1 SP SP (1:00) TUE JAN/01 11:00AM Date JAN/02 Start End 12:00AM 1:00AM New Program E1/E2 E1 1/1 4 5 1 Title of a timer program (Contains date, time, selected external input position, recording mode of the program) 2 Current...
... will change the external tuner's channel while you are also available. Timer Programming Date TUE JAN/01 11:00AM Start End New Program E1/E2 1/1 3 Use [K / L] to select "New Program", then press [OK]. Daily or weekly program recordings are recording. Guide to Timer Programming Display 3 1 2 Timer ...Programming JAN/ 2/08 12:00 AM E1 SP SP (1:00) TUE JAN/01 11:00AM Date JAN/02 Start End 12:00AM 1:00AM New Program E1/E2 E1 1/1 4 5 1 Title of a timer program (Contains date, time, selected external input position, recording mode of the program) 2 Current...
User manual, English (US)
Page 30
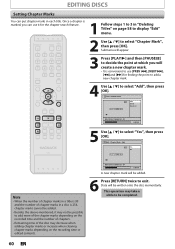
Timer Programming JAN/ 2/08 12:00 AM E1 SP SP (1:00) TUE JAN/01 11:00AM Date JAN/02 Start End 12:00AM 1:00AM New Program E1/E2 E1 1/1 4-A) To delete the timer program: 1 Use [K / L] to select the program you want to correct, then press [OK]. 2 Use [K / L] to select "Program ... press [OK]. To stop the timer recording in progress. Timer Programming WED JAN/02 11:00AM Date Start End E41 JAN/02 12:00AM 1:00AM New Program E1/E2 E1 1/1 Each error number means: E1-22 Recording error other program. 30 EN Power failed No disc when recording Already 49 titles...
Timer Programming JAN/ 2/08 12:00 AM E1 SP SP (1:00) TUE JAN/01 11:00AM Date JAN/02 Start End 12:00AM 1:00AM New Program E1/E2 E1 1/1 4-A) To delete the timer program: 1 Use [K / L] to select the program you want to correct, then press [OK]. 2 Use [K / L] to select "Program ... press [OK]. To stop the timer recording in progress. Timer Programming WED JAN/02 11:00AM Date Start End E41 JAN/02 12:00AM 1:00AM New Program E1/E2 E1 1/1 Each error number means: E1-22 Recording error other program. 30 EN Power failed No disc when recording Already 49 titles...
User manual, English (US)
Page 60
...will appear. 3 Press [PLAY B] and then [PAUSE F] to decide the point at which you can put chapter marks in each title. Submenu will create a new chapter mark. • It is convenient to use it may not be possible to add more of the chapter marks depending on the recorded time...edited contents. 5 Use [K / L] to select "Yes", then press [OK]. Edit - Edit - Add 1 Yes No Chapter 2/ 2 F NOV/21/08 11:00AM E1 SP 0:00:59 A new chapter mark will be added. 6 Press [RETURN] twice to exit. Chapter Mark 1 Add Delete Delete All Chapter 2/ 2 NOV/21/08 11:00AM E1 SP 0:00...
...will appear. 3 Press [PLAY B] and then [PAUSE F] to decide the point at which you can put chapter marks in each title. Submenu will create a new chapter mark. • It is convenient to use it may not be possible to add more of the chapter marks depending on the recorded time...edited contents. 5 Use [K / L] to select "Yes", then press [OK]. Edit - Edit - Add 1 Yes No Chapter 2/ 2 F NOV/21/08 11:00AM E1 SP 0:00:59 A new chapter mark will be added. 6 Press [RETURN] twice to exit. Chapter Mark 1 Add Delete Delete All Chapter 2/ 2 NOV/21/08 11:00AM E1 SP 0:00...

User manual, English (US)
Page 65
... you will divide the title. 3 Use [K / L] to select "Title Dividing", then press [OK]. 4 Use [K / L] to select "Yes", then press [OK]. Data will be divided into 2 new titles. 1 Follow steps 1 to 3 in "Deleting Titles" on page 58 to display "Edit" menu. 2 Use [PREV H], [NEXT G], [E], [D], [PAUSE F] and [PLAY B] to be written onto the..., and the number of recording chapters reaches the maximum of 254. Introduction Connections Basic Setup EDITING DISCS Dividing a Title You can divide one title into 2 new titles.
... you will divide the title. 3 Use [K / L] to select "Title Dividing", then press [OK]. 4 Use [K / L] to select "Yes", then press [OK]. Data will be divided into 2 new titles. 1 Follow steps 1 to 3 in "Deleting Titles" on page 58 to display "Edit" menu. 2 Use [PREV H], [NEXT G], [E], [D], [PAUSE F] and [PLAY B] to be written onto the..., and the number of recording chapters reaches the maximum of 254. Introduction Connections Basic Setup EDITING DISCS Dividing a Title You can divide one title into 2 new titles.
User manual, English (US)
Page 73
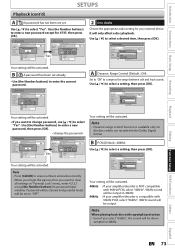
...Playback Display Video Recording Clock HDMI Reset All Parental Lock OFF Parental Lock Ch87a[[nANgdCeu1PADlt7a]ui]ssdcsiowMoOernudut? Use [K / L] to enter a new password, then press [OK]. Use [the Number buttons] to select a desired item, then press [OK]. General Setting Playback Display Video...: If your amplifier/decoder is compatible with 96kHz PCM, select "96kHz". 96kHz sound will be activated. • If you want to enter a new password except for your amplifier/decoder is NOT compatible with copyright protection • Even if you want to change password, use [K / L] to "...
...Playback Display Video Recording Clock HDMI Reset All Parental Lock OFF Parental Lock Ch87a[[nANgdCeu1PADlt7a]ui]ssdcsiowMoOernudut? Use [K / L] to enter a new password, then press [OK]. Use [the Number buttons] to select a desired item, then press [OK]. General Setting Playback Display Video...: If your amplifier/decoder is compatible with 96kHz PCM, select "96kHz". 96kHz sound will be activated. • If you want to enter a new password except for your amplifier/decoder is NOT compatible with copyright protection • Even if you want to change password, use [K / L] to "...
User manual, English (US)
Page 84
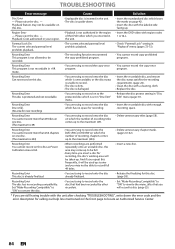
Recording Error Disc is full. (No area for new recording) • You are trying to record onto the disc which is unrecordable, or the disc status is damaged. • Insert the recordable disc, and ... onto the disc on to record on which the number of the DVD-video which you are trying to record full 49 titles. • Insert a new disc. Playback is not authorized in your region. • Playback is not recordable in the unit. • Insert the DVD-video with the labeled side...
Recording Error Disc is full. (No area for new recording) • You are trying to record onto the disc which is unrecordable, or the disc status is damaged. • Insert the recordable disc, and ... onto the disc on to record on which the number of the DVD-video which you are trying to record full 49 titles. • Insert a new disc. Playback is not authorized in your region. • Playback is not recordable in the unit. • Insert the DVD-video with the labeled side...


