
Owners Manual
Page 2
... labeled for ALL regions or for details. DVD+RW DVD+R • You can be compatible with this unit. 1 Connections Connection to an External Tuner 1) Disconnect the power cords of any other than +VR is not recordable on your TV owner's manual for Region 1. Check your TV to an appropriate external input channel. PLAY E B STOP C RETURN K D PAUSE F TITLE...
... labeled for ALL regions or for details. DVD+RW DVD+R • You can be compatible with this unit. 1 Connections Connection to an External Tuner 1) Disconnect the power cords of any other than +VR is not recordable on your TV owner's manual for Region 1. Check your TV to an appropriate external input channel. PLAY E B STOP C RETURN K D PAUSE F TITLE...

Owners Manual
Page 3
...EP (4Hr) 72 min 240 min 3 SLP (6Hr) 108 min 360 min Poor Press [SOURCE] to select the appropriate external input position (E1/E2) to which your disc with its label facing up. * Make sure the disc is connected. Then select the ...Setting". SP 2 : 00 Select the appropriate Select a recording mode. OPEN/CLOSE A 2Insert a disc. PLAY STOP B C 1VMN23376 / E7EAAUD / E7EACUD_QG Turn the TV on the external tuner. Initial Setup Clock Setting JAN / 01 / 2007 ( MON ) 12 : 00 AM 3 DVD Recording 3 - 1 Basic Recording 1Press [OPEN/CLOSE A] to open the disc tray and ...
...EP (4Hr) 72 min 240 min 3 SLP (6Hr) 108 min 360 min Poor Press [SOURCE] to select the appropriate external input position (E1/E2) to which your disc with its label facing up. * Make sure the disc is connected. Then select the ...Setting". SP 2 : 00 Select the appropriate Select a recording mode. OPEN/CLOSE A 2Insert a disc. PLAY STOP B C 1VMN23376 / E7EAAUD / E7EACUD_QG Turn the TV on the external tuner. Initial Setup Clock Setting JAN / 01 / 2007 ( MON ) 12 : 00 AM 3 DVD Recording 3 - 1 Basic Recording 1Press [OPEN/CLOSE A] to open the disc tray and ...

Owners Manual
Page 8
... EXTERNAL TUNER 12 SETTINGS FOR THE VIDEO INPUT 13 CONNECTION TO A TV 14 CONNECTION TO AN AUDIO SYSTEM 15 Basic Setup GUIDE TO ON-SCREEN DISPLAYS AND MENUS . . . . 16 On-Screen Display / Menu 16 Main Menu 17 INITIAL SETTING 18 SETTING THE CLOCK 19 Clock Setting 19 Recording INFORMATION ON DVD RECORDING 20 BEFORE RECORDING 21 Make Recording...
... EXTERNAL TUNER 12 SETTINGS FOR THE VIDEO INPUT 13 CONNECTION TO A TV 14 CONNECTION TO AN AUDIO SYSTEM 15 Basic Setup GUIDE TO ON-SCREEN DISPLAYS AND MENUS . . . . 16 On-Screen Display / Menu 16 Main Menu 17 INITIAL SETTING 18 SETTING THE CLOCK 19 Clock Setting 19 Recording INFORMATION ON DVD RECORDING 20 BEFORE RECORDING 21 Make Recording...

Owners Manual
Page 9
... the disc (refer to page 63). * DVD-R recorded in your favorite disc name. Symbol Description For Recording, Playing Back, and Editing Description refers to DVD+RW Description refers to DVD+R Description refers to DVD-RW Description refers to DVD-R Editing Deleting titles: You can change pictures ...recording: This unit can choose either one -month period. Virtual surround system: You can easily find any of the left channel monaural input as left and right channels automatically (the input from the external device can divide a title into 2 or more. Even if you choose DVD...
... the disc (refer to page 63). * DVD-R recorded in your favorite disc name. Symbol Description For Recording, Playing Back, and Editing Description refers to DVD+RW Description refers to DVD+R Description refers to DVD-RW Description refers to DVD-R Editing Deleting titles: You can change pictures ...recording: This unit can choose either one -month period. Virtual surround system: You can easily find any of the left channel monaural input as left and right channels automatically (the input from the external device can divide a title into 2 or more. Even if you choose DVD...
Owners Manual
Page 10
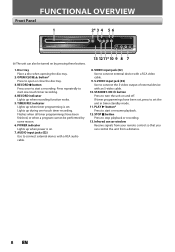
...that you can also be performed by pressing these buttons. 13 1211*10 9 8 7 1. VIDEO input jack (E2) Use to turn the unit on by some reason. 6. S-VIDEO input jack (E2) Use to connect the S-video output of external device with an S-video cable. ...close the disc tray. 3. Lights up when recording function works. 5. RECORD I button Press once to start a recording. PLAY B button* Press to start or resume playback. 12. OPEN/CLOSE A button* Press to stop playback or recording. 13. FUNCTIONAL OVERVIEW Front Panel 1 2* 3 4 5 6 DVD RECORDER (*) The unit can control the unit from...
...that you can also be performed by pressing these buttons. 13 1211*10 9 8 7 1. VIDEO input jack (E2) Use to turn the unit on by some reason. 6. S-VIDEO input jack (E2) Use to connect the S-video output of external device with an S-video cable. ...close the disc tray. 3. Lights up when recording function works. 5. RECORD I button Press once to start a recording. PLAY B button* Press to start or resume playback. 12. OPEN/CLOSE A button* Press to stop playback or recording. 13. FUNCTIONAL OVERVIEW Front Panel 1 2* 3 4 5 6 DVD RECORDER (*) The unit can control the unit from...

Owners Manual
Page 11
...the unit. AUDIO IN jacks (E1) Use to connect the S-video input of the jacks on the rear panel. S-VIDEO OUT jack Use to connect external device with a component video cable. 7. Recording Playback Editing Function Setup Others Español EN 9 VIDEO OUT jack... Use to connect a TV monitor with component video inputs with a RCA audio cable. Introduction Connections Basic Setup FUNCTIONAL OVERVIEW Rear Panel ...
...the unit. AUDIO IN jacks (E1) Use to connect the S-video input of the jacks on the rear panel. S-VIDEO OUT jack Use to connect external device with a component video cable. 7. Recording Playback Editing Function Setup Others Español EN 9 VIDEO OUT jack... Use to connect a TV monitor with component video inputs with a RCA audio cable. Introduction Connections Basic Setup FUNCTIONAL OVERVIEW Rear Panel ...
Owners Manual
Page 14
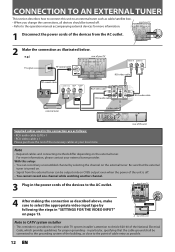
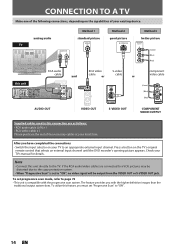
..., which provides guidelines for more information, please contact your TV disconnect 2 Make the connection as close to the AC outlet. For more information. 2 1 Disconnect the power cords of the devices from the external tuner can record any unscrambled channel by VIDEO VIDEO OUT following the steps..., make sure to Article 820-40 of the unit is provided to call the cable TV system installer's attention to select the appropriate video input type by selecting the channel on the external tuner. With this unit Note to CATV system installer • This reminder is off ....
..., which provides guidelines for more information, please contact your TV disconnect 2 Make the connection as close to the AC outlet. For more information. 2 1 Disconnect the power cords of the devices from the external tuner can record any unscrambled channel by VIDEO VIDEO OUT following the steps..., make sure to Article 820-40 of the unit is provided to call the cable TV system installer's attention to select the appropriate video input type by selecting the channel on the external tuner. With this unit Note to CATV system installer • This reminder is off ....
Owners Manual
Page 15
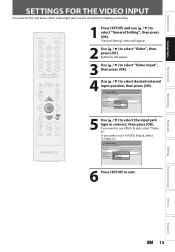
..., then press [OK]. General Setting Playback Display Video Recording Clock Reset All Progressive Scan TV Aspect Video InpVuidteo Input E1 (Rear) E2 (Front) 5 Use [K / L] to select the input jack type to exit. General Setting Playback Display Video Recording Clock Reset All Progressive Scan TV Aspect E1V(Rideeaor)InpVuidteo Input E1Vi(dReeoarIn) E2S-(VFirdoenot)In 6 Press [SETUP] to...
..., then press [OK]. General Setting Playback Display Video Recording Clock Reset All Progressive Scan TV Aspect Video InpVuidteo Input E1 (Rear) E2 (Front) 5 Use [K / L] to select the input jack type to exit. General Setting Playback Display Video Recording Clock Reset All Progressive Scan TV Aspect E1V(Rideeaor)InpVuidteo Input E1Vi(dReeoarIn) E2S-(VFirdoenot)In 6 Press [SETUP] to...
Owners Manual
Page 16
... cables used in this feature, you must set "Progressive Scan" to "ON". 14 EN Press a button on the TV's original remote control that selects an external input channel until the DVD recorder's opening picture appears. If the RCA audio/video cables are as follows: • RCA audio cable (L/R) x 1... • RCA video cable x 1 Please purchase the rest of your local store. Check your TV to the TV. The feature provides you...
... cables used in this feature, you must set "Progressive Scan" to "ON". 14 EN Press a button on the TV's original remote control that selects an external input channel until the DVD recorder's opening picture appears. If the RCA audio/video cables are as follows: • RCA audio cable (L/R) x 1... • RCA video cable x 1 Please purchase the rest of your local store. Check your TV to the TV. The feature provides you...
Owners Manual
Page 17
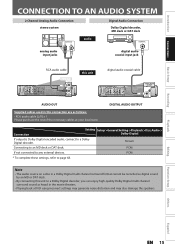
...15 Introduction Connections Basic Setup Recording CONNECTION TO AN AUDIO SYSTEM 2 Channel Analog Audio Connection stereo system Digital Audio Connection Dolby Digital decoder, MD deck or DAT deck analog audio input jacks AUDIO IN R L audio COAXIAL digital audio coaxial input jack RCA audio cable ...VIDEO OUT this unit VIDEO VIDEO OUT IN IN L L R R AUDIO IN S-VIDEO AUDIO OUT (E1) L R AUDIO OUT AUDIO OUT Supplied cables used in the movie theaters. • Playing back a DVD using incorrect settings may generate...
...15 Introduction Connections Basic Setup Recording CONNECTION TO AN AUDIO SYSTEM 2 Channel Analog Audio Connection stereo system Digital Audio Connection Dolby Digital decoder, MD deck or DAT deck analog audio input jacks AUDIO IN R L audio COAXIAL digital audio coaxial input jack RCA audio cable ...VIDEO OUT this unit VIDEO VIDEO OUT IN IN L L R R AUDIO IN S-VIDEO AUDIO OUT (E1) L R AUDIO OUT AUDIO OUT Supplied cables used in the movie theaters. • Playing back a DVD using incorrect settings may generate...
Owners Manual
Page 18
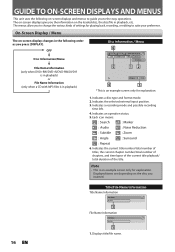
... Name My File 1 1. Indicates an operation status. 5. Indicates the selected external input position. 3. Displays title/file name. OFF Disc Information/Menu Title Name Information (only when DVD+RW/DVD+R/DVD-RW/DVD-R is in playback) or File Name Information (only when a CD with MP3 files...titles, the current chapter number/total number of chapters, and time lapse of the current title playback/ total duration of settings for playing back, recording, or editing to the easy operations. Each icon means: : Search : Marker : Audio : Noise Reduction : Subtitle : Zoom : Angle :...
... Name My File 1 1. Indicates an operation status. 5. Indicates the selected external input position. 3. Displays title/file name. OFF Disc Information/Menu Title Name Information (only when DVD+RW/DVD+R/DVD-RW/DVD-R is in playback) or File Name Information (only when a CD with MP3 files...titles, the current chapter number/total number of chapters, and time lapse of the current title playback/ total duration of settings for playing back, recording, or editing to the easy operations. Each icon means: : Search : Marker : Audio : Noise Reduction : Subtitle : Zoom : Angle :...
Owners Manual
Page 20
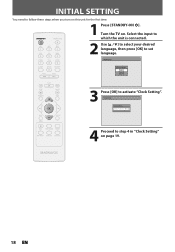
.... STANDBY-ON y OPEN/CLOSE A .@/: ABC DEF 1 2 3 GHI JKL MNO 4 5 6 PQRS 7 TUV WXYZ 8 9 CLEAR SPACE 0 CM SKIP PREV H NEXT G 1 Press [STANDBY-ON y]. Turn the TV on. Select the input to which the unit is connected. 2 Use [K / L] to select your desired language, then press [OK] to activate "Clock Setting". Initial Setup K K OK DISC SETUP...
.... STANDBY-ON y OPEN/CLOSE A .@/: ABC DEF 1 2 3 GHI JKL MNO 4 5 6 PQRS 7 TUV WXYZ 8 9 CLEAR SPACE 0 CM SKIP PREV H NEXT G 1 Press [STANDBY-ON y]. Turn the TV on. Select the input to which the unit is connected. 2 Use [K / L] to select your desired language, then press [OK] to activate "Clock Setting". Initial Setup K K OK DISC SETUP...
Owners Manual
Page 24
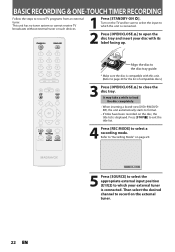
... tuner system so cannot receive TV broadcasts without external tuner or such devices. It may take a while to load the disc completely. • When inserting a brand-new DVD+RW/DVDRW, the unit automatically starts to close the disc tray. SP(2Hr) 0:58 5 Press [SOURCE] to select the appropriate external input position (E1/E2) to select a recording...
... tuner system so cannot receive TV broadcasts without external tuner or such devices. It may take a while to load the disc completely. • When inserting a brand-new DVD+RW/DVDRW, the unit automatically starts to close the disc tray. SP(2Hr) 0:58 5 Press [SOURCE] to select the appropriate external input position (E1/E2) to select a recording...
Owners Manual
Page 26
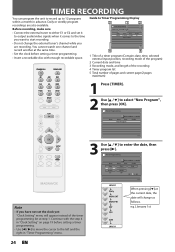
... instead of pages and current page (2 pages maximum) 1 Press [TIMER]. 2 Use [K / L] to the left and the right in advance. Before recording, make sure • Connect the external tuner to either E1 or E2 and set the clock yet: "Clock Setting" menu will change the external...New Program E1/E2 E1 1/1 4 5 1 Title of a timer program (Contains date, time, selected external input position, recording mode of the program) 2 Current date and time 3 Recording mode, and length of the recording 4 Timer program list 5 Total number of the timer programming list at the same time. • Set the ...
... instead of pages and current page (2 pages maximum) 1 Press [TIMER]. 2 Use [K / L] to the left and the right in advance. Before recording, make sure • Connect the external tuner to either E1 or E2 and set the clock yet: "Clock Setting" menu will change the external...New Program E1/E2 E1 1/1 4 5 1 Title of a timer program (Contains date, time, selected external input position, recording mode of the program) 2 Current date and time 3 Recording mode, and length of the recording 4 Timer program list 5 Total number of the timer programming list at the same time. • Set the ...
Owners Manual
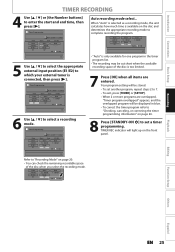
Page 27
... program refer to "Checking, canceling, or correcting the timer programming information" on page 20. • You can check the remaining recordable space of the disc is too limited. 7 Press [OK] when all items are overlapped, "Timer program overlapped" appears, and the... program, repeat steps 2 to select a recording mode. Introduction Connections Basic Setup TIMER RECORDING 4 Use [K / L] or [the Number buttons] to which your external tuner is connected, then press [B]. Mode SP SP 2 : 00 1/1 5 Use [K / L] to select the appropriate external input position (E1/E2) to enter the start...
... program refer to "Checking, canceling, or correcting the timer programming information" on page 20. • You can check the remaining recordable space of the disc is too limited. 7 Press [OK] when all items are overlapped, "Timer program overlapped" appears, and the... program, repeat steps 2 to select a recording mode. Introduction Connections Basic Setup TIMER RECORDING 4 Use [K / L] or [the Number buttons] to which your external tuner is connected, then press [B]. Mode SP SP 2 : 00 1/1 5 Use [K / L] to select the appropriate external input position (E1/E2) to enter the start...
Owners Manual
Page 31
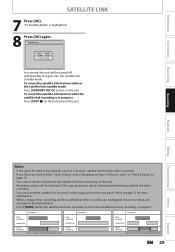
... the signal of external input breaks up over 5 seconds, satellite link function will be cut off. Refer to page 12 for the satellite link timer recording on the front panel of the unit. timer recording satellite link actual recording timer recording satellite link actual recording The first 2 minutes ... unit will be cut off automatically as illustrated below. • Press [TIMER] during satellite link timer recording. • You can record the satellite link by using S-video input jacks on the unit. To cancel the satellite link function while in "Clock Setting" on page 19....
... the signal of external input breaks up over 5 seconds, satellite link function will be cut off. Refer to page 12 for the satellite link timer recording on the front panel of the unit. timer recording satellite link actual recording timer recording satellite link actual recording The first 2 minutes ... unit will be cut off automatically as illustrated below. • Press [TIMER] during satellite link timer recording. • You can record the satellite link by using S-video input jacks on the unit. To cancel the satellite link function while in "Clock Setting" on page 19....
Owners Manual
Page 32
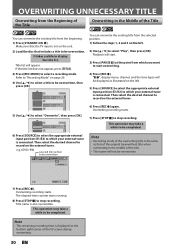
...to "Recording Mode" on the external tuner. 6) Press [REC I] again. This operation may take a while to stop recording. OVERWRITING UNNECESSARY TITLE Overwriting from the Beginning of the Title Overwriting in the middle of the TV screen during overwriting. 30 EN e.g.) DVD+RW ... external tuner is the same as illustrated on the left . 2) Use [K / L] to stop recording. Overwriting recording starts. 7) Press [STOP C] to select "Play", then press [OK]. It takes a while to select a recording mode. Overwriting recording starts. Make sure that the TV input is also...
...to "Recording Mode" on the external tuner. 6) Press [REC I] again. This operation may take a while to stop recording. OVERWRITING UNNECESSARY TITLE Overwriting from the Beginning of the Title Overwriting in the middle of the TV screen during overwriting. 30 EN e.g.) DVD+RW ... external tuner is the same as illustrated on the left . 2) Use [K / L] to stop recording. Overwriting recording starts. 7) Press [STOP C] to select "Play", then press [OK]. It takes a while to select a recording mode. Overwriting recording starts. Make sure that the TV input is also...
Owners Manual
Page 34
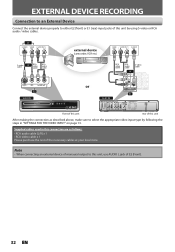
EXTERNAL DEVICE RECORDING Connection to an External Device Connect the external device properly to either E2 (front) or E1 (rear) input jacks of the necessary cables at your local store. Supplied cables used in "SETTINGS FOR THE VIDEO INPUT" on page 13. Note • When connecting an external device...the appropriate video input type by using S-video or RCA audio / video cables. or S-VIDEO VIDEO OUT OUT AUDIO OUT R L external device (camcorder, VCR etc.) VIDEO OUT AUDIO OUT R L S-VIDEO OUT S-video cable or RCA video cable RCA audio cable E2 to E2 IN DVD RECORDER or front ...
EXTERNAL DEVICE RECORDING Connection to an External Device Connect the external device properly to either E2 (front) or E1 (rear) input jacks of the necessary cables at your local store. Supplied cables used in "SETTINGS FOR THE VIDEO INPUT" on page 13. Note • When connecting an external device...the appropriate video input type by using S-video or RCA audio / video cables. or S-VIDEO VIDEO OUT OUT AUDIO OUT R L external device (camcorder, VCR etc.) VIDEO OUT AUDIO OUT R L S-VIDEO OUT S-video cable or RCA video cable RCA audio cable E2 to E2 IN DVD RECORDER or front ...

Owners Manual
Page 35
...sure to open the disc tray. Introduction Connections Basic Setup Recording EXTERNAL DEVICE RECORDING Recording from an External Device Before recording from . 8 Press [STOP C] on page 32. It takes a while to load the disc. 4 Select the input of the TV to which the external device is connected. 2 Press [...unit is connected. (E2 or E1) • To use the input jacks on the TV and press [STANDBY-ON y], and be completed. 23 6 8 1 Playback Editing Function Setup Others Español EN 33 Refer to select a recording mode. Select "E2 (Front)" position by using [SOURCE]. 5 ...
...sure to open the disc tray. Introduction Connections Basic Setup Recording EXTERNAL DEVICE RECORDING Recording from an External Device Before recording from . 8 Press [STOP C] on page 32. It takes a while to load the disc. 4 Select the input of the TV to which the external device is connected. 2 Press [...unit is connected. (E2 or E1) • To use the input jacks on the TV and press [STANDBY-ON y], and be completed. 23 6 8 1 Playback Editing Function Setup Others Español EN 33 Refer to select a recording mode. Select "E2 (Front)" position by using [SOURCE]. 5 ...

Owners Manual
Page 40
If you are playing back a DVD-video or video CD with this unit. (Refer to page 37 for the list of compatible discs.) 3 Press [OPEN/CLOSE A] to close the disc tray. ... a while to load the disc completely. 4 Press [PLAY B] to open the disc tray and insert your disc with its label facing up. Turn on the TV and be sure to select the input to "Resume Playback" on the menu screen by activating PBC (playback control) function (page 37). 38 EN
If you are playing back a DVD-video or video CD with this unit. (Refer to page 37 for the list of compatible discs.) 3 Press [OPEN/CLOSE A] to close the disc tray. ... a while to load the disc completely. 4 Press [PLAY B] to open the disc tray and insert your disc with its label facing up. Turn on the TV and be sure to select the input to "Resume Playback" on the menu screen by activating PBC (playback control) function (page 37). 38 EN
