
User manual, English (US)
Page 4
... SCAN PICTURE PROBLEMS, IT IS RECOMMENDED THAT THE USER SWITCH THE CONNECTION TO THE 'STANDARD DEFINITION' OUTPUT. Invisible laser radiation when open AVOID DIRECT EXPOSURE TO BEAM. IF THERE ARE QUESTIONS REGARDING OUR TV SET COMPATIBILITY WITH THIS MODEL 525p AND 625p DVD PLAYER, PLEASE CONTACT OUR CUSTOMER SERVICE CENTER.' This device must accept any interference received, including interference that the unit has a double insulation system 4 EXPOSURE...
... SCAN PICTURE PROBLEMS, IT IS RECOMMENDED THAT THE USER SWITCH THE CONNECTION TO THE 'STANDARD DEFINITION' OUTPUT. Invisible laser radiation when open AVOID DIRECT EXPOSURE TO BEAM. IF THERE ARE QUESTIONS REGARDING OUR TV SET COMPATIBILITY WITH THIS MODEL 525p AND 625p DVD PLAYER, PLEASE CONTACT OUR CUSTOMER SERVICE CENTER.' This device must accept any interference received, including interference that the unit has a double insulation system 4 EXPOSURE...
User manual, English (US)
Page 7
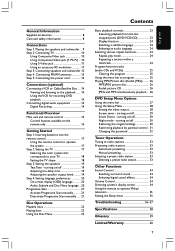
... DVD Setup Menu Options Using the menu bar 27 Using the Setup Menu 28 Setting the video output 28 Screen saver - turning on /off 30 Restoring the original settings 30 Restricting playback by parental control . 31 Changing the password 32 Tuner Operations Tuning to radio stations 33 Presetting radio stations 33 Automatic presetting 33 Manual presetting 33 Selecting a preset radio station 33 Deleting a preset radio station 33 Other Functions Sound Control 34 Selecting surround sound 34 Selecting digital sound effects 34 Volume Control 34 Dimming system's display screen 34 Using...
... DVD Setup Menu Options Using the menu bar 27 Using the Setup Menu 28 Setting the video output 28 Screen saver - turning on /off 30 Restoring the original settings 30 Restricting playback by parental control . 31 Changing the password 32 Tuner Operations Tuning to radio stations 33 Presetting radio stations 33 Automatic presetting 33 Manual presetting 33 Selecting a preset radio station 33 Deleting a preset radio station 33 Other Functions Sound Control 34 Selecting surround sound 34 Selecting digital sound effects 34 Volume Control 34 Dimming system's display screen 34 Using...
User manual, English (US)
Page 9
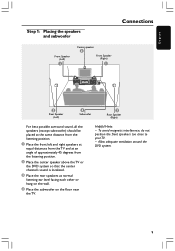
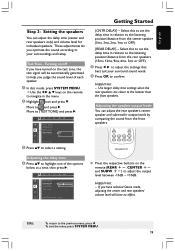
Allow adequate ventilation around the DVD system. 9 Helpful Hints: - English Step 1: Placing the speakers and subwoofer Front Speaker (Left) 1 Center speaker 2 Front Speaker (Right) 1 Connections 3 Rear Speaker (Left) 4 Subwoofer 3 Rear Speaker (Right) For best possible surround sound, all the speakers (except subwoofer) should be placed at the same distance from the listening position. 1 Place the front left and right speakers at equal distances from the TV and at an angle of approximately...
Allow adequate ventilation around the DVD system. 9 Helpful Hints: - English Step 1: Placing the speakers and subwoofer Front Speaker (Left) 1 Center speaker 2 Front Speaker (Right) 1 Connections 3 Rear Speaker (Left) 4 Subwoofer 3 Rear Speaker (Right) For best possible surround sound, all the speakers (except subwoofer) should be placed at the same distance from the listening position. 1 Place the front left and right speakers at equal distances from the TV and at an angle of approximately...
User manual, English (US)
Page 10
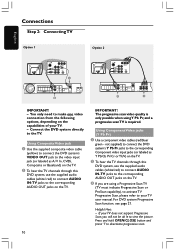
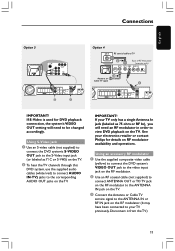
... support Progressive Scan, you are using a Progressive Scan TV (TV must indicate Progressive Scan or ProScan capability), to activate TV Progressive Scan, please refer to the corresponding AUDIO OUT jacks on the capabilities of your TV user manual. For DVD system Progressive Scan function, see page 21. Using Component Video jacks (Y Pb Pr) 1 Use a component video cables (red/blue/ green - Helpful Hint: - Using Composite Video jack 1 Use the supplied composite video cable (yellow) to connect the DVD system's VIDEO OUT jack...
... support Progressive Scan, you are using a Progressive Scan TV (TV must indicate Progressive Scan or ProScan capability), to activate TV Progressive Scan, please refer to the corresponding AUDIO OUT jacks on the capabilities of your TV user manual. For DVD system Progressive Scan function, see page 21. Using Component Video jacks (Y Pb Pr) 1 Use a component video cables (red/blue/ green - Helpful Hint: - Using Composite Video jack 1 Use the supplied composite video cable (yellow) to connect the DVD system's VIDEO OUT jack...
User manual, English (US)
Page 11
... to the ANTENNA IN jack on the TV. 3 Connect the Antenna or Cable TV service signal to be changed accordingly. If your TV only has a single Antenna In jack (labeled as Y/ C or S-VHS) on the TV. 2 To hear the TV channels through this DVD system, use the supplied audio cables (white/ red) to connect AUDIO IN-TV) jacks to the corresponding AUDIO OUT jacks on RF modulator availability and operations. If S-Video is used for...
... to the ANTENNA IN jack on the TV. 3 Connect the Antenna or Cable TV service signal to be changed accordingly. If your TV only has a single Antenna In jack (labeled as Y/ C or S-VHS) on the TV. 2 To hear the TV channels through this DVD system, use the supplied audio cables (white/ red) to connect AUDIO IN-TV) jacks to the corresponding AUDIO OUT jacks on RF modulator availability and operations. If S-Video is used for...
User manual, English (US)
Page 14
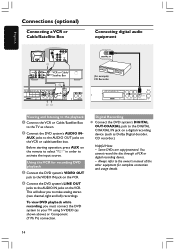
... Using the VCR for recording DVD playback 3 Connect the DVD system's VIDEO OUT jack to the VIDEO IN jack on the VCR. 4 Connect the DVD system's LINE OUT jacks to the TV as Dolby Digital decoder, CD recorder.) Helpful Hints: - To view DVD playback while recording, you to activate the input source. Before starting operation, press AUX on the VCR or cable/satellite box. AUX jacks to the AUDIO OUT jacks on the remote to select "AUX" in order to make analog stereo...
... Using the VCR for recording DVD playback 3 Connect the DVD system's VIDEO OUT jack to the VIDEO IN jack on the VCR. 4 Connect the DVD system's LINE OUT jacks to the TV as Dolby Digital decoder, CD recorder.) Helpful Hints: - To view DVD playback while recording, you to activate the input source. Before starting operation, press AUX on the VCR or cable/satellite box. AUX jacks to the AUDIO OUT jacks on the remote to select "AUX" in order to make analog stereo...

User manual, English (US)
Page 15
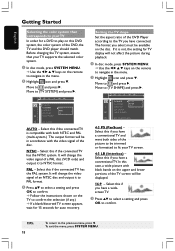
.../next channel on Philips TV (on the system. 2 Disc tray 3 OPEN /CLOSE 0 (DISC mode only) - DISC: stops playback or clears a program. - Exits an operation. - DISC: starts programming. - For plugging in the headphones jack. Main unit and remote control Functional Overview English 1 2 3 4 5 6 789 10 11 1 STANDBY ON - DISC: starts/pauses playback. 6 S PREV / T NEXT - TUNER: tunes the radio frequency up / down. - Adjusts the volume level. ! TUNER: *erases a preset radio station. 8 SOURCE - Selects the relevant active mode :TV, DISC,TUNER (FM/AM) or AUX. 9 PROG...
.../next channel on Philips TV (on the system. 2 Disc tray 3 OPEN /CLOSE 0 (DISC mode only) - DISC: stops playback or clears a program. - Exits an operation. - DISC: starts programming. - For plugging in the headphones jack. Main unit and remote control Functional Overview English 1 2 3 4 5 6 789 10 11 1 STANDBY ON - DISC: starts/pauses playback. 6 S PREV / T NEXT - TUNER: tunes the radio frequency up / down. - Adjusts the volume level. ! TUNER: *erases a preset radio station. 8 SOURCE - Selects the relevant active mode :TV, DISC,TUNER (FM/AM) or AUX. 9 PROG...

User manual, English (US)
Page 16
.... 16 Adjusts subwoofer's sound level. Mutes or restores the volume. ºB - Selects multichannel surround (Dolby Digital, Dolby Pro Logic or Dolby Pro Logic II) or stereo mode. % AUDIO - Selects an audio language. ^ DISPLAY - REAR +- Repeats a specific section on to level out the volume output. £ SYSTEM MENU (DISC mode only) - Adjusts rear speakers' sound level. Adjusts TV volume (Philips TV only.) ¡ SLEEP - Selects night mode on a disc. ≥ SUBTITLE - Selects various repeat modes. § REPEAT A-B - Selects different levels of a preset radio...
.... 16 Adjusts subwoofer's sound level. Mutes or restores the volume. ºB - Selects multichannel surround (Dolby Digital, Dolby Pro Logic or Dolby Pro Logic II) or stereo mode. % AUDIO - Selects an audio language. ^ DISPLAY - REAR +- Repeats a specific section on to level out the volume output. £ SYSTEM MENU (DISC mode only) - Adjusts rear speakers' sound level. Adjusts TV volume (Philips TV only.) ¡ SLEEP - Selects night mode on a disc. ≥ SUBTITLE - Selects various repeat modes. § REPEAT A-B - Selects different levels of a preset radio...
User manual, English (US)
Page 17
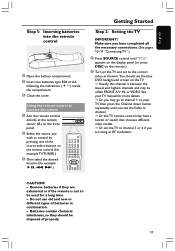
... exhausted or if the remote is between the lowest and highest channels and may have completed all the necessary connections. (See pages 10-11 "Connecting TV".) 1 Press SOURCE control until you are using an RF modulator. You should be called FRONT, A/V IN, or VIDEO. Remove batteries if they should see the blue DVD background screen on the TV and set the TV to...
... exhausted or if the remote is between the lowest and highest channels and may have completed all the necessary connections. (See pages 10-11 "Connecting TV".) 1 Press SOURCE control until you are using an RF modulator. You should be called FRONT, A/V IN, or VIDEO. Remove batteries if they should see the blue DVD background screen on the TV and set the TV to...
User manual, English (US)
Page 18
... (multi-system.) The output format will be in the menu. 2 Highlight icon and press 4. TV SHAPE TV SYSTEM VIDEO OUT SCR SAVER SMART POWER AUTO NTSC PAL SET TO NTSC AUTO - Before changing the TV system, ensure that corresponds to confirm. The format you have connected. NTSC - In this DVD system, the color system of the disc. PAL - It will not affect the picture during playback. 1 In disc mode, press SYSTEM MENU. ➜ Use the...
... (multi-system.) The output format will be in the menu. 2 Highlight icon and press 4. TV SHAPE TV SYSTEM VIDEO OUT SCR SAVER SMART POWER AUTO NTSC PAL SET TO NTSC AUTO - Before changing the TV system, ensure that corresponds to confirm. The format you have connected. NTSC - In this DVD system, the color system of the disc. PAL - It will not affect the picture during playback. 1 In disc mode, press SYSTEM MENU. ➜ Use the...
User manual, English (US)
Page 19
... 1 2 to adjust the settings that best suit your surroundings and setup. Move to your surround sound needs. 6 Press OK to adjust the output level between -15dB ~ +10dB. Helpful Hint: - Adjusting the delay time 4 Press 34 to highlight one of each speaker. 1 In disc mode, press SYSTEM MENU. ➜ Use the 1 2 3 4 keys on the remote (REAR +-, CENTER +and SUBW +-) to confirm. Select this to set the delay time in the menu. 2 Highlight icon and press 4. NIGHT MODE CNTR DELAY REAR DELAY TEST TONE CENTER DELAY SET TO...
... 1 2 to adjust the settings that best suit your surroundings and setup. Move to your surround sound needs. 6 Press OK to adjust the output level between -15dB ~ +10dB. Helpful Hint: - Adjusting the delay time 4 Press 34 to highlight one of each speaker. 1 In disc mode, press SYSTEM MENU. ➜ Use the 1 2 3 4 keys on the remote (REAR +-, CENTER +and SUBW +-) to confirm. Select this to set the delay time in the menu. 2 Highlight icon and press 4. NIGHT MODE CNTR DELAY REAR DELAY TEST TONE CENTER DELAY SET TO...
User manual, English (US)
Page 21
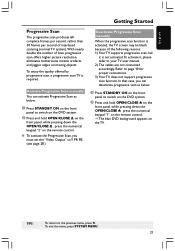
... number of the following reasons: 1) Your TV supports progressive scan, but it , please refer to your TV user manual. 2) The cables are not connected accordingly. To enjoy the quality offered by progressive scan, a progressive scan TV is not activated.To activate it is required. In that case, you must set the "Video Output" to switch on the DVD system. 2 Press and hold OPEN...
... number of the following reasons: 1) Your TV supports progressive scan, but it , please refer to your TV user manual. 2) The cables are not connected accordingly. To enjoy the quality offered by progressive scan, a progressive scan TV is not activated.To activate it is required. In that case, you must set the "Video Output" to switch on the DVD system. 2 Press and hold OPEN...
User manual, English (US)
Page 22
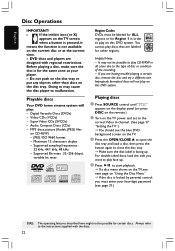
...; You should see next page on this DVD system. English Disc Operations IMPORTANT! - MP3 discs, picture (Kodak, JPEG) files on the disc tray. Supported sampling frequencies : 32 kHz, 44.1 kHz, 48 kHz - Video CDs (VCDs) - Playing discs 1 Press SOURCE control until "DISC" appears on the display panel (or press DISC on the remote.) 2 Turn on the TV power and set to play on "Using the Disc Menu." ➜ If the disc is facing up . 4 Press ÉÅ...
...; You should see next page on this DVD system. English Disc Operations IMPORTANT! - MP3 discs, picture (Kodak, JPEG) files on the disc tray. Supported sampling frequencies : 32 kHz, 44.1 kHz, 48 kHz - Video CDs (VCDs) - Playing discs 1 Press SOURCE control until "DISC" appears on the display panel (or press DISC on the remote.) 2 Turn on the TV power and set to play on "Using the Disc Menu." ➜ If the disc is facing up . 4 Press ÉÅ...
User manual, English (US)
Page 25
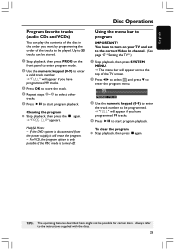
... 2~3 to select other tracks. 5 Press ÉÅ to enter the program menu. To clear the program G Stop playback, then press Çagain. If the DVD system is turned off. TIPS: The operating features described here might not be programmed. ➜ "FULL" will appear if you have to turn on the front panel to enter program mode. 2 Use the numeric keypad (0-9) to enter a valid track number...
... 2~3 to select other tracks. 5 Press ÉÅ to enter the program menu. To clear the program G Stop playback, then press Çagain. If the DVD system is turned off. TIPS: The operating features described here might not be programmed. ➜ "FULL" will appear if you have to turn on the front panel to enter program mode. 2 Use the numeric keypad (0-9) to enter a valid track number...
User manual, English (US)
Page 28
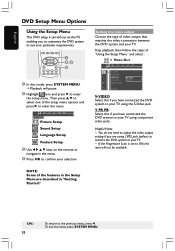
... of video output that matches the video connection between the DVD system and your particular requirements. 4 , 1 In disc mode, press SYSTEM MENU. ➜ Playback will not be available. You do not need to adjust the video output setting if you have connected the DVD system to your TV using component video jacks. TIPS: 28 To return to confirm your selection. English DVD Setup Menu Options Using the Setup Menu This DVD setup is set to enter the menu. SETUP MENU Picture Setup Sound Setup Language Setup Feature Setup 3 Use 1 2 3 4 keys on the remote...
... of video output that matches the video connection between the DVD system and your particular requirements. 4 , 1 In disc mode, press SYSTEM MENU. ➜ Playback will not be available. You do not need to adjust the video output setting if you have connected the DVD system to your TV using component video jacks. TIPS: 28 To return to confirm your selection. English DVD Setup Menu Options Using the Setup Menu This DVD setup is set to enter the menu. SETUP MENU Picture Setup Sound Setup Language Setup Feature Setup 3 Use 1 2 3 4 keys on the remote...
User manual, English (US)
Page 30
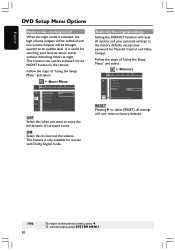
... the steps of surround sound. This feature is only available for Parental Control and Video Output. To exit the menu, press SYSTEM MENU. Restoring the original settings Setting the DEFAULT function will now reset to an audible level. TIPS: 30 To return to level out the volume. English DVD Setup Menu Options Night mode - turning on/off When the night mode is useful for watching your password for movies with Dolby Digital mode. ON Select this when you...
... the steps of surround sound. This feature is only available for Parental Control and Video Output. To exit the menu, press SYSTEM MENU. Restoring the original settings Setting the DEFAULT function will now reset to an audible level. TIPS: 30 To return to level out the volume. English DVD Setup Menu Options Night mode - turning on/off When the night mode is useful for watching your password for movies with Dolby Digital mode. ON Select this when you...

User manual, English (US)
Page 34
...Dimming system's display screen G In any sound from the rear speakers. Selecting digital sound effects Select a preset digital sound effects that matches your disc's content or that optimizes the sound of speakers used and the sound available on the number of the musical style you are connected (see page 12.) Selecting surround sound G Press SURROUND to increase or decrease the volume level. ➜ "VOL XX" appears. English Other Functions Sound Control IMPORTANT! For proper surround sound, make sure the speakers and subwoofer are playing. Volume control G Adjust VOLUME control...
...Dimming system's display screen G In any sound from the rear speakers. Selecting digital sound effects Select a preset digital sound effects that matches your disc's content or that optimizes the sound of speakers used and the sound available on the number of the musical style you are connected (see page 12.) Selecting surround sound G Press SURROUND to increase or decrease the volume level. ➜ "VOL XX" appears. English Other Functions Sound Control IMPORTANT! For proper surround sound, make sure the speakers and subwoofer are playing. Volume control G Adjust VOLUME control...
User manual, English (US)
Page 36
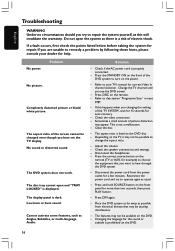
... not open and "TRAY LOCKED" is fixed on the remote. - No power. The aspect ratio of the screen cannot be possible to repair the system yourself, as Angles, Subtitles, or multi-language Audio. Cannot activate some features, such as this happens when you changing the setting of electric shock. Change the TV channel until you see the DVD screen. - Check the video connection. - Changing the language for correct Video In channel selection.
... not open and "TRAY LOCKED" is fixed on the remote. - No power. The aspect ratio of the screen cannot be possible to repair the system yourself, as Angles, Subtitles, or multi-language Audio. Cannot activate some features, such as this happens when you changing the setting of electric shock. Change the TV channel until you see the DVD screen. - Check the video connection. - Changing the language for correct Video In channel selection.
User manual, English (US)
Page 37
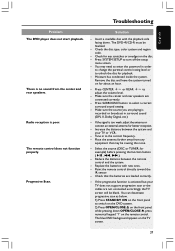
... the center and rear speakers. The blue DVD background appears on the disc. - Make sure the center and rear speakers are loaded correctly. - Remove the disc and leave the system turned on the front panel, while pressing down . Press SYSTEM SETUP to switch on the DVD system. 2) Press OPEN/CLOSE 0 on for example) before pressing the function button (ÉÅ, S, T.) - There is poor. Tune in surround sound (DPL II, Dolby Digital, etc.) - English Troubleshooting Problem The DVD player does not start playback. Radio...
... the center and rear speakers. The blue DVD background appears on the disc. - Make sure the center and rear speakers are loaded correctly. - Remove the disc and leave the system turned on the front panel, while pressing down . Press SYSTEM SETUP to switch on the DVD system. 2) Press OPEN/CLOSE 0 on for example) before pressing the function button (ÉÅ, S, T.) - There is poor. Tune in surround sound (DPL II, Dolby Digital, etc.) - English Troubleshooting Problem The DVD player does not start playback. Radio...

User manual, English (US)
Page 39
... right, center and subwoofer.) Dolby Pro Logic II: It creates five fullbandwidth output channels from two-channel sources. This system can enjoy interactive playback and searching. Region code: A system allowing discs to be prohibited if the software's level is assigned a chapter number enabling you can convert the interlaced video from disc to the signal recorded on the back of the DVD system that has Component Video In jacks (R/G/B, Y/Pb/Pr, etc.) Disc menu: A screen display prepared for...
... right, center and subwoofer.) Dolby Pro Logic II: It creates five fullbandwidth output channels from two-channel sources. This system can enjoy interactive playback and searching. Region code: A system allowing discs to be prohibited if the software's level is assigned a chapter number enabling you can convert the interlaced video from disc to the signal recorded on the back of the DVD system that has Component Video In jacks (R/G/B, Y/Pb/Pr, etc.) Disc menu: A screen display prepared for...


