
User manual, English (US)
Page 7
... 2: Setting the TV 17 Selecting the color system that corresponds to program 25 Playing MP3/Picture disc (Kodak, JPEG) ........ 26 MP3/JPEG picture disc 26 Kodak picture CD 26 JPEG and MP3 simultaneously playback ... 26 DVD Setup Menu Options Using the menu bar 27 ...On-screen display (OSD) language 20 Audio, Subtitle and Disc Menu language .. 20 Progressive Scan 21 Activate Progressive Scan manually .......... 21 Deactivate Progressive Scan manually ..... 21 Disc Operations Playable discs 22 Playing discs 22 Using the Disc Menu 23 Contents Basic playback controls 23 Resuming ...
... 2: Setting the TV 17 Selecting the color system that corresponds to program 25 Playing MP3/Picture disc (Kodak, JPEG) ........ 26 MP3/JPEG picture disc 26 Kodak picture CD 26 JPEG and MP3 simultaneously playback ... 26 DVD Setup Menu Options Using the menu bar 27 ...On-screen display (OSD) language 20 Audio, Subtitle and Disc Menu language .. 20 Progressive Scan 21 Activate Progressive Scan manually .......... 21 Deactivate Progressive Scan manually ..... 21 Disc Operations Playable discs 22 Playing discs 22 Using the Disc Menu 23 Contents Basic playback controls 23 Resuming ...
User manual, English (US)
Page 10
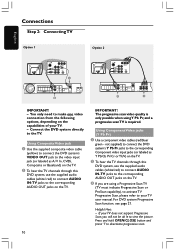
... the TV. If your TV user manual. English Connections Step 2: Connecting TV Option 1 Option 2 1 1 2 2 IMPORTANT! - The progressive scan video quality is only possible when usingY Pb Pr, and a progressive scan TV is required. Helpful Hint: - Connect the DVD system directly to deactivate progressive scan. not supplied...to connect AUDIO IN-TV jacks to make one video connection from the following options, depending on the TV. 10 IMPORTANT! For DVD system Progressive Scan function, see page 21. You only need to the corresponding AUDIO OUT jacks on the capabilities of your TV. -...
... the TV. If your TV user manual. English Connections Step 2: Connecting TV Option 1 Option 2 1 1 2 2 IMPORTANT! - The progressive scan video quality is only possible when usingY Pb Pr, and a progressive scan TV is required. Helpful Hint: - Connect the DVD system directly to deactivate progressive scan. not supplied...to connect AUDIO IN-TV jacks to make one video connection from the following options, depending on the TV. 10 IMPORTANT! For DVD system Progressive Scan function, see page 21. You only need to the corresponding AUDIO OUT jacks on the capabilities of your TV. -...
User manual, English (US)
Page 14
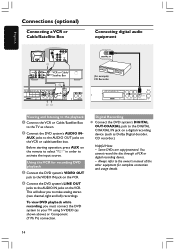
...DVD system to the TV as shown. 2 Connect the DVD system's AUDIO IN- Digital Recording G Connect the DVD system...'s DIGITAL OUT-COAXIAL jack to make analog stereo (two channel, right and left) recordings. AUX jacks to the AUDIO IN jacks on the VCR or cable/satellite box. Using the VCR for recording DVD playback 3 Connect the DVD system...'s VIDEO OUT jack to the VIDEO IN jack on the VCR. 4 Connect the DVD system... Pr) connection. To view DVD playback while recording, you to the DIGITAL COAXIAL IN...
...DVD system to the TV as shown. 2 Connect the DVD system's AUDIO IN- Digital Recording G Connect the DVD system...'s DIGITAL OUT-COAXIAL jack to make analog stereo (two channel, right and left) recordings. AUX jacks to the AUDIO IN jacks on the VCR or cable/satellite box. Using the VCR for recording DVD playback 3 Connect the DVD system...'s VIDEO OUT jack to the VIDEO IN jack on the VCR. 4 Connect the DVD system... Pr) connection. To view DVD playback while recording, you to the DIGITAL COAXIAL IN...

User manual, English (US)
Page 15
Opens/ Closes the disc tray. 4 System display panel 5 ÉÅ PLAY/PAUSE - DISC: *searches backward/forward or selects a track. - DISC: stops playback or clears a program. - Selects the relevant active mode :TV, ... to standby mode or turns on remote only.) 7 Ç STOP - PHONES - TV: selects previous/next channel on Philips TV (on the system. 2 Disc tray 3 OPEN /CLOSE 0 (DISC mode only) - TUNER: starts manual preset programming. 0 VOLUME (VOL +-) - Main unit and remote control Functional Overview English 1 2 3 4 5 6 789 10 11 1 STANDBY ON - The speakers output...
Opens/ Closes the disc tray. 4 System display panel 5 ÉÅ PLAY/PAUSE - DISC: *searches backward/forward or selects a track. - DISC: stops playback or clears a program. - Selects the relevant active mode :TV, ... to standby mode or turns on remote only.) 7 Ç STOP - PHONES - TV: selects previous/next channel on Philips TV (on the system. 2 Disc tray 3 OPEN /CLOSE 0 (DISC mode only) - TUNER: starts manual preset programming. 0 VOLUME (VOL +-) - Main unit and remote control Functional Overview English 1 2 3 4 5 6 789 10 11 1 STANDBY ON - The speakers output...
User manual, English (US)
Page 17
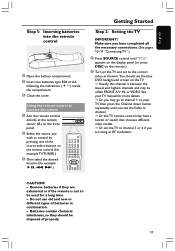
See your TV manual for more details. ➜ Or, you may go to channel 1 on your TV, then press the Channel down button repeatedly until you see the blue DVD background screen on the remote control (for example TV,TUNER.) 3 Then select the desired function (for a long time. - ...CAUTION! - Using the remote control to operate the system 1 Aim the remote control directly at the remote sensor ...
See your TV manual for more details. ➜ Or, you may go to channel 1 on your TV, then press the Channel down button repeatedly until you see the blue DVD background screen on the remote control (for example TV,TUNER.) 3 Then select the desired function (for a long time. - ...CAUTION! - Using the remote control to operate the system 1 Aim the remote control directly at the remote sensor ...
User manual, English (US)
Page 21
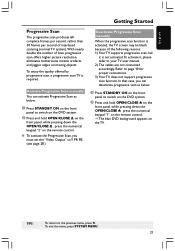
...G To activate the Progressive Scan, you can activate Progressive Scan as below . 1 Press STANDBY ON on the front panel to switch on the DVD system. 2 Press and hold OPEN/CLOSE 0 on the front panel, while pressing down the OPEN/CLOSE 0 press the numerical keypad "1" on the remote... control. ➜ The blue DVD background appears on the remote control. Activate Progressive Scan manually You can deactivate progressive scan as below . 1 Press STANDBY ON on the front panel to switch on the DVD system. 2 Press and hold OPEN/CLOSE 0 on the front panel,...
...G To activate the Progressive Scan, you can activate Progressive Scan as below . 1 Press STANDBY ON on the front panel to switch on the DVD system. 2 Press and hold OPEN/CLOSE 0 on the front panel, while pressing down the OPEN/CLOSE 0 press the numerical keypad "1" on the remote... control. ➜ The blue DVD background appears on the remote control. Activate Progressive Scan manually You can deactivate progressive scan as below . 1 Press STANDBY ON on the front panel to switch on the DVD system. 2 Press and hold OPEN/CLOSE 0 on the front panel,...
User manual, English (US)
Page 33
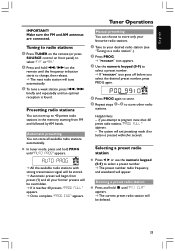
...Presetting radio stations You can store up to select a preset number. ➜ The preset number, radio frequency, and waveband will be deleted. 33 Manual presetting You can store all your desired radio station (see "Tuning to a radio station".) 2 Press PROG. ➜ "PROGRAM" icon appears. 3... goes off before you attempt to change, then release. ➜ The next radio station will exit presetting mode if no button is found. The system will tune automatically. 3 To tune a weak station, press S / T briefly and repeatedly until "AUTO PROG" appears. Selecting a preset radio station...
...Presetting radio stations You can store up to select a preset number. ➜ The preset number, radio frequency, and waveband will be deleted. 33 Manual presetting You can store all your desired radio station (see "Tuning to a radio station".) 2 Press PROG. ➜ "PROGRAM" icon appears. 3... goes off before you attempt to change, then release. ➜ The next radio station will exit presetting mode if no button is found. The system will tune automatically. 3 To tune a weak station, press S / T briefly and repeatedly until "AUTO PROG" appears. Selecting a preset radio station...
User manual, English (US)
Page 36
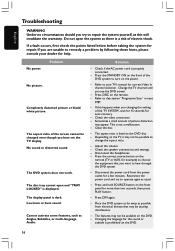
... picture. No sound or distorted sound. Low hum or buzz sound. Solution - The aspect ratio is properly connected. - Adjust the volume. - Place the DVD system as far away as possible from the power outlet for the sound or subtitle is a risk of the screen cannot be possible to change the...work. Cannot activate some features, such as this happens when you are unable to remedy a problem by following these hints, please consult your TV's manual for more than two seconds, then press PLAY button. - Refer to operate again as there is prohibited on the remote (TV or AUX, ...
... picture. No sound or distorted sound. Low hum or buzz sound. Solution - The aspect ratio is properly connected. - Adjust the volume. - Place the DVD system as far away as possible from the power outlet for the sound or subtitle is a risk of the screen cannot be possible to change the...work. Cannot activate some features, such as this happens when you are unable to remedy a problem by following these hints, please consult your TV's manual for more than two seconds, then press PLAY button. - Refer to operate again as there is prohibited on the remote (TV or AUX, ...

