
User manual, English (US)
Page 1
... Co., Ltd. DVD/CD Player with Video Cassette Recorder CMWD2206 A Supplied Accessories STANDBY-ON POWER ON VIDEO AUDIO REC TIMER REC REW F.FWD STOP/EJECT PLAY RECORD IR OPEN/CLOSE CHANNEL VCR DVD SOURCE PREV DISC IN PLAY STOP PLAY NEXT DVD PLAYER / VCR CMWD 2206 Remote control (NB179UD) with two AA (1.5V) batteries RF cable (WPZ0901TM002 / WPZ0901TM005) Precautions Information DVD Functions VCR Functions Setup If you need additional operating assistance after reading this unit. Owner's Manual Please read before using this owner's manual, please call TOLL FREE : 1-800...
... Co., Ltd. DVD/CD Player with Video Cassette Recorder CMWD2206 A Supplied Accessories STANDBY-ON POWER ON VIDEO AUDIO REC TIMER REC REW F.FWD STOP/EJECT PLAY RECORD IR OPEN/CLOSE CHANNEL VCR DVD SOURCE PREV DISC IN PLAY STOP PLAY NEXT DVD PLAYER / VCR CMWD 2206 Remote control (NB179UD) with two AA (1.5V) batteries RF cable (WPZ0901TM002 / WPZ0901TM005) Precautions Information DVD Functions VCR Functions Setup If you need additional operating assistance after reading this unit. Owner's Manual Please read before using this owner's manual, please call TOLL FREE : 1-800...

User manual, English (US)
Page 3
.... Location and Handling • Do not install the unit in direct sunlight, near the deck mechanism. Under conditions of picture problems with 525(480) progressive scan output, it is protected by a child and an adult leaning, pulling, standing or climbing on the power cord when disconnecting it . Replace only with drastic temperature changes. • Install the unit in hazardous radiation exposure. patents...
.... Location and Handling • Do not install the unit in direct sunlight, near the deck mechanism. Under conditions of picture problems with 525(480) progressive scan output, it is protected by a child and an adult leaning, pulling, standing or climbing on the power cord when disconnecting it . Replace only with drastic temperature changes. • Install the unit in hazardous radiation exposure. patents...

User manual, English (US)
Page 4
... video heads after a heater is turned on page 23 before use. • Clean video heads only when problems occur. © 2009 Funai Electric Co., Ltd. No part of this manual may be reproduced, copied, transmitted, disseminated, transcribed, downloaded or stored in any other limited viewing uses only unless otherwise authorized by U.S. All other trademarks used in this document is subject to read the instructions...
... video heads after a heater is turned on page 23 before use. • Clean video heads only when problems occur. © 2009 Funai Electric Co., Ltd. No part of this manual may be reproduced, copied, transmitted, disseminated, transcribed, downloaded or stored in any other limited viewing uses only unless otherwise authorized by U.S. All other trademarks used in this document is subject to read the instructions...

User manual, English (US)
Page 5
... color system. DVD-RAM / DVD-Audio / CD-i / Photo CD / Video CD / DVD with the DVD recorder. Otherwise, malfunction may not be played back. *5: Some discs cannot be smooth, etc.). EN Depending on our brand's DVD recorder. Playable Discs Playable discs DVD-Video *1, 2, 4, 6, 10 Mark (logo) Region code or Recorded signals Disc size DVD-RW DVD-R *1, 3, 4, 5, 6, 7, 8, 9, 10 DVD+RW DVD+R *1, 3, 4, 5, 6, 8, 9, 10 Audio CD *4, 6, 10 CD-RW CD-R *4, 5, 6, 9, 10 Digital video (MPEG2) 12 cm or 8 cm Digital audio Digital audio 12 cm or 8 cm Disc types...
... color system. DVD-RAM / DVD-Audio / CD-i / Photo CD / Video CD / DVD with the DVD recorder. Otherwise, malfunction may not be played back. *5: Some discs cannot be smooth, etc.). EN Depending on our brand's DVD recorder. Playable Discs Playable discs DVD-Video *1, 2, 4, 6, 10 Mark (logo) Region code or Recorded signals Disc size DVD-RW DVD-R *1, 3, 4, 5, 6, 7, 8, 9, 10 DVD+RW DVD+R *1, 3, 4, 5, 6, 8, 9, 10 Audio CD *4, 6, 10 CD-RW CD-R *4, 5, 6, 9, 10 Digital video (MPEG2) 12 cm or 8 cm Digital audio Digital audio 12 cm or 8 cm Disc types...

User manual, English (US)
Page 6
... signal (Cable box or (Back of DVD/VCR) Satellite box) ANT-IN IN OUT RF cable ANT-OUT (supplied) (Back of TV) Select this unit up to a Multi channel Dolby Digital decoder, you need to change the unit's RF output to channel 4. Setup Connections Please refer to "Basic TV Connection" on the front page before you will see a playback picture. • When a picture does not appear on the TV screen, repeat step 4. 6) Press [STOP C] to stop playback...
... signal (Cable box or (Back of DVD/VCR) Satellite box) ANT-IN IN OUT RF cable ANT-OUT (supplied) (Back of TV) Select this unit up to a Multi channel Dolby Digital decoder, you need to change the unit's RF output to channel 4. Setup Connections Please refer to "Basic TV Connection" on the front page before you will see a playback picture. • When a picture does not appear on the TV screen, repeat step 4. 6) Press [STOP C] to stop playback...

User manual, English (US)
Page 8
.../C.RESET]. • To add or delete channels in this unit, [SKIP/CH. LANGUAGE SELECT STANDBY-ON or B ENGLISH [ON] FRANCAIS ESPAÑOL 3 Press [B] to next step. G//K, H/L] (or [CHANNEL K//L]). • If "AUTO SET UP" appears on the TV screen again, check the cable con- G/K, H/L]. Preparation for Use Setup Turn on the Unit for the First Time VCR Operations described in this manual are higher than 99, enter channel numbers as...
.../C.RESET]. • To add or delete channels in this unit, [SKIP/CH. LANGUAGE SELECT STANDBY-ON or B ENGLISH [ON] FRANCAIS ESPAÑOL 3 Press [B] to next step. G//K, H/L] (or [CHANNEL K//L]). • If "AUTO SET UP" appears on the TV screen again, check the cable con- G/K, H/L]. Preparation for Use Setup Turn on the Unit for the First Time VCR Operations described in this manual are higher than 99, enter channel numbers as...

User manual, English (US)
Page 9
...VCR DVD SOURCE PREV DISC IN PLAY STOP PLAY NEXT DVD PLAYER / VCR CMWD 2206 VCR DVD SOURCE VCR button DVD button SOURCE button DVD SOURCE light VCR SOURCE light OPEN/CLOSE STANDBY-ON SPEED AUDIO /EJECT 12 45 78 0 DISPLAY VCR 3 SKIP/CH. 6 VCR/TV 9 SLOW +10 DVD PAUSE RECORD PLAY STOP MENU ENTER SETUP TOP MENU RETURN MODE ZOOM SEARCH MODE CLEAR/ C. EN VCR / DVD Switching You must first select which component you wish to the antenna input jack of a television. 6: VIDEO IN jack Connect a cable coming from the audio out jack of a decoder or audio receiver. (DVD...
...VCR DVD SOURCE PREV DISC IN PLAY STOP PLAY NEXT DVD PLAYER / VCR CMWD 2206 VCR DVD SOURCE VCR button DVD button SOURCE button DVD SOURCE light VCR SOURCE light OPEN/CLOSE STANDBY-ON SPEED AUDIO /EJECT 12 45 78 0 DISPLAY VCR 3 SKIP/CH. 6 VCR/TV 9 SLOW +10 DVD PAUSE RECORD PLAY STOP MENU ENTER SETUP TOP MENU RETURN MODE ZOOM SEARCH MODE CLEAR/ C. EN VCR / DVD Switching You must first select which component you wish to the antenna input jack of a television. 6: VIDEO IN jack Connect a cable coming from the audio out jack of a decoder or audio receiver. (DVD...

User manual, English (US)
Page 10
...° - PLAY RECORD REPEAT RETURN SEARCH MODE SETUP SKIP/CH. EN RESET SUBTITLE T-SET ANGLE REPEAT A-B Installing the Batteries for the Remote Control DVD mode VCR mode Button Disc/Tape (Alphabetical order) 123 456 789 • To select chapter or title directly. 0 +10 • To select track directly. • To select channel. • The +10 button has no obstacle between your chosen point of the remote control. 1 2 3 MODE OPEN/CLOSE /EJECT PAUSE • To arrange the playing order or play randomly. • To set black level...
...° - PLAY RECORD REPEAT RETURN SEARCH MODE SETUP SKIP/CH. EN RESET SUBTITLE T-SET ANGLE REPEAT A-B Installing the Batteries for the Remote Control DVD mode VCR mode Button Disc/Tape (Alphabetical order) 123 456 789 • To select chapter or title directly. 0 +10 • To select track directly. • To select channel. • The +10 button has no obstacle between your chosen point of the remote control. 1 2 3 MODE OPEN/CLOSE /EJECT PAUSE • To arrange the playing order or play randomly. • To set black level...

User manual, English (US)
Page 11
... [STOP C] to stop playback 4 To eject the cassette OPEN/CLOSE STANDBY-ON SPEED AUDIO /EJECT 12 45 78 0 DISPLAY VCR 3 SKIP/CH. 6 VCR/TV 9 SLOW +10 DVD PAUSE STANDBY-ON POWER ON VIDEO AUDIO STOP OPEN/CLOSE /EJECT 2 PLAY STOP 3 Other Operations 1 REC TIMER REC REW F.FWD STOP/EJECT PLAY RECORD IR 32 4 Hint • When a tape without record tab is distorted or rolling vertically, adjust the vertical hold control on page 6. To cue or review picture during a search, your TV if equipped. G/K, H/L] (or [CHANNEL...
... [STOP C] to stop playback 4 To eject the cassette OPEN/CLOSE STANDBY-ON SPEED AUDIO /EJECT 12 45 78 0 DISPLAY VCR 3 SKIP/CH. 6 VCR/TV 9 SLOW +10 DVD PAUSE STANDBY-ON POWER ON VIDEO AUDIO STOP OPEN/CLOSE /EJECT 2 PLAY STOP 3 Other Operations 1 REC TIMER REC REW F.FWD STOP/EJECT PLAY RECORD IR 32 4 Hint • When a tape without record tab is distorted or rolling vertically, adjust the vertical hold control on page 6. To cue or review picture during a search, your TV if equipped. G/K, H/L] (or [CHANNEL...
User manual, English (US)
Page 12
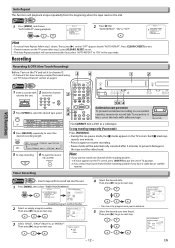
... [RECORD] repeatedly to next step. To stop recording temporarily (Pause mode) Press [PAUSE F]. • During the rec-pause mode, five C marks appear on page 6. 1 2 VCR 1 Insert a cassette with tab into the unit. 1 Press [MENU], then select "TIMER PROGRAMMING". - START TIME END TIME CHANNEL - - or - 12 - MENU or - ed cassette OPEN/CLOSE /EJECT OPEN/CLOSE STANDBY-ON SPEED AUDIO /EJECT 123 SKIP/CH. 456 2 VCR/TV 789 SLOW 0 +10 DISPLAY VCR DVD PAUSE PLAY 5 RECORD STOP 4 MENU ENTER SETUP TOP MENU RETURN STANDBY-ON POWER ON VIDEO AUDIO...
... [RECORD] repeatedly to next step. To stop recording temporarily (Pause mode) Press [PAUSE F]. • During the rec-pause mode, five C marks appear on page 6. 1 2 VCR 1 Insert a cassette with tab into the unit. 1 Press [MENU], then select "TIMER PROGRAMMING". - START TIME END TIME CHANNEL - - or - 12 - MENU or - ed cassette OPEN/CLOSE /EJECT OPEN/CLOSE STANDBY-ON SPEED AUDIO /EJECT 123 SKIP/CH. 456 2 VCR/TV 789 SLOW 0 +10 DISPLAY VCR DVD PAUSE PLAY 5 RECORD STOP 4 MENU ENTER SETUP TOP MENU RETURN STANDBY-ON POWER ON VIDEO AUDIO...
User manual, English (US)
Page 13
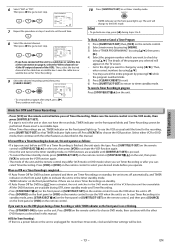
... a Timer Recording or while TIMER indicator on the remote control to use the DVD player during steps 3 to select your desired mode before you selected will be unavailable. The details of the program you operate. Press [SUBTITLE/T-SET] on the remote control or [STOP/EJECT C A] on the unit, then press [VCR] to activate the VCR function again. • Once the unit turns to the timer standby mode, no more than 30 seconds, clock and all the VCR functions will change...
... a Timer Recording or while TIMER indicator on the remote control to use the DVD player during steps 3 to select your desired mode before you selected will be unavailable. The details of the program you operate. Press [SUBTITLE/T-SET] on the remote control or [STOP/EJECT C A] on the unit, then press [VCR] to activate the VCR function again. • Once the unit turns to the timer standby mode, no more than 30 seconds, clock and all the VCR functions will change...

User manual, English (US)
Page 15
... standby mode. Resume message will be carried out on the disc. Make sure the TV and audio receiver (commercially available) are blurred. (Refer to pages 20-21.) To use . STANDBY-ON POWER ON VIDEO AUDIO REC TIMER REC REW F.FWD STOP/EJECT PLAY RECORD IR OPEN/CLOSE CHANNEL VCR DVD SOURCE PREV DISC IN PLAY STOP PLAY NEXT 1 Lights up when power is being switched to this unit. Resume ON Press 'PLAY' to specific programs. • During the playback of a two-layered disc, pictures...
... standby mode. Resume message will be carried out on the disc. Make sure the TV and audio receiver (commercially available) are blurred. (Refer to pages 20-21.) To use . STANDBY-ON POWER ON VIDEO AUDIO REC TIMER REC REW F.FWD STOP/EJECT PLAY RECORD IR OPEN/CLOSE CHANNEL VCR DVD SOURCE PREV DISC IN PLAY STOP PLAY NEXT 1 Lights up when power is being switched to this unit. Resume ON Press 'PLAY' to specific programs. • During the playback of a two-layered disc, pictures...
User manual, English (US)
Page 16
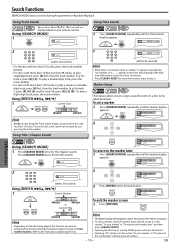
... number. To set a marker" or "To return to enter a number, "0" appears automatically. SEARCH MODE PLAY 2 ENTER 3 ENTER DVD Functions 1 Press [SEARCH MODE] once for track 3, press [0], [3]). CH 1 CH 2 CH 3 CH 4 SKIP SKIP or Current Title (TT) TT 1 TT2 TT3 TT4 SKIP SKIP Hint • Depending on the remote control. 1 SEARCH MODE /29 Using Time Search DVD 1 [SEARCH MODE] repeatedly until the Time Search display appears. EN Using Track Search DVD Operations...
... number. To set a marker" or "To return to enter a number, "0" appears automatically. SEARCH MODE PLAY 2 ENTER 3 ENTER DVD Functions 1 Press [SEARCH MODE] once for track 3, press [0], [3]). CH 1 CH 2 CH 3 CH 4 SKIP SKIP or Current Title (TT) TT 1 TT2 TT3 TT4 SKIP SKIP Hint • Depending on the remote control. 1 SEARCH MODE /29 Using Time Search DVD 1 [SEARCH MODE] repeatedly until the Time Search display appears. EN Using Track Search DVD Operations...

User manual, English (US)
Page 19
... than STEREO. ENTER 1 Black Level Setting DVD Adjust the Black Level Setting to pages 20-22.) 1 PLAY 1/8 ANGLE You can change the subtitle language setting. If you choose a language that language. ... ... You can enjoy stereophonic virtual world on your language is recorded on the screen. DVD Functions Special Settings Subtitle Language DVD This unit allows you to the manual along with Virtual Surround function, the sound will be down sampling at 48kHz and output as example below .
... than STEREO. ENTER 1 Black Level Setting DVD Adjust the Black Level Setting to pages 20-22.) 1 PLAY 1/8 ANGLE You can change the subtitle language setting. If you choose a language that language. ... ... You can enjoy stereophonic virtual world on your language is recorded on the screen. DVD Functions Special Settings Subtitle Language DVD This unit allows you to the manual along with Virtual Surround function, the sound will be down sampling at 48kHz and output as example below .

User manual, English (US)
Page 20
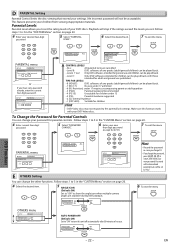
...SETUP] in the stop mode. 2 Select "CUSTOM". 3 Select the desired item. SETUP STOP or ENTER or SETUP QUICK CUSTOM INITIALIZE SETUP QUICK CUSTOM INITIALIZE ENTER SETUP CUSTOM LANGUAGE DISPLAY AUDIO PARENTAL OTHERS DVD Functions LANGUAGE menu SETUP LANGUAGE AUDIO SUBTITLE DISC MENU PLAYER MENU ORIGINAL OFF ENGLISH ENGLISH DISPLAY menu SETUP DISPLAY TV ASPECT STILL MODE 4:3 LETTER BOX AUTO AUDIO menu SETUP AUDIO DRC DOWN SAMPLING DOLBY DIGITAL ON ON BITSTREAM PARENTAL menu SETUP PARENTAL PASSWORD Please enter a 4-digit password. SUBTITLE: *1 *2 (Default: OFF) Sets...
...SETUP] in the stop mode. 2 Select "CUSTOM". 3 Select the desired item. SETUP STOP or ENTER or SETUP QUICK CUSTOM INITIALIZE SETUP QUICK CUSTOM INITIALIZE ENTER SETUP CUSTOM LANGUAGE DISPLAY AUDIO PARENTAL OTHERS DVD Functions LANGUAGE menu SETUP LANGUAGE AUDIO SUBTITLE DISC MENU PLAYER MENU ORIGINAL OFF ENGLISH ENGLISH DISPLAY menu SETUP DISPLAY TV ASPECT STILL MODE 4:3 LETTER BOX AUTO AUDIO menu SETUP AUDIO DRC DOWN SAMPLING DOLBY DIGITAL ON ON BITSTREAM PARENTAL menu SETUP PARENTAL PASSWORD Please enter a 4-digit password. SUBTITLE: *1 *2 (Default: OFF) Sets...
User manual, English (US)
Page 22
... you set to turn this function works with those intended for adult and general use and children can be played back. • Level 1: Only DVD softwares intended for children can change your desired four-digit password. 5 Select "PARENTAL LEVEL". 6 Select the desired level. 7 To exit the menu SETUP 123 or or 456 ENTER ENTER ENTER 789 0 PARENTAL LEVEL ALL PASSWORD CHANGE PARENTAL LEVEL ALL 8 [ADULT] 7 [NC-17] 6 [R] PARENTAL menu SETUP PARENTAL PASSWORD Please enter a 4-digit password. CONTROL...
... you set to turn this function works with those intended for adult and general use and children can be played back. • Level 1: Only DVD softwares intended for children can change your desired four-digit password. 5 Select "PARENTAL LEVEL". 6 Select the desired level. 7 To exit the menu SETUP 123 or or 456 ENTER ENTER ENTER 789 0 PARENTAL LEVEL ALL PASSWORD CHANGE PARENTAL LEVEL ALL 8 [ADULT] 7 [NC-17] 6 [R] PARENTAL menu SETUP PARENTAL PASSWORD Please enter a 4-digit password. CONTROL...

User manual, English (US)
Page 23
... has a record tab. Cannot remove the tape. • Check if this unit is not in the Menu mode. DVD Information • Some functions are experiencing copy guard protection. DVD / VCR VCR PROBLEM No power. • Make sure the power plug is connected to an AC outlet. • Make sure the power is turned on the remote control, the remote control is working. Poor picture or noise. • Interference signal may stop mode. G/K, H/L] on its surface. Disc cannot be...
... has a record tab. Cannot remove the tape. • Check if this unit is not in the Menu mode. DVD Information • Some functions are experiencing copy guard protection. DVD / VCR VCR PROBLEM No power. • Make sure the power plug is connected to an AC outlet. • Make sure the power is turned on the remote control, the remote control is working. Poor picture or noise. • Interference signal may stop mode. G/K, H/L] on its surface. Disc cannot be...

User manual, English (US)
Page 24
... REPAIRS: To obtain warranty service, you choose a Language that has a 3 letter language code, the code will be displayed instead. (3 letter language code is void and of original retail purchase will provide the labor without prior written approval. ALL WARRANTY INSPECTIONS AND REPAIRS MUST BE PERFORMED BY AN AUTHORIZED SERVICE CENTER. Specifications Video Heads : Four Heads Output signal format : NTSC color Power source : 120 V AC +/- 10%, 60 Hz +/- 0.5% Power consumption : 18 W (standby: 2.8W) Language Code List Operating...
... REPAIRS: To obtain warranty service, you choose a Language that has a 3 letter language code, the code will be displayed instead. (3 letter language code is void and of original retail purchase will provide the labor without prior written approval. ALL WARRANTY INSPECTIONS AND REPAIRS MUST BE PERFORMED BY AN AUTHORIZED SERVICE CENTER. Specifications Video Heads : Four Heads Output signal format : NTSC color Power source : 120 V AC +/- 10%, 60 Hz +/- 0.5% Power consumption : 18 W (standby: 2.8W) Language Code List Operating...

User manual, English (US)
Page 25
... VCR 1 Turn on for the Remote Control 1 2 3 3 VCR/DVD Switching OPEN/CLOSE CHANNEL VCR DVD SOURCE PREV DISC IN PLAY STOP PLAY NEXT DVD PLAYER / VCR CMWD 2206 VCR DVD SOURCE VCR button DVD button SOURCE button DVD SOURCE light VCR SOURCE light OPEN/CLOSE STANDBY-ON SPEED AUDIO /EJECT 12 45 78 0 DISPLAY VCR 3 SKIP/CH. 6 VCR/TV 9 SLOW +10 DVD PAUSE RECORD PLAY STOP MENU ENTER SETUP TOP MENU RETURN MODE ZOOM SEARCH MODE CLEAR/ C. YEAR - - - - RESET SUBTITLE T-SET ANGLE REPEAT A-B VCR MODE Press [VCR] on the remote control. (Verify that the VCR SOURCE light...
... VCR 1 Turn on for the Remote Control 1 2 3 3 VCR/DVD Switching OPEN/CLOSE CHANNEL VCR DVD SOURCE PREV DISC IN PLAY STOP PLAY NEXT DVD PLAYER / VCR CMWD 2206 VCR DVD SOURCE VCR button DVD button SOURCE button DVD SOURCE light VCR SOURCE light OPEN/CLOSE STANDBY-ON SPEED AUDIO /EJECT 12 45 78 0 DISPLAY VCR 3 SKIP/CH. 6 VCR/TV 9 SLOW +10 DVD PAUSE RECORD PLAY STOP MENU ENTER SETUP TOP MENU RETURN MODE ZOOM SEARCH MODE CLEAR/ C. YEAR - - - - RESET SUBTITLE T-SET ANGLE REPEAT A-B VCR MODE Press [VCR] on the remote control. (Verify that the VCR SOURCE light...

User manual, English (US)
Page 26
.... 4 To stop playback STOP 8 Remote Control OPEN/CLOSE STANDBY-ON SPEED AUDIO /EJECT 12 45 78 0 DISPLAY VCR 3 SKIP/CH. 6 VCR/TV 9 SLOW +10 DVD PAUSE RECORD PLAY STOP MENU ENTER SETUP TOP MENU RETURN MODE ZOOM SEARCH MODE CLEAR/ C. AUDIO • To select audio languages on a disc. • To call up the VCR Menu. MENU • To call up the Menu on a disc. • To select STEREO, L-ch or R-ch. PLAY RECORD REPEAT RETURN SEARCH MODE SETUP SKIP/CH. Make sure the TV and audio receiver (commercially available) are connected to...
.... 4 To stop playback STOP 8 Remote Control OPEN/CLOSE STANDBY-ON SPEED AUDIO /EJECT 12 45 78 0 DISPLAY VCR 3 SKIP/CH. 6 VCR/TV 9 SLOW +10 DVD PAUSE RECORD PLAY STOP MENU ENTER SETUP TOP MENU RETURN MODE ZOOM SEARCH MODE CLEAR/ C. AUDIO • To select audio languages on a disc. • To call up the VCR Menu. MENU • To call up the Menu on a disc. • To select STEREO, L-ch or R-ch. PLAY RECORD REPEAT RETURN SEARCH MODE SETUP SKIP/CH. Make sure the TV and audio receiver (commercially available) are connected to...


