
User Manual
Page 3
..., with the manufacturers instructions. 8. Only use caution when moving the cart/apparatus combination to grounding electrodes, and requirements for a long time. used , use attachments/accessories specified by the manufacturer. 12 Use only with a cart, stand, tripod, bracket, or table specified by placing electronic equipment/toys on the top of the obsolete outlet. 10. The power supply cord or the plug has been damaged...
..., with the manufacturers instructions. 8. Only use caution when moving the cart/apparatus combination to grounding electrodes, and requirements for a long time. used , use attachments/accessories specified by the manufacturer. 12 Use only with a cart, stand, tripod, bracket, or table specified by placing electronic equipment/toys on the top of the obsolete outlet. 10. The power supply cord or the plug has been damaged...
User Manual
Page 4
...type. Make sure to operate this apparatus if an unauthorized change or modification is made. WARNING: Batteries (battery pack or battery installed) shall not be generated if the unit is placed too close to the floor/wall in a horizontal and stable position. Like all LCD products, this set contains a lamp with your external...accordance with the instructions. Changes or modifications to Part 15 of the following measures: 1) Reorient or relocate the receiving antenna. 2) Increase the separation between the external devices and the unit. • Depending on it by the plug. • Do...
...type. Make sure to operate this apparatus if an unauthorized change or modification is made. WARNING: Batteries (battery pack or battery installed) shall not be generated if the unit is placed too close to the floor/wall in a horizontal and stable position. Like all LCD products, this set contains a lamp with your external...accordance with the instructions. Changes or modifications to Part 15 of the following measures: 1) Reorient or relocate the receiving antenna. 2) Increase the separation between the external devices and the unit. • Depending on it by the plug. • Do...
User Manual
Page 5
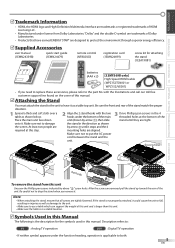
... not to drop the stand when you need to replace these accessories, please refer to use a table which can support the weight of Dolby Laboratories. • Products that all screws are aligned. If the stand is the description for attaching the stand (1ESA19881) batteries (AAA x 2) AAA AAA [32MF369B only] High Speed HDMI cable (WPZ152TSN001 or WPZ152JVE001) • If you remove it could cause the...
... not to drop the stand when you need to replace these accessories, please refer to use a table which can support the weight of Dolby Laboratories. • Products that all screws are aligned. If the stand is the description for attaching the stand (1ESA19881) batteries (AAA x 2) AAA AAA [32MF369B only] High Speed HDMI cable (WPZ152TSN001 or WPZ152JVE001) • If you remove it could cause the...
User Manual
Page 6
...8 PREPARATION Antenna Connection 9 Connection to Cable Receiver or Satellite Box 9 External Device Connection 10 Cable Management 13 Plug the AC Power Cord 13 Initial Setup 14 WATCHING TV Channel Selection 15 Volume Adjustment 15 Sleep Timer 15 Still Mode 16 Switching Each Input Mode 16 Switching Audio Mode 16 TV Screen Information 17 TV Screen Display Mode 18 OPTIONAL SETTING Main Menu 19 Autoprogram 19 Channel List 20 Add Channels 20 Antenna Confirmation 21 Language Selection 21 Picture Adjustment 22 Sound Adjustment 23 Closed Caption 24 Child Lock 27 PC Settings 30...
...8 PREPARATION Antenna Connection 9 Connection to Cable Receiver or Satellite Box 9 External Device Connection 10 Cable Management 13 Plug the AC Power Cord 13 Initial Setup 14 WATCHING TV Channel Selection 15 Volume Adjustment 15 Sleep Timer 15 Still Mode 16 Switching Each Input Mode 16 Switching Audio Mode 16 TV Screen Information 17 TV Screen Display Mode 18 OPTIONAL SETTING Main Menu 19 Autoprogram 19 Channel List 20 Add Channels 20 Antenna Confirmation 21 Language Selection 21 Picture Adjustment 22 Sound Adjustment 23 Closed Caption 24 Child Lock 27 PC Settings 30...
User Manual
Page 7
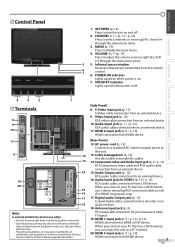
... the user may be asked to do the software upgrade themselves. [Side Panel] 8. POWER 7. S-Video Input jack (p. 11) S-Video cable connection from HDMI device. [Rear Panel] 12. HDMI 2 Input jack (p. 9 / p. 10) HDMI connection from an external device. 9. Audio Output jack (p. 12) RCA audio cable connection for HDMI or DVI device. HDMI 1 Input jack (p. 9 / p. 10 / p. 13) HDMI connection for an external device. 16. INTRODUCTION PREPARATION WATCHING TV OPTIONAL SETTING TROUBLESHOOTING INFORMATION Control Panel - VOLUME + MENU - Infrared sensor window 6 7 Receives infrared...
... the user may be asked to do the software upgrade themselves. [Side Panel] 8. POWER 7. S-Video Input jack (p. 11) S-Video cable connection from HDMI device. [Rear Panel] 12. HDMI 2 Input jack (p. 9 / p. 10) HDMI connection from an external device. 9. Audio Output jack (p. 12) RCA audio cable connection for HDMI or DVI device. HDMI 1 Input jack (p. 9 / p. 10 / p. 13) HDMI connection for an external device. 16. INTRODUCTION PREPARATION WATCHING TV OPTIONAL SETTING TROUBLESHOOTING INFORMATION Control Panel - VOLUME + MENU - Infrared sensor window 6 7 Receives infrared...

User Manual
Page 8
... of setting when the main menu is set to operate this unit. • Make sure the component code on your remote control for more details. Installing the Batteries Install the batteries (AAA x 2) matching the polarity indicated inside battery compartment of time, remove the batteries to prevent damage or injury from the main channel. 11. Analog mode (TV) • Press to display the channel number, signal type and TV setting. Analog mode (TV...
... of setting when the main menu is set to operate this unit. • Make sure the component code on your remote control for more details. Installing the Batteries Install the batteries (AAA x 2) matching the polarity indicated inside battery compartment of time, remove the batteries to prevent damage or injury from the main channel. 11. Analog mode (TV) • Press to display the channel number, signal type and TV setting. Analog mode (TV...
User Manual
Page 9
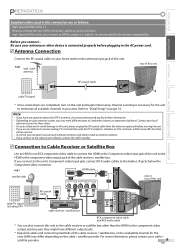
... the unit. • If you connect to the unit's Component video Input jack, connect RCA audio cables to the HDMI or the component video output jack of the cable receiver / satellite box, or the availability channel for DTV reception. Refer to memorize all available channels in your home outlet to receive analog TV, it should also work for the clear QAM may need different types of combiners (mixers) or separators (splitters...
... the unit. • If you connect to the unit's Component video Input jack, connect RCA audio cables to the HDMI or the component video output jack of the cable receiver / satellite box, or the availability channel for DTV reception. Refer to memorize all available channels in your home outlet to receive analog TV, it should also work for the clear QAM may need different types of combiners (mixers) or separators (splitters...
User Manual
Page 11
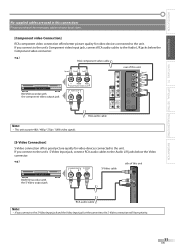
...'s Component video Input jack, connect RCA audio cables to the Audio L/R jacks below the Video connector. If you connect to the Audio L/R jacks below the Component video connector. e.g.) RCA component video cable (green) (blue) (red) TITLE 5 CHAPTER 15 REPEAT A-B BD/DVD recorder with the S-Video output jack RCA audio cable Note: • If you connect to the unit's S-Video Input jack, connect RCA audio cables to the S-Video Input jack and the Video Input jack at your local store. [Component video Connection] RCA component video connection offers better picture...
...'s Component video Input jack, connect RCA audio cables to the Audio L/R jacks below the Video connector. If you connect to the Audio L/R jacks below the Component video connector. e.g.) RCA component video cable (green) (blue) (red) TITLE 5 CHAPTER 15 REPEAT A-B BD/DVD recorder with the S-Video output jack RCA audio cable Note: • If you connect to the unit's S-Video Input jack, connect RCA audio cables to the S-Video Input jack and the Video Input jack at your local store. [Component video Connection] RCA component video connection offers better picture...
User Manual
Page 14
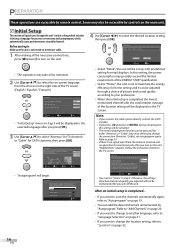
... on-screen language from the antenna terminal and no signal input from the choices on the right side of the ENERGY STAR® qualification. • Select "Home", the unit is scanning for your signal source. Initial Setup Now the system is set autoprogram again. Refer to the "ANT. Follow the instructions listed on the unit. • This operation may also be accessible by remote control...
... on-screen language from the antenna terminal and no signal input from the choices on the right side of the ENERGY STAR® qualification. • Select "Home", the unit is scanning for your signal source. Initial Setup Now the system is set autoprogram again. Refer to the "ANT. Follow the instructions listed on the unit. • This operation may also be accessible by remote control...
User Manual
Page 15
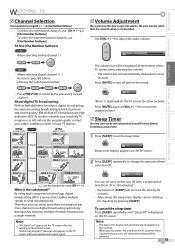
... OPTIONAL SETTING TROUBLESHOOTING INFORMATION WATCHING TV Channel Selection Select channels by using [CH + / -]. The volume bar will appear on the TV screen after the subchannel broadcast is in a few seconds. NTSC Air time (analog mode) CH4 (Soccer) 6:00pm ATSC (digital mode) CH4-1 (Soccer) Mute "Mute" is displayed on the TV screen, when you receive only sound signal. By using [CH + / -] or [the Number buttons]. • To select the memorized channels, use...
... OPTIONAL SETTING TROUBLESHOOTING INFORMATION WATCHING TV Channel Selection Select channels by using [CH + / -]. The volume bar will appear on the TV screen after the subchannel broadcast is in a few seconds. NTSC Air time (analog mode) CH4 (Soccer) 6:00pm ATSC (digital mode) CH4-1 (Soccer) Mute "Mute" is displayed on the TV screen, when you receive only sound signal. By using [CH + / -] or [the Number buttons]. • To select the memorized channels, use...
User Manual
Page 17
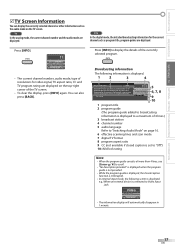
... channel number and the audio mode are displayed on page 16. 6 effective scanning lines and scan mode 7 digital TV format 8 program aspect ratio 9 CC (not available if closed caption function is interrupted. • In external input mode, the following information is displayed. 12 3 4 A Day of Memories KABC A quarter-century ago,which may now qualify as the good old days of newspapering,run-of-paper sales accounted for video signal...
... channel number and the audio mode are displayed on page 16. 6 effective scanning lines and scan mode 7 digital TV format 8 program aspect ratio 9 CC (not available if closed caption function is interrupted. • In external input mode, the following information is displayed. 12 3 4 A Day of Memories KABC A quarter-century ago,which may now qualify as the good old days of newspapering,run-of-paper sales accounted for video signal...
User Manual
Page 19
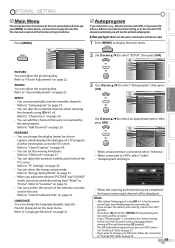
... the version of the software currently used in the "Child Lock". PICTURE SOUND SETUP FEATURES LANGUAGE Autoprogram Channel List Add Channels Antenna Use [Cursor K/L] to select an appropriate option, then press [OK]. SOUND You can set a PIN Code in this unit. The main menu consists of the function setting items below. Refer to "Closed Caption" on the remote control skips unavailable programs automatically. • If you connect the cable system directly, contact the...
... the version of the software currently used in the "Child Lock". PICTURE SOUND SETUP FEATURES LANGUAGE Autoprogram Channel List Add Channels Antenna Use [Cursor K/L] to select an appropriate option, then press [OK]. SOUND You can set a PIN Code in this unit. The main menu consists of the function setting items below. Refer to "Closed Caption" on the remote control skips unavailable programs automatically. • If you connect the cable system directly, contact the...
User Manual
Page 23
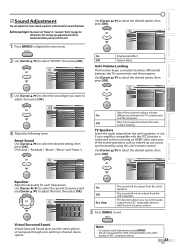
...between channels and programs, providing a consistent audio level. PICTURE SOUND SETUP FEATURES LANGUAGE Smart Sound Equalizer Virtual Surround Sound Auto Volume Leveling TV Speakers Standard On Off Ext. PICTURE SOUND SETUP FEATURES LANGUAGE Smart Sound Equalizer Virtual Surround Sound Auto Volume Leveling TV Speakers Standard On Off Ext. INTRODUCTION PREPARATION WATCHING TV OPTIONAL SETTING TROUBLESHOOTING INFORMATION Sound Adjustment You can access synchronized by connecting to the HDMI-CEC compatible amp with the unit's remote control. 5 Press [MENU] to adjust...
...between channels and programs, providing a consistent audio level. PICTURE SOUND SETUP FEATURES LANGUAGE Smart Sound Equalizer Virtual Surround Sound Auto Volume Leveling TV Speakers Standard On Off Ext. PICTURE SOUND SETUP FEATURES LANGUAGE Smart Sound Equalizer Virtual Surround Sound Auto Volume Leveling TV Speakers Standard On Off Ext. INTRODUCTION PREPARATION WATCHING TV OPTIONAL SETTING TROUBLESHOOTING INFORMATION Sound Adjustment You can access synchronized by connecting to the HDMI-CEC compatible amp with the unit's remote control. 5 Press [MENU] to adjust...
User Manual
Page 25
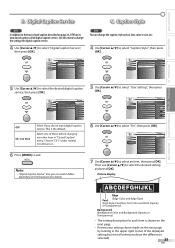
...]. Use this menu to change the caption style such as font, color or size, etc. 4 Use [Cursor K/L] to the basic closed caption described on page 24, DTV has its own closed caption called digital caption service. PICTURE SOUND SETUP FEATURES LANGUAGE User Setting Font Style Font Size Font Color Font Opacity Background Color Background Opacity Edge Color Edge Type Off Middle White Solid Black Solid Black None 6 Use [Cursor K/L] to select the desired setting and press [OK]. PICTURE Caption Service Off SOUND Digital Caption Service CS-1 SETUP Caption...
...]. Use this menu to change the caption style such as font, color or size, etc. 4 Use [Cursor K/L] to the basic closed caption described on page 24, DTV has its own closed caption called digital caption service. PICTURE SOUND SETUP FEATURES LANGUAGE User Setting Font Style Font Size Font Color Font Opacity Background Color Background Opacity Edge Color Edge Type Off Middle White Solid Black Solid Black None 6 Use [Cursor K/L] to select the desired setting and press [OK]. PICTURE Caption Service Off SOUND Digital Caption Service CS-1 SETUP Caption...
User Manual
Page 26
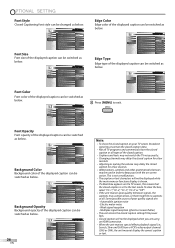
... Type Closed Caption White Black Red Green Blue Yellow Magenta Cyan Background Opacity Background opacity of the displayed caption can be switched as below. 26 EN PICTURE SOUND SETUP FEATURES LANGUAGE User Setting Font Style Font Size Font Color Font Opacity Background Color Background Opacity Edge Color Edge Type Closed Caption Solid Flash Translucent Transparent Edge Color Edge color of the displayed caption can be switched as below . Shadow R.Shadow 8 Press [MENU] to the text mode. Automobile ignition noise - Weak signal...
... Type Closed Caption White Black Red Green Blue Yellow Magenta Cyan Background Opacity Background opacity of the displayed caption can be switched as below. 26 EN PICTURE SOUND SETUP FEATURES LANGUAGE User Setting Font Style Font Size Font Color Font Opacity Background Color Background Opacity Edge Color Edge Type Closed Caption Solid Flash Translucent Transparent Edge Color Edge color of the displayed caption can be switched as below . Shadow R.Shadow 8 Press [MENU] to the text mode. Automobile ignition noise - Weak signal...
User Manual
Page 33
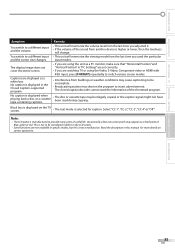
... the right input mode is interrupted and not completed, some channels will not be broadcasting. • When autoprogram is selected by the "Child Lock" setting. Refer to "IR Signal Check" on page 36. • Aim the remote control directly at the infrared sensor window on page 19. • Autoprogram must be viewed by pressing [SOURCE] or using the Component Video Connection check that the Green (Y), Blue...
... the right input mode is interrupted and not completed, some channels will not be broadcasting. • When autoprogram is selected by the "Child Lock" setting. Refer to "IR Signal Check" on page 36. • Aim the remote control directly at the infrared sensor window on page 19. • Autoprogram must be viewed by pressing [SOURCE] or using the Component Video Connection check that the Green (Y), Blue...
User Manual
Page 34
... unit is not available, watch "standard definition" programs instead. • View other TV channels. Control button does not work. • Press only one buttons at a time. No picture or sound No color • Check if the power is on the keyboard to wake up your computer is NOT in sleep mode when the input mode of the antenna, cable receiver or satellite box is connected correctly. • Make sure that the...
... unit is not available, watch "standard definition" programs instead. • View other TV channels. Control button does not work. • Press only one buttons at a time. No picture or sound No color • Check if the power is on the keyboard to wake up your computer is NOT in sleep mode when the input mode of the antenna, cable receiver or satellite box is connected correctly. • Make sure that the...
User Manual
Page 35
... set correctly. • If you are displayed as a fixed point of blue, green or red. The display image does not cover the entire screen. • If you are using the Video, S-Video, Component video or HDMI with 480i Input, press [FORMAT] repeatedly to switch various screen modes. No caption is displayed when playing back a disc or a cassette tape containing captions. • The disc or cassette tape may be illegally copied, or the caption signal...
... set correctly. • If you are displayed as a fixed point of blue, green or red. The display image does not cover the entire screen. • If you are using the Video, S-Video, Component video or HDMI with 480i Input, press [FORMAT] repeatedly to switch various screen modes. No caption is displayed when playing back a disc or a cassette tape containing captions. • The disc or cassette tape may be illegally copied, or the caption signal...

User Manual
Page 36
... the remote control is a video signal format that produces high resolution and high picture quality. Aspect Ratio The width of a TV screen relative to see if it is almost twice as wide as its height. SAP (Secondary Audio Program) Second-audio channel delivered separately from main-audio channel. SDTV (Standard Definition TV) Standard digital format that supports all uncompressed, digital audio/video formats including set-top box, BD/DVD recorder or digital television, over a single cable. NTSC...
... the remote control is a video signal format that produces high resolution and high picture quality. Aspect Ratio The width of a TV screen relative to see if it is almost twice as wide as its height. SAP (Secondary Audio Program) Second-audio channel delivered separately from main-audio channel. SDTV (Standard Definition TV) Standard digital format that supports all uncompressed, digital audio/video formats including set-top box, BD/DVD recorder or digital television, over a single cable. NTSC...
User Manual
Page 37
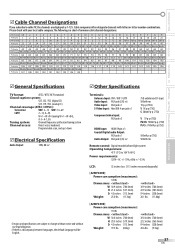
... x 1 Component video Input: RCA jack x 3 HDMI Input: HDMI 19pin x 3 Coaxial Digital audio Output: RCA jack x 1 Audio Output: RCA jack (L/R) x 2 75Ω unbalanced (F-type) 500mV rms 1V p-p (75Ω) Y: 1V p-p (75Ω) C: 286mV p-p (75Ω) Y: 1V p-p (75Ω) Pb/Cb: 700mV p-p (75Ω) Pr/Cr: 700mV p-p (75Ω) 500mV p-p (75Ω) 500mV rms Remote control: Digital encoded infrared light system Operating temperature: 41°F (5°C) to cable TV, the channels...
... x 1 Component video Input: RCA jack x 3 HDMI Input: HDMI 19pin x 3 Coaxial Digital audio Output: RCA jack x 1 Audio Output: RCA jack (L/R) x 2 75Ω unbalanced (F-type) 500mV rms 1V p-p (75Ω) Y: 1V p-p (75Ω) C: 286mV p-p (75Ω) Y: 1V p-p (75Ω) Pb/Cb: 700mV p-p (75Ω) Pr/Cr: 700mV p-p (75Ω) 500mV p-p (75Ω) 500mV rms Remote control: Digital encoded infrared light system Operating temperature: 41°F (5°C) to cable TV, the channels...


