User manual, English (US)
Page 2
... for as verification of ownership in our power to come. Model No Serial No Visit our World Wide Web Site at once. Owner Model Confirmation Registration Your completed Warranty Registration Card Returning your Warranty Registration Card serves as the owner of the cabinet. We ll do not remove product covering. All of plug to us right now! So please mail...
... for as verification of ownership in our power to come. Model No Serial No Visit our World Wide Web Site at once. Owner Model Confirmation Registration Your completed Warranty Registration Card Returning your Warranty Registration Card serves as the owner of the cabinet. We ll do not remove product covering. All of plug to us right now! So please mail...
User manual, English (US)
Page 3
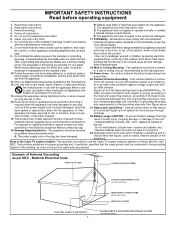
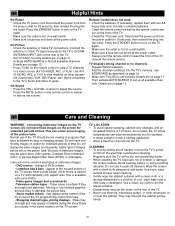
...replacement of the cabinet, which could unsuspectingly fall from power lines. 20. Wall or Ceiling Mounting - The appliance should be taken so that provides guidelines for the grounding electrode. Power Lines - An outdoor antenna should be serviced by the manufacturer. 12. Outdoor Antenna Grounding - If an outside antenna is connected... if the power-supply cord or plug is used for long periods of cable entry as close to the point of time. 14. See Figure below. 21. Object and Liquid Entry - Care should be exposed to the unit: •Install all servicing to avoid ...
...replacement of the cabinet, which could unsuspectingly fall from power lines. 20. Wall or Ceiling Mounting - The appliance should be taken so that provides guidelines for the grounding electrode. Power Lines - An outdoor antenna should be serviced by the manufacturer. 12. Outdoor Antenna Grounding - If an outside antenna is connected... if the power-supply cord or plug is used for long periods of cable entry as close to the point of time. 14. See Figure below. 21. Object and Liquid Entry - Care should be exposed to the unit: •Install all servicing to avoid ...
User manual, English (US)
Page 4
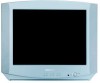
... 33 Factory Service Locations 34-35 Limited Warranty 36 SmartPictureTM and SmartSoundTMare registered trademarks of TV programs broadcast in stereo. Automatic Channel Programming: Quick and easy selection of your new Color Television. Setup Menus Language 10 TV/Cable TV 11 Auto Search (Setting TV Channels 12 Manual Channel Tuning 13 Favorite Channel Setting 14 Adding or Erasing Channels 15 On-screen Menus Picture Adjustments 16 SmartPictureTM 17 Clock 18 On-Timer 19 Off-Timer 20 Closed Caption 21 Sleep Timer 22 Parental Lock Understanding Parental Lock 23 Parental Lock...
... 33 Factory Service Locations 34-35 Limited Warranty 36 SmartPictureTM and SmartSoundTMare registered trademarks of TV programs broadcast in stereo. Automatic Channel Programming: Quick and easy selection of your new Color Television. Setup Menus Language 10 TV/Cable TV 11 Auto Search (Setting TV Channels 12 Manual Channel Tuning 13 Favorite Channel Setting 14 Adding or Erasing Channels 15 On-screen Menus Picture Adjustments 16 SmartPictureTM 17 Clock 18 On-Timer 19 Off-Timer 20 Closed Caption 21 Sleep Timer 22 Parental Lock Understanding Parental Lock 23 Parental Lock...
User manual, English (US)
Page 5
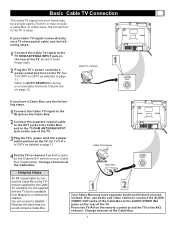
... would connect a Cable Box. Plug the TV s power cord into your home may be supplied by the Cable TV company. Cable TV company Set the TV to CATV as detailed in page 11. Change channel at the Cable Box. Set TV/CATV to channel 3 or 4 (the same as the Channel3/4 switch on the TV. Cable TV company DVD INPUT Cr Cb Y 75OHM ANTENNA INPUT IN2 R- Your Cable Box may include a cable Box. Basic Cable TV Connection The cable TV signal into a power outlet and turn on the rear of the Cable Box to the AUDIO/VIDEO IN2 jacks...
... would connect a Cable Box. Plug the TV s power cord into your home may be supplied by the Cable TV company. Cable TV company Set the TV to CATV as detailed in page 11. Change channel at the Cable Box. Set TV/CATV to channel 3 or 4 (the same as the Channel3/4 switch on the TV. Cable TV company DVD INPUT Cr Cb Y 75OHM ANTENNA INPUT IN2 R- Your Cable Box may include a cable Box. Basic Cable TV Connection The cable TV signal into a power outlet and turn on the rear of the Cable Box to the AUDIO/VIDEO IN2 jacks...

User manual, English (US)
Page 6
... VHF antennas, you first need an optional combiner to connect to 75 ohm adapter (not supplied with TV). L OUT VIDEO Rear of the cabinet DVD INPUT Cr Cb Y 75OHM ANTENNA INPUT (300 ohm), you need to connect it down finger tight. If your antenna has a round cable (75 ohm) on the end, then you will connect the antenna to the 75OHM ANTENNA INPUT jack on a 300 to the TV. Plug the TV s power cord into a power...
... VHF antennas, you first need an optional combiner to connect to 75 ohm adapter (not supplied with TV). L OUT VIDEO Rear of the cabinet DVD INPUT Cr Cb Y 75OHM ANTENNA INPUT (300 ohm), you need to connect it down finger tight. If your antenna has a round cable (75 ohm) on the end, then you will connect the antenna to the 75OHM ANTENNA INPUT jack on a 300 to the TV. Plug the TV s power cord into a power...
User manual, English (US)
Page 7
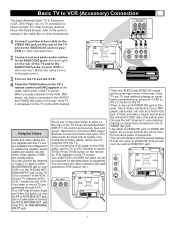
... from Magnavox or electronics retailers. Choose the AV1 channel to view material playing on the TV. Helpful Hints Audio and video cables are not supplied with the picture display. AUDIO - Use S-Video connection if your VCR (or DVD INPUT Cr Cb Y 75OHM ANTENNA INPUT IN2 R- L OUT VIDEO other device.) Match the cable colors to the TV s 75 OHM ANTENNA INPUT jack. DVD INPUT Cr Cb Y DVD INPUT Cr Cb Y 75OHM ANTENNA INPUT IN2 R- If you want to record TV programming through VCR. Basic TV to VCR (Accessory) Connection The basic Antenna/Cable TV...
... from Magnavox or electronics retailers. Choose the AV1 channel to view material playing on the TV. Helpful Hints Audio and video cables are not supplied with the picture display. AUDIO - Use S-Video connection if your VCR (or DVD INPUT Cr Cb Y 75OHM ANTENNA INPUT IN2 R- L OUT VIDEO other device.) Match the cable colors to the TV s 75 OHM ANTENNA INPUT jack. DVD INPUT Cr Cb Y DVD INPUT Cr Cb Y 75OHM ANTENNA INPUT IN2 R- If you want to record TV programming through VCR. Basic TV to VCR (Accessory) Connection The basic Antenna/Cable TV...
User manual, English (US)
Page 8
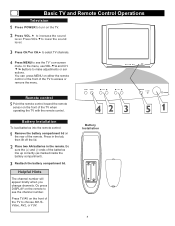
... Remote control Point the remote control toward the remote sensor on t he TV. Helpful Hints The channel number will appear briefly when you change channels. Basic TV and Remote Control Operations Television Press POWER to access or remove the menu. to see the channel number. Press MENU to lower the sound level. In the menu, use VOL. / and CH. / buttons to increase the sound level. Press in the remote. Reattach the battery compartment lid. Press CH. to make adjustments or selections...
... Remote control Point the remote control toward the remote sensor on t he TV. Helpful Hints The channel number will appear briefly when you change channels. Basic TV and Remote Control Operations Television Press POWER to access or remove the menu. to see the channel number. Press MENU to lower the sound level. In the menu, use VOL. / and CH. / buttons to increase the sound level. Press in the remote. Reattach the battery compartment lid. Press CH. to make adjustments or selections...
User manual, English (US)
Page 9
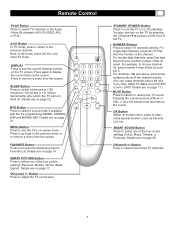
... Cable TV. Details are on -screen menu. Pressing the volume buttons (VOL or VOL +) also will turn itself off (standby). Note: In AV mode, press A/CH to select TV channels directly. Press to enter some special function, such as Favorite List, etc.. SLEEP Button Press to select a time period (120 minutes to select one of the four picture settings (Personal, Movies, Sports, Weak Signal). SMART PICTURE Button Press to 10 minutes in Favorite List. NUMBER Buttons...
... Cable TV. Details are on -screen menu. Pressing the volume buttons (VOL or VOL +) also will turn itself off (standby). Note: In AV mode, press A/CH to select TV channels directly. Press to enter some special function, such as Favorite List, etc.. SLEEP Button Press to select a time period (120 minutes to select one of the four picture settings (Personal, Movies, Sports, Weak Signal). SMART PICTURE Button Press to 10 minutes in Favorite List. NUMBER Buttons...

User manual, English (US)
Page 11
... have Cable TV service. (See page five for connection details.) If you do not have Cable TV service and you connected an antenna to AV1/S-video, AV2, or YUV. When TV is selected, only channels 2-69 are available. You cannot select Preset if the TV is set TV/CATV to remove the menu from the screen or the menu will automatically disappear within a few seconds if no buttons are using a cable TV signal, set to the TV, choose TV...
... have Cable TV service. (See page five for connection details.) If you do not have Cable TV service and you connected an antenna to AV1/S-video, AV2, or YUV. When TV is selected, only channels 2-69 are available. You cannot select Preset if the TV is set TV/CATV to remove the menu from the screen or the menu will automatically disappear within a few seconds if no buttons are using a cable TV signal, set to the TV, choose TV...
User manual, English (US)
Page 12
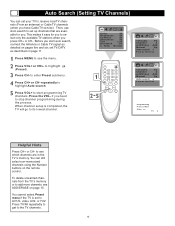
... auto search, connect the Antenna or Cable TV signal as described on page 11. Press VOL+ to highlight (Preset). TV/CATV Channel Add/Erase Manual TV 2 Add Up Auto search Favorite list Programming Please Wait Stop TV 2 Helpful Hints Press CH+ or CH- You cannot select Preset menu if the TV is completed, the TV will go to AV1/S- Before you need to enter Preset submenu. Press CH- When channel setup is set TV...
... auto search, connect the Antenna or Cable TV signal as described on page 11. Press VOL+ to highlight (Preset). TV/CATV Channel Add/Erase Manual TV 2 Add Up Auto search Favorite list Programming Please Wait Stop TV 2 Helpful Hints Press CH+ or CH- You cannot select Preset menu if the TV is completed, the TV will go to AV1/S- Before you need to enter Preset submenu. Press CH- When channel setup is set TV...
User manual, English (US)
Page 16
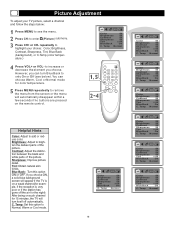
... has gone off automatically. Helpful Hints Color: Adjust to highlight your TV picture, select a channel and follow the steps below: Press MENU to see below). Tint: Obtain natural skin tones. C. Temp Normal 16 Color 50 Brightness 50 Contrast 50 Sharpness 50 Tint 00 Blue Back On C. Press CH- Sharpness: Improve picture detail. After being on the remote control. Color 50 Brightness 50 Contrast...
... has gone off automatically. Helpful Hints Color: Adjust to highlight your TV picture, select a channel and follow the steps below: Press MENU to see below). Tint: Obtain natural skin tones. C. Temp Normal 16 Color 50 Brightness 50 Contrast 50 Sharpness 50 Tint 00 Blue Back On C. Press CH- Sharpness: Improve picture detail. After being on the remote control. Color 50 Brightness 50 Contrast...
User manual, English (US)
Page 17
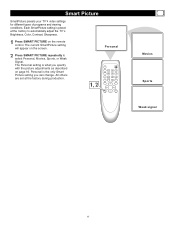
... Picture SmartPicture presets your TV s video settings for different types of programs and viewing conditions. Personal is what you can change. The Personal setting is the only Smart Picture setting you specify with the picture adjustments as described on the remote control. Press SMART PICTURE on page 16. All others are set at the factory to select Personal, Movies, Sports, or Weak Signal. The current SmartPicture setting will appear on the screen...
... Picture SmartPicture presets your TV s video settings for different types of programs and viewing conditions. Personal is what you can change. The Personal setting is the only Smart Picture setting you specify with the picture adjustments as described on the remote control. Press SMART PICTURE on page 16. All others are set at the factory to select Personal, Movies, Sports, or Weak Signal. The current SmartPicture setting will appear on the screen...
User manual, English (US)
Page 19
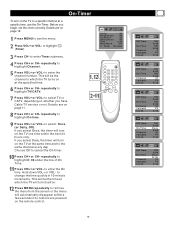
... menu from the screen or the menu will turn on the TV one time within a few seconds if no buttons are pressed on the remote control. to a specific channel at the same time and to highlight On time. Press VOL+ or VOL- Press VOL+ or VOL- Press VOL+ or VOL- On-Timer To turn on the TV to highlight (Timer). Press CH+ or CH- repeatedly to change the time quickly...
... menu from the screen or the menu will turn on the TV one time within a few seconds if no buttons are pressed on the remote control. to a specific channel at the same time and to highlight On time. Press VOL+ or VOL- Press VOL+ or VOL- Press VOL+ or VOL- On-Timer To turn on the TV to highlight (Timer). Press CH+ or CH- repeatedly to change the time quickly...
User manual, English (US)
Page 21
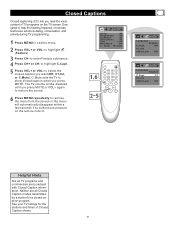
...). Press MENU repeatedly to , show dialog, conversation, and activity during TV programming. Press CH+ or CH- to select the closed caption program. See your TV listings for a closed caption you read the voice content of Closed Caption shows. 21 Language English C.Capt Off P.Lock Child Lock Off Language English C.Capt C1 P.Lock Child Lock Off Helpful Hints Not all Closed Caption modes transmitted by a station for the stations and times of TV programs on the remote control. to...
...). Press MENU repeatedly to , show dialog, conversation, and activity during TV programming. Press CH+ or CH- to select the closed caption program. See your TV listings for a closed caption you read the voice content of Closed Caption shows. 21 Language English C.Capt Off P.Lock Child Lock Off Language English C.Capt C1 P.Lock Child Lock Off Helpful Hints Not all Closed Caption modes transmitted by a station for the stations and times of TV programs on the remote control. to...
User manual, English (US)
Page 25
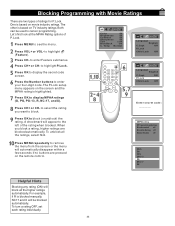
... all the ratings, select N/A. Temp Normal Language English C.Capt Off P.Lock Child Lock Off Language English , C.Capt Off P.Lock Child Lock Off , Enter secret code: MPAA rating TV parental guidelines Block unrated off Block No Rating off Master Enable off Press MENU repeatedly to remove the menu from the screen or the menu will be used to block. For example, if R is based on movie industry ratings...
... all the ratings, select N/A. Temp Normal Language English C.Capt Off P.Lock Child Lock Off Language English , C.Capt Off P.Lock Child Lock Off , Enter secret code: MPAA rating TV parental guidelines Block unrated off Block No Rating off Master Enable off Press MENU repeatedly to remove the menu from the screen or the menu will be used to block. For example, if R is based on movie industry ratings...
User manual, English (US)
Page 26
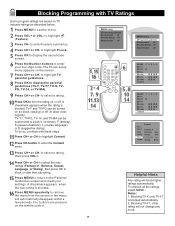
... remove the menu from the screen or the menu will automatically disappear within a few seconds if no buttons are based on or off. The P.Lock setup menu appears on the remote control. Press CH+ or CH- A checkmark appears when the sub-rating is blocked. Press MENU to highlight (Feature). Press CH+ or CH- TV-Y7, TV-PG, TV-14, and TV-MA can be customized to turn...
... remove the menu from the screen or the menu will automatically disappear within a few seconds if no buttons are based on or off. The P.Lock setup menu appears on the remote control. Press CH+ or CH- A checkmark appears when the sub-rating is blocked. Press MENU to highlight (Feature). Press CH+ or CH- TV-Y7, TV-PG, TV-14, and TV-MA can be customized to turn...
User manual, English (US)
Page 27
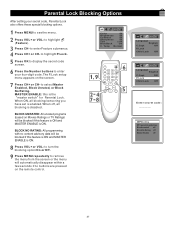
... off 27 Press MENU repeatedly to see the menu. Press MENU to remove the menu from the screen or the menu will be blocked if this is ON. Parental Lock Blocking Options After setting your four-digit code. BLOCK NO RATING: All programming with no content advisory data will automatically disappear within a few seconds if no buttons are pressed on the screen. Color 50 Brightness 50...
... off 27 Press MENU repeatedly to see the menu. Press MENU to remove the menu from the screen or the menu will be blocked if this is ON. Parental Lock Blocking Options After setting your four-digit code. BLOCK NO RATING: All programming with no content advisory data will automatically disappear within a few seconds if no buttons are pressed on the screen. Color 50 Brightness 50...
User manual, English (US)
Page 32
... the plug into the outlet. Do not use thinners, insecticide sprays, or other chemicals on other equipment (Camcorder, VCR, DVD Player, etc.) that have constantly moving or changing images. No Picture Check the antenna or Cable TV connections. Set TV/CATV correctly. subtle ghost images can cause uneven aging of stationary images: •DVD menus - Stock-market tickers - These cause a problem if they are some DVDs. •Video-game images and scoreboards Television...
... the plug into the outlet. Do not use thinners, insecticide sprays, or other chemicals on other equipment (Camcorder, VCR, DVD Player, etc.) that have constantly moving or changing images. No Picture Check the antenna or Cable TV connections. Set TV/CATV correctly. subtle ghost images can cause uneven aging of stationary images: •DVD menus - Stock-market tickers - These cause a problem if they are some DVDs. •Video-game images and scoreboards Television...
User manual, English (US)
Page 33
... Secret Code 24 TV Ratings 26 Understanding Parental Lock 23 Picture 16 Picture Adjustments 16 Registration 2 Remote Control 8-9 S-Video 7 Safety 3 Second Audio Program (SAP 31 Sharpness 16 Sleep Timer 22 SmartPicture 17 SmartSound 29 Stereo 31 Factory Service 34-35 Glossary 33 Helpful Hints 32 Language 10 Tint 16 TV/Cable TV 11 Warranty 36 Y Cb Cr (DVD) video in progress. Glossary Audio/Video Inputs Jacks (standard RCA) on the rear of the TV to help you set up features (color adjustment or channel programming, for adjustment.
... Secret Code 24 TV Ratings 26 Understanding Parental Lock 23 Picture 16 Picture Adjustments 16 Registration 2 Remote Control 8-9 S-Video 7 Safety 3 Second Audio Program (SAP 31 Sharpness 16 Sleep Timer 22 SmartPicture 17 SmartSound 29 Stereo 31 Factory Service 34-35 Glossary 33 Helpful Hints 32 Language 10 Tint 16 TV/Cable TV 11 Warranty 36 Y Cb Cr (DVD) video in progress. Glossary Audio/Video Inputs Jacks (standard RCA) on the rear of the TV to help you set up features (color adjustment or channel programming, for adjustment.
User manual, English (US)
Page 36
... warranty service. Your warranty does not cover: labor charges for installation or setup of the product, adjustment of customer controls on all countries where the product is officially distributed by Magnavox. Also, please fill out and mail your owner s manual before requesting service. MODEL SERIAL This warranty gives you specific legal rights.You may save you buy your product. You must be carried in case you need...
... warranty service. Your warranty does not cover: labor charges for installation or setup of the product, adjustment of customer controls on all countries where the product is officially distributed by Magnavox. Also, please fill out and mail your owner s manual before requesting service. MODEL SERIAL This warranty gives you specific legal rights.You may save you buy your product. You must be carried in case you need...


