
User manual, English (US)
Page 4
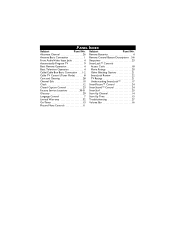
PANEL INDEX Subject Panel No. Subject Panel No. Alternate Channel 26 Remote Batteries 4 Antenna Basic Connection 1 Remote Control Button Descriptions .5-6 Front Audio/Video Input Jacks 4 Sleeptimer 23 Automatically Program TV 9 SmartLock™ Controls Basic Remote Operation 4 Access Code 18 Basic Television Operation 4 Movie Ratings 20 Cable/Cable Box Basic Connection . . .1-2 Other Blocking Options 21 Cable TV...
PANEL INDEX Subject Panel No. Subject Panel No. Alternate Channel 26 Remote Batteries 4 Antenna Basic Connection 1 Remote Control Button Descriptions .5-6 Front Audio/Video Input Jacks 4 Sleeptimer 23 Automatically Program TV 9 SmartLock™ Controls Basic Remote Operation 4 Access Code 18 Basic Television Operation 4 Movie Ratings 20 Cable/Cable Box Basic Connection . . .1-2 Other Blocking Options 21 Cable TV...
User manual, English (US)
Page 7
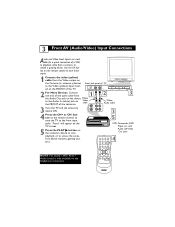
VOLUME + 2 For Mono Devices: Connect one end of the audio cable from 1 the Audio Out jack on the device Yellow to the Audio In... to view playback, or to the Video (yellow) Input locat- "Front" will appear on the TV screen. 5 Press the PLAY ᮣ button on the remote control to tune the TV to tune these inputs. 1 Connect the video (yellow) cable from a camera, or attach a gaming device. VOLUME + CHANNEL POWER CHANNEL...television. MENU ed on the Camera (or accessory device) Front Jack panel of the TV. Use the AV button on the remote control to the front input jacks.
VOLUME + 2 For Mono Devices: Connect one end of the audio cable from 1 the Audio Out jack on the device Yellow to the Audio In... to view playback, or to the Video (yellow) Input locat- "Front" will appear on the TV screen. 5 Press the PLAY ᮣ button on the remote control to tune the TV to tune these inputs. 1 Connect the video (yellow) cable from a camera, or attach a gaming device. VOLUME + CHANNEL POWER CHANNEL...television. MENU ed on the Camera (or accessory device) Front Jack panel of the TV. Use the AV button on the remote control to the front input jacks.
User manual, English (US)
Page 8
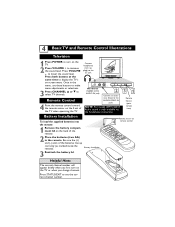
4 Basic TV and Remote Control Illustrations Television 1 Press POWER to turn on the TV or when you first turn on -screen menu. jack. Be sure the (+) and (-) ends of the remote. 2 Place the batteries (two AA) in the menu, use these buttons to make menu... the battery compartment lid on the back of the batteries line up correctly (as marked inside the remote). 3 Reattach the battery lid. Remote Control 4 Point the remote control toward the remote sensor on remote control POWER 3 2 CH+ 1 6 5 CH- 4 9 8 VOL+ 7 CC 0 VOL- VOLUME + CHANNEL POWER MENU VIDEO Non-Stereo ...
4 Basic TV and Remote Control Illustrations Television 1 Press POWER to turn on the TV or when you first turn on -screen menu. jack. Be sure the (+) and (-) ends of the remote. 2 Place the batteries (two AA) in the menu, use these buttons to make menu... the battery compartment lid on the back of the batteries line up correctly (as marked inside the remote). 3 Reattach the battery lid. Remote Control 4 Point the remote control toward the remote sensor on remote control POWER 3 2 CH+ 1 6 5 CH- 4 9 8 VOL+ 7 CC 0 VOL- VOLUME + CHANNEL POWER MENU VIDEO Non-Stereo ...
User manual, English (US)
Page 9
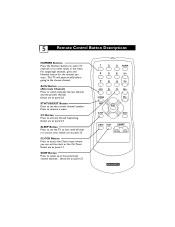
.... A/CH Button (Alternate Channel) Press to five previously viewed channels. Details are on panel 12. Details are on panel 23. Details are on panel 23. 5 Remote Control Button Descriptions NUMBER Buttons Press the Number buttons to select TV channels or to see the current channel number. STATUS/EXIT Button Press to enter...
.... A/CH Button (Alternate Channel) Press to five previously viewed channels. Details are on panel 12. Details are on panel 23. Details are on panel 23. 5 Remote Control Button Descriptions NUMBER Buttons Press the Number buttons to select TV channels or to see the current channel number. STATUS/EXIT Button Press to enter...
User manual, English (US)
Page 10
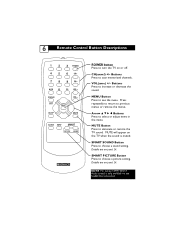
... the TV when the sound is only available via the headphone connection. Details are on or off. Press repeatedly to return to choose a picture setting. 6 Remote Control Button Descriptions POWER button Press to select or adjust items in the menu. Buttons Press to turn the TV on panel 24. Buttons Press to...
... the TV when the sound is only available via the headphone connection. Details are on or off. Press repeatedly to return to choose a picture setting. 6 Remote Control Button Descriptions POWER button Press to select or adjust items in the menu. Buttons Press to turn the TV on panel 24. Buttons Press to...

User manual, English (US)
Page 27
...TV program will appear during TV programming. 1 Press the CC Button on the screen. 3 When finished, press the STATUS/EXT button to the Closed Captioning controls through the TV menu. CC Off 9 3 EXIT NOTE: You can be set to automatically turn itself off . NOTE: An on-screen count down ...will appear on the remote to display the current Closed Caption setting. 2 Press the CC Button repeatedly to choose from the screen. Designed to help the hearing impaired, this feature...
...TV program will appear during TV programming. 1 Press the CC Button on the screen. 3 When finished, press the STATUS/EXT button to the Closed Captioning controls through the TV menu. CC Off 9 3 EXIT NOTE: You can be set to automatically turn itself off . NOTE: An on-screen count down ...will appear on the remote to display the current Closed Caption setting. 2 Press the CC Button repeatedly to choose from the screen. Designed to help the hearing impaired, this feature...
User manual, English (US)
Page 28
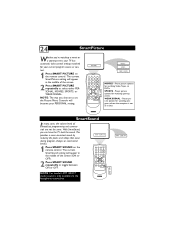
...a more consistent sound by reducing the peaks and valleys that occur during program changes or commercial breaks. 1 Press SMART SOUND on the remote control. With SmartSound, you can have the TV level the sound. Preset picture options for watching sporting events. NOTE: For model 13MT1433/17... its best. WEAK SIGNAL - NOTE: The way you choose to set the Picture Menu Controls will become your current program source or content. 1 Press SMART PICTURE on the remote control. Preset picture options for watching programs where the reception is only available via the headphone connection...
...a more consistent sound by reducing the peaks and valleys that occur during program changes or commercial breaks. 1 Press SMART SOUND on the remote control. With SmartSound, you can have the TV level the sound. Preset picture options for watching sporting events. NOTE: For model 13MT1433/17... its best. WEAK SIGNAL - NOTE: The way you choose to set the Picture Menu Controls will become your current program source or content. 1 Press SMART PICTURE on the remote control. Preset picture options for watching programs where the reception is only available via the headphone connection...
User manual, English (US)
Page 30
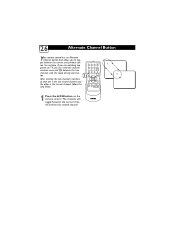
The channels will toggle between the current and previous button. 26 Alternate Channel Button Your remote control has an Alternate Channel button that one button. For instance, if you are watching two games on TV, you to toggle between the current channel and the last viewed channel. After entering the two channels numbers, so that allows you can enter the channel numbers once and flip between the two channels with the touch of only one is the last viewed channel and the other is the current channel, follow the step below. 1 Press the A/CH button on the remote control.
The channels will toggle between the current and previous button. 26 Alternate Channel Button Your remote control has an Alternate Channel button that one button. For instance, if you are watching two games on TV, you to toggle between the current channel and the last viewed channel. After entering the two channels numbers, so that allows you can enter the channel numbers once and flip between the two channels with the touch of only one is the last viewed channel and the other is the current channel, follow the step below. 1 Press the A/CH button on the remote control.
User manual, English (US)
Page 31
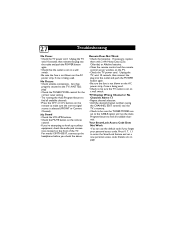
.... •Try running the Auto Program feature to make sure the correct signal source is selected (FRONT or Current Channel). buttons on the remote control. •If you're attempting to enter the SmartLock feature and set to the CABLE option and run the Auto Program feature to be ... channels. •Press the CH+ or CH- If necessary, replace them with 2 AA Heavy Duty (Zinc Chloride) or Alkaline batteries. •Clean the remote control and the remote control sensor window on the AC power strip, if one is not blown on the TV. •Check the TV power cord. Press 0. 7, 1, 1 to...
.... •Try running the Auto Program feature to make sure the correct signal source is selected (FRONT or Current Channel). buttons on the remote control. •If you're attempting to enter the SmartLock feature and set to the CABLE option and run the Auto Program feature to be ... channels. •Press the CH+ or CH- If necessary, replace them with 2 AA Heavy Duty (Zinc Chloride) or Alkaline batteries. •Clean the remote control and the remote control sensor window on the AC power strip, if one is not blown on the TV. •Check the TV power cord. Press 0. 7, 1, 1 to...
User manual, English (US)
Page 33
...feature uses on-screen text boxes to read the voice content of television programs on the front of the TV that receives signals from the remote control. 29 Glossary Audio/Video Inputs • Located on the front of the TV, these connectors (RCA phono type plug) are available for ...name for the two-strand, 300 Ohm antenna wire used for use with a metal (Ftype) connector that are used with specific feature controls (color adjustment, programming, etc.). Remote Sensor • An area on the TV screen. Twin Lead Wire • The more recent Televisions and VCRs. Designed for the...
...feature uses on-screen text boxes to read the voice content of television programs on the front of the TV that receives signals from the remote control. 29 Glossary Audio/Video Inputs • Located on the front of the TV, these connectors (RCA phono type plug) are available for ...name for the two-strand, 300 Ohm antenna wire used for use with a metal (Ftype) connector that are used with specific feature controls (color adjustment, programming, etc.). Remote Sensor • An area on the TV screen. Twin Lead Wire • The more recent Televisions and VCRs. Designed for the...


