
User manual, English (US)
Page 1
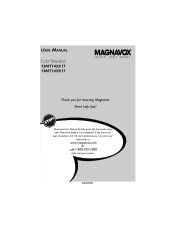
IB8468E001 Read your User Manual first for choosing Magnavox. If you have read your instructions and still need assistance you for quick tips that make using your Magnavox product more enjoyable. Need help at www.magnavox.com or call 1-800-705-2000 while with your product. USER MANUAL Color Television 13MT1432/17 13MT1433/17 Thank you may access our online help fast?
IB8468E001 Read your User Manual first for choosing Magnavox. If you have read your instructions and still need assistance you for quick tips that make using your Magnavox product more enjoyable. Need help at www.magnavox.com or call 1-800-705-2000 while with your product. USER MANUAL Color Television 13MT1432/17 13MT1433/17 Thank you may access our online help fast?
User manual, English (US)
Page 2
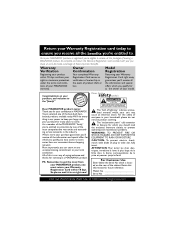
... within your MAGNAVOX warranty. Model No Serial No Visit our World Wide Web Site at once. Warranty Verification Owner Confirmation Model Registration Registering your product within 10 days. Most importantly, you can count on your Warranty Registration card ...rear of the MAGNAVOX "family," you should read the enclosed literature closely to prevent operating and maintenance problems. WARNING: TO PREVENT FIRE OR SHOCK HAZARD, DO NOT EXPOSE THIS EQUIPMENT TO RAIN OR MOISTURE. Remember, to get the most comprehensive warranties and outstanding service networks in MAGNAVOX...
... within your MAGNAVOX warranty. Model No Serial No Visit our World Wide Web Site at once. Warranty Verification Owner Confirmation Model Registration Registering your product within 10 days. Most importantly, you can count on your Warranty Registration card ...rear of the MAGNAVOX "family," you should read the enclosed literature closely to prevent operating and maintenance problems. WARNING: TO PREVENT FIRE OR SHOCK HAZARD, DO NOT EXPOSE THIS EQUIPMENT TO RAIN OR MOISTURE. Remember, to get the most comprehensive warranties and outstanding service networks in MAGNAVOX...
User manual, English (US)
Page 3
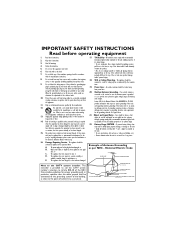
... instructions. 5. Do not block any heat sources such as powersupply cord or plug is not used , use caution when moving the cart/apparatus combination to grounding electrodes, and requirements for long periods of the cabinet. Install in wire to an antenna discharge unit, size of grounding connectors, location of antennadischarge unit, connection to avoid injury from power lines. 20. A grounding type plug...
... instructions. 5. Do not block any heat sources such as powersupply cord or plug is not used , use caution when moving the cart/apparatus combination to grounding electrodes, and requirements for long periods of the cabinet. Install in wire to an antenna discharge unit, size of grounding connectors, location of antennadischarge unit, connection to avoid injury from power lines. 20. A grounding type plug...
User manual, English (US)
Page 4
... 4 Antenna Basic Connection 1 Remote Control Button Descriptions .5-6 Front Audio/Video Input Jacks 4 Sleeptimer 23 Automatically Program TV 9 SmartLock™ Controls Basic Remote Operation 4 Access Code 18 Basic Television Operation 4 Movie Ratings 20 Cable/Cable Box Basic Connection . . .1-2 Other Blocking Options 21 Cable TV Control (Tuner Mode 8 SmartLock Review 22 Care and Cleaning 28 TV Ratings 21 Channel Edit 10 Understanding SmartLock 17 Clock 12 SmartPicture™ Control 24 Closed Caption Control 23 SmartSound™ Control 24 Factory Service...
... 4 Antenna Basic Connection 1 Remote Control Button Descriptions .5-6 Front Audio/Video Input Jacks 4 Sleeptimer 23 Automatically Program TV 9 SmartLock™ Controls Basic Remote Operation 4 Access Code 18 Basic Television Operation 4 Movie Ratings 20 Cable/Cable Box Basic Connection . . .1-2 Other Blocking Options 21 Cable TV Control (Tuner Mode 8 SmartLock Review 22 Care and Cleaning 28 TV Ratings 21 Channel Edit 10 Understanding SmartLock 17 Clock 12 SmartPicture™ Control 24 Closed Caption Control 23 SmartSound™ Control 24 Factory Service...

User manual, English (US)
Page 5
... Cable TV Connection If Cable TV signal into your antenna has flat twinlead wire (300 ohm), you 're ready to connect it down tight. Use Auto Program as described on panel 9 to the AV channel and there is no Video Signal is threaded, screw it to the 75Ω jack on the rear of TV If no Video Signal present, the screen will remain black and the TV will display a "BLUE" screen and...
... Cable TV Connection If Cable TV signal into your antenna has flat twinlead wire (300 ohm), you 're ready to connect it down tight. Use Auto Program as described on panel 9 to the AV channel and there is no Video Signal is threaded, screw it to the 75Ω jack on the rear of TV If no Video Signal present, the screen will remain black and the TV will display a "BLUE" screen and...

User manual, English (US)
Page 6
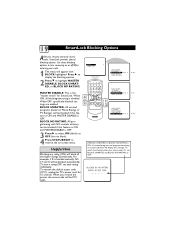
... the same channel and change channels until the picture appears. Screw it down finger tight. Cable Signal IN from the Cable Company 2 TO TV/VCR CABLE IN 1 IR USB VIDEO AUDIO IN SPDIF IN OUT R L DVD-D OUT S-VIDEO AUDIO OUT Y Pb Pr TV PASSCARD OPTICAL SPDIF Jack Panel Back of Cable Box 3 75Ω Round 75Ω Coaxial Cable 75Ω Jack Panel Back of TV Helpful Hints If no Video Signal present, the screen will remain black and...
... the same channel and change channels until the picture appears. Screw it down finger tight. Cable Signal IN from the Cable Company 2 TO TV/VCR CABLE IN 1 IR USB VIDEO AUDIO IN SPDIF IN OUT R L DVD-D OUT S-VIDEO AUDIO OUT Y Pb Pr TV PASSCARD OPTICAL SPDIF Jack Panel Back of Cable Box 3 75Ω Round 75Ω Coaxial Cable 75Ω Jack Panel Back of TV Helpful Hints If no Video Signal present, the screen will remain black and...
User manual, English (US)
Page 7
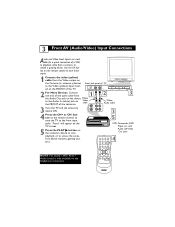
... Jack panel of the television. button on Video cable the FRONT of TV to tune these inputs. 1 Connect the video (yellow) cable from a camera, or attach a gaming device. VOLUME + 2 For Mono Devices: Connect one end of a VCR, to access the accessory device (camera, gaming unit, etc.). with Audio and Video Out jacks 4 EXIT NOTE: For model 13MT1433/17 Audio sound is only available via the headphone connection. "Front" will appear on the TV screen. 5 Press the PLAY...
... Jack panel of the television. button on Video cable the FRONT of TV to tune these inputs. 1 Connect the video (yellow) cable from a camera, or attach a gaming device. VOLUME + 2 For Mono Devices: Connect one end of a VCR, to access the accessory device (camera, gaming unit, etc.). with Audio and Video Out jacks 4 EXIT NOTE: For model 13MT1433/17 Audio sound is only available via the headphone connection. "Front" will appear on the TV screen. 5 Press the PLAY...
User manual, English (US)
Page 8
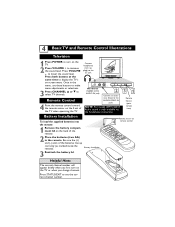
... menu adjustments or selections. 3 Press CHANNEL ;8 or 9 to select TV channels. VIDEO AUDIO MENU - NOTE: For model 13MT1433/17 Audio sound is only available via the headphone connection. Battery Installation Remote sensor on the TV or when you change channels. jack. to the AUDIO/VIDEO IN jacks. VOLUME + CHANNEL Connect an accessory device to lower the sound level. Press both buttons at the same time to the ; Connect headphones (not supplied) to display the TV's on the back of the TV when operating...
... menu adjustments or selections. 3 Press CHANNEL ;8 or 9 to select TV channels. VIDEO AUDIO MENU - NOTE: For model 13MT1433/17 Audio sound is only available via the headphone connection. Battery Installation Remote sensor on the TV or when you change channels. jack. to the AUDIO/VIDEO IN jacks. VOLUME + CHANNEL Connect an accessory device to lower the sound level. Press both buttons at the same time to the ; Connect headphones (not supplied) to display the TV's on the back of the TV when operating...
User manual, English (US)
Page 9
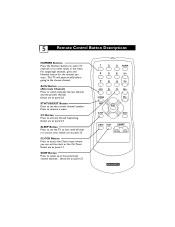
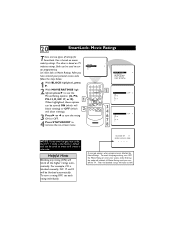
.... 5 Remote Control Button Descriptions NUMBER Buttons Press the Number buttons to select TV channels or to the chosen channel. SLEEP Button Press to set the clock or the On-Timer. SURF Button Press to select up to turn itself off within a certain time. Details are on panel 12. Press to see the current channel number. Details are on panel 26. CLOCK Button Press to access the Clock menu, where you want. STATUS/EXIT Button Press to remove a menu...
.... 5 Remote Control Button Descriptions NUMBER Buttons Press the Number buttons to select TV channels or to the chosen channel. SLEEP Button Press to set the clock or the On-Timer. SURF Button Press to select up to turn itself off within a certain time. Details are on panel 12. Press to see the current channel number. Details are on panel 26. CLOCK Button Press to access the Clock menu, where you want. STATUS/EXIT Button Press to remove a menu...

User manual, English (US)
Page 13
... the SETUP menu. 6 EXIT 4 Press 8 or 9 to scroll through the SETUP menu until AUTO PROGRAM is complete, CHANNELS ARE SET will reappear briefly. 6 Press STATUS/EXIT to start scanning and memorizing channels. 9 Auto Program (Setting TV Channels) Your TV can set itself for you press CH +/-. When Auto Programming is highlighted. 5 Press : to remove the on the screen. Then the SETUP menu will appear on -screen menu. Connect an Antenna or Cable TV signal before starting AUTO PROGRAM. Helpful Hints...
... the SETUP menu. 6 EXIT 4 Press 8 or 9 to scroll through the SETUP menu until AUTO PROGRAM is complete, CHANNELS ARE SET will reappear briefly. 6 Press STATUS/EXIT to start scanning and memorizing channels. 9 Auto Program (Setting TV Channels) Your TV can set itself for you press CH +/-. When Auto Programming is highlighted. 5 Press : to remove the on the screen. Then the SETUP menu will appear on -screen menu. Connect an Antenna or Cable TV signal before starting AUTO PROGRAM. Helpful Hints...

User manual, English (US)
Page 15
.../EXIT to improve picture detail. COLOR Press - PICTURE Press - to remove the on-screen menu. or ; Setting CONTRAST PLUS to choose ON or OFF. SHARPNESS Press - or ; to ON sharpens the picture quality. until the lightest parts of the picture show good detail. or ; The black portions of the picture are as bright as you prefer. 11 Picture Menu Controls T o adjust your TV picture, select a channel and follow the...
.../EXIT to improve picture detail. COLOR Press - PICTURE Press - to remove the on-screen menu. or ; Setting CONTRAST PLUS to choose ON or OFF. SHARPNESS Press - or ; to ON sharpens the picture quality. until the lightest parts of the picture show good detail. or ; The black portions of the picture are as bright as you prefer. 11 Picture Menu Controls T o adjust your TV picture, select a channel and follow the...

User manual, English (US)
Page 19
Helpful Hint Remember to set AM or PM. 5 Press STATUS/EXIT to ON. 15 Start-Up Time Used with the Timer feature, you can select a specific time at which the TV will turn on the TV using the Number buttons. to set TIMER ACTIVE to remove the on-screen menu. If the first number is highlighted. 3 Enter the time to display the Clock menu. 2 Press 9 until START TIME is a single digit, first enter a zero, then the digit (i.e., press "0," then press "8"). 5 4 Press : or ; Details are on when TIMER ACTIVE is ON. 1 Press CLOCK to turn itself on panel 13.
Helpful Hint Remember to set AM or PM. 5 Press STATUS/EXIT to ON. 15 Start-Up Time Used with the Timer feature, you can select a specific time at which the TV will turn on the TV using the Number buttons. to set TIMER ACTIVE to remove the on-screen menu. If the first number is highlighted. 3 Enter the time to display the Clock menu. 2 Press 9 until START TIME is a single digit, first enter a zero, then the digit (i.e., press "0," then press "8"). 5 4 Press : or ; Details are on when TIMER ACTIVE is ON. 1 Press CLOCK to turn itself on panel 13.
User manual, English (US)
Page 20
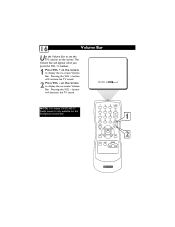
on the remote to display the on -screen Volume Bar. NOTE: For model 13MT1433/17 Audio sound is only available via the headphone connection. buttons. 1 Press VOL + on the remote to see the TV's volume on the screen. 16 Volume Bar Use the Volume Bar to display the on -screen Volume Bar. Pressing the VOL - The Volume Bar will increase the TV sound. 2 Press VOL - Pressing the VOL + button will appear when you press the VOL +/- button will decrease the TV sound.
on the remote to display the on -screen Volume Bar. NOTE: For model 13MT1433/17 Audio sound is only available via the headphone connection. buttons. 1 Press VOL + on the remote to see the TV's volume on the screen. 16 Volume Bar Use the Volume Bar to display the on -screen Volume Bar. Pressing the VOL - The Volume Bar will increase the TV sound. 2 Press VOL - Pressing the VOL + button will appear when you press the VOL +/- button will decrease the TV sound.
User manual, English (US)
Page 21
... indecent language (L). After an access code has been programmed, you clear all ages. All ages admitted. PG-13: Parents Strongly Cautioned - TV-PG -- An Access Code must be set by TV broadcasters. Most parents would find unsuitable for all channels being blocked from viewing using standard TV ratings set to distinguish between make-believe and reality. This type of programming contains one or more...
... indecent language (L). After an access code has been programmed, you clear all ages. All ages admitted. PG-13: Parents Strongly Cautioned - TV-PG -- An Access Code must be set by TV broadcasters. Most parents would find unsuitable for all channels being blocked from viewing using standard TV ratings set to distinguish between make-believe and reality. This type of programming contains one or more...
User manual, English (US)
Page 23
.... When OFF, specifically blocked settings are enabled. BLOCK NO RATING: All programming with BLOCK highlighted. To restore the default access code (0711), unplug the TV's power cord for SmartLock. To watch the channel, enter your personal access code, SmartLock provides special blocking options. Helpful Hint Blocking any ...is OFF. 3 Press : to select ON (block) or OFF (do not block). 4 Press STATUS/EXIT to turn a rating OFF, set each rating individually. Use these blocking options to remove the on-screen menu. For example, if R is blocked manually, NC 17 and X will be ...
.... When OFF, specifically blocked settings are enabled. BLOCK NO RATING: All programming with BLOCK highlighted. To restore the default access code (0711), unplug the TV's power cord for SmartLock. To watch the channel, enter your personal access code, SmartLock provides special blocking options. Helpful Hint Blocking any ...is OFF. 3 Press : to select ON (block) or OFF (do not block). 4 Press STATUS/EXIT to turn a rating OFF, set each rating individually. Use these blocking options to remove the on-screen menu. For example, if R is blocked manually, NC 17 and X will be ...
User manual, English (US)
Page 24
... by Movie Ratings. A message appears when programming is based on movie industry ratings. To watch the programming, turn off the TV. Helpful Hints Blocking any rating (ON) will unblock all the higher ratings automatically. to turn a rating OFF, set each rating individually. Then the blocked ratings will reset to remove the on-screen menu. 9 EXIT NOTE: If you have entered your access code.
... by Movie Ratings. A message appears when programming is based on movie industry ratings. To watch the programming, turn off the TV. Helpful Hints Blocking any rating (ON) will unblock all the higher ratings automatically. to turn a rating OFF, set each rating individually. Then the blocked ratings will reset to remove the on-screen menu. 9 EXIT NOTE: If you have entered your access code.
User manual, English (US)
Page 28
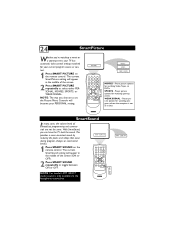
... EXIT SLEEP CLOCK MENU 1 2 MUTE SURF SMART PICTURE SOUND MOVIES - Preset picture options for watching sporting events. WEAK SIGNAL - Preset picture options for watching programs where the reception is only available via the headphone connection. NOTE: For model 13MT1433/17 Audio sound is not at its best. Preset picture options for watching Video Tapes, or DVDs. SmartSound In many cases, the volume levels of the screen. 2 Press SMART PICTURE repeatedly...
... EXIT SLEEP CLOCK MENU 1 2 MUTE SURF SMART PICTURE SOUND MOVIES - Preset picture options for watching sporting events. WEAK SIGNAL - Preset picture options for watching programs where the reception is only available via the headphone connection. NOTE: For model 13MT1433/17 Audio sound is not at its best. Preset picture options for watching Video Tapes, or DVDs. SmartSound In many cases, the volume levels of the screen. 2 Press SMART PICTURE repeatedly...
User manual, English (US)
Page 31
... audio jack connections located on the remote to hook up the headphone before you forget your personal access code. Remote Does Not Work •Check the batteries. Are they properly secured to the TV's ANT 75Ω plug? •Check the TUNER MODE control for the correct tuner setting. •Try running the Auto Program feature to be sure the TUNER MODES are on the TV. •Check the TV power cord...
... audio jack connections located on the remote to hook up the headphone before you forget your personal access code. Remote Does Not Work •Check the batteries. Are they properly secured to the TV's ANT 75Ω plug? •Check the TUNER MODE control for the correct tuner setting. •Try running the Auto Program feature to be sure the TUNER MODES are on the TV. •Check the TV power cord...

User manual, English (US)
Page 32
you may be DVD disks, laser disks, video games, CD-i disks, videotapes, digital television boxes, broadcast channels, cable channels, satellite channels, and others in your viewing): • DVD menus-listings of DVD disk content • Letterbox black bars-shown at the bottom of the TV screen • Shopping channel logos and pricing displays-bright and shown constantly or repeatedly in direct sunlight or near the cabinet, as they are bright and...
you may be DVD disks, laser disks, video games, CD-i disks, videotapes, digital television boxes, broadcast channels, cable channels, satellite channels, and others in your viewing): • DVD menus-listings of DVD disk content • Letterbox black bars-shown at the bottom of the TV screen • Shopping channel logos and pricing displays-bright and shown constantly or repeatedly in direct sunlight or near the cabinet, as they are bright and...
User manual, English (US)
Page 33
... two-strand, 300 Ohm antenna wire used for adjustments. Menu • An on-screen listing of the TV that receives signals from the remote control. Twin Lead Wire • The more recent Televisions and VCRs. Designed to help the user with specific feature controls (color adjustment, programming, etc.). The TV remembers only the locally available or desired channel numbers and skips over any unwanted channel numbers. 29 Glossary Audio/Video Inputs • Located on the...
... two-strand, 300 Ohm antenna wire used for adjustments. Menu • An on-screen listing of the TV that receives signals from the remote control. Twin Lead Wire • The more recent Televisions and VCRs. Designed to help the user with specific feature controls (color adjustment, programming, etc.). The TV remembers only the locally available or desired channel numbers and skips over any unwanted channel numbers. 29 Glossary Audio/Video Inputs • Located on the...


