User Guide
Page 2
...Revision History First release Second release Add VIRTU Update Conter Center for FAQ, technical guide, BIOS updates, driver updates, and other information: http://www.msi.com/service/download/ ◙ Contact our technical staff at: http://support.msi.com/ ii Alternatively, please try the following help resources for further guidance. ◙ ...Visit the MSI website for AMD CPU Add CLICK BIOS II Add VIRTU Universal MVP and Network Genie Date 2010/10 2011/03 2011/04 2011/05 2011/06 2012/01 Technical ...
...Revision History First release Second release Add VIRTU Update Conter Center for FAQ, technical guide, BIOS updates, driver updates, and other information: http://www.msi.com/service/download/ ◙ Contact our technical staff at: http://support.msi.com/ ii Alternatively, please try the following help resources for further guidance. ◙ ...Visit the MSI website for AMD CPU Add CLICK BIOS II Add VIRTU Universal MVP and Network Genie Date 2010/10 2011/03 2011/04 2011/05 2011/06 2012/01 Technical ...
User Guide
Page 3
... install Teaming Genie, Teaming Genie overview, Team mode and how to use CLICK BIOS II to charge your mainboard hardware, read CPU, memory information and use the advanced software applications designed by MSI. ◯ Control Center - this chapter describes VIRTU Universal MVP, how to connect... the display and how to create a team. ◯ Live Update 5 - this chapter describes how to use i-Mode, d-Mode, HyperFormance and Virtual Vsync. ◯ CLICK BIOS II - iii ...
... install Teaming Genie, Teaming Genie overview, Team mode and how to use CLICK BIOS II to charge your mainboard hardware, read CPU, memory information and use the advanced software applications designed by MSI. ◯ Control Center - this chapter describes VIRTU Universal MVP, how to connect... the display and how to create a team. ◯ Live Update 5 - this chapter describes how to use i-Mode, d-Mode, HyperFormance and Virtual Vsync. ◯ CLICK BIOS II - iii ...
User Guide
Page 7
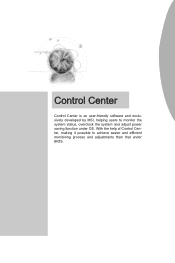
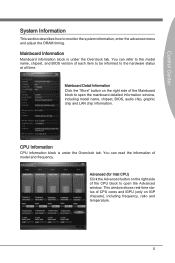
With the help of Control Center, making it possible to monitor the system status, overclock the system and adjust power saving function under BIOS. Control Center Control Center is an user-friendly software and exclusively developed by MSI, helping users to achieve easier and efficient monitoring process and adjustments than that under OS.
With the help of Control Center, making it possible to monitor the system status, overclock the system and adjust power saving function under BIOS. Control Center Control Center is an user-friendly software and exclusively developed by MSI, helping users to achieve easier and efficient monitoring process and adjustments than that under OS.
User Guide
Page 11
... each item to be informed to open the mainboard detailed information window, including model name, chipset, BIOS, audio chip, graphic chip and LAN chip information. You can refer to the model name, chipset, and BIOS version of the Mainboard block to monitor the system information, enter the advanced menu and adjust the...
... each item to be informed to open the mainboard detailed information window, including model name, chipset, BIOS, audio chip, graphic chip and LAN chip information. You can refer to the model name, chipset, and BIOS version of the Mainboard block to monitor the system information, enter the advanced menu and adjust the...
User Guide
Page 13
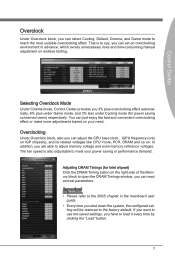
...、iGPU frequency (only on IGP chipsets), and its related voltages like CPU Vcore, PCH, DRAM and so on. Important • Please refer to the BIOS chapter in advance, which avoids unnecessary risks and time-consuming manual adjustment on endless testing. Control Center Overclock Under Overclock block, you can just enjoy...
...、iGPU frequency (only on IGP chipsets), and its related voltages like CPU Vcore, PCH, DRAM and so on. Important • Please refer to the BIOS chapter in advance, which avoids unnecessary risks and time-consuming manual adjustment on endless testing. Control Center Overclock Under Overclock block, you can just enjoy...
User Guide
Page 22
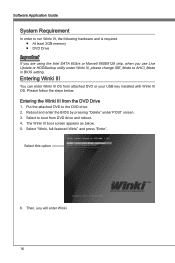
... can enter Winki III OS from DVD drive and reboot. 4. Please follow the steps below . 5. Reboot and enter the BIOS by pressing "Delete" under Winki III, please change IDE_Mode to AHCI_Mode in BIOS setting. The Winki III boot screen appears as below : Entering the Winki III from the DVD Drive 1. Software Application...
... can enter Winki III OS from DVD drive and reboot. 4. Please follow the steps below . 5. Reboot and enter the BIOS by pressing "Delete" under Winki III, please change IDE_Mode to AHCI_Mode in BIOS setting. The Winki III boot screen appears as below : Entering the Winki III from the DVD Drive 1. Software Application...
User Guide
Page 23
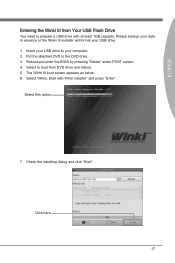
..." and press "Enter". Click here 17 Select "Winki, Start with at least 1GB capacity. Check the installing dialog and click "Start". Reboot and enter the BIOS by pressing "Delete" under POST screen. 4. The Winki III boot screen appears as below. 6. Please backup your data in advance or the Winki III installer...
..." and press "Enter". Click here 17 Select "Winki, Start with at least 1GB capacity. Check the installing dialog and click "Start". Reboot and enter the BIOS by pressing "Delete" under POST screen. 4. The Winki III boot screen appears as below. 6. Please backup your data in advance or the Winki III installer...

User Guide
Page 24
Click "Close" when finish. Then, you backup your data in advanced. Click here 9. Click here 11. Software Application Guide 8. Click here 10. Select to continue. The installer is proceeding. Then, click "Yes" to boot from USB drive and reboot. 13. Click "Reboot" and then "Yes". Make sure that you will enter Winki III. 18 Enter the BIOS by pressing "Delete" under POST screen. 12.
Click "Close" when finish. Then, you backup your data in advanced. Click here 9. Click here 11. Software Application Guide 8. Click here 10. Select to continue. The installer is proceeding. Then, click "Yes" to boot from USB drive and reboot. 13. Click "Reboot" and then "Yes". Make sure that you will enter Winki III. 18 Enter the BIOS by pressing "Delete" under POST screen. 12.
User Guide
Page 28
... audio device is built-in with your stereo and select audio files for your mainboard, take a moment to confirm that the item "Audio Controller" in BIOS has been set to install Realtek Audio and THX TruStudio PRO.
... audio device is built-in with your stereo and select audio files for your mainboard, take a moment to confirm that the item "Audio Controller" in BIOS has been set to install Realtek Audio and THX TruStudio PRO.

User Guide
Page 40
... 802.3ad (LACP) specification. In this mode is similar to the Link Aggregation\LACP(802.3ad) mode in that the items "Onboard LAN Controller" in BIOS has been set to Teaming Genie installation. Basically, this mode, at least one of the Link Aggregation\LACP(802.3ad) mode. All adapters in active...
... 802.3ad (LACP) specification. In this mode is similar to the Link Aggregation\LACP(802.3ad) mode in that the items "Onboard LAN Controller" in BIOS has been set to Teaming Genie installation. Basically, this mode, at least one of the Link Aggregation\LACP(802.3ad) mode. All adapters in active...

User Guide
Page 43
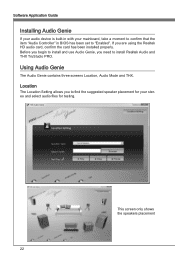
Live Update 5 will download the appropriate drivers automatically. With Live Update 5, you don't need to search the drivers on web sites, and don't need to scan and download the latest drivers, BIOS and utilities. Live Update 5 Live Update 5 is an application for the MSI system to know the models of mainboard and graphics cards.
Live Update 5 will download the appropriate drivers automatically. With Live Update 5, you don't need to search the drivers on web sites, and don't need to scan and download the latest drivers, BIOS and utilities. Live Update 5 Live Update 5 is an application for the MSI system to know the models of mainboard and graphics cards.
User Guide
Page 57
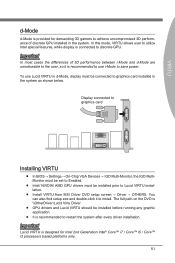
Display connected to graphics card Installing VIRTU ■ In BIOS → Settings → On-Chip VGA Devices → IGD Multi-Monitor, the IGD MultiMonitor must be set to Enabled. ■ Intel/ NVIDIA/ AMD GPU drivers ... Lucid VIRTU should be installed prior to discrete GPU. The full path on the DVD is connected to Lucid VIRTU installation. ■ Install VIRTU from MSI Driver DVD setup screen → Driver → OTHERS. Important In most cases the differences of discrete GPU installed in the system as shown below.
Display connected to graphics card Installing VIRTU ■ In BIOS → Settings → On-Chip VGA Devices → IGD Multi-Monitor, the IGD MultiMonitor must be set to Enabled. ■ Intel/ NVIDIA/ AMD GPU drivers ... Lucid VIRTU should be installed prior to discrete GPU. The full path on the DVD is connected to Lucid VIRTU installation. ■ Install VIRTU from MSI Driver DVD setup screen → Driver → OTHERS. Important In most cases the differences of discrete GPU installed in the system as shown below.
User Guide
Page 65
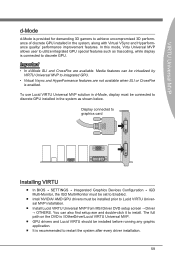
...allows user to Lucid VIRTU Universal MVP installation. ■ Install Lucid VIRTU Universal MVP from MSI Driver DVD setup screen → Driver → OTHERS. The full path on the DVD... display is recommended to discrete GPU. Display connected to graphics card Installing VIRTU ■ In BIOS → SETTINGS → Integerated Graphics Devices Configuration → IGD Multi-Monitor, the IGD ...Vsync and HyperFormance features are available. Important • In d-Mode SLI and CrossFire are not available when SLI or CrossFire is provided for demanding 3D gamers to install. To use...
...allows user to Lucid VIRTU Universal MVP installation. ■ Install Lucid VIRTU Universal MVP from MSI Driver DVD setup screen → Driver → OTHERS. The full path on the DVD... display is recommended to discrete GPU. Display connected to graphics card Installing VIRTU ■ In BIOS → SETTINGS → Integerated Graphics Devices Configuration → IGD Multi-Monitor, the IGD ...Vsync and HyperFormance features are available. Important • In d-Mode SLI and CrossFire are not available when SLI or CrossFire is provided for demanding 3D gamers to install. To use...
User Guide
Page 71
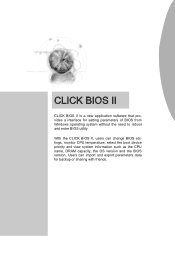
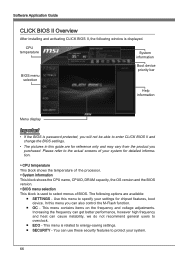
Users can change BIOS settings, monitor CPU temperature, select the boot device priority and view system information such as the CPU name, DRAM capacity, the OS version and the BIOS version. CLICK BIOS II CLICK BIOS II is a new application software that provides a interface for backup or sharing with friends. With the CLICK BIOS II, users can import and export parameters data for setting parameters of BIOS from Windows operating system without the need to reboot and enter BIOS utility.
Users can change BIOS settings, monitor CPU temperature, select the boot device priority and view system information such as the CPU name, DRAM capacity, the OS version and the BIOS version. CLICK BIOS II CLICK BIOS II is a new application software that provides a interface for backup or sharing with friends. With the CLICK BIOS II, users can import and export parameters data for setting parameters of BIOS from Windows operating system without the need to reboot and enter BIOS utility.
User Guide
Page 72
... settings for chipset features, boot device. CPU temperature System information BIOS menu selection Boot device priority bar Help information Menu display Important • If the BIOS is used to enter CLICK BIOS II and change the BIOS settings. • The pictures in this guide are available: ...the processor. ▶ System information This block shows the CPU name, CPUID, DRAM capacity, the OS version and the BIOS version. ▶ BIOS menu selection This block is password protected, you purchased. Please refer to the actual screens of your system for detailed information....
... settings for chipset features, boot device. CPU temperature System information BIOS menu selection Boot device priority bar Help information Menu display Important • If the BIOS is used to enter CLICK BIOS II and change the BIOS settings. • The pictures in this guide are available: ...the processor. ▶ System information This block shows the CPU name, CPUID, DRAM capacity, the OS version and the BIOS version. ▶ BIOS menu selection This block is password protected, you purchased. Please refer to the actual screens of your system for detailed information....
User Guide
Page 73
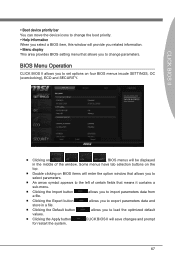
...■ Clicking the Default button allows you to select parameters. ■ An arrow symbol appears to the left of the window. CLICK BIOS II will enter the option window that allows you to load the optimized default values. ■ Clicking the Apply button for restart the ...to change parameters. Some menus have tab selection buttons on the top. ■ Double clicking on , , , , BIOS menus will be displayed in a file. BIOS Menu Operation CLICK BIOS II allows you to import parameters data from a file. ■ Clicking the Export button store in the middle of ...
...■ Clicking the Default button allows you to select parameters. ■ An arrow symbol appears to the left of the window. CLICK BIOS II will enter the option window that allows you to load the optimized default values. ■ Clicking the Apply button for restart the ...to change parameters. Some menus have tab selection buttons on the top. ■ Double clicking on , , , , BIOS menus will be displayed in a file. BIOS Menu Operation CLICK BIOS II allows you to import parameters data from a file. ■ Clicking the Export button store in the middle of ...
User Guide
Page 74
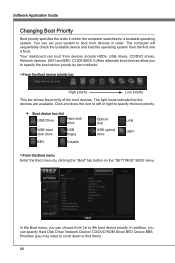
...the Boot menu, you may need to scroll down to specify the boot device priority by clicking the "Boot" tab button on the "SETTINGS" BIOS menu. The computer will sequentially check the bootable device and load the operating system from devices include HDDs, USB drives, CD/DVD drives, Network devices..., UEFI and BEV. The light icons indicate that the devices are available. CLICK BIOS II offers alternate boot devices allow you to find them). 68 In addition, you can specify Hard Disk Drive/ Network Device/ CD/DVD ROM ...
...the Boot menu, you may need to scroll down to specify the boot device priority by clicking the "Boot" tab button on the "SETTINGS" BIOS menu. The computer will sequentially check the bootable device and load the operating system from devices include HDDs, USB drives, CD/DVD drives, Network devices..., UEFI and BEV. The light icons indicate that the devices are available. CLICK BIOS II offers alternate boot devices allow you to find them). 68 In addition, you can specify Hard Disk Drive/ Network Device/ CD/DVD ROM ...


