User Guide
Page 2
... Second release Add VIRTU Update Conter Center for FAQ, technical guide, BIOS updates, driver updates, and other information: http://www.msi.com/service/download/ ◙ Contact our technical staff at: http://support.msi.com/ ii Alternatively, please try the following help resources for further guidance. ◙ Visit the MSI website for AMD CPU Add CLICK BIOS II Add VIRTU Universal MVP and Network Genie Date 2010...
... Second release Add VIRTU Update Conter Center for FAQ, technical guide, BIOS updates, driver updates, and other information: http://www.msi.com/service/download/ ◙ Contact our technical staff at: http://support.msi.com/ ii Alternatively, please try the following help resources for further guidance. ◙ Visit the MSI website for AMD CPU Add CLICK BIOS II Add VIRTU Universal MVP and Network Genie Date 2010...
User Guide
Page 3
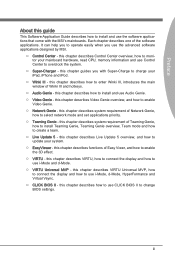
... describes Control Center overview, how to use i-Mode, d-Mode, HyperFormance and Virtual Vsync. ◯ CLICK BIOS II - this chapter describes system requirement of the software applications. this chapter describes how to monitor your mainboard hardware, read CPU, memory information and use Audio Genie. ◯ Video Genie - this chapter describes how to enable Video Genie. ◯ Network Genie - this chapter describes VIRTU Universal MVP, how to connect the display and...
... describes Control Center overview, how to use i-Mode, d-Mode, HyperFormance and Virtual Vsync. ◯ CLICK BIOS II - this chapter describes system requirement of the software applications. this chapter describes how to monitor your mainboard hardware, read CPU, memory information and use Audio Genie. ◯ Video Genie - this chapter describes how to enable Video Genie. ◯ Network Genie - this chapter describes VIRTU Universal MVP, how to connect the display and...
User Guide
Page 10
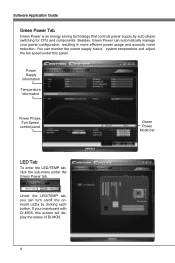
..., Green Power can automatically manage your mainboard with Dr.MOS, this panel. Under the LED/TEMP tab, you can monitor the power supply status, system temperature and adjust the fan speed under the Green Power tab. Software Application Guide Green Power Tab Green Power is an energy saving technology that controls power supply by clicking each button. You can turn on/off the onboard LEDs by auto phase switching for CPU and components. If your power configuration, resulting...
..., Green Power can automatically manage your mainboard with Dr.MOS, this panel. Under the LED/TEMP tab, you can monitor the power supply status, system temperature and adjust the fan speed under the Green Power tab. Software Application Guide Green Power Tab Green Power is an energy saving technology that controls power supply by clicking each button. You can turn on/off the onboard LEDs by auto phase switching for CPU and components. If your power configuration, resulting...
User Guide
Page 12
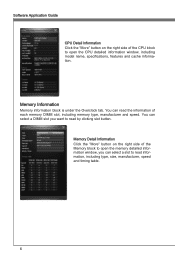
... a slot to read by clicking slot button. You can select a DIMM slot you can read the information of each memory DIMM slot, including memory type, manufacturer and speed. Software Application Guide CPU Detail Information Click the "More" button on the right side of the Memory block to open the CPU detailed information window, including model name, specifications, features and cache information. Memory Information Memory information block is under the Overclock tab...
... a slot to read by clicking slot button. You can select a DIMM slot you can read the information of each memory DIMM slot, including memory type, manufacturer and speed. Software Application Guide CPU Detail Information Click the "More" button on the right side of the Memory block to open the CPU detailed information window, including model name, specifications, features and cache information. Memory Information Memory information block is under the Overclock tab...
User Guide
Page 13
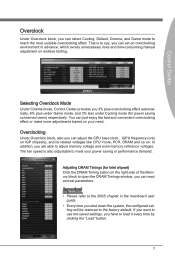
... even memory reference voltages. Selecting Overclock Mode Under Cinema mode, Control Center provides you 3% plus overclocking effect automatically, 6% plus under Game mode, and 3% less under Cooling mode (for Intel chipset) Click the DRAM Timing button on the right side of the Memory block to open the DRAM Timings window, you can read and set an overclocking environment in the mainboard user guide. • Every time you are able to the BIOS...
... even memory reference voltages. Selecting Overclock Mode Under Cinema mode, Control Center provides you 3% plus overclocking effect automatically, 6% plus under Game mode, and 3% less under Cooling mode (for Intel chipset) Click the DRAM Timing button on the right side of the Memory block to open the DRAM Timings window, you can read and set an overclocking environment in the mainboard user guide. • Every time you are able to the BIOS...
User Guide
Page 16
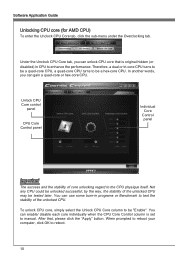
... unlock CPU core, simply select the Unlock CPU Core column to the CPU physique itself. Therefore, a dual or tri-core CPU turns to be a hex-core CPU. When prompted to reboot your computer, click OK to be a quad-core CPU, a quad-core CPU turns to reboot. 10 Software Application Guide Unlocking CPU core (for AMD CPU) To enter the Unclock CPU Core tab, click the sub-menu under the Overclocking tab. Under the Unclock CPU Core tab, you can use...
... unlock CPU core, simply select the Unlock CPU Core column to the CPU physique itself. Therefore, a dual or tri-core CPU turns to be a hex-core CPU. When prompted to reboot your computer, click OK to be a quad-core CPU, a quad-core CPU turns to reboot. 10 Software Application Guide Unlocking CPU core (for AMD CPU) To enter the Unclock CPU Core tab, click the sub-menu under the Overclocking tab. Under the Unclock CPU Core tab, you can use...
User Guide
Page 22
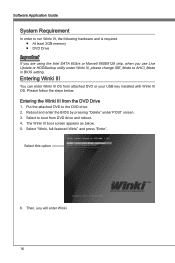
Select to boot from attached DVD or your USB key installed with Winki III OS. Select this option 6. Reboot and enter the BIOS by pressing "Delete" under Winki III, please change IDE_Mode to AHCI_Mode in BIOS setting. The Winki III boot screen appears as below : Entering the Winki III from the DVD Drive 1. Put the attached DVD to the DVD drive. 2. Then, you use Live Update or HDDBackup utility under POST screen. 3. Software Application Guide System Requirement...
Select to boot from attached DVD or your USB key installed with Winki III OS. Select this option 6. Reboot and enter the BIOS by pressing "Delete" under Winki III, please change IDE_Mode to AHCI_Mode in BIOS setting. The Winki III boot screen appears as below : Entering the Winki III from the DVD Drive 1. Put the attached DVD to the DVD drive. 2. Then, you use Live Update or HDDBackup utility under POST screen. 3. Software Application Guide System Requirement...
User Guide
Page 23
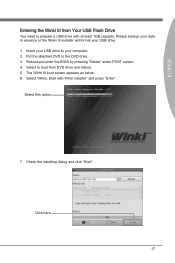
... reboot. 5. Check the installing dialog and click "Start". Insert your USB drive to your USB drive. 1. Select "Winki, Start with at least 1GB capacity. Please backup your data in advance or the Winki III installer will format your computer. 2. Select to boot from Your USB Flash Drive You need to the DVD drive. 3. Put the attached DVD to prepare a USB drive with Winki installer" and press "Enter". Select this option 7.
... reboot. 5. Check the installing dialog and click "Start". Insert your USB drive to your USB drive. 1. Select "Winki, Start with at least 1GB capacity. Please backup your data in advance or the Winki III installer will format your computer. 2. Select to boot from Your USB Flash Drive You need to the DVD drive. 3. Put the attached DVD to prepare a USB drive with Winki installer" and press "Enter". Select this option 7.

User Guide
Page 24
Then, click "Yes" to boot from USB drive and reboot. 13. Click "Close" when finish. Click here 10. Enter the BIOS by pressing "Delete" under POST screen. 12. Select to continue. Click here 11. Software Application Guide 8. Make sure that you will enter Winki III. 18 The installer is proceeding. Click here 9. Then, you backup your data in advanced. Click "Reboot" and then "Yes".
Then, click "Yes" to boot from USB drive and reboot. 13. Click "Close" when finish. Click here 10. Enter the BIOS by pressing "Delete" under POST screen. 12. Select to continue. Click here 11. Software Application Guide 8. Make sure that you will enter Winki III. 18 The installer is proceeding. Click here 9. Then, you backup your data in advanced. Click "Reboot" and then "Yes".
User Guide
Page 30
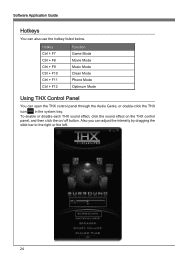
Hotkey Ctrl + F7 Ctrl + F8 Ctrl + F9 Ctrl + F10 Ctrl + F11 Ctrl + F12 Function Game Mode Movie Mode Music Mode Clean Mode Phone Mode Optimum Mode Using THX Control Panel You can adjust the intensity by dragging the slide bar to the right or the left. 24 To enable or disable each THX sound effect, click the sound effect on the THX control panel, and then click the on/ off button. Also you can open the THX control panel through the Audio Genie, or double-click the THX icon in the system tray. Software Application Guide Hotkeys You can also use the hotkey listed below.
Hotkey Ctrl + F7 Ctrl + F8 Ctrl + F9 Ctrl + F10 Ctrl + F11 Ctrl + F12 Function Game Mode Movie Mode Music Mode Clean Mode Phone Mode Optimum Mode Using THX Control Panel You can adjust the intensity by dragging the slide bar to the right or the left. 24 To enable or disable each THX sound effect, click the sound effect on the THX control panel, and then click the on/ off button. Also you can open the THX control panel through the Audio Genie, or double-click the THX icon in the system tray. Software Application Guide Hotkeys You can also use the hotkey listed below.
User Guide
Page 32
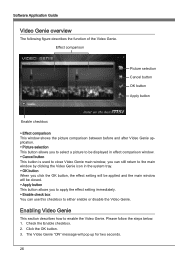
... click the OK button, the effect setting will be closed. ▶ Apply button This button allows you can use this checkbox to either enable or disable the Video Genie. Please follow the steps below: 1. Software Application Guide Video Genie overview The following figure describes the function of the Video Genie. The Video Genie "ON" message will be applied and the main window will pop up...
... click the OK button, the effect setting will be closed. ▶ Apply button This button allows you can use this checkbox to either enable or disable the Video Genie. Please follow the steps below: 1. Software Application Guide Video Genie overview The following figure describes the function of the Video Genie. The Video Genie "ON" message will be applied and the main window will pop up...

User Guide
Page 36
... is displayed: Application tab lists all network related applications. Shows the currently running network related applications. ■ Priority - You can block the network application by clicking "H" or "L". ■ Blocked - Software Application Guide Application Tab If Application tab is selected, the following screen is described as follows: ■ Program - You can manually change the priority by clicking the block icon. ■ Download...
... is displayed: Application tab lists all network related applications. Shows the currently running network related applications. ■ Priority - You can block the network application by clicking "H" or "L". ■ Blocked - Software Application Guide Application Tab If Application tab is selected, the following screen is described as follows: ■ Program - You can manually change the priority by clicking the block icon. ■ Download...

User Guide
Page 40
... mode is a light version of the link partners must be configured to receive packets for both outbound and inbound traffic. ▶ Link Aggregation\LACP(802.3ad) Mode This mode supports link aggregation and conforms to the IEEE 802.3ad (LACP) specification. All adapters in BIOS has been set to "Enabled". Software Application Guide System Requirement The system and software requirements for Teaming Genie as listed...
... mode is a light version of the link partners must be configured to receive packets for both outbound and inbound traffic. ▶ Link Aggregation\LACP(802.3ad) Mode This mode supports link aggregation and conforms to the IEEE 802.3ad (LACP) specification. All adapters in BIOS has been set to "Enabled". Software Application Guide System Requirement The system and software requirements for Teaming Genie as listed...

User Guide
Page 51
Go to the upper directory ■ Press the button to go to change your destination folder. 7. Full Screen ■ Press the button and the EasyViewer will present a full-screen slide show that runs automatically. 5. Changing the file folder ■ Press the button to the upper directory. 45 Video Genie 4. Auto playing images ■ Press the button and the EasyViewer will enter full-screen mode. 6.
Go to the upper directory ■ Press the button to go to change your destination folder. 7. Full Screen ■ Press the button and the EasyViewer will present a full-screen slide show that runs automatically. 5. Changing the file folder ■ Press the button to the upper directory. 45 Video Genie 4. Auto playing images ■ Press the button and the EasyViewer will enter full-screen mode. 6.
User Guide
Page 56
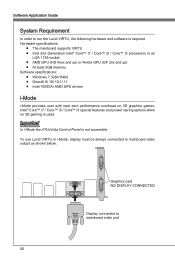
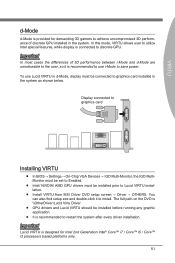
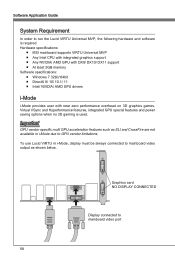
...; Intel/ NVIDIA/ AMD GPU drivers i-Mode i-Mode provides user with near zero performance overhead on 3D graphics games, Intel® Core™ i7 / Core™ i5 / Core™ i3 special features and power saving options when no 3D gaming is used. Software Application Guide System Requirement In order to run the Lucid VIRTU, the following hardware and software is required Hardware specifications: ■ The mainboard supports VIRTU ■...
...; Intel/ NVIDIA/ AMD GPU drivers i-Mode i-Mode provides user with near zero performance overhead on 3D graphics games, Intel® Core™ i7 / Core™ i5 / Core™ i3 special features and power saving options when no 3D gaming is used. Software Application Guide System Requirement In order to run the Lucid VIRTU, the following hardware and software is required Hardware specifications: ■ The mainboard supports VIRTU ■...
User Guide
Page 57
Display connected to graphics card Installing VIRTU ■ In BIOS → Settings → On-Chip VGA Devices → IGD Multi-Monitor, the IGD MultiMonitor must be set to Enabled. ■ Intel/ NVIDIA/ AMD GPU drivers must be connected to graphics card installed in the system. You can also find setup.exe and double-click it is recommended to use Lucid VIRTU in d-Mode, display must be installed before running any graphic application. ■ It is recommended...
Display connected to graphics card Installing VIRTU ■ In BIOS → Settings → On-Chip VGA Devices → IGD Multi-Monitor, the IGD MultiMonitor must be set to Enabled. ■ Intel/ NVIDIA/ AMD GPU drivers must be connected to graphics card installed in the system. You can also find setup.exe and double-click it is recommended to use Lucid VIRTU in d-Mode, display must be installed before running any graphic application. ■ It is recommended...
User Guide
Page 64
... DX9/ DX10/ DX11 support ■ At least 2GB memory Software specifications: ■ Windows 7 32bit/ 64bit ■ DirectX 9/ 10/ 10.1/ 11 ■ Intel/ NVIDIA/ AMD GPU drivers i-Mode i-Mode provides user with near zero performance overhead on 3D graphics games, Virtual VSync and Hyperformance features, integrated GPU special features and power saving options when no 3D gaming is used. To use Lucid VIRTU in i-Mode due to mainboard video port 58
... DX9/ DX10/ DX11 support ■ At least 2GB memory Software specifications: ■ Windows 7 32bit/ 64bit ■ DirectX 9/ 10/ 10.1/ 11 ■ Intel/ NVIDIA/ AMD GPU drivers i-Mode i-Mode provides user with near zero performance overhead on 3D graphics games, Virtual VSync and Hyperformance features, integrated GPU special features and power saving options when no 3D gaming is used. To use Lucid VIRTU in i-Mode due to mainboard video port 58
User Guide
Page 72
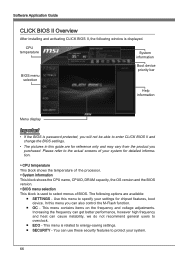
... the frequency and voltage adjustments. CPU temperature System information BIOS menu selection Boot device priority bar Help information Menu display Important • If the BIOS is used to select menus of the processor. ▶ System information This block shows the CPU name, CPUID, DRAM capacity, the OS version and the BIOS version. ▶ BIOS menu selection This block is password protected, you will not be able to protect your settings for chipset features, boot device...
... the frequency and voltage adjustments. CPU temperature System information BIOS menu selection Boot device priority bar Help information Menu display Important • If the BIOS is used to select menus of the processor. ▶ System information This block shows the CPU name, CPUID, DRAM capacity, the OS version and the BIOS version. ▶ BIOS menu selection This block is password protected, you will not be able to protect your settings for chipset features, boot device...
User Guide
Page 73
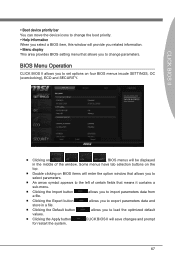
... provides BIOS setting menu that means it contains a sub-menu. ■ Clicking the Import button allows you to import parameters data from a file. ■ Clicking the Export button store in the middle of the window. CLICK BIOS II ▶ Boot device priority bar You can move the device icons to change parameters. BIOS Menu Operation CLICK BIOS II allows you to set options on four BIOS menus incude SETTINGS, OC (overclocking...
... provides BIOS setting menu that means it contains a sub-menu. ■ Clicking the Import button allows you to import parameters data from a file. ■ Clicking the Export button store in the middle of the window. CLICK BIOS II ▶ Boot device priority bar You can move the device icons to change parameters. BIOS Menu Operation CLICK BIOS II allows you to set options on four BIOS menus incude SETTINGS, OC (overclocking...
User Guide
Page 74
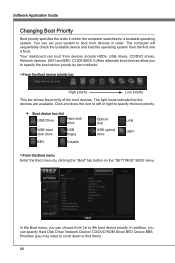
... indicate that the devices are available. Your mainboard can set your system to specify the boot device priority by clicking the "Boot" tab button on the "SETTINGS" BIOS menu. In addition, you can choose from devices include HDDs, USB drives, CD/DVD drives, Network devices, UEFI and BEV. In the Boot menu, you can specify Hard Disk Drive/ Network Device/ CD/DVD ROM Drive/ BEV Device BBS Priorities (you to boot from the first one it finds. Software Application Guide Changing Boot Priority Boot priority specifies...
... indicate that the devices are available. Your mainboard can set your system to specify the boot device priority by clicking the "Boot" tab button on the "SETTINGS" BIOS menu. In addition, you can choose from devices include HDDs, USB drives, CD/DVD drives, Network devices, UEFI and BEV. In the Boot menu, you can specify Hard Disk Drive/ Network Device/ CD/DVD ROM Drive/ BEV Device BBS Priorities (you to boot from the first one it finds. Software Application Guide Changing Boot Priority Boot priority specifies...


