

User Manual
Page 3
Preface 1-3 Rear Side View...2-18 Bottom Side View ...2-19 Getting Started Power Management ...3-2 ECO Engine--Power Saving Function 3-2 AC Adapter ...3-4 Battery Pack ...3-6 Using the Battery Pack...3-10 Basic Operations ...3-12 Safety and Comfort Tips...3-12 Having a Good Work Habit...3-13 Knowing the Keyboard ...3-14 Knowing the Touchpad ...3-18 About Hard Disk Drive...3-21 Connecting the External Devices 3-22 Using the External Optical Storage Device 3-22 Connecting the Peripheral Devices 3-24 Connecting the Communication Devices 3-27 Safely Remove Hardware ...3-28
Preface 1-3 Rear Side View...2-18 Bottom Side View ...2-19 Getting Started Power Management ...3-2 ECO Engine--Power Saving Function 3-2 AC Adapter ...3-4 Battery Pack ...3-6 Using the Battery Pack...3-10 Basic Operations ...3-12 Safety and Comfort Tips...3-12 Having a Good Work Habit...3-13 Knowing the Keyboard ...3-14 Knowing the Touchpad ...3-18 About Hard Disk Drive...3-21 Connecting the External Devices 3-22 Using the External Optical Storage Device 3-22 Connecting the Peripheral Devices 3-24 Connecting the Communication Devices 3-27 Safely Remove Hardware ...3-28

User Manual
Page 8
... prevent explosion caused by improper battery replacement, use the same or equivalent type of battery recommended by a service personnel: Š The power cord or plug is reliable connected to step on top of breakage. Always keep the strong magnetic or electrical objects away from the equipment. Do not place anything on it work according to User's Manual. Š The equipment was...
... prevent explosion caused by improper battery replacement, use the same or equivalent type of battery recommended by a service personnel: Š The power cord or plug is reliable connected to step on top of breakage. Always keep the strong magnetic or electrical objects away from the equipment. Do not place anything on it work according to User's Manual. Š The equipment was...

User Manual
Page 22
... this manual carefully before using this notebook. Beside, the steps of this notebook. This brand-new exquisite notebook will give you open the packing box. It is recommended to using this notebook. Also, this chapter provides the specification of this notebook. Chapter 3, Getting Started, gives the basic operation instructions on becoming a user of this notebook, and introduces the function buttons, quick launch buttons, connectors, LEDs and externals of installing and uninstalling the battery; and...
... this manual carefully before using this notebook. Beside, the steps of this notebook. This brand-new exquisite notebook will give you open the packing box. It is recommended to using this notebook. Also, this chapter provides the specification of this notebook. Chapter 3, Getting Started, gives the basic operation instructions on becoming a user of this notebook, and introduces the function buttons, quick launch buttons, connectors, LEDs and externals of installing and uninstalling the battery; and...

User Manual
Page 23
... power cord These accessories listed above may change without notice. Carry bag (optional) All-in the future. Introductions 2-3 Chapter 4, BIOS Setup, provides information on BIOS Setup program and allows you need to configure the system for optimum use. Also, keep the box and packing materials in case you to ship the unit in -one application disk, containing the full version of user's manual, drivers, utilities, and optional recovery function...
... power cord These accessories listed above may change without notice. Carry bag (optional) All-in the future. Introductions 2-3 Chapter 4, BIOS Setup, provides information on BIOS Setup program and allows you need to configure the system for optimum use. Also, keep the box and packing materials in case you to ship the unit in -one application disk, containing the full version of user's manual, drivers, utilities, and optional recovery function...

User Manual
Page 25
I/O Port Monitor (VGA) USB HDMI Mic-in Headphone-out Internal Microphone RJ45 Card Reader 15 pin D-sub x 1 USB 2.0 x 2 x 1 x 1 x 1 x 1 x 1 x 1 (SD/ SDHC/ MMC) (optional) The supported memory cards may vary without notice) HDD form factor 2.5", 9.5 mm High, SATA External Optical Device USB External ODD (optional) Special Notification The actual HDD preinstalled in the notebook depends on the model you purchased. Storage (Items listed here may vary without notice. Introductions 2-5 Power AC Adapter Battery Type RTC Battery Special Notification 40W, 20V/ 19V...
I/O Port Monitor (VGA) USB HDMI Mic-in Headphone-out Internal Microphone RJ45 Card Reader 15 pin D-sub x 1 USB 2.0 x 2 x 1 x 1 x 1 x 1 x 1 x 1 (SD/ SDHC/ MMC) (optional) The supported memory cards may vary without notice) HDD form factor 2.5", 9.5 mm High, SATA External Optical Device USB External ODD (optional) Special Notification The actual HDD preinstalled in the notebook depends on the model you purchased. Storage (Items listed here may vary without notice. Introductions 2-5 Power AC Adapter Battery Type RTC Battery Special Notification 40W, 20V/ 19V...

User Manual
Page 26
... Port (Items listed here may vary without notice) LAN 10/100 MHz Wireless LAN Support Bluetooth Support (optional) Display LCD Type Brightness 14" 16:9 WXGA LED (Glare type) Brightness controlled by K/B hot-key & SW Webcam CMOS 1.3 Mega Pixel (optional) Audio Sound Controller Internal Speaker Sound Volume Realtek® ALC662-GR 2 speakers with housing Adjust by K/B hot-keys Video (optional) Graphics VRAM LCD Resolution CRT Output Dual View Function ATI® Radeon X1250 Graphics Share with the memory 1366 x 768 Supported LCD or CRT will be auto detected when connected...
... Port (Items listed here may vary without notice) LAN 10/100 MHz Wireless LAN Support Bluetooth Support (optional) Display LCD Type Brightness 14" 16:9 WXGA LED (Glare type) Brightness controlled by K/B hot-key & SW Webcam CMOS 1.3 Mega Pixel (optional) Audio Sound Controller Internal Speaker Sound Volume Realtek® ALC662-GR 2 speakers with housing Adjust by K/B hot-keys Video (optional) Graphics VRAM LCD Resolution CRT Output Dual View Function ATI® Radeon X1250 Graphics Share with the memory 1366 x 768 Supported LCD or CRT will be auto detected when connected...

User Manual
Page 27
For any further information about upgrade limitation, please refer to the specification in the product users purchased may cause the warranty void. It is strongly recommended to upgrade or replace any upgrade or replace service. Introductions 2-7 Software & BIOS USB Flash Boot BIOS Others Compliance Yes, USB floppy boot up DOS only Fast Boot Support --- To learn more about the product users purchased, please contact the local dealer. Do not attempt...
For any further information about upgrade limitation, please refer to the specification in the product users purchased may cause the warranty void. It is strongly recommended to upgrade or replace any upgrade or replace service. Introductions 2-7 Software & BIOS USB Flash Boot BIOS Others Compliance Yes, USB floppy boot up DOS only Fast Boot Support --- To learn more about the product users purchased, please contact the local dealer. Do not attempt...

User Manual
Page 30
... button repeatedly to enable or disable the 3G function recurrently. Š Read the icon on behalf of the function of 3G appearing on . Introductions 2-10 + ECO Engine (Power Saving) + Wireless LAN (optional) + Bluetooth (optional) + 3G (not supported) Š Press and hold the Fn button, and then press the F5 button to turn the ECO Engine function on the display to learn the function status. Š Note that the function...
... button repeatedly to enable or disable the 3G function recurrently. Š Read the icon on behalf of the function of 3G appearing on . Introductions 2-10 + ECO Engine (Power Saving) + Wireless LAN (optional) + Bluetooth (optional) + 3G (not supported) Š Press and hold the Fn button, and then press the F5 button to turn the ECO Engine function on the display to learn the function status. Š Note that the function...

User Manual
Page 34
... Connector 3. Card Reader 1. HDMI Connector 2. HDMI Connector HDMI (High Definition Multimedia Interface Support) is used to connect an external monitor or other standard VGA-compatible device (such as a projector) for a great view of the computer display. RJ-45 Connector The Ethernet connector is a new interface standard for network connection. 3. VGA Port The 15-pin D-sub VGA port allows you to connect a LAN cable for PCs, displays and consumer electronics devices that supports standard...
... Connector 3. Card Reader 1. HDMI Connector 2. HDMI Connector HDMI (High Definition Multimedia Interface Support) is used to connect an external monitor or other standard VGA-compatible device (such as a projector) for a great view of the computer display. RJ-45 Connector The Ethernet connector is a new interface standard for network connection. 3. VGA Port The 15-pin D-sub VGA port allows you to connect a LAN cable for PCs, displays and consumer electronics devices that supports standard...

User Manual
Page 47
Please contact your local dealer to buy a battery pack that is always recommended to have another battery in reserve for enough power supply. Locate the battery release 5 button on the bottom side. 34 Push and hold the release button to the battery releasing direction as shown on the bottom side. 4. Press the lock/unlock button to the unlocked position. 3. Getting Started 3-7 Releasing the Battery Pack It is compliant to your notebook. Make sure the notebook is turned off, and the AC power is disconnected. 2 2. To remove the battery pack, following the steps below: 1.
Please contact your local dealer to buy a battery pack that is always recommended to have another battery in reserve for enough power supply. Locate the battery release 5 button on the bottom side. 34 Push and hold the release button to the battery releasing direction as shown on the bottom side. 4. Press the lock/unlock button to the unlocked position. 3. Getting Started 3-7 Releasing the Battery Pack It is compliant to your notebook. Make sure the notebook is turned off, and the AC power is disconnected. 2 2. To remove the battery pack, following the steps below: 1.

User Manual
Page 50
... reach of children. Š Do not use rusty or damaged batteries. Š Dispose of time. Š Disable unnecessary settings or remove idle peripherals. Š Connect an AC adapter to temperatures above +60° C (+140° F). Š Do not temper with batteries. Conserving Battery Power Efficient battery power is not managed well, the saved data and customized settings may present a risk of fire or explosion...
... reach of children. Š Do not use rusty or damaged batteries. Š Dispose of time. Š Disable unnecessary settings or remove idle peripherals. Š Connect an AC adapter to temperatures above +60° C (+140° F). Š Do not temper with batteries. Conserving Battery Power Efficient battery power is not managed well, the saved data and customized settings may present a risk of fire or explosion...

User Manual
Page 57
... display output mode between the LCD, external monitor and both. For more information of the two keys, please refer to perform Windows-specific functions, such as opening the Start menu and launching the shortcut menu. Disable the computer's audio + function. Enable or disable the touchpad function. Decrease the built-in speaker's + volume. Increase the LCD + brightness. Getting Started 3-17 Function Keys „ Windows Keys You can find the Windows Logo key ( ) and one Application Logo key ( ) on + the system configuration). Decrease the LCD + brightness...
... display output mode between the LCD, external monitor and both. For more information of the two keys, please refer to perform Windows-specific functions, such as opening the Start menu and launching the shortcut menu. Disable the computer's audio + function. Enable or disable the touchpad function. Decrease the built-in speaker's + volume. Increase the LCD + brightness. Getting Started 3-17 Function Keys „ Windows Keys You can find the Windows Logo key ( ) and one Application Logo key ( ) on + the system configuration). Decrease the LCD + brightness...
User Manual
Page 58
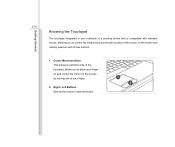
Cursor Movement Area This pressure-sensitive area of the touchpad, allows you to control the notebook by pointing the location of the cursor on the screen by moving one of your finger on and control the cursor on the screen and making selection with standard mouse, allowing you to place your finger. 2. Right / Left Buttons Acts as the mouse's right/ left button. 1 2 Getting Started 3-18 Knowing the Touchpad The touchpad integrated in your notebook is a pointing device that is compatible with its two buttons. 1.
Cursor Movement Area This pressure-sensitive area of the touchpad, allows you to control the notebook by pointing the location of the cursor on the screen by moving one of your finger on and control the cursor on the screen and making selection with standard mouse, allowing you to place your finger. 2. Right / Left Buttons Acts as the mouse's right/ left button. 1 2 Getting Started 3-18 Knowing the Touchpad The touchpad integrated in your notebook is a pointing device that is compatible with its two buttons. 1.
User Manual
Page 59
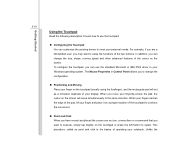
... the cursor on the screen will move your notebook. The Mouse Properties in your display. For example, if you are a left button to meet your personal needs. To configure the touchpad, you can change the configuration. „ Positioning and Moving Place your finger on the touchpad or press the left -handed user, you to swap the functions of your Windows operating system. This procedure, called...
... the cursor on the screen will move your notebook. The Mouse Properties in your display. For example, if you are a left button to meet your personal needs. To configure the touchpad, you can change the configuration. „ Positioning and Moving Place your finger on the touchpad or press the left -handed user, you to swap the functions of your Windows operating system. This procedure, called...

User Manual
Page 62
The actual external optical storage device may vary depending on the notebook allow you purchased. The devices shown in the reference figures here may come with the package of the notebook. All devices listed here are for reference only. Using the External Optical Storage Device An optional external optical storage device may be different from the devices users have. Getting Started 3-22 Connecting the External Devices The I/O (input/output) ports on the model you to connect peripheral devices.
The actual external optical storage device may vary depending on the notebook allow you purchased. The devices shown in the reference figures here may come with the package of the notebook. All devices listed here are for reference only. Using the External Optical Storage Device An optional external optical storage device may be different from the devices users have. Getting Started 3-22 Connecting the External Devices The I/O (input/output) ports on the model you to connect peripheral devices.
User Manual
Page 64
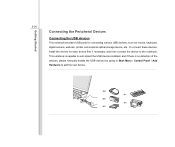
... devices, install the drivers for connecting various USB devices, such as mouse, keyboard, digital camera, webcam, printer, and external optical storage device, ete.. Getting Started 3-24 Connecting the Peripheral Devices Connecting the USB devices This notebook provides USB ports for each device first if necessary, and then connect the device to add the new device. This notebook is capable to auto detect the USB devices installed, and if there is no detection of the devices, please manually enable the USB devices by going to Start Menu / Control Panel / Add Hardware...
... devices, install the drivers for connecting various USB devices, such as mouse, keyboard, digital camera, webcam, printer, and external optical storage device, ete.. Getting Started 3-24 Connecting the Peripheral Devices Connecting the USB devices This notebook provides USB ports for each device first if necessary, and then connect the device to add the new device. This notebook is capable to auto detect the USB devices installed, and if there is no detection of the devices, please manually enable the USB devices by going to Start Menu / Control Panel / Add Hardware...

User Manual
Page 65
Getting Started 3-25 Connecting the External Display Devices This notebook provides a VGA port for a great view of the notebook display. The 15-pin D-sub VGA port allows users to connect an external monitor or other standard VGA-compatible device (such as a projector) for connecting a larger display with higher resolution.
Getting Started 3-25 Connecting the External Display Devices This notebook provides a VGA port for a great view of the notebook display. The 15-pin D-sub VGA port allows users to connect an external monitor or other standard VGA-compatible device (such as a projector) for connecting a larger display with higher resolution.

User Manual
Page 66
Getting Started 3-26 This notebook provides a HDMI port (optional) for PCs, displays and consumer electronics devices that supports standard, enhanced and high-definition video, plus multi-channel digital audio on the notebook and the external display should respond by default. HDMI (High Definition Multimedia Interface Support) is connected to the notebook, power on a single cable. If not, you can switch the display mode by configuring the settings in Display Properties of Windows operating system. Alternately, you can change the display mode by...
Getting Started 3-26 This notebook provides a HDMI port (optional) for PCs, displays and consumer electronics devices that supports standard, enhanced and high-definition video, plus multi-channel digital audio on the notebook and the external display should respond by default. HDMI (High Definition Multimedia Interface Support) is connected to the notebook, power on a single cable. If not, you can switch the display mode by configuring the settings in Display Properties of Windows operating system. Alternately, you can change the display mode by...
User Manual
Page 72
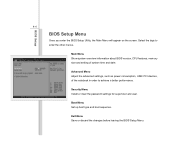
... about BIOS version, CPU features, memory size and setting of the notebook in order to enter the other menus. Advanced Menu Adjust the advanced settings, such as power consumption, USB/ PCI devices, of system time and date. Boot Menu Set up boot type and boot sequence. Security Menu Install or clear the password settings for supervisor and user. BIOS Setup 4-4 BIOS Setup Menu Once you enter the BIOS Setup Utility, the Main Menu will appear on the screen. Exit Menu Save or discard the changes before leaving the BIOS Setup Menu.
... about BIOS version, CPU features, memory size and setting of the notebook in order to enter the other menus. Advanced Menu Adjust the advanced settings, such as power consumption, USB/ PCI devices, of system time and date. Boot Menu Set up boot type and boot sequence. Security Menu Install or clear the password settings for supervisor and user. BIOS Setup 4-4 BIOS Setup Menu Once you enter the BIOS Setup Utility, the Main Menu will appear on the screen. Exit Menu Save or discard the changes before leaving the BIOS Setup Menu.

User Manual
Page 76
or allows users to use USB devices, such as mouse, keyboard, or portable disk, in DOS system; Setting options: 32, 64, 96, 128, 160, 192, 224, and 248. Š Legacy USB Support Selecting Enabled allows users to boot the system by USB device. For better PCI performance, you should set to higher values. BIOS Setup 4-8 Š PCI Latency Timer This item controls how long each PCI device can conduct transactions for a longer...
or allows users to use USB devices, such as mouse, keyboard, or portable disk, in DOS system; Setting options: 32, 64, 96, 128, 160, 192, 224, and 248. Š Legacy USB Support Selecting Enabled allows users to boot the system by USB device. For better PCI performance, you should set to higher values. BIOS Setup 4-8 Š PCI Latency Timer This item controls how long each PCI device can conduct transactions for a longer...


