
User Manual
Page 7
... equipment checked by a service personnel: w The power cord or plug is within its safety range and has been adjusted properly to the value of 100~240V before connecting the equipment to moisture. Do not cover the openings. 6. Preface Safety Instructions 1. Save this User Guide for air convection and to User's Manual. Always unplug the power cord before setting it work according to prevent the...
... equipment checked by a service personnel: w The power cord or plug is within its safety range and has been adjusted properly to the value of 100~240V before connecting the equipment to moisture. Do not cover the openings. 6. Preface Safety Instructions 1. Save this User Guide for air convection and to User's Manual. Always unplug the power cord before setting it work according to prevent the...
User Manual
Page 14
Preface Customizing this Notebook Connecting the External Devices 3-2 Connecting the Peripheral Devices 3-3 Connecting the Communication Devices 3-6 Express Card Installation 3-7 Installing the Express card 3-7 Removing the Express card 3-8 Safely Remove Hardware 3-9 BIOS Setup About BIOS Setup 4-2 When to Use BIOS Setup 4-2 How to Run BIOS Setup 4-2 Control Keys 4-3 BIOS Setup Menu 4-4 Main menu 4-5 Advanced menu 4-7 Security menu 4-8 Boot menu 4-10 Exit menu 4-11 XIV
Preface Customizing this Notebook Connecting the External Devices 3-2 Connecting the Peripheral Devices 3-3 Connecting the Communication Devices 3-6 Express Card Installation 3-7 Installing the Express card 3-7 Removing the Express card 3-8 Safely Remove Hardware 3-9 BIOS Setup About BIOS Setup 4-2 When to Use BIOS Setup 4-2 How to Run BIOS Setup 4-2 Control Keys 4-3 BIOS Setup Menu 4-4 Main menu 4-5 Advanced menu 4-7 Security menu 4-8 Boot menu 4-10 Exit menu 4-11 XIV
User Manual
Page 16
... instructs the correct procedure of this notebook. General Introductions Congratulations on becoming a new user of installing or uninstalling the battery pack, and the brief ideas on how to tell our users that if you have all the accessories of this notebook. 1-2 It is recommended to check out that this notebook. Chapter 2, Getting Started, provides the specification of this notebook, and introduces the function buttons, quick...
... instructs the correct procedure of this notebook. General Introductions Congratulations on becoming a new user of installing or uninstalling the battery pack, and the brief ideas on how to tell our users that if you have all the accessories of this notebook. 1-2 It is recommended to check out that this notebook. Chapter 2, Getting Started, provides the specification of this notebook, and introduces the function buttons, quick...
User Manual
Page 17
Chapter 4, BIOS setup, provides information on BIOS Setup program and allows you to configure the system for optimum use. 1-3 General Introductions Chapter 3, Customizing this Notebook, gives instructions not only in connecting the mouse, keyboard, webcam, printer, external monitor, IEEE 1394 devices, and communication devices, but also in installing and removing the PC card.
Chapter 4, BIOS setup, provides information on BIOS Setup program and allows you to configure the system for optimum use. 1-3 General Introductions Chapter 3, Customizing this Notebook, gives instructions not only in connecting the mouse, keyboard, webcam, printer, external monitor, IEEE 1394 devices, and communication devices, but also in installing and removing the PC card.
User Manual
Page 18
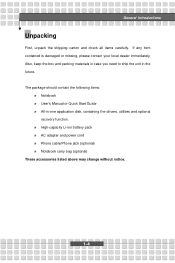
... jack (optional) w Notebook carry bag (optional) These accessories listed above may change without notice. 1-4 Also, keep the box and packing materials in case you need to ship the unit in -one application disk, containing the drivers, utilities and optional recovery function. If any item contained is damaged or missing, please contact your local dealer immediately. The package should contain the following items: w Notebook w User's Manual or Quick Start Guide...
... jack (optional) w Notebook carry bag (optional) These accessories listed above may change without notice. 1-4 Also, keep the box and packing materials in case you need to ship the unit in -one application disk, containing the drivers, utilities and optional recovery function. If any item contained is damaged or missing, please contact your local dealer immediately. The package should contain the following items: w Notebook w User's Manual or Quick Start Guide...
User Manual
Page 22
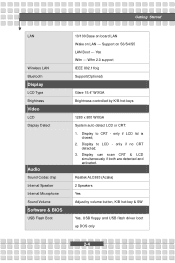
... no CRT detected; 3. Display to LCD - Display can scan CRT & LCD simultaneously if both are detected and activated. Display to CRT - Getting Started LAN Wireless LAN Bluetooth Display LCD Type Brightness Video LCD Display Detect Audio Sound Codec chip Internal Speaker Internal Microphone Sound Volume Software & BIOS USB Flash Boot 10/100 Base on board LAN Wake on S3/S4/S5 LAN Boot --- Support on LAN --- Wfm 2.0 support IEEE 802.11b/g Support(Optional) Glare 15.4" WXGA Brightness controlled by volume button, K/B hot-key & SW Yes, USB floppy and USB flash driver boot up DOS only...
... no CRT detected; 3. Display to LCD - Display can scan CRT & LCD simultaneously if both are detected and activated. Display to CRT - Getting Started LAN Wireless LAN Bluetooth Display LCD Type Brightness Video LCD Display Detect Audio Sound Codec chip Internal Speaker Internal Microphone Sound Volume Software & BIOS USB Flash Boot 10/100 Base on board LAN Wake on S3/S4/S5 LAN Boot --- Support on LAN --- Wfm 2.0 support IEEE 802.11b/g Support(Optional) Glare 15.4" WXGA Brightness controlled by volume button, K/B hot-key & SW Yes, USB floppy and USB flash driver boot up DOS only...
User Manual
Page 25
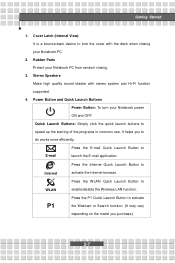
... Button to speed up the starting of the programs in common use. It helps you purchase.) 2-7 Cover Latch (Internal View) It is a bounce-back device to lock the cover with stereo system and Hi-Fi function supported. 4. E-mail Press the E-mail Quick Launch Button to do works more efficiently. Stereo Speakers Make high quality sound blaster with the deck when closing . 3. Power Button and Quick Launch Buttons Power Button: To turn your Notebook...
... Button to speed up the starting of the programs in common use. It helps you purchase.) 2-7 Cover Latch (Internal View) It is a bounce-back device to lock the cover with stereo system and Hi-Fi function supported. 4. E-mail Press the E-mail Quick Launch Button to do works more efficiently. Stereo Speakers Make high quality sound blaster with the deck when closing . 3. Power Button and Quick Launch Buttons Power Button: To turn your Notebook...
User Manual
Page 26
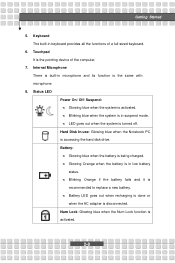
... pointing device of a full-sized keyboard. 6. Num Lock: Glowing blue when the Num Lock function is disconnected. w Battery LED goes out when recharging is done or when the AC adapter is activated. 2-8 Battery: w Glowing blue when the battery is recommended to replace a new battery. w Blinking Orange if the battery fails and it is being charged. Status LED Power On/ Off/ Suspend: w Glowing blue when the system is accessing the hard disk drive. Hard Disk In-use...
... pointing device of a full-sized keyboard. 6. Num Lock: Glowing blue when the Num Lock function is disconnected. w Battery LED goes out when recharging is done or when the AC adapter is activated. 2-8 Battery: w Glowing blue when the battery is recommended to replace a new battery. w Blinking Orange if the battery fails and it is being charged. Status LED Power On/ Off/ Suspend: w Glowing blue when the system is accessing the hard disk drive. Hard Disk In-use...
User Manual
Page 29
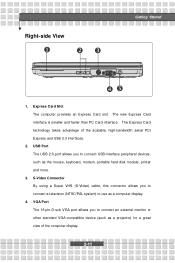
... serial PCI Express and USB 2.0 interfaces. 2. VGA Port The 15-pin-D-sub VGA port allows you to connect a television (NTSC/PAL system) to use as the mouse, keyboard, modem, portable hard disk module, printer and more. 3. The Express Card technology takes advantage of the computer display. 2-11 S-Video Connector By using a Super VHS (S-Video) cable, this connector allows you to connect USB-interface peripheral devices, such as a computer display. 4. The new Express Card...
... serial PCI Express and USB 2.0 interfaces. 2. VGA Port The 15-pin-D-sub VGA port allows you to connect a television (NTSC/PAL system) to use as the mouse, keyboard, modem, portable hard disk module, printer and more. 3. The Express Card technology takes advantage of the computer display. 2-11 S-Video Connector By using a Super VHS (S-Video) cable, this connector allows you to connect USB-interface peripheral devices, such as a computer display. 4. The new Express Card...
User Manual
Page 31
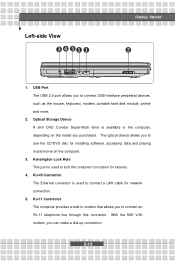
USB Port The USB 2.0 port allows you can make a dial-up connection. 2-13 RJ-45 Connector The Ethernet connector is used to lock the computer to use the CD/DVD disc for network connection. 5. Optical Storage Device A slim DVD Combo/ Super-Multi drive is used to connect a LAN cable for installing software, accessing data and playing music/movie on the model you to connect USB-interface peripheral devices, such as the mouse, keyboard, modem, portable hard disk module, printer and more. 2. The optical...
USB Port The USB 2.0 port allows you can make a dial-up connection. 2-13 RJ-45 Connector The Ethernet connector is used to lock the computer to use the CD/DVD disc for network connection. 5. Optical Storage Device A slim DVD Combo/ Super-Multi drive is used to connect a LAN cable for installing software, accessing data and playing music/movie on the model you to connect USB-interface peripheral devices, such as the mouse, keyboard, modem, portable hard disk module, printer and more. 2. The optical...
User Manual
Page 40
Keep them to conserve power. Check with your area. w Disable unneeded settings or remove idle peripherals to temperatures above +60° C (+140° F). w Do not disassemble, short-circuit or incinerate batteries or store them away from children. w Connect an AC adapter to maintain a normal operation. w Only replace the main battery pack with batteries. w Suspend system operation if the system will be idle for proper...
Keep them to conserve power. Check with your area. w Disable unneeded settings or remove idle peripherals to temperatures above +60° C (+140° F). w Do not disassemble, short-circuit or incinerate batteries or store them away from children. w Connect an AC adapter to maintain a normal operation. w Only replace the main battery pack with batteries. w Suspend system operation if the system will be idle for proper...
User Manual
Page 47
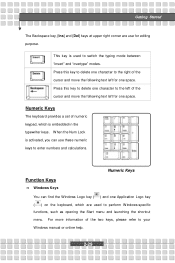
... delete one character to perform Windows-specific functions, such as opening the Start menu and launching the shortcut menu. Numeric Keys Function Keys n Windows Keys You can use for one Application Logo key ( ) on the keyboard, which is embedded in the typewriter keys. Press this key to delete one character to enter numbers and calculations. When the Num Lock is activated, you can find the Windows Logo key ( ) and one space. For more...
... delete one character to perform Windows-specific functions, such as opening the Start menu and launching the shortcut menu. Numeric Keys Function Keys n Windows Keys You can use for one Application Logo key ( ) on the keyboard, which is embedded in the typewriter keys. Press this key to delete one character to enter numbers and calculations. When the Num Lock is activated, you can find the Windows Logo key ( ) and one space. For more...
User Manual
Page 48
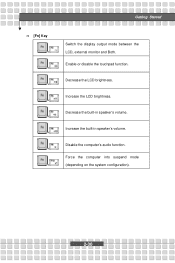
Force the computer into suspend mode (depending on the system configuration). 2-30 Decrease the built-in speaker's volume. Decrease the LCD brightness. Disable the computer's audio function. Enable or disable the touchpad function. Increase the built-in speaker's volume. Getting Started n [Fn] Key Switch the display output mode between the LCD, external monitor and Both. Increase the LCD brightness.
Force the computer into suspend mode (depending on the system configuration). 2-30 Decrease the built-in speaker's volume. Decrease the LCD brightness. Disable the computer's audio function. Enable or disable the touchpad function. Increase the built-in speaker's volume. Getting Started n [Fn] Key Switch the display output mode between the LCD, external monitor and Both. Increase the LCD brightness.
User Manual
Page 52
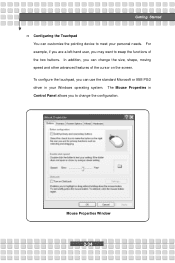
Getting Started n Configuring the Touchpad You can customize the pointing device to meet your Windows operating system. For example, if you are a left-hand user, you may want to change the size, shape, moving speed and other advanced features of the two buttons. To configure the touchpad, you to swap the functions of the cursor on the screen. In addition, you can use the standard Microsoft or IBM PS/2 driver in Control Panel allows you can change the configuration. The Mouse Properties in your personal needs. Mouse Properties Window 2-34
Getting Started n Configuring the Touchpad You can customize the pointing device to meet your Windows operating system. For example, if you are a left-hand user, you may want to change the size, shape, moving speed and other advanced features of the two buttons. To configure the touchpad, you to swap the functions of the cursor on the screen. In addition, you can use the standard Microsoft or IBM PS/2 driver in Control Panel allows you can change the configuration. The Mouse Properties in your personal needs. Mouse Properties Window 2-34
User Manual
Page 58
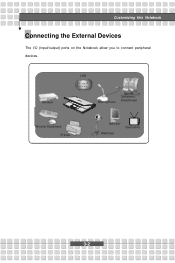
Customizing this Notebook Connecting the External Devices The I/O (input/output) ports on the Notebook allow you to connect peripheral devices. LAN Modem Microphone Speakers/ Earphones Mouse/ Keyboard Printer Monitor WebCam Television 3-2
Customizing this Notebook Connecting the External Devices The I/O (input/output) ports on the Notebook allow you to connect peripheral devices. LAN Modem Microphone Speakers/ Earphones Mouse/ Keyboard Printer Monitor WebCam Television 3-2
User Manual
Page 59
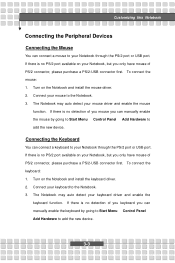
... to Start Menu à Control Panel à Add Hardware to add the new device. Turn on the Notebook and install the mouse driver. 2. The Notebook may auto detect your mouse driver and enable the mouse function. The Notebook may auto detect your keyboard driver and enable the keyboard function. If there is no PS/2 port available on your Notebook, but you only have mouse of PS/2 connector, please purchase a PS/2-USB connector first. Turn on the Notebook and install the keyboard driver. 2. Connect your mouse...
... to Start Menu à Control Panel à Add Hardware to add the new device. Turn on the Notebook and install the mouse driver. 2. The Notebook may auto detect your mouse driver and enable the mouse function. The Notebook may auto detect your keyboard driver and enable the keyboard function. If there is no PS/2 port available on your Notebook, but you only have mouse of PS/2 connector, please purchase a PS/2-USB connector first. Turn on the Notebook and install the keyboard driver. 2. Connect your mouse...
User Manual
Page 60
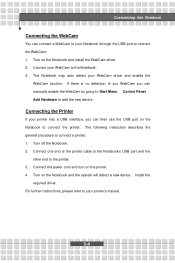
... this Notebook Connecting the WebCam You can connect a WebCam to your Notebook through the USB port to the Notebook. 3. Connect your WebCam to connect the WebCam: 1. Connect one end of you WebCam you can then use the USB port on the Notebook and install the WebCam driver. 2. Connect the power cord and turn on the Notebook and the system will detect a new device. The Notebook may auto detect your printer has a USB interface, you can manually enable the WebCam by going to Start Menu à Control Panel...
... this Notebook Connecting the WebCam You can connect a WebCam to your Notebook through the USB port to the Notebook. 3. Connect your WebCam to connect the WebCam: 1. Connect one end of you WebCam you can then use the USB port on the Notebook and install the WebCam driver. 2. Connect the power cord and turn on the Notebook and the system will detect a new device. The Notebook may auto detect your printer has a USB interface, you can manually enable the WebCam by going to Start Menu à Control Panel...
User Manual
Page 61
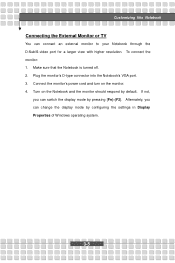
Make sure that the Notebook is turned off. 2. Connect the monitor's power cord and turn on the Notebook and the monitor should respond by default. Turn on the monitor. 4. If not, you can switch the display mode by configuring the settings in Display Properties of Windows operating system. 3-5 Plug the monitor's D-type connector into the Notebook's VGA port. 3. Alternately, you can change the display mode by pressing [Fn]+[F2]. To connect the monitor: 1. Customizing this Notebook Connecting the External Monitor or TV You can...
Make sure that the Notebook is turned off. 2. Connect the monitor's power cord and turn on the Notebook and the monitor should respond by default. Turn on the monitor. 4. If not, you can switch the display mode by configuring the settings in Display Properties of Windows operating system. 3-5 Plug the monitor's D-type connector into the Notebook's VGA port. 3. Alternately, you can change the display mode by pressing [Fn]+[F2]. To connect the monitor: 1. Customizing this Notebook Connecting the External Monitor or TV You can...
User Manual
Page 62
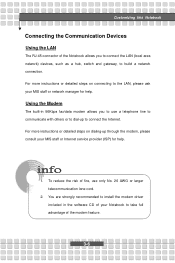
... the software CD of your MIS staff or Internet service provider (ISP) for help . 1. You are strongly recommended to install the modem driver included in 56Kbps fax/data modem allows you to connect the LAN (local area network) devices, such as a hub, switch and gateway, to build a network connection. For more instructions or detailed steps on dialing-up to connect the Internet. For more instructions or...
... the software CD of your MIS staff or Internet service provider (ISP) for help . 1. You are strongly recommended to install the modem driver included in 56Kbps fax/data modem allows you to connect the LAN (local area network) devices, such as a hub, switch and gateway, to build a network connection. For more instructions or detailed steps on dialing-up to connect the Internet. For more instructions or...
User Manual
Page 74
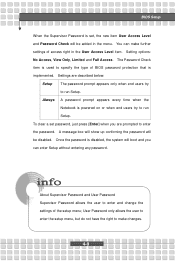
... run Setup. User Password only allows the user to enter the setup menu, but do not have the right to make further settings of BIOS password protection that is implemented. You can enter Setup without entering any password. To clear a set , the new item User Access Level and Password Check will be disabled. BIOS Setup When the Supervisor Password is set password, just press [Enter] when you can make changes. 4-9 About Supervisor Password and User Password Supervisor Password allows the user to specify the type of access...
... run Setup. User Password only allows the user to enter the setup menu, but do not have the right to make further settings of BIOS password protection that is implemented. You can enter Setup without entering any password. To clear a set , the new item User Access Level and Password Check will be disabled. BIOS Setup When the Supervisor Password is set password, just press [Enter] when you can make changes. 4-9 About Supervisor Password and User Password Supervisor Password allows the user to specify the type of access...


