
User Manual
Page 3
... Rear Side View...2-18 Bottom Side View ...2-20 Getting Started Power Management ...3-2 AC Adapter ...3-2 Battery Pack ...3-4 Using the Battery Pack...3-7 Basic Operations ...3-9 Safety and Comfort Tips...3-9 Having a Good Work Habit...3-10 Knowing the Keyboard ...3-11 Knowing the Touchpad ...3-15 About Hard Disk Drive...3-18 Using the Optical Storage Device 3-19 Connecting the External Devices 3-22 Connecting the Peripheral Devices 3-22 Connecting the Communication Devices 3-26 Express Card Installation...3-28 Removing the Express card 3-28 Installing the Express card ...3-28
... Rear Side View...2-18 Bottom Side View ...2-20 Getting Started Power Management ...3-2 AC Adapter ...3-2 Battery Pack ...3-4 Using the Battery Pack...3-7 Basic Operations ...3-9 Safety and Comfort Tips...3-9 Having a Good Work Habit...3-10 Knowing the Keyboard ...3-11 Knowing the Touchpad ...3-15 About Hard Disk Drive...3-18 Using the Optical Storage Device 3-19 Connecting the External Devices 3-22 Connecting the Peripheral Devices 3-22 Connecting the Communication Devices 3-26 Express Card Installation...3-28 Removing the Express card 3-28 Installing the Express card ...3-28

User Manual
Page 8
... exposed to moisture. Š The equipment has not worked well or you can not get the equipment checked by the manufacturer only. To prevent explosion caused by improper battery replacement, use the same or equivalent type of battery recommended by a service personnel: Š The power cord or plug is reliable connected to User's Manual. Š The equipment was dropped and damaged...
... exposed to moisture. Š The equipment has not worked well or you can not get the equipment checked by the manufacturer only. To prevent explosion caused by improper battery replacement, use the same or equivalent type of battery recommended by a service personnel: Š The power cord or plug is reliable connected to User's Manual. Š The equipment was dropped and damaged...
User Manual
Page 23
Manual Map This User's Manual provides instructions and illustrations on how to read this manual carefully before using this notebook. Chapter 2, Introductions, includes the descriptions of all the accessories included when you a delightful and professional experience in using keyboard, touchpad, hard disk drive, and optical storage drive. Beside, the steps of this notebook. This brand-new exquisite notebook will give you open the packing box. We are also provided...
Manual Map This User's Manual provides instructions and illustrations on how to read this manual carefully before using this notebook. Chapter 2, Introductions, includes the descriptions of all the accessories included when you a delightful and professional experience in using keyboard, touchpad, hard disk drive, and optical storage drive. Beside, the steps of this notebook. This brand-new exquisite notebook will give you open the packing box. We are also provided...
User Manual
Page 24
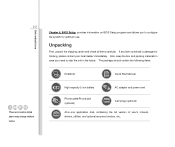
... on BIOS Setup program and allows you need to configure the system for optimum use. The package should contain the following items: Notebook Quick Start Manual High-capacity Li-ion battery AC adapter and power cord Phone cable/Phone jack (optional) Carry bag (optional) All-in the future. If any item contained is damaged or missing, please contact your local dealer immediately. 2-3 These accessories listed above may change...
... on BIOS Setup program and allows you need to configure the system for optimum use. The package should contain the following items: Notebook Quick Start Manual High-capacity Li-ion battery AC adapter and power cord Phone cable/Phone jack (optional) Carry bag (optional) All-in the future. If any item contained is damaged or missing, please contact your local dealer immediately. 2-3 These accessories listed above may change...
User Manual
Page 31
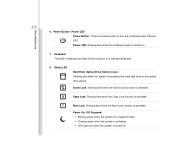
Power LED: Glowing blue when the notebook power is activated. Scroll Lock: Glowing blue when the Scroll Lock function is turned on. 7. Num Lock: Glowing blue when the Num Lock function is activated. Caps Lock: Glowing blue when the Caps Lock function is activated. Power Button / Power LED Power Button:Press the power button to turn the notebook power ON and OFF. Status LED Hard Disk/ Optical Drive Device In-use: Glowing blue when the system is turned off. Keyboard The built-in suspend mode. Š Glowing green when...
Power LED: Glowing blue when the notebook power is activated. Scroll Lock: Glowing blue when the Scroll Lock function is turned on. 7. Num Lock: Glowing blue when the Num Lock function is activated. Caps Lock: Glowing blue when the Caps Lock function is activated. Power Button / Power LED Power Button:Press the power button to turn the notebook power ON and OFF. Status LED Hard Disk/ Optical Drive Device In-use: Glowing blue when the system is turned off. Keyboard The built-in suspend mode. Š Glowing green when...
User Manual
Page 32
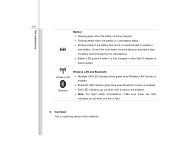
... purchasing an equivalent type of the notebook. Wireless LAN Bluetooth Wireless LAN and Bluetooth: Š Wireless LAN LED indicator blinks green when Wireless LAN function is enabled. Š Bluetooth LED indicator glows blue when Bluetooth function is enabled. Š Both LED indicators go out when both functions are disabled. Š Note: For flight safety consideration, make sure these two LED indicators go out when you are in low battery status. Š Blinking amber if the battery fails and it is fully charged or when...
... purchasing an equivalent type of the notebook. Wireless LAN Bluetooth Wireless LAN and Bluetooth: Š Wireless LAN LED indicator blinks green when Wireless LAN function is enabled. Š Bluetooth LED indicator glows blue when Bluetooth function is enabled. Š Both LED indicators go out when both functions are disabled. Š Note: For flight safety consideration, make sure these two LED indicators go out when you are in low battery status. Š Blinking amber if the battery fails and it is fully charged or when...
User Manual
Page 35
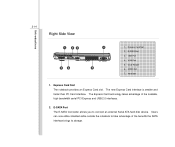
... new Express Card interface is smaller and faster than PC Card interface. The Express Card technology takes advantage of the benefits the SATA interface brings to storage. E-SATA Port The E-SATA Connector allows you to take advantage of the scalable, high-bandwidth serial PCI Express and USB 2.0 interfaces. 2. Card Reader 6. Express Card Slot 2. USB Port 4. Users can now utilize shielded cable outside the notebook to connect an external Serial ATA hard disk device...
... new Express Card interface is smaller and faster than PC Card interface. The Express Card technology takes advantage of the benefits the SATA interface brings to storage. E-SATA Port The E-SATA Connector allows you to take advantage of the scalable, high-bandwidth serial PCI Express and USB 2.0 interfaces. 2. Card Reader 6. Express Card Slot 2. USB Port 4. Users can now utilize shielded cable outside the notebook to connect an external Serial ATA hard disk device...
User Manual
Page 36
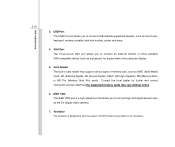
... cool the system. Card Reader The built-in card reader may vary without notice. 6. USB Port The USB 2.0 port allows you to connect USB-interface peripheral devices, such as the DV (digital video camera). 7. Ventilator The ventilator is a high-speed bus that the supported memory cards may support various types of the computer display. 5. DO NOT block the ventilator for a great view of memory card, such as MMC (Multi-Media Card), XD (eXtreme...
... cool the system. Card Reader The built-in card reader may vary without notice. 6. USB Port The USB 2.0 port allows you to connect USB-interface peripheral devices, such as the DV (digital video camera). 7. Ventilator The ventilator is a high-speed bus that the supported memory cards may support various types of the computer display. 5. DO NOT block the ventilator for a great view of memory card, such as MMC (Multi-Media Card), XD (eXtreme...
User Manual
Page 37
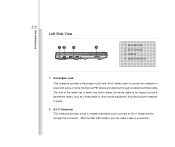
... 3 4 1. Kensington Lock 2. USB Port 4. Optical Device Drive 1. RJ-11 Connector This notebook provides a built-in place. 2. With the 56K V.90 modem, you to be looped around a permanent object, such as a heavy table or other similar equipment, thus securing the notebook in modem that allows you can make a dial-up connection. RJ-11 Connector 3. Kensington Lock This notebook provides a Kensington Lock hole, which...
... 3 4 1. Kensington Lock 2. USB Port 4. Optical Device Drive 1. RJ-11 Connector This notebook provides a built-in place. 2. With the 56K V.90 modem, you to be looped around a permanent object, such as a heavy table or other similar equipment, thus securing the notebook in modem that allows you can make a dial-up connection. RJ-11 Connector 3. Kensington Lock This notebook provides a Kensington Lock hole, which...
User Manual
Page 38
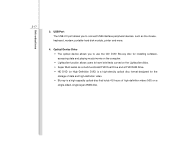
... the Lightscribe disks. Š Super Multi works as the mouse, keyboard, modem, portable hard disk module, printer and more. 4. USB Port The USB 2.0 port allows you to use the CD/ DVD/ Blu-ray disc for installing software, accessing data and playing music/movie on the computer. Š Lightscribe function allows users to connect USB-interface peripheral devices, such as a multi-functional DVD Dual Drive and a DVD RAM Drive. Š HD DVD (or High-Definition DVD) is a high-density optical disc format designed...
... the Lightscribe disks. Š Super Multi works as the mouse, keyboard, modem, portable hard disk module, printer and more. 4. USB Port The USB 2.0 port allows you to use the CD/ DVD/ Blu-ray disc for installing software, accessing data and playing music/movie on the computer. Š Lightscribe function allows users to connect USB-interface peripheral devices, such as a multi-functional DVD Dual Drive and a DVD RAM Drive. Š HD DVD (or High-Definition DVD) is a high-density optical disc format designed...
User Manual
Page 39
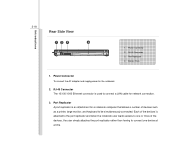
... be simultaneously connected. Battery Pack 1. Port Replicator 4. Port Replicator A port replicator is used to connect a LAN cable for network connection. 3. RJ-45 Connector The 10/100/1000 Ethernet connector is an attachment for the notebook. 2. RJ-45 Connector 3. Introductions 2-18 Rear Side View 12 3 4 1. Power Connector To connect the AC adapter and supply power for a notebook computer that allows a number of devices such as a printer, large monitor, and keyboard to connect one...
... be simultaneously connected. Battery Pack 1. Port Replicator 4. Port Replicator A port replicator is used to connect a LAN cable for network connection. 3. RJ-45 Connector The 10/100/1000 Ethernet connector is an attachment for the notebook. 2. RJ-45 Connector 3. Introductions 2-18 Rear Side View 12 3 4 1. Power Connector To connect the AC adapter and supply power for a notebook computer that allows a number of devices such as a printer, large monitor, and keyboard to connect one...

User Manual
Page 49
.... Š Disable unnecessary settings or remove idle peripherals. Š Connect an AC adapter to the system whenever possible. Getting Started 3-7 Using the Battery Pack Battery Safety Tips Replacing or handling the battery incorrectly may be using it for proper disposal in your local solid waste officials for details about recycling options or for a period of batteries according to local regulations. If the battery power is critical...
.... Š Disable unnecessary settings or remove idle peripherals. Š Connect an AC adapter to the system whenever possible. Getting Started 3-7 Using the Battery Pack Battery Safety Tips Replacing or handling the battery incorrectly may be using it for proper disposal in your local solid waste officials for details about recycling options or for a period of batteries according to local regulations. If the battery power is critical...
User Manual
Page 56
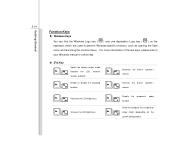
... the keyboard, which are used to your Windows manual or online help. „ [Fn] Key + + Switch the display output mode between the LCD, external monitor and both. Getting Started 3-14 Function Keys „ Windows Keys You can find the Windows Logo key ( ) and one Application Logo key ( ) on the + system configuration). For more information of the two keys, please refer to perform Windows-specific functions, such as opening the Start menu and launching the shortcut menu. Enable or disable the touchpad function.
... the keyboard, which are used to your Windows manual or online help. „ [Fn] Key + + Switch the display output mode between the LCD, external monitor and both. Getting Started 3-14 Function Keys „ Windows Keys You can find the Windows Logo key ( ) and one Application Logo key ( ) on the + system configuration). For more information of the two keys, please refer to perform Windows-specific functions, such as opening the Start menu and launching the shortcut menu. Enable or disable the touchpad function.
User Manual
Page 58
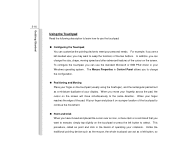
... you want to swap the functions of your display. Getting Started 3-16 Using the Touchpad Read the following description to learn how to use the touchpad: „ Configuring the Touchpad You can use the standard Microsoft or IBM PS/2 driver in Control Panel allows you to select. For example, if you are a left-handed user, you can customize the pointing device to execute, simply tap...
... you want to swap the functions of your display. Getting Started 3-16 Using the Touchpad Read the following description to learn how to use the touchpad: „ Configuring the Touchpad You can use the standard Microsoft or IBM PS/2 driver in Control Panel allows you to select. For example, if you are a left-handed user, you can customize the pointing device to execute, simply tap...
User Manual
Page 64
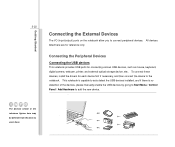
... mouse, keyboard, digital camera, webcam, printer, and external optical storage device, ete.. Connecting the Peripheral Devices Connecting the USB devices This notebook provides USB ports for each device first if necessary, and then connect the device to the notebook. All devices listed here are for reference only. This notebook is capable to auto detect the USB devices installed, and if there is no detection of the devices, please manually enable the USB devices by going to Start Menu / Control Panel / Add Hardware to connect peripheral devices...
... mouse, keyboard, digital camera, webcam, printer, and external optical storage device, ete.. Connecting the Peripheral Devices Connecting the USB devices This notebook provides USB ports for each device first if necessary, and then connect the device to the notebook. All devices listed here are for reference only. This notebook is capable to auto detect the USB devices installed, and if there is no detection of the devices, please manually enable the USB devices by going to Start Menu / Control Panel / Add Hardware to connect peripheral devices...
User Manual
Page 65
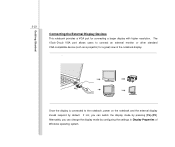
...) for connecting a larger display with higher resolution. The 15-pin-D-sub VGA port allows users to the notebook, power on the notebook and the external display should respond by default. If not, you can switch the display mode by configuring the settings in Display Properties of the notebook display. Alternately, you can change the display mode by pressing [Fn]+[F2]. Getting Started 3-23 Connecting the External Display Devices This notebook provides a VGA port for a great view of Windows operating system.
...) for connecting a larger display with higher resolution. The 15-pin-D-sub VGA port allows users to the notebook, power on the notebook and the external display should respond by default. If not, you can switch the display mode by configuring the settings in Display Properties of the notebook display. Alternately, you can change the display mode by pressing [Fn]+[F2]. Getting Started 3-23 Connecting the External Display Devices This notebook provides a VGA port for a great view of Windows operating system.

User Manual
Page 69
It is strongly recommended to install the modem driver included in Bluetooth function) allows you to use only No. 26 AWG or larger telecommunication line cord. To reduce the risk of the modem feature. Getting Started 3-27 Using the Modem or Combo Modem The built-in 56Kbps fax/data...to dial-up through the modem, please consult your notebook to take full advantage of fire, use a telephone line to communicate with built-in the software disk of your MIS staff or Internet service provider (ISP) for help. For more instructions or detailed steps on dialing-up to connect the Internet.
It is strongly recommended to install the modem driver included in Bluetooth function) allows you to use only No. 26 AWG or larger telecommunication line cord. To reduce the risk of the modem feature. Getting Started 3-27 Using the Modem or Combo Modem The built-in 56Kbps fax/data...to dial-up through the modem, please consult your notebook to take full advantage of fire, use a telephone line to communicate with built-in the software disk of your MIS staff or Internet service provider (ISP) for help. For more instructions or detailed steps on dialing-up to connect the Internet.
User Manual
Page 79
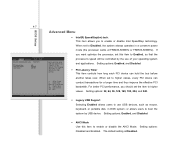
.... BIOS Setup 4-7 Advanced Menu Š Intel(R) SpeedStep(tm) tech. When set to enable or disable the AHCI Mode. If you want optimize the processor, set the item to enable or disable Intel SpeedStep technology. Setting options: 32, 64, 96, 128, 160, 192, 224, and 248. Š Legacy USB Support Selecting Enabled allows users to boot the system by the use USB devices, such as mouse, keyboard, or portable disk, in a conserve power mode (the processor works...
.... BIOS Setup 4-7 Advanced Menu Š Intel(R) SpeedStep(tm) tech. When set to enable or disable the AHCI Mode. If you want optimize the processor, set the item to enable or disable Intel SpeedStep technology. Setting options: 32, 64, 96, 128, 160, 192, 224, and 248. Š Legacy USB Support Selecting Enabled allows users to boot the system by the use USB devices, such as mouse, keyboard, or portable disk, in a conserve power mode (the processor works...
User Manual
Page 80
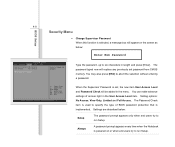
BIOS Setup 4-8 Security Menu Š Change Supervisor Password When this function is selected, a message box will be added in the menu. When the Supervisor Password is used to specify the type of access right in length and press [Enter]. Setting options: No Access, View Only, Limited and Full Access. You may also press [ESC] to run Setup. The Password Check item is set password from CMOS memory. Settings are described below : Enter New Password Type the password, up to...
BIOS Setup 4-8 Security Menu Š Change Supervisor Password When this function is selected, a message box will be added in the menu. When the Supervisor Password is used to specify the type of access right in length and press [Enter]. Setting options: No Access, View Only, Limited and Full Access. You may also press [ESC] to run Setup. The Password Check item is set password from CMOS memory. Settings are described below : Enter New Password Type the password, up to...

User Manual
Page 81
User Password only allows the user to enter the setup menu, but do not have the right to enter and change the settings of the setup menu; Supervisor Password allows the user to make changes. BIOS Setup 4-9 To clear a set password, just press [Enter] when you can enter Setup without entering any password. A message box will show up confirming the password will boot and you are prompted to enter the password. Once the password is disabled, the system will be disabled.
User Password only allows the user to enter the setup menu, but do not have the right to enter and change the settings of the setup menu; Supervisor Password allows the user to make changes. BIOS Setup 4-9 To clear a set password, just press [Enter] when you can enter Setup without entering any password. A message box will show up confirming the password will boot and you are prompted to enter the password. Once the password is disabled, the system will be disabled.

