User Guide
Page 2
... First release for P7N SLI Date March 2008 Technical Support If a problem arises with your system and no guarantee is a registered trademark of NVIDIA Corporation in the preparation of this document is the intellectual property of Intel Corporation. Visit the MSI website for further... guidance. func=faqIndex Contact our technical staff at: http://support.msi.com.tw/ ii NVIDIA, the NVIDIA logo, DualNet, and nForce are registered trademarks of purchase or local distributor. Award®...
... First release for P7N SLI Date March 2008 Technical Support If a problem arises with your system and no guarantee is a registered trademark of NVIDIA Corporation in the preparation of this document is the intellectual property of Intel Corporation. Visit the MSI website for further... guidance. func=faqIndex Contact our technical staff at: http://support.msi.com.tw/ ii NVIDIA, the NVIDIA logo, DualNet, and nForce are registered trademarks of purchase or local distributor. Award®...
User Guide
Page 11
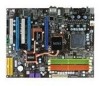
North Bridge: nVidia® nForce 750i SLI (C72P) - c om . Supports 10/100/1000 Fast Ethernet by VIA VT 6308P - Up to 4 IDE devices SATA - 4 SATAII ports by nForce 430i - Supports up to 7.1 Channel audio-out - m s i. Chip integrated by Realtek® RTL8211BL IEEE 1394 (optional) - t w / i ...IDE ports by Realtek ALC888 - Supports transfer rate up to 3 Gb/s 1-2 Supports Intel® EIST Technology - Chip integrated by nForce 430i - South Bridge: nVidia® nForce 430i (MCP51) Memory Support - DDR2 533/ 667/ 800 SDRAM (240pin, 1.8V) - 4 DDR2 DIMMs (8GB Max) (...
North Bridge: nVidia® nForce 750i SLI (C72P) - c om . Supports 10/100/1000 Fast Ethernet by VIA VT 6308P - Up to 4 IDE devices SATA - 4 SATAII ports by nForce 430i - Supports up to 7.1 Channel audio-out - m s i. Chip integrated by Realtek® RTL8211BL IEEE 1394 (optional) - t w / i ...IDE ports by Realtek ALC888 - Supports transfer rate up to 3 Gb/s 1-2 Supports Intel® EIST Technology - Chip integrated by nForce 430i - South Bridge: nVidia® nForce 430i (MCP51) Memory Support - DDR2 533/ 667/ 800 SDRAM (240pin, 1.8V) - 4 DDR2 DIMMs (8GB Max) (...

User Guide
Page 87
...bios section for details.) 2. Define a New Array window will reboot right away. The default RAID M ode is set to Optimal. nVidia RAID RAID Configuration Basic Configuration Instructions The following are the basic steps for details.) 4. Bootable RAID Array 1. Then enter the RAID BIOS... described below to set to Mirroring and Striping Block is set up the NVRAID BIOS. B-3 Enter the W indows OS, run the W indows nForce Setup application and install the RAID software. (Check B-9 for configuring NVRAID: Non-Bootable RAID Array 1. Specify the RAID level, either Mirroring (RAID...
...bios section for details.) 2. Define a New Array window will reboot right away. The default RAID M ode is set to Optimal. nVidia RAID RAID Configuration Basic Configuration Instructions The following are the basic steps for details.) 4. Bootable RAID Array 1. Then enter the RAID BIOS... described below to set to Mirroring and Striping Block is set up the NVRAID BIOS. B-3 Enter the W indows OS, run the W indows nForce Setup application and install the RAID software. (Check B-9 for configuring NVRAID: Non-Bootable RAID Array 1. Specify the RAID level, either Mirroring (RAID...
User Guide
Page 91
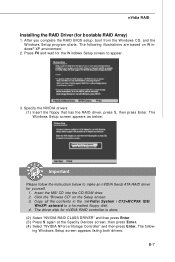
Insert the MSI CD into the CD-ROM drive. 2. Click the "Browse CD" on W indows® XP environment. 2. The follow the instruction below to a formatted floppy disk. 4. Specify the NVIDIA drivers: (1) Insert the floppy that has the RAID driver, press S, then press Enter. The .... (3) Press S again at the Specify Devices screen, then press Enter. (4) Select "NVIDIA NForce Storage Controller" and then press Enter. The W indows Setup screen appears as below: Important Please follow - nVidia RAID Installing the RAID Driver (for yourself. 1. After you complete the RAID BIOS setup,...
Insert the MSI CD into the CD-ROM drive. 2. Click the "Browse CD" on W indows® XP environment. 2. The follow the instruction below to a formatted floppy disk. 4. Specify the NVIDIA drivers: (1) Insert the floppy that has the RAID driver, press S, then press Enter. The .... (3) Press S again at the Specify Devices screen, then press Enter. (4) Select "NVIDIA NForce Storage Controller" and then press Enter. The W indows Setup screen appears as below: Important Please follow - nVidia RAID Installing the RAID Driver (for yourself. 1. After you complete the RAID BIOS setup,...

User Guide
Page 93
... install. B-9 After the installation is selected. Make sure that you do not install the NVIDIA IDE driver, NVIDIA RAID will upgrade the W indows IDE driver and install the RAID software. 1. Start the NVIDIA nForce Drivers installation program to use the NVIDIA IDE Parallel ATA driver (as well as the NV Serial ATA driver if SATA...
... install. B-9 After the installation is selected. Make sure that you do not install the NVIDIA IDE driver, NVIDIA RAID will upgrade the W indows IDE driver and install the RAID software. 1. Start the NVIDIA nForce Drivers installation program to use the NVIDIA IDE Parallel ATA driver (as well as the NV Serial ATA driver if SATA...
