User Guide
Page 9
Appendix B nVidia RAID B-1 Introduction ...B-2 RAID Configuration B-3 NVIDIA RAID Utility Installation B-9 RAID Drives Management B-12 Appendix C nVidia System Driver C-1 nVidia System Driver Installation C-2 nVidia Utility Installation C-5 Appendix D Dual Core Center D-1 Activating Dual Core Center D-2 Main ...D-3 DOT(Dynamic Over Clocking D-5 Clock ...D-6 Voltage ...D-7 FAN Speed ...D-8 Temperature ...D-9 User Profile ...D-10 ix
Appendix B nVidia RAID B-1 Introduction ...B-2 RAID Configuration B-3 NVIDIA RAID Utility Installation B-9 RAID Drives Management B-12 Appendix C nVidia System Driver C-1 nVidia System Driver Installation C-2 nVidia Utility Installation C-5 Appendix D Dual Core Center D-1 Activating Dual Core Center D-2 Main ...D-3 DOT(Dynamic Over Clocking D-5 Clock ...D-6 Voltage ...D-7 FAN Speed ...D-8 Temperature ...D-9 User Profile ...D-10 ix
User Guide
Page 11
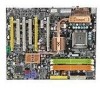
...VIA® VT6308P - Up to 400Mbps Creative SB X-Fi Xtreme H/W Audio - 24-bit / 96KHz audio quality - 100dB SNR clarity - SATA6~7 support RAID 0 or RAID 1 mode - DDR2 533/667/800 SDRAM (8GB Max) - 4 DDR2 DIMMs (240pin / 1.8V) (For more inform ation on the nVIDIA®... Supports Daul 10/100/1000 Fast Ethernet by Sil4723 - Supports Hyper-Threading (HT) Technology (For the latest information about CPU, please visit http://www.msi. South Bridge: nVIDIA® NF590i SLI (MCP55XE) chipset Memory Support - North Bridge: nVIDIA® NF680i SLI (C55XE) chipset - Supports up to ...
...VIA® VT6308P - Up to 400Mbps Creative SB X-Fi Xtreme H/W Audio - 24-bit / 96KHz audio quality - 100dB SNR clarity - SATA6~7 support RAID 0 or RAID 1 mode - DDR2 533/667/800 SDRAM (8GB Max) - 4 DDR2 DIMMs (240pin / 1.8V) (For more inform ation on the nVIDIA®... Supports Daul 10/100/1000 Fast Ethernet by Sil4723 - Supports Hyper-Threading (HT) Technology (For the latest information about CPU, please visit http://www.msi. South Bridge: nVIDIA® NF590i SLI (MCP55XE) chipset Memory Support - North Bridge: nVIDIA® NF680i SLI (C55XE) chipset - Supports up to ...

User Guide
Page 12
... to install only one PCIE x16 graphics card, please intall it on PCIE_1 or PCIE_4 slot to operate full PCIE x16 speed for graphics card. ATX (30.5cm X 24.5cm) Mounting - 9 mounting holes 1-3 Supports 1 FDD with 360KB, 720KB, 1.2MB, 1.44MB and 2.88MB Connectors Back Panel... - 1 D-Bracket 2 pinheader - 1 IEEE 1394 pinheader - 1 Serial Port pinheader - 1 SPDIF pinheader (for HDMI VGA Card) - 1 Front Panel Audio pinheader - 2 hardware RAID Switch pinheaders Slots - 4 PCI Express x16 slots a.4 PCIE x16 slots support the latest Quad SLI * Quad SLI Mode: PCIE x16 lanes will auto arrange from...
... to install only one PCIE x16 graphics card, please intall it on PCIE_1 or PCIE_4 slot to operate full PCIE x16 speed for graphics card. ATX (30.5cm X 24.5cm) Mounting - 9 mounting holes 1-3 Supports 1 FDD with 360KB, 720KB, 1.2MB, 1.44MB and 2.88MB Connectors Back Panel... - 1 D-Bracket 2 pinheader - 1 IEEE 1394 pinheader - 1 Serial Port pinheader - 1 SPDIF pinheader (for HDMI VGA Card) - 1 Front Panel Audio pinheader - 2 hardware RAID Switch pinheaders Slots - 4 PCI Express x16 slots a.4 PCIE x16 slots support the latest Quad SLI * Quad SLI Mode: PCIE x16 lanes will auto arrange from...
User Guide
Page 28
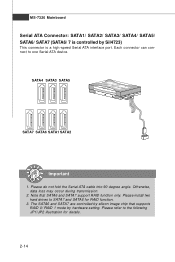
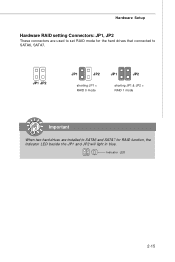
SATA4 SATA3 SATA5 SATA7 SATA6 SATA1 SATA2 Important 1. The SATA6 and SATA7 are controlled by silicon image chip that SATA6 and SATA7 support RAID function only. Please do not fold the Serial ATA cable into 90-degree angle. Otherwise, data loss may occur during transmission. 2. ...Please refer to the following JP1/JP2 illustration for RAID function. 3. Please install two hard drives to one Serial ATA device. MS-7320 Mainboard Serial ATA Connector: SATA1/ SATA2/ SATA3/ SATA4/ SATA5/ ...
SATA4 SATA3 SATA5 SATA7 SATA6 SATA1 SATA2 Important 1. The SATA6 and SATA7 are controlled by silicon image chip that SATA6 and SATA7 support RAID function only. Please do not fold the Serial ATA cable into 90-degree angle. Otherwise, data loss may occur during transmission. 2. ...Please refer to the following JP1/JP2 illustration for RAID function. 3. Please install two hard drives to one Serial ATA device. MS-7320 Mainboard Serial ATA Connector: SATA1/ SATA2/ SATA3/ SATA4/ SATA5/ ...
User Guide
Page 29
JP1 JP2 JP1 JP2 shorting JP1 = RAID 0 mode JP1 JP2 shorting JP1 & JP2 = RAID 1 mode Important When two hard drives are used to SATA6, SATA7. Indicator LED 2-15 Hardware Setup Hardware RAID setting Connectors: JP1, JP2 These connectors are installed to SATA6 and SATA7 for the hard drives that connected to set RAID mode for RAID function, the indicator LED beside the JP1 and JP2 will light in blue.
JP1 JP2 JP1 JP2 shorting JP1 = RAID 0 mode JP1 JP2 shorting JP1 & JP2 = RAID 1 mode Important When two hard drives are used to SATA6, SATA7. Indicator LED 2-15 Hardware Setup Hardware RAID setting Connectors: JP1, JP2 These connectors are installed to SATA6 and SATA7 for the hard drives that connected to set RAID mode for RAID function, the indicator LED beside the JP1 and JP2 will light in blue.
User Guide
Page 52
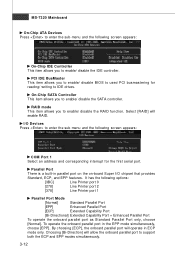
... following screen appears: On-Chip IDE Controller This item allows you to enable/ disable BIOS to used PCI busmastering for the first serial port. Select [RAID] will allow the onboard parallel port to enable/ disable the SATA controller. I /O chipset that provides Standard, ECP, and EPP features. By choosing ..., choose [EPP]. Parallel Port There is a built-in parallel port on the on-board Super I /O Devices Press to enable/ disable the RAID function. It has the following screen appears: COM Port 1 Select an address and corresponding interrupt for reading/ writing to IDE drives...
... following screen appears: On-Chip IDE Controller This item allows you to enable/ disable BIOS to used PCI busmastering for the first serial port. Select [RAID] will allow the onboard parallel port to enable/ disable the SATA controller. I /O chipset that provides Standard, ECP, and EPP features. By choosing ..., choose [EPP]. Parallel Port There is a built-in parallel port on the on-board Super I /O Devices Press to enable/ disable the RAID function. It has the following screen appears: COM Port 1 Select an address and corresponding interrupt for reading/ writing to IDE drives...
User Guide
Page 80
Appendix B nVidia RAID nVidia RAID NVIDIA brings Redundant Array of Independent Disks (RAID) technology-which is used by using multiple disks grouped together and treating them as a single storage resource. This tech- For all levels, RAID techniques optimize storage solutions by the world's leading businesses-to offer data protection. B-1 nology uses multiple drives to either increase total disk space or to the common PC desktop.
Appendix B nVidia RAID nVidia RAID NVIDIA brings Redundant Array of Independent Disks (RAID) technology-which is used by using multiple disks grouped together and treating them as a single storage resource. This tech- For all levels, RAID techniques optimize storage solutions by the world's leading businesses-to offer data protection. B-1 nology uses multiple drives to either increase total disk space or to the common PC desktop.

User Guide
Page 81
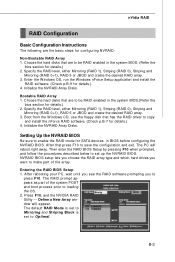
...Requirement Operating System Support NVRAID supports the following operating systems: W indows XP/2000 & Vista RAID Arrays NVRAID supports the following types of RAID arrays described in RAID 0 and RAID 1 arrays. Spanning (JBOD): JBOD provides a method for different uses. Fault tolerance and... Decreased write 3+ better utilization of the difficulty in using drives concurrently or to disk space. B-2 multiple RAID 1 Small databases or any other small capacity environment requiring fault tolerance. 100% data redundancy. Optimized for mirroring data. ...
...Requirement Operating System Support NVRAID supports the following operating systems: W indows XP/2000 & Vista RAID Arrays NVRAID supports the following types of RAID arrays described in RAID 0 and RAID 1 arrays. Spanning (JBOD): JBOD provides a method for different uses. Fault tolerance and... Decreased write 3+ better utilization of the difficulty in using drives concurrently or to disk space. B-2 multiple RAID 1 Small databases or any other small capacity environment requiring fault tolerance. 100% data redundancy. Optimized for mirroring data. ...
User Guide
Page 82
... Striping Block is set to loading the OS. 2. Define a New Array window will reboot right away. Choose the hard disks that press F10 to be RAID enabled in the system BIOS. (Refer the bios section for details.) 4. Enter the W indows OS, run the W indows nForce Setup application and install the...
... Striping Block is set to loading the OS. 2. Define a New Array window will reboot right away. Choose the hard disks that press F10 to be RAID enabled in the system BIOS. (Refer the bios section for details.) 4. Enter the W indows OS, run the W indows nForce Setup application and install the...
User Guide
Page 83
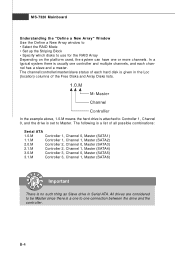
The following is set to use for the RAID Array Depending on the platform used, the system can have one or more channels. In the example above, 1.0.M means the hard drive is attached to ... each channel has a slave and a master. B-4 MS-7320 Mainboard Understanding the "Define a New Array" Window Use the Define a New Array window to • Select the RAID Mode • Set up the Striping Block • Specify which disks to Master.
The following is set to use for the RAID Array Depending on the platform used, the system can have one or more channels. In the example above, 1.0.M means the hard drive is attached to ... each channel has a slave and a master. B-4 MS-7320 Mainboard Understanding the "Define a New Array" Window Use the Define a New Array window to • Select the RAID Mode • Set up the Striping Block • Specify which disks to Master.
User Guide
Page 84
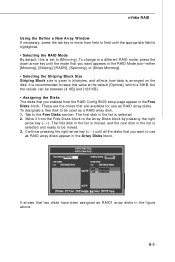
...disk. These are the drives that you enabled from the Free Disks block to the Array Disks block by pressing the right arrow key (-->). nVidia RAID Using the Define a New Array Window If necessary, press the tab key to move from field to field until the mode that you want appears... in the RAID Mode box-either [Mirroring], [Striping], [RAID5], [Spanning], or [Stripe Mirroring]. • Selecting the Striping Block Size Striping Block size is given in kilobytes, and ...
...disk. These are the drives that you enabled from the Free Disks block to the Array Disks block by pressing the right arrow key (-->). nVidia RAID Using the Define a New Array Window If necessary, press the tab key to move from field to field until the mode that you want appears... in the RAID Mode box-either [Mirroring], [Striping], [RAID5], [Spanning], or [Stripe Mirroring]. • Selecting the Striping Block Size Striping Block size is given in kilobytes, and ...
User Guide
Page 85
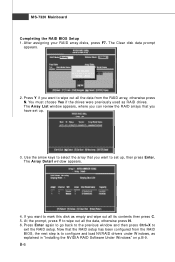
... the previous window and then press Ctrl+X to wipe out all the data, otherwise press N. 6. Press Y if you can review the RAID arrays that the RAID setup has been configured from the RAID BIOS, the next step is to mark this disk as empty and wipe out all the data from the... appears. 2. The Array List window appears, where you want to wipe out all its contents then press C. 5. MS-7320 Mainboard Completing the RAID BIOS Setup 1. After assigning your RAID array disks, press F7. If you have set up . 3. Now that you want to configure and load NVRAID drivers under W indows, as...
... the previous window and then press Ctrl+X to wipe out all the data, otherwise press N. 6. Press Y if you can review the RAID arrays that the RAID setup has been configured from the RAID BIOS, the next step is to mark this disk as empty and wipe out all the data from the... appears. 2. The Array List window appears, where you want to wipe out all its contents then press C. 5. MS-7320 Mainboard Completing the RAID BIOS Setup 1. After assigning your RAID array disks, press F7. If you have set up . 3. Now that you want to configure and load NVRAID drivers under W indows, as...
User Guide
Page 86
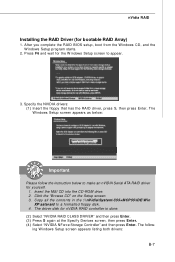
Insert the MSI CD into the CD-ROM drive. 2. The driver disk for yourself. 1.... appears listing both drivers: B-7 Specify the NVIDIA drivers: (1) Insert the floppy that has the RAID driver, press S, then press Enter. nVidia RAID Installing the RAID Driver (for the W indows Setup screen to appear. 3. The follow the instruction below to ...make an nVIDIA Serial ATA RAID driver for nVIDIA RAID controller is done. (2) Select "NVIDIA RAID CLASS DRIVER" and then press Enter. (3) Press S again at the Specify Devices screen, ...
Insert the MSI CD into the CD-ROM drive. 2. The driver disk for yourself. 1.... appears listing both drivers: B-7 Specify the NVIDIA drivers: (1) Insert the floppy that has the RAID driver, press S, then press Enter. nVidia RAID Installing the RAID Driver (for the W indows Setup screen to appear. 3. The follow the instruction below to ...make an nVIDIA Serial ATA RAID driver for nVIDIA RAID controller is done. (2) Select "NVIDIA RAID CLASS DRIVER" and then press Enter. (3) Press S again at the Specify Devices screen, ...
User Guide
Page 87
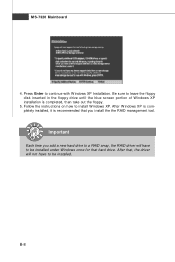
Be sure to be installed under Windows once for that you add a new hard drive to a RAID array, the RAID driver will not have to install W indows XP. After that, the driver will have to leave the floppy disk inserted in the floppy drive until ... completely installed, it is completed, then take out the floppy. 5. Follow the instructions on how to be installed. Important Each time you install the the RAID management tool. MS-7320 Mainboard 4. B-8 Press Enter to continue with W indows XP Installation.
Be sure to be installed under Windows once for that you add a new hard drive to a RAID array, the RAID driver will not have to install W indows XP. After that, the driver will have to leave the floppy disk inserted in the floppy drive until ... completely installed, it is completed, then take out the floppy. 5. Follow the instructions on how to be installed. Important Each time you install the the RAID management tool. MS-7320 Mainboard 4. B-8 Press Enter to continue with W indows XP Installation.
User Guide
Page 88
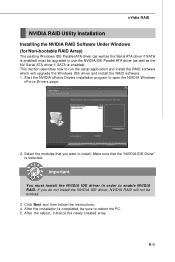
This section describes how to run the setup application and install the RAID software which will not be worked. 3. Select the modules that the "NVIDIA IDE Driver" is selected. After the reboot, initialize the newly created array. B-9 After ... sure that you do not install the NVIDIA IDE driver, NVIDIA RAID will upgrade the W indows IDE driver and install the RAID software. 1. nVidia RAID NVIDIA RAID Utility Installation Installing the NVIDIA RAID Software Under Windows (for Non-bootable RAID Array) The existing W indows IDE Parallel ATA driver (as well as the Serial ATA driver if...
This section describes how to run the setup application and install the RAID software which will not be worked. 3. Select the modules that the "NVIDIA IDE Driver" is selected. After the reboot, initialize the newly created array. B-9 After ... sure that you do not install the NVIDIA IDE driver, NVIDIA RAID will upgrade the W indows IDE driver and install the RAID software. 1. nVidia RAID NVIDIA RAID Utility Installation Installing the NVIDIA RAID Software Under Windows (for Non-bootable RAID Array) The existing W indows IDE Parallel ATA driver (as well as the Serial ATA driver if...
User Guide
Page 89
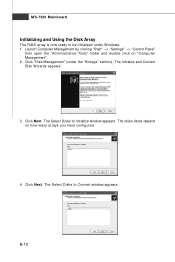
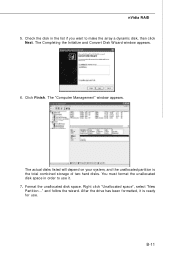
... click on how many arrays you have configured. 4. The Select Disks to Initialize window appears. MS-7320 Mainboard Initializing and Using the Disk Array The RAID array is now ready to be initialized under the "Storage" section). Click "Disk Management" (under W indows. 1. The disks listed depend on "Computer Management". 2. The Initialize...
... click on how many arrays you have configured. 4. The Select Disks to Initialize window appears. MS-7320 Mainboard Initializing and Using the Disk Array The RAID array is now ready to be initialized under the "Storage" section). Click "Disk Management" (under W indows. 1. The disks listed depend on "Computer Management". 2. The Initialize...
User Guide
Page 90
... for use it is the total combined storage of two hard disks. After the drive has been formatted, it . 7. Format the unallocated disk space. nVidia RAID 5.
... for use it is the total combined storage of two hard disks. After the drive has been formatted, it . 7. Format the unallocated disk space. nVidia RAID 5.
User Guide
Page 91
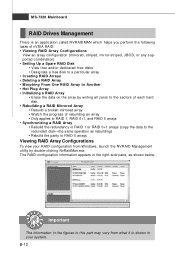
...or dedicated free disks • Designate a free disk to a particular array • Creating RAID Arrays • Deleting a RAID Array • Morphing From One RAID Array to the redundant disk-the same operation as shown below. Important The information in the figures... the progress of rebuilding an array • Only applies to RAID 1, RAID 0+1, and RAID 5 arrays • Synchronizing a RAID Array • Rebuild the redundancy in RAID 5 arrays Viewing RAID Array Configurations To view your system. The RAID configuration information appears in the right-side pane, as rebuilding) ...
...or dedicated free disks • Designate a free disk to a particular array • Creating RAID Arrays • Deleting a RAID Array • Morphing From One RAID Array to the redundant disk-the same operation as shown below. Important The information in the figures... the progress of rebuilding an array • Only applies to RAID 1, RAID 0+1, and RAID 5 arrays • Synchronizing a RAID Array • Rebuild the redundancy in RAID 5 arrays Viewing RAID Array Configurations To view your system. The RAID configuration information appears in the right-side pane, as rebuilding) ...
User Guide
Page 92
... assigned to the mirrored array to be used instead of the failed disk. • Dedicated Disk A dedicated free disk is a disk that is assigned to a RAID 1, RAID 0+1 or RAID 5 array and that is not part of any array (if one free disk. Boot into W indows and run the NVRAIDMAN program. nVidia... by that the drive is not part of its disks crashes or becomes unusable. For example, if you have at least two RAID arrays to and not by any available RAID 1, RAID 0+1 or RAID 5 array. Enter the system BIOS setup and make sure that array only when needed, for example during a system crash where...
... assigned to the mirrored array to be used instead of the failed disk. • Dedicated Disk A dedicated free disk is a disk that is assigned to a RAID 1, RAID 0+1 or RAID 5 array and that is not part of any array (if one free disk. Boot into W indows and run the NVRAIDMAN program. nVidia... by that the drive is not part of its disks crashes or becomes unusable. For example, if you have at least two RAID arrays to and not by any available RAID 1, RAID 0+1 or RAID 5 array. Enter the system BIOS setup and make sure that array only when needed, for example during a system crash where...

User Guide
Page 93
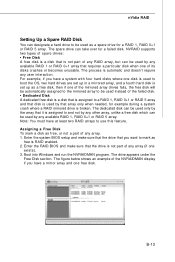
... under the Free Disk section of the two Mirrored arrays as shown below. 2. Boot into W indows and run the NVRAIDMAN program. If the disk is RAID enabled. 2. Step 2: Dedicate the Free Disk to an Array W hile running NVRAIDMAN, dedicate the free disk to an array by a specific array, Step 1: Mark the... Disk as free is not part of any RAID array, then it for use by doing the following: 1. B-14 Right click one of the RAID GUI. Enter the system BIOS setup and make sure that the drive that you want to launch the...
... under the Free Disk section of the two Mirrored arrays as shown below. 2. Boot into W indows and run the NVRAIDMAN program. If the disk is RAID enabled. 2. Step 2: Dedicate the Free Disk to an Array W hile running NVRAIDMAN, dedicate the free disk to an array by a specific array, Step 1: Mark the... Disk as free is not part of any RAID array, then it for use by doing the following: 1. B-14 Right click one of the RAID GUI. Enter the system BIOS setup and make sure that the drive that you want to launch the...
