User Guide
Page 2
... of M ICRO-STAR INTERNATIONAL. NVIDIA, the NVIDIA logo, DualNet, and nForce are the properties of Novell, Inc. We take every care in the United States and/or other information: http://www.msi.com.tw/program/service/faq/ faq/esc_faq_list.php Contact our technical staff at...8482; are registered trademarks of AMD Corporation. PS/2 and OS®/2 are registered trademarks of International Business Machines Corporation. Visit the MSI website for further guidance. Our products are under continual improvement and we reserve the right to the correctness of Phoenix Technologies Ltd....
... of M ICRO-STAR INTERNATIONAL. NVIDIA, the NVIDIA logo, DualNet, and nForce are the properties of Novell, Inc. We take every care in the United States and/or other information: http://www.msi.com.tw/program/service/faq/ faq/esc_faq_list.php Contact our technical staff at...8482; are registered trademarks of AMD Corporation. PS/2 and OS®/2 are registered trademarks of International Business Machines Corporation. Visit the MSI website for further guidance. Our products are under continual improvement and we reserve the right to the correctness of Phoenix Technologies Ltd....
User Guide
Page 10
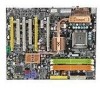
The P6N Diamond Series mainboards are based on nVIDIA® nForce 680i SLI & nForce 590i SLI chipsets for choosing the P6N Diamond Series (MS7320 V1.X) ATX Mainboard. Getting Started Chapter 1 Getting Started Thank you for optimal system efficiency. Designed to fit the advanced Intel® Core 2 Extreme, Core 2 Quad, Core 2 Duo, Pentium XE and Pentium D processor, the P6N Diamond Series deliver a high performance and professional desktop platform solution. 1-1
The P6N Diamond Series mainboards are based on nVIDIA® nForce 680i SLI & nForce 590i SLI chipsets for choosing the P6N Diamond Series (MS7320 V1.X) ATX Mainboard. Getting Started Chapter 1 Getting Started Thank you for optimal system efficiency. Designed to fit the advanced Intel® Core 2 Extreme, Core 2 Quad, Core 2 Duo, Pentium XE and Pentium D processor, the P6N Diamond Series deliver a high performance and professional desktop platform solution. 1-1
User Guide
Page 11
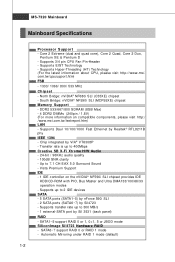
...Core 2 Duo, Pentium XE & Pentium D - Supports EIST Technology - Supports Hyper-Threading (HT) Technology (For the latest information about CPU, please visit http://www.msi. Transfer rate is up to 400Mbps Creative SB X-Fi Xtreme H/W Audio - 24-bit / 96KHz audio quality - 100dB SNR clarity - Supports Daul 10/100/1000 .../66/33 operation modes - Supports up to 7.1 CH EAX 5.0 Surround Sound - Up to 2 IDE devices SATA - 5 SATA ports (SATA1~5) by nForce 590i SLI - 2 SATA ports (SATA6~7) by Sil 3531 (back panel) RAID - MS-7320 Mainboard Mainboard Specifications Processor Support -
...Core 2 Duo, Pentium XE & Pentium D - Supports EIST Technology - Supports Hyper-Threading (HT) Technology (For the latest information about CPU, please visit http://www.msi. Transfer rate is up to 400Mbps Creative SB X-Fi Xtreme H/W Audio - 24-bit / 96KHz audio quality - 100dB SNR clarity - Supports Daul 10/100/1000 .../66/33 operation modes - Supports up to 7.1 CH EAX 5.0 Surround Sound - Up to 2 IDE devices SATA - 5 SATA ports (SATA1~5) by nForce 590i SLI - 2 SATA ports (SATA6~7) by Sil 3531 (back panel) RAID - MS-7320 Mainboard Mainboard Specifications Processor Support -
User Guide
Page 24
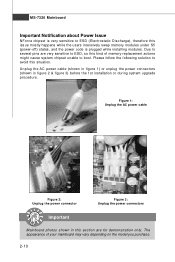
MS-7320 Mainboard Important Notification about Power Issue NForce chipset is plugged while installing modules. Due to several pins are very sensitive to ESD, so this section are for demonstration only. Please follow the ...
MS-7320 Mainboard Important Notification about Power Issue NForce chipset is plugged while installing modules. Due to several pins are very sensitive to ESD, so this section are for demonstration only. Please follow the ...
User Guide
Page 82
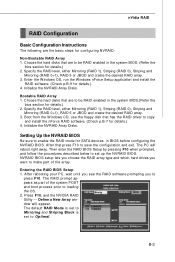
... 3. The PC will appear. Press F10, and the NVIDIA RAID Utility --- Choose the hard disks that press F10 to copy and install the nForce RAID software. (Check p.B-7 for details.) 4. Bootable RAID Array 1. Boot from the W indows CD, use the floppy disk that are to enable...(Refer the bios section for details.) 2. Define a New Array window will reboot right away. Enter the W indows OS, run the W indows nForce Setup application and install the RAID software. (Check p.B-9 for details.) 4. nVidia RAID RAID Configuration Basic Configuration Instructions The following are to be RAID ...
... 3. The PC will appear. Press F10, and the NVIDIA RAID Utility --- Choose the hard disks that press F10 to copy and install the nForce RAID software. (Check p.B-7 for details.) 4. Bootable RAID Array 1. Boot from the W indows CD, use the floppy disk that are to enable...(Refer the bios section for details.) 2. Define a New Array window will reboot right away. Enter the W indows OS, run the W indows nForce Setup application and install the RAID software. (Check p.B-9 for details.) 4. nVidia RAID RAID Configuration Basic Configuration Instructions The following are to be RAID ...
User Guide
Page 86
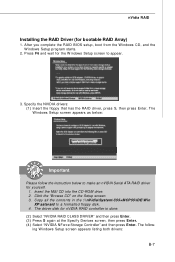
...S, then press Enter. nVidia RAID Installing the RAID Driver (for yourself. 1. ing W indows Setup screen appears listing both drivers: B-7 Insert the MSI CD into the CD-ROM drive. 2. The follow the instruction below : Important Please follow - After you complete the RAID BIOS setup, boot from ...Select "NVIDIA RAID CLASS DRIVER" and then press Enter. (3) Press S again at the Specify Devices screen, then press Enter. (4) Select "NVIDIA NForce Storage Controller" and then press Enter. Copy all the contents in the :\\nVidia\System\C55+M CP55\IDE\Win XP\sataraid to appear. 3. The ...
...S, then press Enter. nVidia RAID Installing the RAID Driver (for yourself. 1. ing W indows Setup screen appears listing both drivers: B-7 Insert the MSI CD into the CD-ROM drive. 2. The follow the instruction below : Important Please follow - After you complete the RAID BIOS setup, boot from ...Select "NVIDIA RAID CLASS DRIVER" and then press Enter. (3) Press S again at the Specify Devices screen, then press Enter. (4) Select "NVIDIA NForce Storage Controller" and then press Enter. Copy all the contents in the :\\nVidia\System\C55+M CP55\IDE\Win XP\sataraid to appear. 3. The ...
User Guide
Page 88
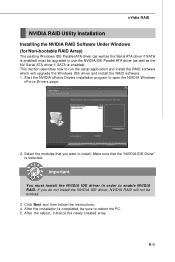
.... 4. After the reboot, initialize the newly created array. B-9 After the installation is selected. Important You must be worked. 3. Start the NVIDIA nForce Drivers installation program to open the NVIDIA W indows nForce Drivers page. 2. Select the modules that the "NVIDIA IDE Driver" is completed, be sure to reboot the PC. 5. This section describes...
.... 4. After the reboot, initialize the newly created array. B-9 After the installation is selected. Important You must be worked. 3. Start the NVIDIA nForce Drivers installation program to open the NVIDIA W indows nForce Drivers page. 2. Select the modules that the "NVIDIA IDE Driver" is completed, be sure to reboot the PC. 5. This section describes...