User Guide
Page 8
...Started 1-1 Mainboard Specifications 1-2 Mainboard Layout 1-4 Packing Checklist 1-5 Chapter 2 Hardware Setup 2-1 Quick Components Guide 2-2 CPU (Central Processing Unit 2-3 Memory 2-6 Power Supply 2-8 Back Panel 2-9 Connectors 2-11 Switch 2-17 Jumpers 2-18 Button 2-19 Slots 2-20 LED Status Indicators 2-24 Chapter 3 BIOS Setup 3-1 Entering ...3-2 The Main Menu 3-4 Standard CMOS Features 3-6 Advanced BIOS Features 3-9 Integrated Peripherals 3-12 Power Management Setup 3-14 H/W Monitor 3-16 Green Power 3-17 BIOS Setting Password 3-18 Cell Menu 3-19 User Settings 3-25 viii
...Started 1-1 Mainboard Specifications 1-2 Mainboard Layout 1-4 Packing Checklist 1-5 Chapter 2 Hardware Setup 2-1 Quick Components Guide 2-2 CPU (Central Processing Unit 2-3 Memory 2-6 Power Supply 2-8 Back Panel 2-9 Connectors 2-11 Switch 2-17 Jumpers 2-18 Button 2-19 Slots 2-20 LED Status Indicators 2-24 Chapter 3 BIOS Setup 3-1 Entering ...3-2 The Main Menu 3-4 Standard CMOS Features 3-6 Advanced BIOS Features 3-9 Integrated Peripherals 3-12 Power Management Setup 3-14 H/W Monitor 3-16 Green Power 3-17 BIOS Setting Password 3-18 Cell Menu 3-19 User Settings 3-25 viii
User Guide
Page 19
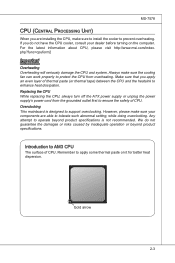
... to install the cooler to ensure the safety of CPU. Gold arrow 2-3 Replacing the CPU While replacing the CPU, always turn off the ATX power supply or unplug the power supply's power cord from overheating. Always make sure the cooling fan can work properly to protect the CPU from the grounded outlet first to prevent overheating... the computer. php?func=cpuform2 Important Overheating Overheating will seriously damage the CPU and system. For the latest information about CPU, please visit http://www.msi.com/index.
... to install the cooler to ensure the safety of CPU. Gold arrow 2-3 Replacing the CPU While replacing the CPU, always turn off the ATX power supply or unplug the power supply's power cord from overheating. Always make sure the cooling fan can work properly to protect the CPU from the grounded outlet first to prevent overheating... the computer. php?func=cpuform2 Important Overheating Overheating will seriously damage the CPU and system. For the latest information about CPU, please visit http://www.msi.com/index.
User Guide
Page 24
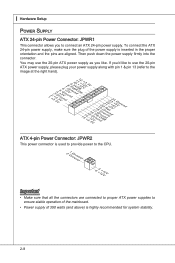
... into the connector. You may use the 20-pin ATX power supply as you like to use the 20-pin ATX power supply, please plug your power supply along with pin 1 & pin 13 (refer to the image at the right hand). 1.+23.+3.33.G4V.3.r+5Vo.5uG6Vn.... Power supply of the power supply is highly recommended for system stability. 2-8 To connect the ATX 24-pin power supply, make sure the plug of 350 watts (and above) is inserted in the proper orientation and the pins are connected to proper ATX power supplies to connect an ATX 24-pin power supply. ▍ Hardware Setup Power Supply ATX 24-pin Power ...
... into the connector. You may use the 20-pin ATX power supply as you like to use the 20-pin ATX power supply, please plug your power supply along with pin 1 & pin 13 (refer to the image at the right hand). 1.+23.+3.33.G4V.3.r+5Vo.5uG6Vn.... Power supply of the power supply is highly recommended for system stability. 2-8 To connect the ATX 24-pin power supply, make sure the plug of 350 watts (and above) is inserted in the proper orientation and the pins are connected to proper ATX power supplies to connect an ATX 24-pin power supply. ▍ Hardware Setup Power Supply ATX 24-pin Power ...
User Guide
Page 34
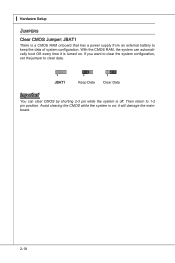
Then return to keep the data of system configuration. Avoid clearing the CMOS while the system is off. it is a CMOS RAM onboard that has a power supply from an external battery to 1-2 pin position. With the CMOS RAM, the system can clear CMOS by shorting 2-3 pin while the system is on . ▍ Hardware Setup Jumpers Clear CMOS Jumper: JBAT1 There is turned on ; If you want to clear the system configuration, set the jumper to clear data. 1 JBAT1 1 Keep Data 1 Clear Data Important You can automatically boot OS every time it will damage the mainboard. 2-18
Then return to keep the data of system configuration. Avoid clearing the CMOS while the system is off. it is a CMOS RAM onboard that has a power supply from an external battery to 1-2 pin position. With the CMOS RAM, the system can clear CMOS by shorting 2-3 pin while the system is on . ▍ Hardware Setup Jumpers Clear CMOS Jumper: JBAT1 There is turned on ; If you want to clear the system configuration, set the jumper to clear data. 1 JBAT1 1 Keep Data 1 Clear Data Important You can automatically boot OS every time it will damage the mainboard. 2-18
User Guide
Page 36
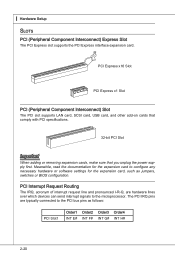
... add-on cards that comply with PCI specifications. 32-bit PCI Slot Important When adding or removing expansion cards, make sure that you unplug the power supply first.
... add-on cards that comply with PCI specifications. 32-bit PCI Slot Important When adding or removing expansion cards, make sure that you unplug the power supply first.
User Guide
Page 37
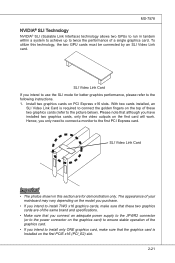
... on PCI Express x16 slots. To utilize this section are of the same brand and specifications. • Make sure that you connect an adequate power supply to the JPWR2 connector (or to twice the performance of your mainboard may vary depending on the model you purchase. • If you have installed ...
... on PCI Express x16 slots. To utilize this section are of the same brand and specifications. • Make sure that you connect an adequate power supply to the JPWR2 connector (or to twice the performance of your mainboard may vary depending on the model you purchase. • If you have installed ...

