User Guide
Page 9
MS-7578 Load Fail-Safe/ Optimized Defaults 3-27 Appendix A Realtek Audio A-1 Installing the Realtek HD Audio Driver A-2 Software Configuration A-4 Hardware Setup A-19 Appendix B NVIDIA RAID B-1 Introduction B-2 RAID Configuration B-3 Installing Driver B-7 NVIDIA RAID Utility Installation B-8 Using the NVMediaShield Software B-11 Appendix C Overclocking Center C-1 Activating Overclocking Center C-2 System Info C-3 DOT C-5 ix
MS-7578 Load Fail-Safe/ Optimized Defaults 3-27 Appendix A Realtek Audio A-1 Installing the Realtek HD Audio Driver A-2 Software Configuration A-4 Hardware Setup A-19 Appendix B NVIDIA RAID B-1 Introduction B-2 RAID Configuration B-3 Installing Driver B-7 NVIDIA RAID Utility Installation B-8 Using the NVMediaShield Software B-11 Appendix C Overclocking Center C-1 Activating Overclocking Center C-2 System Info C-3 DOT C-5 ix
User Guide
Page 19
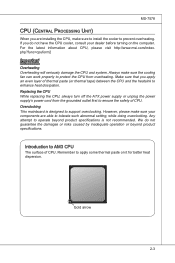
However, please make sure to install the cooler to support overclocking. Any attempt to operate beyond product specifications. Remember to ensure the safety of CPU. For the latest information about CPU, please visit http://www.msi.com/index. Make sure that you apply an even layer of CPU...?func=cpuform2 Important Overheating Overheating will seriously damage the CPU and system. Replacing the CPU While replacing the CPU, always turn off the ATX power supply or unplug the power supply's power cord from overheating. MS-7578 CPU (Central Processing Unit) When you are installing the ...
However, please make sure to install the cooler to support overclocking. Any attempt to operate beyond product specifications. Remember to ensure the safety of CPU. For the latest information about CPU, please visit http://www.msi.com/index. Make sure that you apply an even layer of CPU...?func=cpuform2 Important Overheating Overheating will seriously damage the CPU and system. Replacing the CPU While replacing the CPU, always turn off the ATX power supply or unplug the power supply's power cord from overheating. MS-7578 CPU (Central Processing Unit) When you are installing the ...
User Guide
Page 29
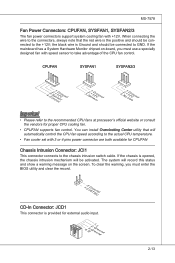
... refer to take advantage of the CPU fan control. the black wire is the positive and should be connected to the +12V; You can install Overclocking Center utility that the red wire is Ground and should be connected to the chassis intrusion switch cable. If the chassis is provided for proper...
... refer to take advantage of the CPU fan control. the black wire is the positive and should be connected to the +12V; You can install Overclocking Center utility that the red wire is Ground and should be connected to the chassis intrusion switch cable. If the chassis is provided for proper...
User Guide
Page 33
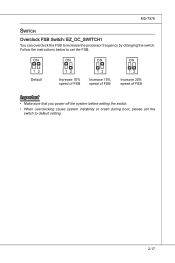
Default Increase 10% speed of FSB Increase 15% speed of FSB Increase 20% speed of FSB Important • Make sure that you power off the system before setting the switch. • When overclocking cause system instability or crash during boot, please set the switch to set the FSB. Follow the instructions below to default setting. 2-17 MS-7578 Switch Overclock FSB Switch: EZ_OC_SWITCH1 You can overclock the FSB to increase the processor frequency by changing the switch.
Default Increase 10% speed of FSB Increase 15% speed of FSB Increase 20% speed of FSB Important • Make sure that you power off the system before setting the switch. • When overclocking cause system instability or crash during boot, please set the switch to set the FSB. Follow the instructions below to default setting. 2-17 MS-7578 Switch Overclock FSB Switch: EZ_OC_SWITCH1 You can overclock the FSB to increase the processor frequency by changing the switch.
User Guide
Page 44
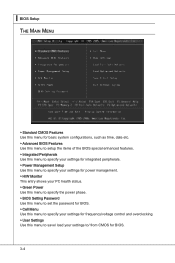
... Password Use this menu to set the password for BIOS. ▶ Cell Menu Use this menu to specify your settings for frequency/voltage control and overclocking. ▶ User Settings Use this menu to save/ load your settings to/ from CMOS for BIOS. 3-4
... Password Use this menu to set the password for BIOS. ▶ Cell Menu Use this menu to specify your settings for frequency/voltage control and overclocking. ▶ User Settings Use this menu to save/ load your settings to/ from CMOS for BIOS. 3-4
User Guide
Page 61
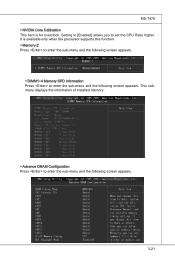
MS-7578 ▶ NVIDIA Core Calibration This item is available only when the processor supports this function. ▶ Memory-Z Press to enter the sub-menu and the following screen appears. ▶ DIMM1~4 Memory SPD Information Press to enter the sub-menu and the following screen appears. 3-21 It is for overclock. This submenu displays the information of installed memory. ▶ Advance DRAM Configuration Press to set the CPU Ratio higher. Setting to [Enabled] allows you to enter the sub-menu and the following screen appears.
MS-7578 ▶ NVIDIA Core Calibration This item is available only when the processor supports this function. ▶ Memory-Z Press to enter the sub-menu and the following screen appears. ▶ DIMM1~4 Memory SPD Information Press to enter the sub-menu and the following screen appears. 3-21 It is for overclock. This submenu displays the information of installed memory. ▶ Advance DRAM Configuration Press to set the CPU Ratio higher. Setting to [Enabled] allows you to enter the sub-menu and the following screen appears.
User Guide
Page 63
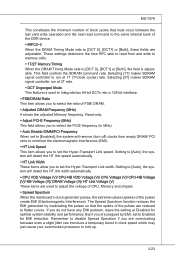
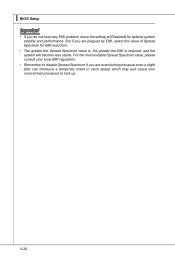
...set to set the Hyper-Transport Link speed. But if you to select the PCIE frequency (in clock speed which may just cause your overclocked processor to run at 2T rate. ▶ DCT Unganged Mode This feature is adjustable. Read-only. ▶ Adjust PCI-E Frequency (...9654; Spread Spectrum When the mainboard's clock generator pulses, the extreme values (spikes) of the pulses create EMI (Electromagnetic Interference). If you are overclocking because even a slight jitter can introduce a temporary boost in MHz). ▶ Auto Disable DIMM/PCI Frequency When set the Hyper-Transport Link ...
...set to set the Hyper-Transport Link speed. But if you to select the PCIE frequency (in clock speed which may just cause your overclocked processor to run at 2T rate. ▶ DCT Unganged Mode This feature is adjustable. Read-only. ▶ Adjust PCI-E Frequency (...9654; Spread Spectrum When the mainboard's clock generator pulses, the extreme values (spikes) of the pulses create EMI (Electromagnetic Interference). If you are overclocking because even a slight jitter can introduce a temporary boost in MHz). ▶ Auto Disable DIMM/PCI Frequency When set the Hyper-Transport Link ...
User Guide
Page 64
... speed which may just cause your local EMI regulation. • Remember to lock up. 3-24 For the most suitable Spread Spectrum value, please consult your overclocked processor to disable Spread Spectrum if you do not have any EMI problem, leave the setting at [Disabled] for EMI reduction. • The greater the...
... speed which may just cause your local EMI regulation. • Remember to lock up. 3-24 For the most suitable Spread Spectrum value, please consult your overclocked processor to disable Spread Spectrum if you do not have any EMI problem, leave the setting at [Disabled] for EMI reduction. • The greater the...
User Guide
Page 66
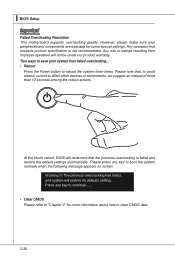
... system normally when the following message appears on screen. Please note that exceeds product specification is failed and restore the default settings automatically. The previous overclocking had failed, and system will not be under our product warranty. Any operation that , to avoid electric current to affect other devices or components, we... system three times. Please press any key to continue....... • Clear CMOS Please refer to clear CMOS data. 3-26 Warning !!! ▍ BIOS Setup Important Failed Overclocking Resolution This motherboard supports overclocking greatly.
... system normally when the following message appears on screen. Please note that exceeds product specification is failed and restore the default settings automatically. The previous overclocking had failed, and system will not be under our product warranty. Any operation that , to avoid electric current to affect other devices or components, we... system three times. Please press any key to continue....... • Clear CMOS Please refer to clear CMOS data. 3-26 Warning !!! ▍ BIOS Setup Important Failed Overclocking Resolution This motherboard supports overclocking greatly.
User Guide
Page 109
DotNet Frame Work 2.0 B-C-1 Operation system: Windows XP or up. 4. Before you install the Overclocking Center, please make sure the system has meet the following requirements: 1. 256MB system memory. 2. Appendix C Overclocking Center Overclocking Center, the most useful and powerful utility that MSI has spent much research and efforts to develop, helps users to monitor or configure the hardware status of MSI Mainboard in windows, such as CPU clock, voltage, fan speed and temperature. DVD-ROM drive for software installation. 3.
DotNet Frame Work 2.0 B-C-1 Operation system: Windows XP or up. 4. Before you install the Overclocking Center, please make sure the system has meet the following requirements: 1. 256MB system memory. 2. Appendix C Overclocking Center Overclocking Center, the most useful and powerful utility that MSI has spent much research and efforts to develop, helps users to monitor or configure the hardware status of MSI Mainboard in windows, such as CPU clock, voltage, fan speed and temperature. DVD-ROM drive for software installation. 3.
User Guide
Page 110
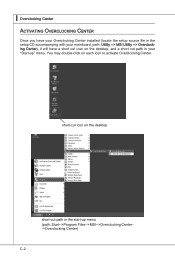
short-cut icon on the desktop, and a short cut path in your mainboard, path: Utility --> MSI Utility --> Overclocking Center), it will have a short cut icon on the desktop short-cut path in the start-up " menu. ▍ Overclocking Center Activating Overclocking Center Once you have your Overclocking Center installed (locate the setup source file in the setup CD accompanying with your "Start-up menu (path: Start-->Program Files-->MSI-->Overclocking Center->Overclocking Center) C-2 You may double-click on each icon to activate Overclocking Center.
short-cut icon on the desktop, and a short cut path in your mainboard, path: Utility --> MSI Utility --> Overclocking Center), it will have a short cut icon on the desktop short-cut path in the start-up " menu. ▍ Overclocking Center Activating Overclocking Center Once you have your Overclocking Center installed (locate the setup source file in the setup CD accompanying with your "Start-up menu (path: Start-->Program Files-->MSI-->Overclocking Center->Overclocking Center) C-2 You may double-click on each icon to activate Overclocking Center.
User Guide
Page 112
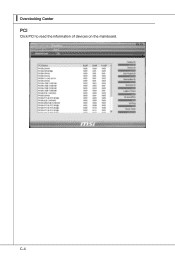
C-4 ▍ Overclocking Center PCI Click PCI to read the information of devices on the mainboard.
C-4 ▍ Overclocking Center PCI Click PCI to read the information of devices on the mainboard.
User Guide
Page 113
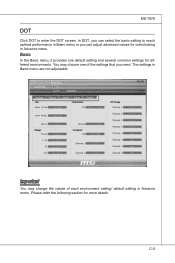
In DOT, you can adjust advanced values for overclocking in Advance menu. Basic In the Basic menu, it provides one of each environment setting/ default setting in Basic menu are not adjustable. Please refer the following section for different environments. C-5 You may change the values of the settings that you need. Important You may choose one default setting and several common settings for more details. The settings in Advance menu. MS-7578 DOT Click DOT to reach optimal performance in Basic menu or you can select the basic setting to enter the DOT screen.
In DOT, you can adjust advanced values for overclocking in Advance menu. Basic In the Basic menu, it provides one of each environment setting/ default setting in Basic menu are not adjustable. Please refer the following section for different environments. C-5 You may change the values of the settings that you need. Important You may choose one default setting and several common settings for more details. The settings in Advance menu. MS-7578 DOT Click DOT to reach optimal performance in Basic menu or you can select the basic setting to enter the DOT screen.
User Guide
Page 114
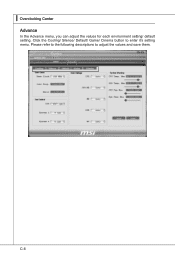
C-6 Click the Cooling/ Silence/ Default/ Game/ Cinema button to adjust the values and save them. ▍ Overclocking Center Advance In the Advance menu, you can adjust the values for each environment setting/ default setting. Please refer to the following descriptions to enter it's setting menu.
C-6 Click the Cooling/ Silence/ Default/ Game/ Cinema button to adjust the values and save them. ▍ Overclocking Center Advance In the Advance menu, you can adjust the values for each environment setting/ default setting. Please refer to the following descriptions to enter it's setting menu.
User Guide
Page 115
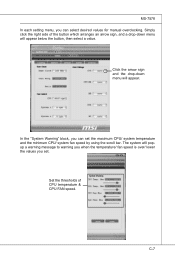
Simply click the right side of CPU temperature & CPU FAN speed. In the "System Warning" block, you can select desired values for manual overclocking. Click the arrow sign and the drop-down menu will appear. The system will popup a warning message to warning you when the temperature/ fan speed ...
Simply click the right side of CPU temperature & CPU FAN speed. In the "System Warning" block, you can select desired values for manual overclocking. Click the arrow sign and the drop-down menu will appear. The system will popup a warning message to warning you when the temperature/ fan speed ...
User Guide
Page 116
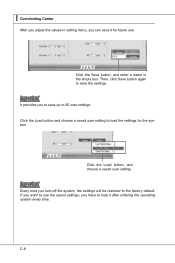
▍ Overclocking Center After you adjust the values in the empty box. Important Every time you to save the settings. Important It provides you turn-off the ...
▍ Overclocking Center After you adjust the values in the empty box. Important Every time you to save the settings. Important It provides you turn-off the ...


