User Guide
Page 2
... nForce are registered trademarks or trademarks of American Megatrends Inc. Alternatively, please try the following help resources for FAQ, technical guide, BIOS updates, driver updates, and other countries. Copyright Notice The material in this document, but no solution can be obtained from the...preparation of this document is a registered trademark of M ICRO-STAR INTERNATIONAL. func=faqIndex Contact our technical staff at: http://support.msi.com.tw/ ii Our products are registered trademarks of purchase or local distributor. AMI® is a registered trademark of its ...
... nForce are registered trademarks or trademarks of American Megatrends Inc. Alternatively, please try the following help resources for FAQ, technical guide, BIOS updates, driver updates, and other countries. Copyright Notice The material in this document, but no solution can be obtained from the...preparation of this document is a registered trademark of M ICRO-STAR INTERNATIONAL. func=faqIndex Contact our technical staff at: http://support.msi.com.tw/ ii Our products are registered trademarks of purchase or local distributor. AMI® is a registered trademark of its ...

User Guide
Page 8
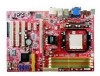
... Memory ...2-6 Power Supply ...2-8 Back Panel ...2-9 Connectors ...2-11 Jumpers ...2-18 Slots ...2-19 Chapter 3 BIOS Setup 3-1 Entering Setup ...3-2 The Main Menu ...3-4 Standard CMOS Features 3-6 Advanced BIOS Features 3-9 Integrated Peripherals 3-12 Power Management Setup 3-14 PNP/PCI Configurations 3-17 H/W Monitor ...3-19 ...Cell Menu ...3-20 Load Optimized Defaults 3-23 BIOS Setting Password 3-24 Appendix A Realtek ALC888 Audio A-1 Installing the Realtek HD Audio Driver A-2 Software Configuration A-4 Hardware...
... Memory ...2-6 Power Supply ...2-8 Back Panel ...2-9 Connectors ...2-11 Jumpers ...2-18 Slots ...2-19 Chapter 3 BIOS Setup 3-1 Entering Setup ...3-2 The Main Menu ...3-4 Standard CMOS Features 3-6 Advanced BIOS Features 3-9 Integrated Peripherals 3-12 Power Management Setup 3-14 PNP/PCI Configurations 3-17 H/W Monitor ...3-19 ...Cell Menu ...3-20 Load Optimized Defaults 3-23 BIOS Setting Password 3-24 Appendix A Realtek ALC888 Audio A-1 Installing the Realtek HD Audio Driver A-2 Software Configuration A-4 Hardware...

User Guide
Page 27
... is opened, the chassis intrusion mechanism will record this status and show a warning message on the screen. To clear the warning, you must enter the BIOS utility and clear the record. 1 CINTRU 2 GND JCI1 CD-In Connector: JCD1 This connector is provided for external audio input. 2-12 L GND R JCD1 Each connector...
... is opened, the chassis intrusion mechanism will record this status and show a warning message on the screen. To clear the warning, you must enter the BIOS utility and clear the record. 1 CINTRU 2 GND JCI1 CD-In Connector: JCD1 This connector is provided for external audio input. 2-12 L GND R JCD1 Each connector...

User Guide
Page 34
... PCI Express x 1 slot supports up to 4.0 GB/s transfer rate. The PCI Express x 16 slot supports up to the PCI bus pins as jumpers, switches or BIOS configuration. Meanwhile, read the documentation for the expansion card to the microprocessor. PCI Express x1 Slot PCI Express x16 Slot PCI (Peripheral Component Interconnect) Slot...
... PCI Express x 1 slot supports up to 4.0 GB/s transfer rate. The PCI Express x 16 slot supports up to the PCI bus pins as jumpers, switches or BIOS configuration. Meanwhile, read the documentation for the expansion card to the microprocessor. PCI Express x1 Slot PCI Express x16 Slot PCI (Peripheral Component Interconnect) Slot...

User Guide
Page 36
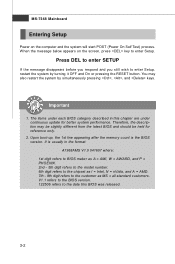
Chapter 3 BIOS Setup BIOS Setup This chapter provides information on the BIOS Setup program and allows you to run the Setup program when: ² An error message appears on the screen during the system booting up, and requests you to change the default settings for optimum use. You may need to run SETUP. ² You want to configure the system for customized features. 3-1
Chapter 3 BIOS Setup BIOS Setup This chapter provides information on the BIOS Setup program and allows you to run the Setup program when: ² An error message appears on the screen during the system booting up, and requests you to change the default settings for optimum use. You may need to run SETUP. ² You want to configure the system for customized features. 3-1
User Guide
Page 37
... described in the format: A7368AMS V1.0 041607 where: 1st digit refers to BIOS maker as A = AMI, W = AWARD, and P = PHOENIX. 2nd - 5th digit refers to the model number. 6th digit refers to the chipset as I = Intel, N = nVidia, and A = AMD. 7th - 8th digit refers to the date this chapter are under continuous update for reference only. 2. It...
... described in the format: A7368AMS V1.0 041607 where: 1st digit refers to BIOS maker as A = AMI, W = AWARD, and P = PHOENIX. 2nd - 5th digit refers to the model number. 6th digit refers to the chipset as I = Intel, N = nVidia, and A = AMD. 7th - 8th digit refers to the date this chapter are under continuous update for reference only. 2. It...

User Guide
Page 38
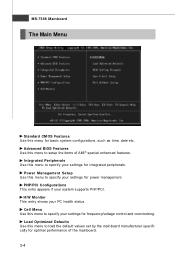
..., just press the . A sub-menu contains additional options for the highlighted item. If you want to return to exit the Help screen. 3-3 General Help The BIOS setup program provides a General Help screen. You can use the control keys to enter values and move from this screen from any menu by simply... the CMOS changes and exit Getting Help After entering the Setup menu, the first menu you can be launched from field to select the item. BIOS Setup Control Keys Enter> Move to the previous item Move to the next item Move to the item in the left hand Move to the...
..., just press the . A sub-menu contains additional options for the highlighted item. If you want to return to exit the Help screen. 3-3 General Help The BIOS setup program provides a General Help screen. You can use the control keys to enter values and move from this screen from any menu by simply... the CMOS changes and exit Getting Help After entering the Setup menu, the first menu you can be launched from field to select the item. BIOS Setup Control Keys Enter> Move to the previous item Move to the next item Move to the item in the left hand Move to the...
User Guide
Page 39
... Defaults Use this menu to load the default values set by the mainboard manufacturer specifically for basic system configurations, such as time, date etc. Advanced BIOS Features Use this menu to specify your settings for frequency/voltage control and overclocking. PNP/PCI Configurations This entry appears if your PC health status...
... Defaults Use this menu to load the default values set by the mainboard manufacturer specifically for basic system configurations, such as time, date etc. Advanced BIOS Features Use this menu to specify your settings for frequency/voltage control and overclocking. PNP/PCI Configurations This entry appears if your PC health status...

User Guide
Page 40
BIOS Setup 3-5 Exit Without Saving Abandon all changes and exit setup. Save & Exit Setup Save changes to set the password for BIOS. BIOS Setting Password Use this menu to CMOS and exit setup.
BIOS Setup 3-5 Exit Without Saving Abandon all changes and exit setup. Save & Exit Setup Save changes to set the password for BIOS. BIOS Setting Password Use this menu to CMOS and exit setup.
User Guide
Page 41
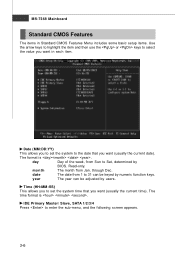
...:YY) This allows you to set the system time that you want (usually the current time). month The month from Sun to Sat, determined by BIOS. Time (HH:MM :SS) This allows you to set the system to the date that you want in each item. MS-7368 Mainboard Standard CMOS...
...:YY) This allows you to set the system time that you want (usually the current time). month The month from Sun to Sat, determined by BIOS. Time (HH:MM :SS) This allows you to set the system to the date that you want in each item. MS-7368 Mainboard Standard CMOS...

User Guide
Page 42
... to enable or disable the LBA (Logical Block Address, the logical block size in hard disk) mode. This gives you to predict hard disk failure. BIOS Setup Dev i c e/ Ve n do r / Si z e These 3 items show the information about the specified item. This allows you an opportunity to move data from a hard disk...
... to enable or disable the LBA (Logical Block Address, the logical block size in hard disk) mode. This gives you to predict hard disk failure. BIOS Setup Dev i c e/ Ve n do r / Si z e These 3 items show the information about the specified item. This allows you an opportunity to move data from a hard disk...

User Guide
Page 43
MS-7368 Mainboard System Information Press to enter the sub-menu, and the following screen appears. CPU Type, CPUID/MicroCode, CPU Frequency, BIOS Version, Physical Memory, Usage Memory, Cache Size This sub-menu shows the CPU information, BIOS version and memory status of your system (read only). 3-8
MS-7368 Mainboard System Information Press to enter the sub-menu, and the following screen appears. CPU Type, CPUID/MicroCode, CPU Frequency, BIOS Version, Physical Memory, Usage Memory, Cache Size This sub-menu shows the CPU information, BIOS version and memory status of your system (read only). 3-8

User Guide
Page 44
...accidental corruption by unauthorized users or computer viruses. You should immediately re-enable it to protect it against viruses. 3-9 Advanced BIOS Features BIOS Setup Full Screen LOGO Display This item enables you to show the company logo on the numeric keypad. Setting to [... status when the system is powered on . After updating the BIOS, you 'll need to update the BIOS with a Flash utility. To successfully update the BIOS, you should enable this Flash BIOS Protection function. W hen enabled, the BIOS' data cannot be changed when attempting to disable it will turn...
...accidental corruption by unauthorized users or computer viruses. You should immediately re-enable it to protect it against viruses. 3-9 Advanced BIOS Features BIOS Setup Full Screen LOGO Display This item enables you to show the company logo on the numeric keypad. Setting to [... status when the system is powered on . After updating the BIOS, you 'll need to update the BIOS with a Flash utility. To successfully update the BIOS, you should enable this Flash BIOS Protection function. W hen enabled, the BIOS' data cannot be changed when attempting to disable it will turn...

User Guide
Page 46
Boot From Other Device Setting the option to [Yes] allows the system to try to boot from the 1st/ 2nd/ 3rd boot device. 3-11 BIOS Setup 1st/ 2nd/ 3rd Boot Device The items allow you to set the first/ second/ third boot device where BIOS attempts to boot from other device. if the system fails to load the disk operating system.
Boot From Other Device Setting the option to [Yes] allows the system to try to boot from the 1st/ 2nd/ 3rd boot device. 3-11 BIOS Setup 1st/ 2nd/ 3rd Boot Device The items allow you to set the first/ second/ third boot device where BIOS attempts to boot from other device. if the system fails to load the disk operating system.

User Guide
Page 48
... IDE drives. Selecting [Auto] allows AMIBIOS to automatically determine the correct base I /O port addresses of the onboard Serial Port 1 (COM 1). BIOS Setup On-Chip ATA Devices Press to enter the sub-menu and the following screen appears: COM Port 1 This item specifies the base I /O port address. 3-...
... IDE drives. Selecting [Auto] allows AMIBIOS to automatically determine the correct base I /O port addresses of the onboard Serial Port 1 (COM 1). BIOS Setup On-Chip ATA Devices Press to enter the sub-menu and the following screen appears: COM Port 1 This item specifies the base I /O port address. 3-...

User Guide
Page 49
... to activate the ACPI (Advanced Configuration and Power Management Interface) Function. If your operating system is lost (CPU or chipset) and hardware main- If your BIOS supports S3 sleep mode. tains all system context. [S3/STR] The S3 sleep mode is a lower power state where the in formation of this section...
... to activate the ACPI (Advanced Configuration and Power Management Interface) Function. If your operating system is lost (CPU or chipset) and hardware main- If your BIOS supports S3 sleep mode. tains all system context. [S3/STR] The S3 sleep mode is a lower power state where the in formation of this section...

User Guide
Page 50
... Setup Press and the following sub-menu appears. Restore On AC Power Loss This setting specifies whether your system to configure the Power Button function. BIOS Setup Suspend Time Out (Minute) If system activity is turned off.
... Setup Press and the following sub-menu appears. Restore On AC Power Loss This setting specifies whether your system to configure the Power Button function. BIOS Setup Suspend Time Out (Minute) If system activity is turned off.

User Guide
Page 52
BIOS Setup PNP/PCI Configurations This section describes configuring the PCI bus system and PnP (Plug & Play) feature. PCI Slot 1/ 2/ 3 IRQ These items specify the IRQ ...
BIOS Setup PNP/PCI Configurations This section describes configuring the PCI bus system and PnP (Plug & Play) feature. PCI Slot 1/ 2/ 3 IRQ These items specify the IRQ ...

User Guide
Page 53
... is ready, the system will still be removed from the pool of the operating system, it . The available IRQ pool is configured by the system BIOS. All IRQs used . If all IRQs are set to [Reserved], and IRQ 14/15 are configured as [Available]. MS-7368 Mainboard IRQ Resource Setup Press...
... is ready, the system will still be removed from the pool of the operating system, it . The available IRQ pool is configured by the system BIOS. All IRQs used . If all IRQs are set to [Reserved], and IRQ 14/15 are configured as [Available]. MS-7368 Mainboard IRQ Resource Setup Press...

User Guide
Page 54
If the current CPU fan temperature reaches to the target value, the smart fan function will automatically return to [Reset]. H/W Monitor BIOS Setup Chassis Intrusion The field enables or disables the feature of the monitored hardware devices/ components such as CPU voltage, temperatures and all of recording ...
If the current CPU fan temperature reaches to the target value, the smart fan function will automatically return to [Reset]. H/W Monitor BIOS Setup Chassis Intrusion The field enables or disables the feature of the monitored hardware devices/ components such as CPU voltage, temperatures and all of recording ...


