
User Manual
Page 4
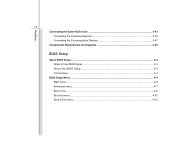
Preface 1-4 Connecting the External Devices 3-43 Connecting the Peripheral Devices 3-43 Connecting the Communication Devices 3-47 Components Replacement and Upgrade 3-50 BIOS Setup About BIOS Setup...4-2 When to Use BIOS Setup...4-2 How to Run BIOS Setup...4-2 Control Keys ...4-3 BIOS Setup Menu...4-4 Main menu...4-5 Advanced menu...4-7 Boot menu ...4-9 Security menu...4-10 Save & Exit menu...4-12
Preface 1-4 Connecting the External Devices 3-43 Connecting the Peripheral Devices 3-43 Connecting the Communication Devices 3-47 Components Replacement and Upgrade 3-50 BIOS Setup About BIOS Setup...4-2 When to Use BIOS Setup...4-2 How to Run BIOS Setup...4-2 Control Keys ...4-3 BIOS Setup Menu...4-4 Main menu...4-5 Advanced menu...4-7 Boot menu ...4-9 Security menu...4-10 Save & Exit menu...4-12
User Manual
Page 24
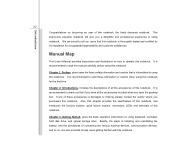
... provides the specification of this notebook, and introduces the function buttons, quick launch buttons, connectors, LEDs and externals of this notebook. If any of installing and uninstalling the battery; We are also provided to operate this notebook. Manual Map This User's Manual provides instructions and illustrations on using this notebook is damaged or missing, please contact the vendor where you purchased this notebook. Chapter 3, Getting Started, gives the basic operation instructions on how...
... provides the specification of this notebook, and introduces the function buttons, quick launch buttons, connectors, LEDs and externals of this notebook. If any of installing and uninstalling the battery; We are also provided to operate this notebook. Manual Map This User's Manual provides instructions and illustrations on using this notebook is damaged or missing, please contact the vendor where you purchased this notebook. Chapter 3, Getting Started, gives the basic operation instructions on how...

User Manual
Page 25
... ship the unit in -one application disk, containing the full version of user's manual, drivers, utilities, and optional recovery function, etc.. If any item contained is damaged or missing, please contact your local dealer immediately. The package should contain the following items: Notebook Quick Start Manual High-capacity Li-ion battery AC/DC adapter and AC power cord Carry bag (optional) All-in the future. Unpacking...
... ship the unit in -one application disk, containing the full version of user's manual, drivers, utilities, and optional recovery function, etc.. If any item contained is damaged or missing, please contact your local dealer immediately. The package should contain the following items: Notebook Quick Start Manual High-capacity Li-ion battery AC/DC adapter and AC power cord Carry bag (optional) All-in the future. Unpacking...
User Manual
Page 29
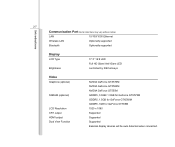
.../1000 Ethernet Wireless LAN Optionally supported Bluetooth Optionally supported Display LCD Type Brightness 17.3" 16:9 LED Full HD Glare/ Anti-Glare LED controlled by K/B hot-keys Video Graphics (optional) SGRAM (optional) LCD Resolution CRT output HDMI output Dual View Function NVIDIA GeForce GTX570M NVIDIA GeForce GTX560M NVIDIA GeForce GT555M GDDR5, 3.0GB/ 1.5GB for GeForce GTX570M GDDR5, 1.5GB for GeForce GTX560M GDDR5, 1GB for GeForce GT555M 1920 x 1080 Supported Supported Supported External display devices will be auto detected when connected.
.../1000 Ethernet Wireless LAN Optionally supported Bluetooth Optionally supported Display LCD Type Brightness 17.3" 16:9 LED Full HD Glare/ Anti-Glare LED controlled by K/B hot-keys Video Graphics (optional) SGRAM (optional) LCD Resolution CRT output HDMI output Dual View Function NVIDIA GeForce GTX570M NVIDIA GeForce GTX560M NVIDIA GeForce GT555M GDDR5, 3.0GB/ 1.5GB for GeForce GTX570M GDDR5, 1.5GB for GeForce GTX560M GDDR5, 1GB for GeForce GT555M 1920 x 1080 Supported Supported Supported External display devices will be auto detected when connected.

User Manual
Page 30
Supported Realtek® ALC892-GR x 2 x 1 x 1 Adjust by K/B hot-key & SW Yes, USB floppy boot up DOS only Fast Boot Support --- Yes WHQL x 1 Introductions 2-8 Special Notification WebCam HD CMOS Camera Audio Sound Controller Internal Speaker Internal Subwoofer Internal Microphone Sound Volume Software & BIOS USB Flash Boot BIOS Others Compliance Kensington Lock Hole The actual graphics chipset preinstalled in the notebook depends on the model you purchased, and may vary without notice.
Supported Realtek® ALC892-GR x 2 x 1 x 1 Adjust by K/B hot-key & SW Yes, USB floppy boot up DOS only Fast Boot Support --- Yes WHQL x 1 Introductions 2-8 Special Notification WebCam HD CMOS Camera Audio Sound Controller Internal Speaker Internal Subwoofer Internal Microphone Sound Volume Software & BIOS USB Flash Boot BIOS Others Compliance Kensington Lock Hole The actual graphics chipset preinstalled in the notebook depends on the model you purchased, and may vary without notice.
User Manual
Page 34
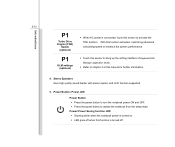
... speed to enhance the system performance. Š Touch this sensor to bring up the setting interface of Keyboard LED Manager application (KLM). Š Refer to chapter 3 of this function is connected, touch this sensor to awake the notebook from the sleep state. Introductions 2-12 P1 Turbo Drive Engine (TDE) Switch (optional) P1 KLM settings (optional) Š When AC power is turned off when this manual for further information. 4.
... speed to enhance the system performance. Š Touch this sensor to bring up the setting interface of Keyboard LED Manager application (KLM). Š Refer to chapter 3 of this function is connected, touch this sensor to awake the notebook from the sleep state. Introductions 2-12 P1 Turbo Drive Engine (TDE) Switch (optional) P1 KLM settings (optional) Š When AC power is turned off when this manual for further information. 4.
User Manual
Page 35
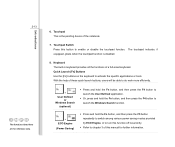
...-in keyboard provides all the functions of this button to activate the specific applications or tools. Quick Launch [Fn] Buttons Use the [Fn] buttons on the keyboard to enable or disable the touchpad function. Touchpad This is disabled. 8. The touchpad indicator, if equipped, glows when the touchpad function is the pointing device of the notebook. 7. With the help of these quick launch buttons, users will be able to do work more efficiently. + User Defined or Windows Search (optional) Š...
...-in keyboard provides all the functions of this button to activate the specific applications or tools. Quick Launch [Fn] Buttons Use the [Fn] buttons on the keyboard to enable or disable the touchpad function. Touchpad This is disabled. 8. The touchpad indicator, if equipped, glows when the touchpad function is the pointing device of the notebook. 7. With the help of these quick launch buttons, users will be able to do work more efficiently. + User Defined or Windows Search (optional) Š...
User Manual
Page 44
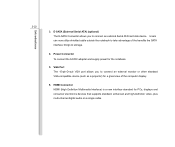
Users can now utilize shielded cable outside the notebook to take advantage of the computer display. 6. HDMI Connector HDMI (High Definition Multimedia Interface) is a new interface standard for the notebook. 5. Power Connector To connect the AC/DC adapter and supply power for PCs, displays and consumer electronics devices that supports standard, enhanced and high-definition video, plus multi-channel digital audio on a single cable. VGA Port The 15-pin-D-sub VGA...
Users can now utilize shielded cable outside the notebook to take advantage of the computer display. 6. HDMI Connector HDMI (High Definition Multimedia Interface) is a new interface standard for the notebook. 5. Power Connector To connect the AC/DC adapter and supply power for PCs, displays and consumer electronics devices that supports standard, enhanced and high-definition video, plus multi-channel digital audio on a single cable. VGA Port The 15-pin-D-sub VGA...
User Manual
Page 54
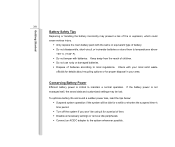
... recycling options or for a period of battery. Š Do not disassemble, short-circuit or incinerate batteries or store them to temperatures above +60° C (+140° F). Š Do not temper with the same or equivalent type of time. Š Disable unnecessary settings or remove idle peripherals. Š Connect an AC/DC adapter to the system whenever possible. If the battery power is...
... recycling options or for a period of battery. Š Do not disassemble, short-circuit or incinerate batteries or store them to temperatures above +60° C (+140° F). Š Do not temper with the same or equivalent type of time. Š Disable unnecessary settings or remove idle peripherals. Š Connect an AC/DC adapter to the system whenever possible. If the battery power is...
User Manual
Page 59
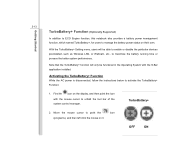
.... Activating the TurboBattery+ Function While the AC power is disconnected, follow the instructions below to unfold the tool bar of the system control manager. Getting Started 3-13 TurboBattery+ Function (Optionally Supported) In addition to ECO Engine function, this notebook also provides a battery power management function, which named TurboBattery+, for users to manage the battery power status on it. Note that the TurboBattery+ function will be functional in the Operating System with the mouse cursor...
.... Activating the TurboBattery+ Function While the AC power is disconnected, follow the instructions below to unfold the tool bar of the system control manager. Getting Started 3-13 TurboBattery+ Function (Optionally Supported) In addition to ECO Engine function, this notebook also provides a battery power management function, which named TurboBattery+, for users to manage the battery power status on it. Note that the TurboBattery+ function will be functional in the Operating System with the mouse cursor...
User Manual
Page 60
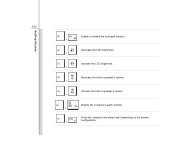
... that which devices preinstalled in the notebook should be switched off manually, such as Bluetooth, Wireless LAN, or Webcam, etc., when these devices are not going through the above steps. 5. Using TurboBattery+ Setting menu This TurboBattery+ Function provides a setting menu for users to activate the TurboBattery+ Function. 4. icon, and then left click the mouse on the tool bar of power saving. When the TurboBattery+ Function is activated, the display will be used temporarily to...
... that which devices preinstalled in the notebook should be switched off manually, such as Bluetooth, Wireless LAN, or Webcam, etc., when these devices are not going through the above steps. 5. Using TurboBattery+ Setting menu This TurboBattery+ Function provides a setting menu for users to activate the TurboBattery+ Function. 4. icon, and then left click the mouse on the tool bar of power saving. When the TurboBattery+ Function is activated, the display will be used temporarily to...

User Manual
Page 64
Getting Started 3-18 Energy Saving Tips Š Activate the ECO power saving function to manage the computer's energy consumption. Š Turn off the monitor after a period of user inactivity. Š Utilize the Fn and F12 sleep mode keys to turn into power saving mode. Š Tune the settings in Power Options under Windows OS to optimize the computer's power management. Š Always disconnect the AC power cord or uninstall the battery pack or switch off the wall socket if the computer would be left unused for a certain time to achieve zero energy consumption.
Getting Started 3-18 Energy Saving Tips Š Activate the ECO power saving function to manage the computer's energy consumption. Š Turn off the monitor after a period of user inactivity. Š Utilize the Fn and F12 sleep mode keys to turn into power saving mode. Š Tune the settings in Power Options under Windows OS to optimize the computer's power management. Š Always disconnect the AC power cord or uninstall the battery pack or switch off the wall socket if the computer would be left unused for a certain time to achieve zero energy consumption.
User Manual
Page 71
Getting Started 3-25 Enable or disable the touchpad function. + Decrease the LCD brightness. + Increase the LCD brightness. + Decrease the built-in speaker's volume. + Increase the built-in speaker's volume. + Disable the computer's audio function. + Force the computer into sleep state (depending on the system configuration). +
Getting Started 3-25 Enable or disable the touchpad function. + Decrease the LCD brightness. + Increase the LCD brightness. + Decrease the built-in speaker's volume. + Increase the built-in speaker's volume. + Disable the computer's audio function. + Force the computer into sleep state (depending on the system configuration). +
User Manual
Page 77
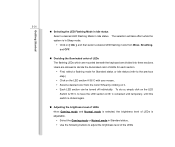
... clicked again. „ Adjusting the brightness level of LEDs When Gaming mode and Normal mode is selected, the brightness level of LEDs The flashing LEDs which are mounted beneath the keyboard are allowed to the previous step.) y Click on it, y Each LED section can be turned off individually. Getting Started 3-31 „ Selecting the LED Flashing Mode in Idle status Select a desired LED Flashing Mode in Sleep mode. y Click on [ Idle...
... clicked again. „ Adjusting the brightness level of LEDs When Gaming mode and Normal mode is selected, the brightness level of LEDs The flashing LEDs which are mounted beneath the keyboard are allowed to the previous step.) y Click on it, y Each LED section can be turned off individually. Getting Started 3-31 „ Selecting the LED Flashing Mode in Idle status Select a desired LED Flashing Mode in Sleep mode. y Click on [ Idle...
User Manual
Page 80
... personal needs. Getting Started 3-34 Using the Touchpad Read the following description to learn how to use the standard Microsoft or IBM PS/2 driver in Control Panel allows you can change the configuration. „ Positioning and Moving Place your finger on the touchpad or press the left -handed user, you can use the touchpad: „ Configuring the Touchpad You can act as a miniature duplicate of your display...
... personal needs. Getting Started 3-34 Using the Touchpad Read the following description to learn how to use the standard Microsoft or IBM PS/2 driver in Control Panel allows you can change the configuration. „ Positioning and Moving Place your finger on the touchpad or press the left -handed user, you can use the touchpad: „ Configuring the Touchpad You can act as a miniature duplicate of your display...
User Manual
Page 89
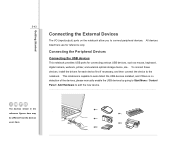
... the devices, please manually enable the USB devices by going to Start Menu / Control Panel / Add Hardware to connect peripheral devices. Connecting the Peripheral Devices Connecting the USB devices This notebook provides USB ports for each device first if necessary, and then connect the device to the notebook. To connect these devices, install the drivers for connecting various USB devices, such as mouse, keyboard, digital camera, webcam, printer, and external optical storage device, ete.. The devices shown in the reference figures here may be different from the devices users have...
... the devices, please manually enable the USB devices by going to Start Menu / Control Panel / Add Hardware to connect peripheral devices. Connecting the Peripheral Devices Connecting the USB devices This notebook provides USB ports for each device first if necessary, and then connect the device to the notebook. To connect these devices, install the drivers for connecting various USB devices, such as mouse, keyboard, digital camera, webcam, printer, and external optical storage device, ete.. The devices shown in the reference figures here may be different from the devices users have...
User Manual
Page 90
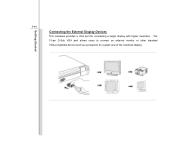
The 15-pin D-Sub VGA port allows users to connect an external monitor or other standard VGA-compatible device (such as a projector) for connecting a larger display with higher resolution. Getting Started 3-44 Connecting the External Display Devices This notebook provides a VGA port for a great view of the notebook display.
The 15-pin D-Sub VGA port allows users to connect an external monitor or other standard VGA-compatible device (such as a projector) for connecting a larger display with higher resolution. Getting Started 3-44 Connecting the External Display Devices This notebook provides a VGA port for a great view of the notebook display.
User Manual
Page 91
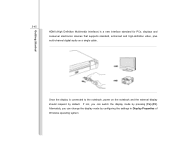
Once the display is a new interface standard for PCs, displays and consumer electronics devices that supports standard, enhanced and high-definition video, plus multi-channel digital audio on the notebook and the external display should respond by default. Alternately, you can change the display mode by pressing [Fn]+[F2]. Getting Started 3-45 HDMI (High Definition Multimedia Interface) is connected to the notebook, power on a single cable. If not, you can switch the display mode by configuring the settings in Display Properties of Windows operating system.
Once the display is a new interface standard for PCs, displays and consumer electronics devices that supports standard, enhanced and high-definition video, plus multi-channel digital audio on the notebook and the external display should respond by default. Alternately, you can change the display mode by pressing [Fn]+[F2]. Getting Started 3-45 HDMI (High Definition Multimedia Interface) is connected to the notebook, power on a single cable. If not, you can switch the display mode by configuring the settings in Display Properties of Windows operating system.
User Manual
Page 97
... an optical drive device, and this storage device may be upgradable and replaceable by the authorized dealer or service center. This notebook is equipped with a hard disk drive, and this device may be upgradable and replaceable by the authorized dealer or service center. Additional memory module may be installed, by users. To replace the battery pack, please refer to increase the performance of Using Battery power for details. Getting Started 3-51 1 2 3 4 This notebook is equipped...
... an optical drive device, and this storage device may be upgradable and replaceable by the authorized dealer or service center. This notebook is equipped with a hard disk drive, and this device may be upgradable and replaceable by the authorized dealer or service center. Additional memory module may be installed, by users. To replace the battery pack, please refer to increase the performance of Using Battery power for details. Getting Started 3-51 1 2 3 4 This notebook is equipped...
User Manual
Page 108
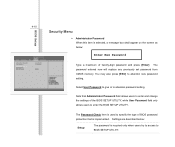
... password entered now will replace any previously set password from CMOS memory. Settings are described below : Enter New Password Type a maximum of BIOS password protection that Administrator Password field allows users to enter and change the settings of the BIOS SETUP UTILITY, while User Password field only allows users to BIOS SETUP UTILITY. Select User Password to give or to abandon new password setting. BIOS Setup 4-10 Security Menu Š Administrator Password When this item is selected, a message box shall appear on the screen as below : Setup The password is...
... password entered now will replace any previously set password from CMOS memory. Settings are described below : Enter New Password Type a maximum of BIOS password protection that Administrator Password field allows users to enter and change the settings of the BIOS SETUP UTILITY, while User Password field only allows users to BIOS SETUP UTILITY. Select User Password to give or to abandon new password setting. BIOS Setup 4-10 Security Menu Š Administrator Password When this item is selected, a message box shall appear on the screen as below : Setup The password is...


