User Guide
Page 23
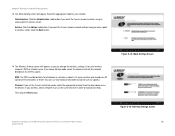
... the Camera to communicate using an access point or wireless router. Compact Wireless-G Internet Video Camera 13. Figure 5-12: Mode Settings Screen Figure 5-13: Wireless Settings Screen Chapter 5: Setting up and Mounting the Compact Wireless-G Internet Video Camera 15 Setup Wizard Select the appropriate mode for all devices in order to Ad-Hoc mode, select the appropriate channel from the drop-down...
... the Camera to communicate using an access point or wireless router. Compact Wireless-G Internet Video Camera 13. Figure 5-12: Mode Settings Screen Figure 5-13: Wireless Settings Screen Chapter 5: Setting up and Mounting the Compact Wireless-G Internet Video Camera 15 Setup Wizard Select the appropriate mode for all devices in order to Ad-Hoc mode, select the appropriate channel from the drop-down...

User Guide
Page 31
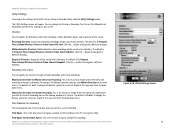
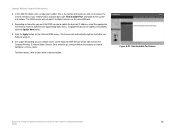
... drop the Camera to the Camera. Displayed here is divided into three sections, Camera Status, Camera functions, and viewing windows for Channels 1-8 of your desktop's taskbar. It is the Channel setting used by the Camera within the Utility. (The Utility offers up to control Wireless-G and Wireless-B Internet Video Cameras on... Multi-Camera Viewer & Recorder Utility icon will see the Utility's main screen. button in the system tray, and then click Main Program. NOTE: This Multi-Camera Viewer & Recorder Utility is the name you can use the scroll bar on your network. VIDEO ON/...
... drop the Camera to the Camera. Displayed here is divided into three sections, Camera Status, Camera functions, and viewing windows for Channels 1-8 of your desktop's taskbar. It is the Channel setting used by the Camera within the Utility. (The Utility offers up to control Wireless-G and Wireless-B Internet Video Cameras on... Multi-Camera Viewer & Recorder Utility icon will see the Utility's main screen. button in the system tray, and then click Main Program. NOTE: This Multi-Camera Viewer & Recorder Utility is the name you can use the scroll bar on your network. VIDEO ON/...

User Guide
Page 34
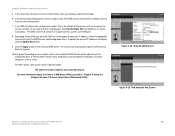
...want to make the viewing window twice as large, click this icon. Drag and drop the Camera to a different viewing window with audio, you want to record the current video, click this icon. Then use this icon. Click the icon again to a Channel...A digital zoom feature is available. instead, you want to change the Camera's Channel setting; Compact Wireless-G Internet Video Camera View Video The Camera Status section lists all of a specific Camera, select a Camera. To view the video of the Cameras the Utility has detected. If you want to raise or lower the ...
...want to make the viewing window twice as large, click this icon. Drag and drop the Camera to a different viewing window with audio, you want to record the current video, click this icon. Then use this icon. Click the icon again to a Channel...A digital zoom feature is available. instead, you want to change the Camera's Channel setting; Compact Wireless-G Internet Video Camera View Video The Camera Status section lists all of a specific Camera, select a Camera. To view the video of the Cameras the Utility has detected. If you want to raise or lower the ...

User Guide
Page 38
.... If you want the video recording to save the new scheduled motion detection video. To refresh the current image, click the Refresh Image button. To delete a scheduled motion detection video, select the video from the drop-down menu. 3 x 3 (default). Compact Wireless-G Internet Video Camera Snapshots Click the Snapshot Pictures...sensitivity levels for motion. Select the time you want it split into nine sections (see the on a networked PC. By default, the Camera's field of scheduled motion detection recordings will appear and display the available SnapShot folders. If you want ...
.... If you want the video recording to save the new scheduled motion detection video. To refresh the current image, click the Refresh Image button. To delete a scheduled motion detection video, select the video from the drop-down menu. 3 x 3 (default). Compact Wireless-G Internet Video Camera Snapshots Click the Snapshot Pictures...sensitivity levels for motion. Select the time you want it split into nine sections (see the on a networked PC. By default, the Camera's field of scheduled motion detection recordings will appear and display the available SnapShot folders. If you want ...
User Guide
Page 39
...Disk Allocation for recording. Maximum time frame for Motion Detection Recording. This is C:\Program Files\Linksys\Wireless-G Internet Video Camera\Motion. To change the default, select the maximum length of time you click the Instant ...Linksys\Wireless-G Internet Video Camera\Record. Chapter 6: Installing and Using the Compact Wireless-G Internet Video Camera Multi-Camera Viewer & Recorder Utility Using the Multi-Camera Viewer & Recorder Utility Figure 6-19: Utility Settings Screen 31 Directory You can designate how much hard disk space you want from the drop...
...Disk Allocation for recording. Maximum time frame for Motion Detection Recording. This is C:\Program Files\Linksys\Wireless-G Internet Video Camera\Motion. To change the default, select the maximum length of time you click the Instant ...Linksys\Wireless-G Internet Video Camera\Record. Chapter 6: Installing and Using the Compact Wireless-G Internet Video Camera Multi-Camera Viewer & Recorder Utility Using the Multi-Camera Viewer & Recorder Utility Figure 6-19: Utility Settings Screen 31 Directory You can designate how much hard disk space you want from the drop...
User Guide
Page 52
... click Find Available Port and follow the on how to configure a Linksys router. The Camera has been added to update the dynamic IP address, select the appropriate time interval from the DDNS Service Update drop-down menu. In the Username, Password, and Your Domain fields, ... on your network router, so the SoloLink DDNS Service will use the same WAN port. 8. Set up the Linksys SoloLink™ DDNS Service 44 SoloLink Registration of the port you want the DDNS service to your SoloLink account information. 6. Go to track the Compact Wireless-G Internet Video Camera. Figure 7-...
... click Find Available Port and follow the on how to configure a Linksys router. The Camera has been added to update the dynamic IP address, select the appropriate time interval from the DDNS Service Update drop-down menu. In the Username, Password, and Your Domain fields, ... on your network router, so the SoloLink DDNS Service will use the same WAN port. 8. Set up the Linksys SoloLink™ DDNS Service 44 SoloLink Registration of the port you want the DDNS service to your SoloLink account information. 6. Go to track the Compact Wireless-G Internet Video Camera. Figure 7-...

User Guide
Page 54
... as a flip, mirror, or rotated image. Compact Wireless-G Internet Video Camera View Video Follow these instructions to see the Camera's video, click the Yes button. 3. NOTE: To view video using a web browser, you the video from the drop-down menu. You can resize the image, zoom, take...image as an image rotated 180º, click this icon. Chapter 8: Using the Compact Wireless-G Internet Video Camera's Web-based Utility View Video Figure 8-3: Security Warning Screen Figure 8-4: View Video Screen 46 The snapshot will not work with Netscape. Size Selection. To view the ...
... as a flip, mirror, or rotated image. Compact Wireless-G Internet Video Camera View Video Follow these instructions to see the Camera's video, click the Yes button. 3. NOTE: To view video using a web browser, you the video from the drop-down menu. You can resize the image, zoom, take...image as an image rotated 180º, click this icon. Chapter 8: Using the Compact Wireless-G Internet Video Camera's Web-based Utility View Video Figure 8-3: Security Warning Screen Figure 8-4: View Video Screen 46 The snapshot will not work with Netscape. Size Selection. To view the ...

User Guide
Page 56
...Camera is based on the same wireless network. Description. Click the Enable radio button if you want the LED permanently disabled. Time Zone. To adjust the Camera's current time for the Camera's location. If the Camera will obtain an IP address automatically from the drop-...hoc mode, select its date and time with your PC. Enter the network's SSID or network name here. Chapter 8: Using the Compact Wireless-G Internet Video Camera's Web-based Utility Setup Figure 8-7: Basic - LAN and Wireless Settings Screen 48 Device Settings Device ID. Adjust for daylight savings. Device ...
...Camera is based on the same wireless network. Description. Click the Enable radio button if you want the LED permanently disabled. Time Zone. To adjust the Camera's current time for the Camera's location. If the Camera will obtain an IP address automatically from the drop-...hoc mode, select its date and time with your PC. Enter the network's SSID or network name here. Chapter 8: Using the Compact Wireless-G Internet Video Camera's Web-based Utility Setup Figure 8-7: Basic - LAN and Wireless Settings Screen 48 Device Settings Device ID. Adjust for daylight savings. Device ...

User Guide
Page 63
...Registration Status. The date and time of the port you will use the SoloLink DDNS service for each Camera you want to remove the Camera from the drop-down menu. The Device Removal screen will be registered with your SoloLink account. Enter the number of... website to update the dynamic IP address, select the appropriate time interval from the DDNS service account, click the Remove Camera button. Chapter 8: Using the Compact Wireless-G Internet Video Camera's Web-based Utility Setup Figure 8-18: SoloLink Screen, continued Figure 8-19: Manage Your SoloLink DDNS Account Figure 8-20...
...Registration Status. The date and time of the port you will use the SoloLink DDNS service for each Camera you want to remove the Camera from the drop-down menu. The Device Removal screen will be registered with your SoloLink account. Enter the number of... website to update the dynamic IP address, select the appropriate time interval from the DDNS service account, click the Remove Camera button. Chapter 8: Using the Compact Wireless-G Internet Video Camera's Web-based Utility Setup Figure 8-18: SoloLink Screen, continued Figure 8-19: Manage Your SoloLink DDNS Account Figure 8-20...
User Guide
Page 64
...Update drop-down menu. In the WAN Port field, enter a unique port number. Depending on how often you need to track the Compact Wireless-G Internet Video Camera. The Camera will be able to find an available port, click Find Available Port and follow the on your network router... WAN port. 4. For other routers, refer to access the Camera remotely. If you want the DDNS service to configure a Linksys router. Figure 8-21: Find Available Port Screen Chapter 8: Using the Compact Wireless-G Internet Video Camera's Web-based Utility 56 Setup To update the dynamic IP address...
...Update drop-down menu. In the WAN Port field, enter a unique port number. Depending on how often you need to track the Compact Wireless-G Internet Video Camera. The Camera will be able to find an available port, click Find Available Port and follow the on your network router... WAN port. 4. For other routers, refer to access the Camera remotely. If you want the DDNS service to configure a Linksys router. Figure 8-21: Find Available Port Screen Chapter 8: Using the Compact Wireless-G Internet Video Camera's Web-based Utility 56 Setup To update the dynamic IP address...

User Guide
Page 65
.... Specify the minimum time interval between E-mails. If you want to be notified by e-mail when the Camera detects motion, then select Enable from the drop-down menu. Two motion detection areas will receive e-mail alerts. (You can choose to save your environment.... labeled Area 1 and Area 2. Enter the text that you want to a maximum of your changes. E-Mail Video. The default is 2 minutes. Chapter 8: Using the Compact Wireless-G Internet Video Camera's Web-based Utility Setup Figure 8-22: Options Screen Figure 8-23: Options Screen, continued Figure 8-24: Motion ...
.... Specify the minimum time interval between E-mails. If you want to be notified by e-mail when the Camera detects motion, then select Enable from the drop-down menu. Two motion detection areas will receive e-mail alerts. (You can choose to save your environment.... labeled Area 1 and Area 2. Enter the text that you want to a maximum of your changes. E-Mail Video. The default is 2 minutes. Chapter 8: Using the Compact Wireless-G Internet Video Camera's Web-based Utility Setup Figure 8-22: Options Screen Figure 8-23: Options Screen, continued Figure 8-24: Motion ...