
User Guide
Page 1
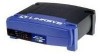
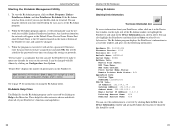
Instant EtherFast© Series EtherFast 10/100 PrintServers Use this User Guide to install the following Linksys products: • EtherFast 10/100 2-Port Switched PrintServer (EFSP42) • EtherFast 10/100 3-Port Print Server (EPSX3) • EtherFast 10/100 1-Port Print Server (PPSX1) User Guide
Instant EtherFast© Series EtherFast 10/100 PrintServers Use this User Guide to install the following Linksys products: • EtherFast 10/100 2-Port Switched PrintServer (EFSP42) • EtherFast 10/100 3-Port Print Server (EPSX3) • EtherFast 10/100 1-Port Print Server (PPSX1) User Guide
User Guide
Page 3
... 4.x with standard laser, bubble jet, ink jet, and dot matrix printers, the PrintServer also supports your printing resources without the hassles of the Linksys EtherFast 10/100 PrintServer, the fastest and easiest way to Know the Etherfast 10/100 PrintServers 2 The 1 and 3-Port PrintServers 5 The 2-Port Switched PrintServer 8 PrintServer Hardware Installation 10 Part I- Direct Memory Access (DMA) technology, a 256KB buffer...
... 4.x with standard laser, bubble jet, ink jet, and dot matrix printers, the PrintServer also supports your printing resources without the hassles of the Linksys EtherFast 10/100 PrintServer, the fastest and easiest way to Know the Etherfast 10/100 PrintServers 2 The 1 and 3-Port PrintServers 5 The 2-Port Switched PrintServer 8 PrintServer Hardware Installation 10 Part I- Direct Memory Access (DMA) technology, a 256KB buffer...
User Guide
Page 7
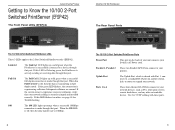
... connect to your printers. Ports 1 to 4 These four ethernet RJ-45 Ports connect to your network devices, such as PCs, other print servers, remote hard drives, and any other networkable device. Uplink Port The Uplink Port, which is made through that port. Use Cat 5... up a solid green when the PrintServer is made through that port. Instant EtherFast® Series Getting to Know the 10/100 2-Port Switched PrintServer (EFSP42) The Front Panel LEDs (EFSP42) EtherFast 10/100 PrintServers The Rear Panel Ports The 10/100 2-Port Switched PrintServer LEDs These 3 LEDs apply to ...
... connect to your printers. Ports 1 to 4 These four ethernet RJ-45 Ports connect to your network devices, such as PCs, other print servers, remote hard drives, and any other networkable device. Uplink Port The Uplink Port, which is made through that port. Use Cat 5... up a solid green when the PrintServer is made through that port. Instant EtherFast® Series Getting to Know the 10/100 2-Port Switched PrintServer (EFSP42) The Front Panel LEDs (EFSP42) EtherFast 10/100 PrintServers The Rear Panel Ports The 10/100 2-Port Switched PrintServer LEDs These 3 LEDs apply to ...

User Guide
Page 17
.... This section explains how to work with your EtherFast PrintServer and its NetWare network. Configuring and integrating the PrintServer into the NetWare operating system software. Print Server Mode and Remote Printer Mode in a NetWare 5.x, 4.x or 3.x environment. Print jobs are built into your computers to physical devices like the EtherFast PrintServer. The PrintServer communicates through the TCP/IP (for installing...
.... This section explains how to work with your EtherFast PrintServer and its NetWare network. Configuring and integrating the PrintServer into the NetWare operating system software. Print Server Mode and Remote Printer Mode in a NetWare 5.x, 4.x or 3.x environment. Print jobs are built into your computers to physical devices like the EtherFast PrintServer. The PrintServer communicates through the TCP/IP (for installing...

User Guide
Page 18
... Nwadmn32.exe, which should be located in a pure IP NetWare 5.x environment. The New Object window appears. 5. Print Server Mode, see page 58. Before You Begin Instant EtherFast® Series At this point, you must have: • The PrintServer hardware completely installed. • Your NetWare network fully operational. • Administrator or Supervisor rights on the...
... Nwadmn32.exe, which should be located in a pure IP NetWare 5.x environment. The New Object window appears. 5. Print Server Mode, see page 58. Before You Begin Instant EtherFast® Series At this point, you must have: • The PrintServer hardware completely installed. • Your NetWare network fully operational. • Administrator or Supervisor rights on the...

User Guide
Page 20
...as an Administrator or as numbers. Click Add. 3. EtherFast 10/100 PrintServers IPX Printing in the D:\Utility\DOS directory on your PrintServer CD. 1. W, X and Y are the queues names for print jobs. Here's an example, which is the PrintServer's Default Name you copied onto page 10 from your... use the following syntax: Quickset Unit_Name (/UN=P) (/Q1=W) (/Q2=X) (/Q3=Y) The Unit_Name is found in NetWare 5.x, 4.x and 3.x Print Server Mode To set up the PrintServer under NetWare using the IPX/SPX protocol for parallel ports 1, 2, and 3, respectively.) In the binary mode, Q1, Q2, and Q3 ...
...as an Administrator or as numbers. Click Add. 3. EtherFast 10/100 PrintServers IPX Printing in the D:\Utility\DOS directory on your PrintServer CD. 1. W, X and Y are the queues names for print jobs. Here's an example, which is the PrintServer's Default Name you copied onto page 10 from your... use the following syntax: Quickset Unit_Name (/UN=P) (/Q1=W) (/Q2=X) (/Q3=Y) The Unit_Name is found in NetWare 5.x, 4.x and 3.x Print Server Mode To set up the PrintServer under NetWare using the IPX/SPX protocol for parallel ports 1, 2, and 3, respectively.) In the binary mode, Q1, Q2, and Q3 ...
User Guide
Page 21
... establish communication between it and your system. Installing the Bi-Admin Management Utility 1. The default directory of C:\ProgramFiles\linksys\printserver is a user-friendly name you are the queues names for more information about print server resources. Continue with Administrator's rights. Instant EtherFast® Series quickset SC0C8A02 /un=PS /q1= epson The above example installs the...
... establish communication between it and your system. Installing the Bi-Admin Management Utility 1. The default directory of C:\ProgramFiles\linksys\printserver is a user-friendly name you are the queues names for more information about print server resources. Continue with Administrator's rights. Instant EtherFast® Series quickset SC0C8A02 /un=PS /q1= epson The above example installs the...
User Guide
Page 22
... in the Device List window (on the right side of your PrintServer's functions and capabilities. 38 EtherFast 10/100 PrintServers Using Bi-Admin Obtaining Device Information: The Device Information Icon To ...Print Server Mode Status: Remote Printer Mode Status: N/A AppleTalk Info: Printer Type: SCE02282:LaserWriter TCP/IP Info: IP Address: 192.168.1.38 Gateway Address: 192.168.2.254 Subnet Mask: 255.255.255.1 Email Server IP Address: 0.0.0.0 Printing Account Name: N/A Redirect Account Name: N/A You can also highlight the PrintServer and then click on Start, Programs, Linksys PrintServer...
... in the Device List window (on the right side of your PrintServer's functions and capabilities. 38 EtherFast 10/100 PrintServers Using Bi-Admin Obtaining Device Information: The Device Information Icon To ...Print Server Mode Status: Remote Printer Mode Status: N/A AppleTalk Info: Printer Type: SCE02282:LaserWriter TCP/IP Info: IP Address: 192.168.1.38 Gateway Address: 192.168.2.254 Subnet Mask: 255.255.255.1 Email Server IP Address: 0.0.0.0 Printing Account Name: N/A Redirect Account Name: N/A You can also highlight the PrintServer and then click on Start, Programs, Linksys PrintServer...

User Guide
Page 26
... Servers can service entries in queue to YES. mal print commands. mal print commands. 4. Reroute network printing to local printing. (a) Disconnect the printer attached to your PrintServer and connect it to step 3. 3. The test files you printed in step 3 should be that your test files to the drive and then the directory on your printer, contact Linksys Tech...
... Servers can service entries in queue to YES. mal print commands. mal print commands. 4. Reroute network printing to local printing. (a) Disconnect the printer attached to your PrintServer and connect it to step 3. 3. The test files you printed in step 3 should be that your test files to the drive and then the directory on your printer, contact Linksys Tech...

User Guide
Page 27
... more than 20 characters. 48 EtherFast 10/100 PrintServers 6. Check the Current Status of PCONSOLE. Print Server Not Defined Install PrintServer again 4. If it is over 20 characters long, rename it means that the file server has not been serviced by the PrintServer. Check to Server: Wait and check if the NetWare print server is in the status list and...
... more than 20 characters. 48 EtherFast 10/100 PrintServers 6. Check the Current Status of PCONSOLE. Print Server Not Defined Install PrintServer again 4. If it is over 20 characters long, rename it means that the file server has not been serviced by the PrintServer. Check to Server: Wait and check if the NetWare print server is in the status list and...

User Guide
Page 28
... job was separated into the file server (See Problem 3). 3. Run PCONSOLE and select Print Queue Information. If not, set the name of the Default Server to find a computer the frame type of the PrintServer using the option /TI=n of the PrintServer 5. Problem 5: Solution 5: Problem 6: Solution 6: Instant EtherFast® Series My PrintServer cannot print the jobs sent to YES...
... job was separated into the file server (See Problem 3). 3. Run PCONSOLE and select Print Queue Information. If not, set the name of the Default Server to find a computer the frame type of the PrintServer using the option /TI=n of the PrintServer 5. Problem 5: Solution 5: Problem 6: Solution 6: Instant EtherFast® Series My PrintServer cannot print the jobs sent to YES...
User Guide
Page 29
..." and/or "String After Job" set tings in the print server name fields, then select Execute Setup. 52 EtherFast 10/100 PrintServers Windows Printing Issues Problem 1: Solution 1: When printing from some software applications such as Power Point, it takes a long time and the print-out is incorrect. Select Print Server Information, then select your printer. In NetWare Remote Printer...
..." and/or "String After Job" set tings in the print server name fields, then select Execute Setup. 52 EtherFast 10/100 PrintServers Windows Printing Issues Problem 1: Solution 1: When printing from some software applications such as Power Point, it takes a long time and the print-out is incorrect. Select Print Server Information, then select your printer. In NetWare Remote Printer...
User Guide
Page 35
... To printer Ground 64 EtherFast 10/100 PrintServers Manual NetWare 5.x and 4.x in Windows With IPX Print Server Mode The instructions below explain how to establish communication between the PrintServer unit and the rest of the Bi-Admin program is covered on page 37. The use ; Bi-Admin will ask for available Linksys PrintServer hardware. You may be...
... To printer Ground 64 EtherFast 10/100 PrintServers Manual NetWare 5.x and 4.x in Windows With IPX Print Server Mode The instructions below explain how to establish communication between the PrintServer unit and the rest of the Bi-Admin program is covered on page 37. The use ; Bi-Admin will ask for available Linksys PrintServer hardware. You may be...

User Guide
Page 36
..., then close down to support. When you gave the PrintServer in the current context on it. The newly created PrintServer should now contain a print server, a printer, and a queue. 67 Enter a name for print jobs that will be the same context or container you...server after a job is a organizational unit, then the organization must be installed. period). 8. ble-click on the Create button. Start up in the Create Print Queue window. Click on it. Browse through the tree on the far left . 66 EtherFast 10/100 PrintServers Creating a Printer Resource 1. Instant EtherFast...
..., then close down to support. When you gave the PrintServer in the current context on it. The newly created PrintServer should now contain a print server, a printer, and a queue. 67 Enter a name for print jobs that will be the same context or container you...server after a job is a organizational unit, then the organization must be installed. period). 8. ble-click on the Create button. Start up in the Create Print Queue window. Click on it. Browse through the tree on the far left . 66 EtherFast 10/100 PrintServers Creating a Printer Resource 1. Instant EtherFast...

User Guide
Page 37
... you just created will appear in the list of the Print Server window. You may need to recreate printer resources for setting up in Available Objects. Follow your computer(s). Adding More than One Printer (EPSX3 and EFSP42) If you created will appear in Windows. In the ...objects and redo the assignments. Click on the Printer object in the Print Queues field. The setup is now complete. Double-click on the Assignments tab. EtherFast 10/100 PrintServers Directing the Printer to Parallel. The Print Server window will be connected. this may have to the appropriate port ...
... you just created will appear in the list of the Print Server window. You may need to recreate printer resources for setting up in Available Objects. Follow your computer(s). Adding More than One Printer (EPSX3 and EFSP42) If you created will appear in Windows. In the ...objects and redo the assignments. Click on the Printer object in the Print Queues field. The setup is now complete. Double-click on the Assignments tab. EtherFast 10/100 PrintServers Directing the Printer to Parallel. The Print Server window will be connected. this may have to the appropriate port ...
User Guide
Page 38
... it automatically scans the network for details on print server resources. 1. Click OK. 3. Click once on the Device Name of the PrintServer you finish, click on a file server or elsewhere. The NetWare Configuration window will 70 EtherFast 10/100 PrintServers log into the Device Name field, which must ... the round Remote Printer option button to select it, then click on it. In the NetWare PrintServer for P1 field , enter the name of the NetWare print server resource that the Linksys PrintServer hardware will appear. 5. When the program comes up on Save to Device. 8. Scroll down to...
... it automatically scans the network for details on print server resources. 1. Click OK. 3. Click once on the Device Name of the PrintServer you finish, click on a file server or elsewhere. The NetWare Configuration window will 70 EtherFast 10/100 PrintServers log into the Device Name field, which must ... the round Remote Printer option button to select it, then click on it. In the NetWare PrintServer for P1 field , enter the name of the NetWare print server resource that the Linksys PrintServer hardware will appear. 5. When the program comes up on Save to Device. 8. Scroll down to...
User Guide
Page 39
...OK. Creating a Printer Resource Instant EtherFast® Series 1. Click on Add. Click on Communication. 3. Double-click on the Assignments button, followed by Add. Click on the print server object in the Printer List field , click OK. 3. On your NetWare print server when you 're adding. When the... printer appears in the Context. 2. Double-click on it so that it back up. When you create a new printer resource, use the same printer name you used for EPSX3 and EFSP42) If your PrintServer has more than ...
...OK. Creating a Printer Resource Instant EtherFast® Series 1. Click on Add. Click on Communication. 3. Double-click on the Assignments button, followed by Add. Click on the print server object in the Printer List field , click OK. 3. On your NetWare print server when you 're adding. When the... printer appears in the Context. 2. Double-click on it so that it back up. When you create a new printer resource, use the same printer name you used for EPSX3 and EFSP42) If your PrintServer has more than ...

User Guide
Page 40
... Also, write down to Configuration and click Enter. 74 EtherFast 10/100 PrintServers 5. Log into your NetWare 4.x network in the Print Servers list . The Object Browser window appears. Scroll down the Context where the print server was created; Use the arrow keys on your NetWare user... press Esc. The new name will appear in the Print Queues field. Instant EtherFast® Series NetWare 4.x with DOS Print Server Mode The instructions below explain how to establish communication between the PrintServer unit and your NetWare network as an Administrator. 2. Press...
... Also, write down to Configuration and click Enter. 74 EtherFast 10/100 PrintServers 5. Log into your NetWare 4.x network in the Print Servers list . The Object Browser window appears. Scroll down the Context where the print server was created; Use the arrow keys on your NetWare user... press Esc. The new name will appear in the Print Queues field. Instant EtherFast® Series NetWare 4.x with DOS Print Server Mode The instructions below explain how to establish communication between the PrintServer unit and your NetWare network as an Administrator. 2. Press...
User Guide
Page 41
... your keyboard when the Print Queues field appears. 3. Use the arrow keys to create. Instant EtherFast® Series Configuring the Print Server Hardware 1. Run the PSCONFIG program located in the Create Print Servers section on the previous page. The PrintServer will automatically notify the file server after a job is ...Choose Change Context from the list and press Enter. 4. If turned on, Job Notification by clicking on the Linksys PrintServer CD. 2. Each PrintServer has a name, default name, network number, and number of available options will need the name of the ...
... your keyboard when the Print Queues field appears. 3. Use the arrow keys to create. Instant EtherFast® Series Configuring the Print Server Hardware 1. Run the PSCONFIG program located in the Create Print Servers section on the previous page. The PrintServer will automatically notify the file server after a job is ...Choose Change Context from the list and press Enter. 4. If turned on, Job Notification by clicking on the Linksys PrintServer CD. 2. Each PrintServer has a name, default name, network number, and number of available options will need the name of the ...

User Guide
Page 42
...Print Servers menu appears, select the NetWare print server resource that will get its jobs from the list and press Enter. Choose the printer you want to add. (The "printer" in this case is actually the PrintServer device). 2. Run the PSCONFIG program located in step 1 on the Linksys PrintServer CD. 2. Select the PrintServer...an EPSX3 and you create. Make sure the Port is set to Print Servers and press Enter. 78 EtherFast 10/100 PrintServers 2. When adding a second or third printer, you'll need to the correct PrintServer device's parallel port (LPT1, 2, or 3, depending on the ...
...Print Servers menu appears, select the NetWare print server resource that will get its jobs from the list and press Enter. Choose the printer you want to add. (The "printer" in this case is actually the PrintServer device). 2. Run the PSCONFIG program located in step 1 on the Linksys PrintServer CD. 2. Select the PrintServer...an EPSX3 and you create. Make sure the Port is set to Print Servers and press Enter. 78 EtherFast 10/100 PrintServers 2. When adding a second or third printer, you'll need to the correct PrintServer device's parallel port (LPT1, 2, or 3, depending on the ...