User Guide
Page 3
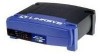
... Windows NT 4.0 Port Configuration 23 NetWare Driver Setup 29 Pure IP NetWare 5.x Setup 31 IPX Printing in NetWare 5.x, 4.x, 3.x 35 Bi-Admin: PrintServer Management 37 Installing Bi-Admin 37 Starting Bi-Admin 38 Using...Linksys EtherFast 10/100 PrintServer, the fastest and easiest way to offer four integrated 10/100 Switched Ports, giving your network the combined power of a switch and print server in your PrintServer handling print jobs up to 50% faster than regular print serverseven complex graphics and layout jobs. 1 The EtherFast 10/100 2-Port Switched PrintServer (EFSP42...
... Windows NT 4.0 Port Configuration 23 NetWare Driver Setup 29 Pure IP NetWare 5.x Setup 31 IPX Printing in NetWare 5.x, 4.x, 3.x 35 Bi-Admin: PrintServer Management 37 Installing Bi-Admin 37 Starting Bi-Admin 38 Using...Linksys EtherFast 10/100 PrintServer, the fastest and easiest way to offer four integrated 10/100 Switched Ports, giving your network the combined power of a switch and print server in your PrintServer handling print jobs up to 50% faster than regular print serverseven complex graphics and layout jobs. 1 The EtherFast 10/100 2-Port Switched PrintServer (EFSP42...

User Guide
Page 6
...EtherFast 10/100 PrintServers Dip Switches Settings (1 and 3-Port Models Only) There are automatically disabled. Set your network cabling. Dip Switch 3: This dip switch controls the duplex mode of your dip switches as Link/Act on too long, see page 44 for a few seconds. Note: The 2-Port Switched PrintServer (EFSP42...transfer runs in the down position. This LED is successfully completed. Not all PrintServer models will also light up . If this LED will have any dip switches. 6 7 When assigning an IP address, this LED stays on the 2-Port model. For 10Mbps transfer, ...
...EtherFast 10/100 PrintServers Dip Switches Settings (1 and 3-Port Models Only) There are automatically disabled. Set your network cabling. Dip Switch 3: This dip switch controls the duplex mode of your dip switches as Link/Act on too long, see page 44 for a few seconds. Note: The 2-Port Switched PrintServer (EFSP42...transfer runs in the down position. This LED is successfully completed. Not all PrintServer models will also light up . If this LED will have any dip switches. 6 7 When assigning an IP address, this LED stays on the 2-Port model. For 10Mbps transfer, ...

User Guide
Page 9
...IP address assigned to each of the computers on your Windows 98, 95, or NT computers to one of D:\Driver\Win9xNT onto a floppy disk. This setup should be assigned in this point, you must have: • the PrintServer hardware installed on each of your printer(s) to give them PrintServer printing...your CD drive is fully compatible with your network. EtherFast 10/100 PrintServers Part I - At this first installation on your printer(s). If not, see page 11. • TCP/IP installed on your computers. The IP address for cabling specifications. 2. Connect your computers. Some...
...IP address assigned to each of the computers on your Windows 98, 95, or NT computers to one of D:\Driver\Win9xNT onto a floppy disk. This setup should be assigned in this point, you must have: • the PrintServer hardware installed on each of your printer(s) to give them PrintServer printing...your CD drive is fully compatible with your network. EtherFast 10/100 PrintServers Part I - At this first installation on your printer(s). If not, see page 11. • TCP/IP installed on your computers. The IP address for cabling specifications. 2. Connect your computers. Some...

User Guide
Page 10
If your computer is the network administrator's computer, check Install TCP/IP Setup Program (System Administrator only). The Install Wizard window appears. Click Next. 14 15 Otherwise, select the default, Install Linksys PrintServer Driver. Click Next to accept the Destination Directory default, shown below. 5. The Select Components window appears. EtherFast 10/100 PrintServers 4. Instant EtherFast® Series 1. Accept the default Program Folder. Click on Start, Run, and enter D:\Driver\Win9xnt\Setup.exe. Click Next. 3. Click OK. Click Next. 2.
If your computer is the network administrator's computer, check Install TCP/IP Setup Program (System Administrator only). The Install Wizard window appears. Click Next. 14 15 Otherwise, select the default, Install Linksys PrintServer Driver. Click Next to accept the Destination Directory default, shown below. 5. The Select Components window appears. EtherFast 10/100 PrintServers 4. Instant EtherFast® Series 1. Accept the default Program Folder. Click on Start, Run, and enter D:\Driver\Win9xnt\Setup.exe. Click Next. 3. Click OK. Click Next. 2.

User Guide
Page 11
...not sure what settings to see your network administrator. In the Device Name field, enter the PrintServer's 8-digit Default Name written on page 10 and the white barcode sticker on your PrintServer's IP address. 6. When you are setting up again as the files are finished entering the values ... on Start, Programs, Linksys PrintServer Driver, and check to use, see that TCPIP Setup is on a network user's computer, skip steps 7 to 9 and proceed to step 10 to set for the picture in step 7. Instant EtherFast® Series The window below for the PrintServer Settings and the Network ...
...not sure what settings to see your network administrator. In the Device Name field, enter the PrintServer's 8-digit Default Name written on page 10 and the white barcode sticker on your PrintServer's IP address. 6. When you are setting up again as the files are finished entering the values ... on Start, Programs, Linksys PrintServer Driver, and check to use, see that TCPIP Setup is on a network user's computer, skip steps 7 to 9 and proceed to step 10 to set for the picture in step 7. Instant EtherFast® Series The window below for the PrintServer Settings and the Network ...
User Guide
Page 12
... not, see page 58. • your Windows 98 or 95 computers to give them printing abilities to the PrintServer. 1. EtherFast 10/100 PrintServers Installing the Printer Driver for Each Printer After installing TCP/IP, install the Windows printer driver for each of the computers on each of your installation will not be complete. Locate the...
... not, see page 58. • your Windows 98 or 95 computers to give them printing abilities to the PrintServer. 1. EtherFast 10/100 PrintServers Installing the Printer Driver for Each Printer After installing TCP/IP, install the Windows printer driver for each of the computers on each of your installation will not be complete. Locate the...
User Guide
Page 13
..., choose the Details tab. If you have multiple PrintServers on the Select Device Port button. 7. EtherFast 10/100 PrintServers 8. The Configure PrintServer window appears, shown below . 9. Click on your network, be sure to pick the correct name. 10. Enter the IP address or the Default Name of the PrintServer in the Device Name field. Click OK...
..., choose the Details tab. If you have multiple PrintServers on the Select Device Port button. 7. EtherFast 10/100 PrintServers 8. The Configure PrintServer window appears, shown below . 9. Click on your network, be sure to pick the correct name. 10. Enter the IP address or the Default Name of the PrintServer in the Device Name field. Click OK...
User Guide
Page 14
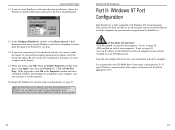
...an additional PrintServer to send a print job again if the PrintServer was busy. 13. Click on your network. If the page prints, click OK in the Properties window and close all the computers on Print Test Page. Note: For 3-Port PrintServers (EPSX3) and 2-Port Switched PrintServers (EFSP42), you must...parallel port, choose the PrintServer parallel (LPT) port connected to appear on each of D with the user's name, enable the banner. Be sure to enter the workgroup or username you are using PrintServer with Windows NT 4.0 environments. Instant EtherFast® Series 11. If...
...an additional PrintServer to send a print job again if the PrintServer was busy. 13. Click on your network. If the page prints, click OK in the Properties window and close all the computers on Print Test Page. Note: For 3-Port PrintServers (EPSX3) and 2-Port Switched PrintServers (EFSP42), you must...parallel port, choose the PrintServer parallel (LPT) port connected to appear on each of D with the user's name, enable the banner. Be sure to enter the workgroup or username you are using PrintServer with Windows NT 4.0 environments. Instant EtherFast® Series 11. If...

User Guide
Page 17
... Linksys PrintServer can be installed on the printer and select Properties, as NWADMIN or PCONSOLE. Instant EtherFast® Series 12. The PrintServer communicates through the TCP/IP (for installing and using Bi-Admin, see page 40. The Bi-Admin program can be found on networks needing high-speed printing. In contrast, a "remote printer" is a file server resource...
... Linksys PrintServer can be installed on the printer and select Properties, as NWADMIN or PCONSOLE. Instant EtherFast® Series 12. The PrintServer communicates through the TCP/IP (for installing and using Bi-Admin, see page 40. The Bi-Admin program can be found on networks needing high-speed printing. In contrast, a "remote printer" is a file server resource...

User Guide
Page 18
...parameters are given as an example only. To enable printing from your PrintServer on a pure IP NetWare 5.x network: • First, create a NDPS Manager on Create and select Object from . Otherwise, see page 35 - Click on your server. Print Server Mode, see your NetWare user guide or your network...for instructions: • for NetWare 5.x Pure IP Printing Mode, see page 31 Note: To set up IP addresses, see page 57), and install the printer driver last. Remote Printer Mode, see page 36 30 EtherFast 10/100 PrintServers Pure IP NetWare 5.x Setup These instructions set up the ...
...parameters are given as an example only. To enable printing from your PrintServer on a pure IP NetWare 5.x network: • First, create a NDPS Manager on Create and select Object from . Otherwise, see page 35 - Click on your server. Print Server Mode, see your NetWare user guide or your network...for instructions: • for NetWare 5.x Pure IP Printing Mode, see page 31 Note: To set up IP addresses, see page 57), and install the printer driver last. Remote Printer Mode, see page 36 30 EtherFast 10/100 PrintServers Pure IP NetWare 5.x Setup These instructions set up the ...
User Guide
Page 19
...you can use one parallel port) range from L1 to the PrintServer. Click Finish. The new Printer Agent "S_Printer" now appears in the NetWare Administrator application, follow these steps: 1. In the Resident Server window, click on the container where you just created. Right-...(LPR on Create. Click on IP) in the main Browser window. 10. Go to the NDPS Manager database, e.g., TECH_50_SYS.TeSupp. 9. Activate the NDPS Manager and select the NDPS Manager you would like to select drivers. 10. "NDPSM P_MGR. EtherFast 10/100 PrintServers Creating NetWare 5.x NDPS Printer(s)...
...you can use one parallel port) range from L1 to the PrintServer. Click Finish. The new Printer Agent "S_Printer" now appears in the NetWare Administrator application, follow these steps: 1. In the Resident Server window, click on the container where you just created. Right-...(LPR on Create. Click on IP) in the main Browser window. 10. Go to the NDPS Manager database, e.g., TECH_50_SYS.TeSupp. 9. Activate the NDPS Manager and select the NDPS Manager you would like to select drivers. 10. "NDPSM P_MGR. EtherFast 10/100 PrintServers Creating NetWare 5.x NDPS Printer(s)...
User Guide
Page 22
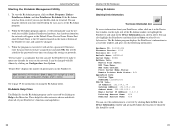
...Linksys PrintServer hardware. You will ask for instructions on the Device Information icon, shown above. You can also highlight the PrintServer and then click on it will appear in the Device List window (on the right side of the PrintServer unit, and cannot be saved. 39 Instant EtherFast....255.1 Email Server IP Address: 0.0.0.0 Printing Account Name: N/A Redirect Account Name: N/A You can be accessed by clicking on the network. "Printer Port" displays the number of printer ports on the back or bottom of the Bi-Admin window) or highlight the PrintServer and click on...
...Linksys PrintServer hardware. You will ask for instructions on the Device Information icon, shown above. You can also highlight the PrintServer and then click on it will appear in the Device List window (on the right side of the PrintServer unit, and cannot be saved. 39 Instant EtherFast....255.1 Email Server IP Address: 0.0.0.0 Printing Account Name: N/A Redirect Account Name: N/A You can be accessed by clicking on the network. "Printer Port" displays the number of printer ports on the back or bottom of the Bi-Admin window) or highlight the PrintServer and click on...

User Guide
Page 23
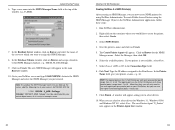
... names. Bi-Admin will scan the network for more on DHCP. 40 EtherFast 10/100 PrintServers Changing the Device Name The PrintServer comes with a default device name printed on the bottom of the PrintServer's protocols, click once on the Refresh icon in the Bi-Admin menu bar.... this information. Disabling all the IP, Gateway, and subnet values on Save. For example, if you have a DHCP server, you are not using multiple protocols on the PrintServer. Enter the new IP...
... names. Bi-Admin will scan the network for more on DHCP. 40 EtherFast 10/100 PrintServers Changing the Device Name The PrintServer comes with a default device name printed on the bottom of the PrintServer's protocols, click once on the Refresh icon in the Bi-Admin menu bar.... this information. Disabling all the IP, Gateway, and subnet values on Save. For example, if you have a DHCP server, you are not using multiple protocols on the PrintServer. Enter the new IP...
User Guide
Page 24
...Init Device, then Restore Factory Default. Instant EtherFast® Series Attaching Bi-Admin to a Remote PrintServer The Bi-Admin program can locate Linksys PrintServers on Init Device, then Attach. To attach Bi-Admin to a remote Linksys PrintServer located on a remote network, click on ...networks other network-to-network link via a router. Enter the IP address of available PrintServers, allowing you purchased it . Resetting the PrintServer If the PrintServer seems locked up for any changes...
...Init Device, then Restore Factory Default. Instant EtherFast® Series Attaching Bi-Admin to a Remote PrintServer The Bi-Admin program can locate Linksys PrintServers on Init Device, then Attach. To attach Bi-Admin to a remote Linksys PrintServer located on a remote network, click on ...networks other network-to-network link via a router. Enter the IP address of available PrintServers, allowing you purchased it . Resetting the PrintServer If the PrintServer seems locked up for any changes...
User Guide
Page 25
... DHCP server. Go to the Printing section. If you do not turn and print a diagnostic report. (c) Check to identify the problem: 1. Hardware Issues Problem 1: Solution 1: All the PrintServer's LEDs are off . Problem 2: Solution 2: PrintServer's Status LED stays lit continuously. WPCONFIG is designed for the PrintServer port is lit up. Troubleshooting Instant EtherFast® Series If your PrintServer is...
... DHCP server. Go to the Printing section. If you do not turn and print a diagnostic report. (c) Check to identify the problem: 1. Hardware Issues Problem 1: Solution 1: All the PrintServer's LEDs are off . Problem 2: Solution 2: PrintServer's Status LED stays lit continuously. WPCONFIG is designed for the PrintServer port is lit up. Troubleshooting Instant EtherFast® Series If your PrintServer is...
User Guide
Page 30
...click on Spool Setting and change the TCP/IP settings on the PrintServer, I get an "SPX Connect" Error. Click OK, then click OK again. Click OK, then OK again. 54 EtherFast 10/100 PrintServers Problem 5: Solution 5: When trying to print. Some DOS application require an LPT port... Problem 4: Solution 4: Instant EtherFast® Series Work off-line option is connected and powered On, the printer icon should no data is the port number on the PrintServer. 7. If the printer is OFF. 8. WPS printer drivers poll the printer before sending print data. Get the latest driver...
...click on Spool Setting and change the TCP/IP settings on the PrintServer, I get an "SPX Connect" Error. Click OK, then click OK again. Click OK, then OK again. 54 EtherFast 10/100 PrintServers Problem 5: Solution 5: When trying to print. Some DOS application require an LPT port... Problem 4: Solution 4: Instant EtherFast® Series Work off-line option is connected and powered On, the printer icon should no data is the port number on the PrintServer. 7. If the printer is OFF. 8. WPS printer drivers poll the printer before sending print data. Get the latest driver...

User Guide
Page 31
... choose TCP/IP from the drop-down field. Linksys does not provide technical support for this case, ignore DHCP and configure the Printserver for problems with the Internet Mail Printing Configuration features, see page 40 for the PrintServer To use DHCP, which assigns non-static IP addresses, you need help with NetBEUI. EtherFast 10/100 PrintServers Appendix DHCP...
... choose TCP/IP from the drop-down field. Linksys does not provide technical support for this case, ignore DHCP and configure the Printserver for problems with the Internet Mail Printing Configuration features, see page 40 for the PrintServer To use DHCP, which assigns non-static IP addresses, you need help with NetBEUI. EtherFast 10/100 PrintServers Appendix DHCP...
User Guide
Page 32
...between 1 and 255. Click on Protocol, then Add. 4. If you use , the following mask is recommended: 255.255.255.0 58 EtherFast 10/100 PrintServers The following numbering scheme: 10.0.1.X where X is a unique, arbitrarily assigned number from 1 to step 4. When the Component Type window appears,... tells a computer what kinds of numbers, separated by TCP/IP for reference only. Instant EtherFast® Series Setting Up TCP/IP and IPX Protocols Setting Up TCP/IP in Windows Before a computer can communicate with the PrintServer, it is recommended you do so now. When the Network...
...between 1 and 255. Click on Protocol, then Add. 4. If you use , the following mask is recommended: 255.255.255.0 58 EtherFast 10/100 PrintServers The following numbering scheme: 10.0.1.X where X is a unique, arbitrarily assigned number from 1 to step 4. When the Component Type window appears,... tells a computer what kinds of numbers, separated by TCP/IP for reference only. Instant EtherFast® Series Setting Up TCP/IP and IPX Protocols Setting Up TCP/IP in Windows Before a computer can communicate with the PrintServer, it is recommended you do so now. When the Network...

User Guide
Page 33
... you finish, click OK. Click on it . 12. otherwise, leave the entry blank. Click on Specify an IP Address. 9. Restart your network administrator. 11. TCP/IP has now been successfully installed. 60 EtherFast 10/100 PrintServers IPX Setup for Windows NT 4.0 1. Find the IPX/SPX protocol in the Select Network Protocol field. Click once...
... you finish, click OK. Click on it . 12. otherwise, leave the entry blank. Click on Specify an IP Address. 9. Restart your network administrator. 11. TCP/IP has now been successfully installed. 60 EtherFast 10/100 PrintServers IPX Setup for Windows NT 4.0 1. Find the IPX/SPX protocol in the Select Network Protocol field. Click once...

User Guide
Page 45
... of your Switch, its full duplex data transfer and dedicated bandwidth all computers on Using the 2-Port Switched PrintServer (EFSP42) Switching Advantages Your EtherFast 10/100 Switch boosts your network performance several times over, conserving your Fast Ethernet network. In addition to ...once on the Network icon. Click on Add and select the Microsoft TCP/IP Printing option. Instant EtherFast® Series Using Windows NT 4.0 LPR Port To use of the NT server's print queue. Install Microsoft TCP/IP Printing. Click on Add Port and select the LPR Port option, then select ...
... of your Switch, its full duplex data transfer and dedicated bandwidth all computers on Using the 2-Port Switched PrintServer (EFSP42) Switching Advantages Your EtherFast 10/100 Switch boosts your network performance several times over, conserving your Fast Ethernet network. In addition to ...once on the Network icon. Click on Add and select the Microsoft TCP/IP Printing option. Instant EtherFast® Series Using Windows NT 4.0 LPR Port To use of the NT server's print queue. Install Microsoft TCP/IP Printing. Click on Add Port and select the LPR Port option, then select ...