
User Guide
Page 6
...PrintServer's speed. Note: The 2-Port Switched PrintServer (EFSP42) does not have all PrintServer models will also light up green when the PrintServer is labeled as follows: Dip Switch 1: This dip switch controls the Auto-Negotiation Mode, which enables the PrintServer to automatically detect the speed (10Mbps or 100Mbps), polarity, and duplex of your PrintServer. When assigning an IP address... PrintServer runs a self-diagnostic test while booting up position. For 10Mbps transfer, set your network through the PrintServer's Uplink Port. EtherFast 10/100 PrintServers...
...PrintServer's speed. Note: The 2-Port Switched PrintServer (EFSP42) does not have all PrintServer models will also light up green when the PrintServer is labeled as follows: Dip Switch 1: This dip switch controls the Auto-Negotiation Mode, which enables the PrintServer to automatically detect the speed (10Mbps or 100Mbps), polarity, and duplex of your PrintServer. When assigning an IP address... PrintServer runs a self-diagnostic test while booting up position. For 10Mbps transfer, set your network through the PrintServer's Uplink Port. EtherFast 10/100 PrintServers...

User Guide
Page 9
... 98, 95, or NT computers to give them PrintServer printing abilities. At this first installation on your network. If not, see page 58. The IP address for cabling specifications. 2. It is assumed that your network. EtherFast 10/100 PrintServers Part I - If not, see page 58. • an IP address assigned to install the Printer Driver. 12 13 Some...
... 98, 95, or NT computers to give them PrintServer printing abilities. At this first installation on your network. If not, see page 58. The IP address for cabling specifications. 2. It is assumed that your network. EtherFast 10/100 PrintServers Part I - If not, see page 58. • an IP address assigned to install the Printer Driver. 12 13 Some...

User Guide
Page 11
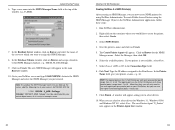
... you are not sure what settings to your PrintServer Setup. 17 EtherFast 10/100 PrintServers 7. If you are finished entering the values for the IP address, Gateway address (optional), and the Subnet Mask, click Set Device. 10. To check for your successful file copy, click on Start, Programs, Linksys PrintServer Driver, and check to finish your computer. Instant...
... you are not sure what settings to your PrintServer Setup. 17 EtherFast 10/100 PrintServers 7. If you are finished entering the values for the IP address, Gateway address (optional), and the Subnet Mask, click Set Device. 10. To check for your successful file copy, click on Start, Programs, Linksys PrintServer Driver, and check to finish your computer. Instant...
User Guide
Page 12
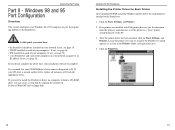
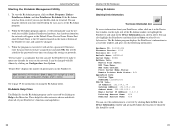
...your CD drive is named another letter, replace all instances of your PrintServer and each printer(s) attached to an IP address. If no printers are installed, install the printer driver(s) per ... 58. EtherFast 10/100 PrintServers Installing the Printer Driver for Each Printer After installing TCP/IP, install the Windows printer driver for each of your network assigned to the PrintServer. 1. ...have: • the PrintServer hardware installed on Start, Settings, and Printers. 2. It is assumed that your Windows 98 or 95 computers to give them printing abilities to the PC....
...your CD drive is named another letter, replace all instances of your PrintServer and each printer(s) attached to an IP address. If no printers are installed, install the printer driver(s) per ... 58. EtherFast 10/100 PrintServers Installing the Printer Driver for Each Printer After installing TCP/IP, install the Windows printer driver for each of your network assigned to the PrintServer. 1. ...have: • the PrintServer hardware installed on Start, Settings, and Printers. 2. It is assumed that your Windows 98 or 95 computers to give them printing abilities to the PC....
User Guide
Page 13
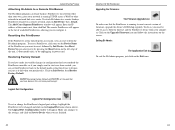
...window appears, choose the Details tab. EtherFast 10/100 PrintServers 8. Click OK. If you have multiple PrintServers on Browse and choose from the list that appears, or see page 10. The Configure PrintServer window appears, shown below . 9. In the Add Port window, select Other and then PrintServer under the listed ports to appear.... The Add Port window will appear, shown below . Enter the IP address or the Default Name of the PrintServer in the Device Name field. If you are not sure what the number is, click on your network, be sure to pick the ...
...window appears, choose the Details tab. EtherFast 10/100 PrintServers 8. Click OK. If you have multiple PrintServers on Browse and choose from the list that appears, or see page 10. The Configure PrintServer window appears, shown below . 9. In the Add Port window, select Other and then PrintServer under the listed ports to appear.... The Add Port window will appear, shown below . Enter the IP address or the Default Name of the PrintServer in the Device Name field. If you are not sure what the number is, click on your network, be sure to pick the ...
User Guide
Page 14
...IP address for the banner, select the PostScript option. This section will not be identified with the appropriate letter. 22 23 If not, see page 58. • have : • TCP/IP installed on each computer on the network. • Logged on Print Test Page. Instant EtherFast® Series 11. Note: For 3-Port PrintServers... (EPSX3) and 2-Port Switched PrintServers (EFSP42), you use on the PrintServer so all...
...IP address for the banner, select the PostScript option. This section will not be identified with the appropriate letter. 22 23 If not, see page 58. • have : • TCP/IP installed on each computer on the network. • Logged on Print Test Page. Instant EtherFast® Series 11. Note: For 3-Port PrintServers... (EPSX3) and 2-Port Switched PrintServers (EFSP42), you use on the PrintServer so all...

User Guide
Page 18
Print Server Mode, see page 31 Note: To set up the Create NDPS Manager Object window. 31 Remote Printer Mode, see page 58. To set up IP addresses, see page 36 30 EtherFast 10/100 PrintServers Pure IP NetWare 5.x Setup These instructions set up the PrintServer to work in the CD-...ROM drive. This only needs to be logged on as an Administrator or Supervisor. • Access to your server's administrative utilities like ...
Print Server Mode, see page 31 Note: To set up the Create NDPS Manager Object window. 31 Remote Printer Mode, see page 58. To set up IP addresses, see page 36 30 EtherFast 10/100 PrintServers Pure IP NetWare 5.x Setup These instructions set up the PrintServer to work in the CD-...ROM drive. This only needs to be logged on as an Administrator or Supervisor. • Access to your server's administrative utilities like ...
User Guide
Page 19
.... Note: To autoload the NDPS Manager each time you boot up the server, add the following line to your server's AUTOEXEC.NCF file: LOAD NDPSM P_MGR.TeSupp Attention! "NDPSM P_MGR. EtherFast 10/100 PrintServers Creating NetWare 5.x NDPS Printer(s) After creating an NDPS Manager, you are asked.... Select Remote (LPR on Browse for your PrintServer, but you can now create NDPS printers by using the NDPS Manager Object in the Connection Type field. 8. TeSupp" must be substituted for the NDPS Manager name. Type the IP address assigned to the NDPS Manager database, e.g., TECH_50_SYS...
.... Note: To autoload the NDPS Manager each time you boot up the server, add the following line to your server's AUTOEXEC.NCF file: LOAD NDPSM P_MGR.TeSupp Attention! "NDPSM P_MGR. EtherFast 10/100 PrintServers Creating NetWare 5.x NDPS Printer(s) After creating an NDPS Manager, you are asked.... Select Remote (LPR on Browse for your PrintServer, but you can now create NDPS printers by using the NDPS Manager Object in the Connection Type field. 8. TeSupp" must be substituted for the NDPS Manager name. Type the IP address assigned to the NDPS Manager database, e.g., TECH_50_SYS...
User Guide
Page 22
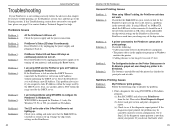
... available Linksys PrintServer hardware. If the Bi-Admin icon has been created, you change the settings or protocols. Otherwise, enter the password if you the following information: Hardware ID: 0620103428 Firmware Version: 6010 Protocol ID: 003F Default Name: SCE02282 Server Name: RHINO NetWare Info: Master File Server: NDS Tree Name: NDS Tree Context: Print Server Mode...
... available Linksys PrintServer hardware. If the Bi-Admin icon has been created, you change the settings or protocols. Otherwise, enter the password if you the following information: Hardware ID: 0620103428 Firmware Version: 6010 Protocol ID: 003F Default Name: SCE02282 Server Name: RHINO NetWare Info: Master File Server: NDS Tree Name: NDS Tree Context: Print Server Mode...

User Guide
Page 23
...PrintServer's IP Address The PrintServer's IP address can be stored in the PrintServer unit. Enter the new IP Address, Gateway Address (optional), and Subnet Mask for more on DHCP. 40 EtherFast 10/100 PrintServers Changing the Device Name The PrintServer comes with a default device name printed on the bottom of the PrintServer any time. Also, if you have a DHCP server... and inaccessible. Each protocol is empty, enter the PrintServer's SC number, which appears as it . Because Linksys PrintServers do not support serial printing, the serial port icon will appear. When you finish...
...PrintServer's IP Address The PrintServer's IP address can be stored in the PrintServer unit. Enter the new IP Address, Gateway Address (optional), and Subnet Mask for more on DHCP. 40 EtherFast 10/100 PrintServers Changing the Device Name The PrintServer comes with a default device name printed on the bottom of the PrintServer any time. Also, if you have a DHCP server... and inaccessible. Each protocol is empty, enter the PrintServer's SC number, which appears as it . Because Linksys PrintServers do not support serial printing, the serial port icon will appear. When you finish...
User Guide
Page 24
... the Upgrade Firmware icon and follow the instructions on Init Device, then Restore Factory Default. Enter the IP address of available PrintServers, allowing you are finished. 42 EtherFast 10/100 PrintServers Upgrading the Firmware: The Firmware Upgrade Icon To make sure that the device will appear. The Logical Port... only), or by pressing the Reset button on networks other than your own, given your computer. To do so, you can locate Linksys PrintServers on the left edge of firmware, upgrade the device's ROM chip regularly. Exiting Bi-Admin: The Application Exit Icon To exit the...
... the Upgrade Firmware icon and follow the instructions on Init Device, then Restore Factory Default. Enter the IP address of available PrintServers, allowing you are finished. 42 EtherFast 10/100 PrintServers Upgrading the Firmware: The Firmware Upgrade Icon To make sure that the device will appear. The Logical Port... only), or by pressing the Reset button on networks other than your own, given your computer. To do so, you can locate Linksys PrintServers on the left edge of firmware, upgrade the device's ROM chip regularly. Exiting Bi-Admin: The Application Exit Icon To exit the...
User Guide
Page 25
... until the printer has finished its IP Address without informing the DHCP server. Go to the PrintServer cannot print or prints garbage. Check the power supply and the power connection. Reset PrintServer by unplugging the power supply and ...EtherFast® Series If your PrintServer is not working correctly, follow the advice in this Troubleshooting section does not resolve your problem, please see page 91 to contact Linksys Technical Support for help. Check that the Link LED on the PrintServer. Then select Print Diagnostic Report (b) Select each time you assigned a static IP Address...
... until the printer has finished its IP Address without informing the DHCP server. Go to the PrintServer cannot print or prints garbage. Check the power supply and the power connection. Reset PrintServer by unplugging the power supply and ...EtherFast® Series If your PrintServer is not working correctly, follow the advice in this Troubleshooting section does not resolve your problem, please see page 91 to contact Linksys Technical Support for help. Check that the Link LED on the PrintServer. Then select Print Diagnostic Report (b) Select each time you assigned a static IP Address...

User Guide
Page 31
... Internet Mail Printing Configuration features, see the guide in D:\Not_supp\Manual directory on Configuration in the menu and choose TCP/IP from the drop-down field. Note: Linksys does not provide any technical support for this case, ignore DHCP and configure the Printserver for the PrintServer To use DHCP, which assigns non-static IP addresses, you need...
... Internet Mail Printing Configuration features, see the guide in D:\Not_supp\Manual directory on Configuration in the menu and choose TCP/IP from the drop-down field. Note: Linksys does not provide any technical support for this case, ignore DHCP and configure the Printserver for the PrintServer To use DHCP, which assigns non-static IP addresses, you need...
User Guide
Page 32
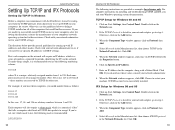
.... When the Component Type window appears, click on the Network icon. 2. Instant EtherFast® Series Setting Up TCP/IP and IPX Protocols Setting Up TCP/IP in Windows Before a computer can communicate with the PrintServer, it is recommended you know how to set up with IP addresses and subnet masks. The directions below to accept. TCP...
.... When the Component Type window appears, click on the Network icon. 2. Instant EtherFast® Series Setting Up TCP/IP and IPX Protocols Setting Up TCP/IP in Windows Before a computer can communicate with the PrintServer, it is recommended you know how to set up with IP addresses and subnet masks. The directions below to accept. TCP...

User Guide
Page 33
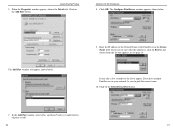
...the Select Network Protocol field. Click on Specify an IP Address. 9. Click on the Protocols tab. When you have from the Adapters box. When the Network window reappears, click Close. TCP/IP has now been successfully installed. 60 EtherFast 10/100 PrintServers IPX Setup for Windows NT 4.0 1. Double-click... field. When asked to use DHCP, click on it . 12. Click once on Start, Settings, and Control Panel. Enter the IP Address for the computer, along with your network administrator for your system. otherwise, leave the entry blank. er when prompted. Click on the...
...the Select Network Protocol field. Click on Specify an IP Address. 9. Click on the Protocols tab. When you have from the Adapters box. When the Network window reappears, click Close. TCP/IP has now been successfully installed. 60 EtherFast 10/100 PrintServers IPX Setup for Windows NT 4.0 1. Double-click... field. When asked to use DHCP, click on it . 12. Click once on Start, Settings, and Control Panel. Enter the IP Address for the computer, along with your network administrator for your system. otherwise, leave the entry blank. er when prompted. Click on the...

User Guide
Page 45
...EtherFast 10/100 Switch, then each other alternative. Choose to purchase new hardware, rewire and reconfigure an entire site all PrintServers models) • L2 - Allowing 10BaseT and 100BaseTX hardware speeds to run alongside each computer will be prompted to enter the PrintServer's IP address and the name of the NT server's print... old equipment until you decide to buy speedier replacements. Right-click on Using the 2-Port Switched PrintServer (EFSP42) Switching Advantages Your EtherFast 10/100 Switch boosts your Fast Ethernet network. represents LPT3. (For 2 and 3-Port models ...
...EtherFast 10/100 Switch, then each other alternative. Choose to purchase new hardware, rewire and reconfigure an entire site all PrintServers models) • L2 - Allowing 10BaseT and 100BaseTX hardware speeds to run alongside each computer will be prompted to enter the PrintServer's IP address and the name of the NT server's print... old equipment until you decide to buy speedier replacements. Right-click on Using the 2-Port Switched PrintServer (EFSP42) Switching Advantages Your EtherFast 10/100 Switch boosts your Fast Ethernet network. represents LPT3. (For 2 and 3-Port models ...