
User Guide
Page 11
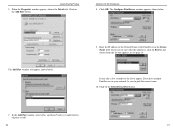
...Computer Settings show how the settings have been set up your PrintServer's IP address. 6. EtherFast 10/100 PrintServers 7. If you are finished entering the values for your successful file copy, click on Start, Programs, Linksys PrintServer Driver, and check to finish your network administrator. When you...computer, go to page 23 to see your PrintServer Setup. 17 To check for the IP address, Gateway address (optional), and the Subnet Mask, click Set Device. 10. In the Device Name field, enter the PrintServer's 8-digit Default Name written on page 10 and the white...
...Computer Settings show how the settings have been set up your PrintServer's IP address. 6. EtherFast 10/100 PrintServers 7. If you are finished entering the values for your successful file copy, click on Start, Programs, Linksys PrintServer Driver, and check to finish your network administrator. When you...computer, go to page 23 to see your PrintServer Setup. 17 To check for the IP address, Gateway address (optional), and the Subnet Mask, click Set Device. 10. In the Device Name field, enter the PrintServer's 8-digit Default Name written on page 10 and the white...
User Guide
Page 13
...will appear, shown below . EtherFast 10/100 PrintServers 8. Enter the IP address or the Default Name of the PrintServer in the Device Name field. Click on the Add Port button. Click on the Select Device Port button. 7. Click OK. If you have multiple PrintServers on Browse and choose from the... name. 10. In the Add Port window, select Other and then PrintServer under the listed ports to appear. When the Properties window appears, choose the Details tab. Instant EtherFast® Series 5. The Configure PrintServer window appears, shown below . 9. It may take a few seconds for...
...will appear, shown below . EtherFast 10/100 PrintServers 8. Enter the IP address or the Default Name of the PrintServer in the Device Name field. Click on the Add Port button. Click on the Select Device Port button. 7. Click OK. If you have multiple PrintServers on Browse and choose from the... name. 10. In the Add Port window, select Other and then PrintServer under the listed ports to appear. When the Properties window appears, choose the Details tab. Instant EtherFast® Series 5. The Configure PrintServer window appears, shown below . 9. It may take a few seconds for...
User Guide
Page 22
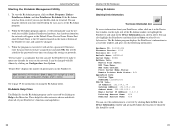
... scan the network for available Linksys PrintServer hardware. These help files offer extensive advice and details about all of your PrintServer's functions and capabilities. 38 EtherFast 10/100 PrintServers Using Bi-Admin Obtaining Device ...Default Name: SCE02282 Server Name: RHINO NetWare Info: Master File Server: NDS Tree Name: NDS Tree Context: Print Server Mode Status: Remote Printer Mode Status: N/A AppleTalk Info: Printer Type: SCE02282:LaserWriter TCP/IP Info: IP Address: 192.168.1.38 Gateway Address: 192.168.2.254 Subnet Mask: 255.255.255.1 Email Server IP Address: 0.0.0.0 Printing...
... scan the network for available Linksys PrintServer hardware. These help files offer extensive advice and details about all of your PrintServer's functions and capabilities. 38 EtherFast 10/100 PrintServers Using Bi-Admin Obtaining Device ...Default Name: SCE02282 Server Name: RHINO NetWare Info: Master File Server: NDS Tree Name: NDS Tree Context: Print Server Mode Status: Remote Printer Mode Status: N/A AppleTalk Info: Printer Type: SCE02282:LaserWriter TCP/IP Info: IP Address: 192.168.1.38 Gateway Address: 192.168.2.254 Subnet Mask: 255.255.255.1 Email Server IP Address: 0.0.0.0 Printing...

User Guide
Page 23
... new IP Address, Gateway Address (optional), and Subnet Mask for the PrintServer in a group (for available PrintServers and report back with a default device name printed on Save. You may be able to the PrintServer. Caution! To disable one or more user-friendly, you want , then click on the network query it has ports. Refreshing the Device List: Instant EtherFast...
... new IP Address, Gateway Address (optional), and Subnet Mask for the PrintServer in a group (for available PrintServers and report back with a default device name printed on Save. You may be able to the PrintServer. Caution! To disable one or more user-friendly, you want , then click on the network query it has ports. Refreshing the Device List: Instant EtherFast...
User Guide
Page 24
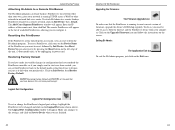
... rendered the PrintServer unusable, or if you purchased it. Restoring Factory Default will erase ALL of the PrintServer you can reset it . Click on the Upgrade Firmware icon and follow the instructions on Init Device, then Restore Factory Default. Enter the IP address of the unit...just click on Init Device, then Attach. The Add Cross Segment PrintServer window will appear. Caution! Instant EtherFast® Series Attaching Bi-Admin to a Remote PrintServer The Bi-Admin program can locate Linksys PrintServers on networks other network-to-network link via a router. Logical ...
... rendered the PrintServer unusable, or if you purchased it. Restoring Factory Default will erase ALL of the PrintServer you can reset it . Click on the Upgrade Firmware icon and follow the instructions on Init Device, then Restore Factory Default. Enter the IP address of the unit...just click on Init Device, then Attach. The Add Cross Segment PrintServer window will appear. Caution! Instant EtherFast® Series Attaching Bi-Admin to a Remote PrintServer The Bi-Admin program can locate Linksys PrintServers on networks other network-to-network link via a router. Logical ...

User Guide
Page 33
...IP Address. 9. Click on No. 5. Find the TCP/IP protocol in the Select Network Protocol field. NT will store your Windows NT CD, do so. You may have one; Click on Start, Settings, and Control Panel. er when prompted. TCP/IP has now been successfully installed. 60 EtherFast 10/100 PrintServers... network administrator. 11. Double-click on the Add button. 3. If asked if you have to your PrintServer Setup CD and the NT CD. 6. Enter the IP Address for Windows NT 4.0 1. Note: a Default Gateway is not required. Click on the Network icon. 2. When asked to use DHCP, click on...
...IP Address. 9. Click on No. 5. Find the TCP/IP protocol in the Select Network Protocol field. NT will store your Windows NT CD, do so. You may have one; Click on Start, Settings, and Control Panel. er when prompted. TCP/IP has now been successfully installed. 60 EtherFast 10/100 PrintServers... network administrator. 11. Double-click on the Add button. 3. If asked if you have to your PrintServer Setup CD and the NT CD. 6. Enter the IP Address for Windows NT 4.0 1. Note: a Default Gateway is not required. Click on the Network icon. 2. When asked to use DHCP, click on...