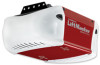
3840 Manual
Page 2
... on the following pages, it will alert you to the possibility of your garage door opener 28 Using the remote control 29 The remote control battery 29 Troubleshooting 29 Standby Power (Optional 30 Having a problem 31 Diagnostic chart 32-33 Programming 34-35 To add or reprogram a hand-held remote control...
... on the following pages, it will alert you to the possibility of your garage door opener 28 Using the remote control 29 The remote control battery 29 Troubleshooting 29 Standby Power (Optional 30 Having a problem 31 Diagnostic chart 32-33 Programming 34-35 To add or reprogram a hand-held remote control...
3840 Manual
Page 5
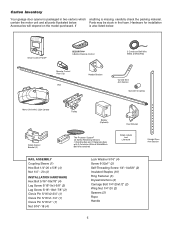
... Clip Header Bracket Rail 2 Conductor Bell Wire White & White/Red Curved Door Arm Section Sprocket Coupling Motor Unit with 2 Light Lenses Safety Sensor Bracket (2) Trolley Battery (Optional) The Protector System® (2) Safety Reversing Sensors (1 Sending Eye and 1 Receiving Eye) with 2-Conductor White & White/Black Bell Wire attached Door Bracket Safety Labels...
... Clip Header Bracket Rail 2 Conductor Bell Wire White & White/Red Curved Door Arm Section Sprocket Coupling Motor Unit with 2 Light Lenses Safety Sensor Bracket (2) Trolley Battery (Optional) The Protector System® (2) Safety Reversing Sensors (1 Sending Eye and 1 Receiving Eye) with 2-Conductor White & White/Black Bell Wire attached Door Bracket Safety Labels...
3840 Manual
Page 7
...; within sight of the garage door. • out of reach of children at minimum height of 5 feet (1.5 m). • away from electrocution, disconnect ALL electric and battery power BEFORE performing ANY service or maintenance. 7 Disable ALL locks and remove ALL ropes connected to garage door BEFORE installing opener to do so. 8. Upon...
...; within sight of the garage door. • out of reach of children at minimum height of 5 feet (1.5 m). • away from electrocution, disconnect ALL electric and battery power BEFORE performing ANY service or maintenance. 7 Disable ALL locks and remove ALL ropes connected to garage door BEFORE installing opener to do so. 8. Upon...
3840 Manual
Page 16
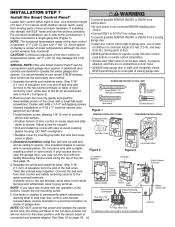
.... R W 1 2 (BACK VIEW) Door Control Terminal Screws LOCK Lock Button LOCK Light Button Door Control Connections Safety Reversing Sensors Connections Strip wire 7/16" 7/16" (11 mm) Battery Status LED Antenna NOTE: DO NOT connect the power and operate the opener Red White Grey at this wire with a small flat-head screwdriver. NEVER...
.... R W 1 2 (BACK VIEW) Door Control Terminal Screws LOCK Lock Button LOCK Light Button Door Control Connections Safety Reversing Sensors Connections Strip wire 7/16" 7/16" (11 mm) Battery Status LED Antenna NOTE: DO NOT connect the power and operate the opener Red White Grey at this wire with a small flat-head screwdriver. NEVER...
3840 Manual
Page 17
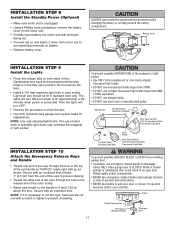
... is 6 feet (1.83 m) above the floor. Secure with an overhand knot at least 1" (2.5 cm) from motor unit to corresponding terminals on battery. • Replace battery cover. Secure with a match or lighter to prevent unraveling. INSTALLATION STEP 8 Install the Standby Power (Optional) • Make sure motor unit is... other end of the rope through the hole in the top of the red handle so "NOTICE" reads right side up as shown. Battery Battery Cover INSTALLATION STEP 9 Install the Lights • Press the release tabs on both sides of lens. The use short neck or specialty ...
... is 6 feet (1.83 m) above the floor. Secure with an overhand knot at least 1" (2.5 cm) from motor unit to corresponding terminals on battery. • Replace battery cover. Secure with a match or lighter to prevent unraveling. INSTALLATION STEP 8 Install the Standby Power (Optional) • Make sure motor unit is... other end of the rope through the hole in the top of the red handle so "NOTICE" reads right side up as shown. Battery Battery Cover INSTALLATION STEP 9 Install the Lights • Press the release tabs on both sides of lens. The use short neck or specialty ...
3840 Manual
Page 26
...) on under EXTREME tension, MUST be made , the safety reversal system MUST be seen clearly, it will not close from electrocution, disconnect ALL electric and battery power BEFORE performing ANY service or maintenance. 15. NEVER use emergency release handle unless garage doorway is clear of children. SAVE THESE INSTRUCTIONS. WARNING OPERATION...
...) on under EXTREME tension, MUST be made , the safety reversal system MUST be seen clearly, it will not close from electrocution, disconnect ALL electric and battery power BEFORE performing ANY service or maintenance. 15. NEVER use emergency release handle unless garage doorway is clear of children. SAVE THESE INSTRUCTIONS. WARNING OPERATION...

3840 Manual
Page 29
... or modifications of remote control) Check if proximity lighting is swallowed, immediately notify doctor. Using the Remote Control The Remote Control Battery NOTE: To activate the remote control functions, pull out the plastic pull tab protruding from the remote control housing. Press and hold...: (1) this device may be programmed to recalibrate itself. To re-enable the proximity lighting, simply press a button. To replace the batteries, remove the two screws and open the remote control housing. Dispose of the holder for 3 seconds. THERE ARE NO OTHER USER SERVICEABLE...
... or modifications of remote control) Check if proximity lighting is swallowed, immediately notify doctor. Using the Remote Control The Remote Control Battery NOTE: To activate the remote control functions, pull out the plastic pull tab protruding from the remote control housing. Press and hold...: (1) this device may be programmed to recalibrate itself. To re-enable the proximity lighting, simply press a button. To replace the batteries, remove the two screws and open the remote control housing. Dispose of the holder for 3 seconds. THERE ARE NO OTHER USER SERVICEABLE...
3840 Manual
Page 30
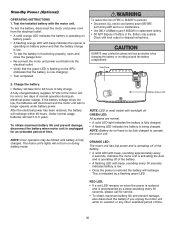
... on during an electrical power outage. NOTE: Battery do not have to persons: • Disconnect ALL electric and battery power BEFORE performing ANY service or maintenance. • Use ONLY LiftMaster part # 485LM for service. • To obtain maximum battery life and prevent damage, also disconnect the battery if you unplug the motor unit while on...
... on during an electrical power outage. NOTE: Battery do not have to persons: • Disconnect ALL electric and battery power BEFORE performing ANY service or maintenance. • Use ONLY LiftMaster part # 485LM for service. • To obtain maximum battery life and prevent damage, also disconnect the battery if you unplug the motor unit while on...
3840 Manual
Page 31
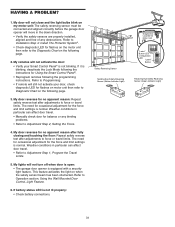
.... Refer to Operation section; My remotes will not turn off when door is open: • The garage door opener is not lit properly: • Check battery connections. Refer to Installation Step 4: Install The Protector System®. • Check diagnostic LED for Using the Smart Control Panel®. • Reprogram remotes following...
.... Refer to Operation section; My remotes will not turn off when door is open: • The garage door opener is not lit properly: • Check battery connections. Refer to Installation Step 4: Install The Protector System®. • Check diagnostic LED for Using the Smart Control Panel®. • Reprogram remotes following...
3840 Manual
Page 36
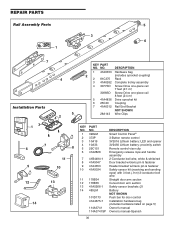
NO. 1 398LM DESCRIPTION Smart Control Panel® 2 373P 3-Button remote control 3 10A19 3V2016 Lithium battery: LED and opener 7 6 4 10A33 8 5 29C151 3V2450 Lithium battery: proximity switch Remote control visor clip 6 41A2828 Emergency release rope and handle NOTICE assembly 11 7 41B4494-1 2-...wire 12 13 11 178B34 12 178B35 Straight door arm section Curved door arm section 13 41A5266-1 Safety sensor brackets (2) 14 485LM Battery NOT SHOWN 101D173 Push bar for door control 14 41A4675-7 Installation hardware bag (includes hardware listed on page 5) 114A3741 Owner's ...
NO. 1 398LM DESCRIPTION Smart Control Panel® 2 373P 3-Button remote control 3 10A19 3V2016 Lithium battery: LED and opener 7 6 4 10A33 8 5 29C151 3V2450 Lithium battery: proximity switch Remote control visor clip 6 41A2828 Emergency release rope and handle NOTICE assembly 11 7 41B4494-1 2-...wire 12 13 11 178B34 12 178B35 Straight door arm section Curved door arm section 13 41A5266-1 Safety sensor brackets (2) 14 485LM Battery NOT SHOWN 101D173 Push bar for door control 14 41A4675-7 Installation hardware bag (includes hardware listed on page 5) 114A3741 Owner's ...
3840 Manual
Page 37
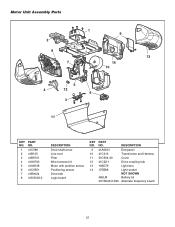
Motor Unit Assembly Parts 1 9 2 8 7 13 14 10 5 4 12 6 3 11 KEY NO. 1 2 3 4 5 6 7 8 PART NO. 41C588 41B135 41B6701 41A6790 41A6538 41C6551 41B0024 41DS002-2 DESCRIPTION Drive shaft cover Line cord Filter Wire harness kit Motor with position sensor Positioning sensor Drive belt Logic board KEY NO. 9 10 11 12 13 14 PART NO. 41A6231 41C213 31D504-20 41C22-1 108D79 175B88 485LM 41DS002-2-390 DESCRIPTION End panel Transformer and Harness Cover Drive coupling hub Light lens Light socket NOT SHOWN Battery kit Alternate frequency board 37
Motor Unit Assembly Parts 1 9 2 8 7 13 14 10 5 4 12 6 3 11 KEY NO. 1 2 3 4 5 6 7 8 PART NO. 41C588 41B135 41B6701 41A6790 41A6538 41C6551 41B0024 41DS002-2 DESCRIPTION Drive shaft cover Line cord Filter Wire harness kit Motor with position sensor Positioning sensor Drive belt Logic board KEY NO. 9 10 11 12 13 14 PART NO. 41A6231 41C213 31D504-20 41C22-1 108D79 175B88 485LM 41DS002-2-390 DESCRIPTION End panel Transformer and Harness Cover Drive coupling hub Light lens Light socket NOT SHOWN Battery kit Alternate frequency board 37
3840 Manual
Page 38
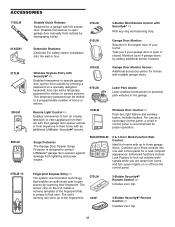
...: Enables homeowner to turn opener lights on a lamp, television or other appliance from their car with their home with an additional LiftMaster Security✚® remote. 378LM LOCK LIGHT Garage Door Monitor Sensor: Additional accessory sensor for homes with up to ten fingerprints.... wall or floor. Wireless Keyless Entry with Security✚® : Enables homeowner to lock out outside by scanning their fingerprint. Includes battery. Enhanced functions include Lock Feature to operate garage door opener from lightning and power surges. 902LM/903LM 2 & 3 Door Multi-Function...
...: Enables homeowner to turn opener lights on a lamp, television or other appliance from their car with their home with an additional LiftMaster Security✚® remote. 378LM LOCK LIGHT Garage Door Monitor Sensor: Additional accessory sensor for homes with up to ten fingerprints.... wall or floor. Wireless Keyless Entry with Security✚® : Enables homeowner to lock out outside by scanning their fingerprint. Includes battery. Enhanced functions include Lock Feature to operate garage door opener from lightning and power surges. 902LM/903LM 2 & 3 Door Multi-Function...
3840 Manual
Page 40
...TO THE DOOR SPRINGS, DOOR ROLLERS, DOOR ALIGNMENT OR HINGES. Country Club Road Tucson, Arizona 85706 SERVICE INFORMATION TOLL FREE NUMBER: 1-800-528-9131 LIFTMASTER® FIVE-YEAR LIMITED WARRANTY LIFETIME MOTOR LIMITED WARRANTY The Chamberlain Group, Inc. ("Seller") warrants to comply strictly with new or factory-rebuilt parts at...TO PROVIDE REASONABLE AND NECESSARY MAINTENANCE, UNAUTHORIZED REPAIRS OR ANY ALTERATIONS TO THIS PRODUCT), LABOR CHARGES FOR REINSTALLING A REPAIRED OR REPLACED UNIT, REPLACEMENT OF BATTERIES AND LIGHT BULBS OR UNITS INSTALLED FOR NON-RESIDENTIAL USE.
...TO THE DOOR SPRINGS, DOOR ROLLERS, DOOR ALIGNMENT OR HINGES. Country Club Road Tucson, Arizona 85706 SERVICE INFORMATION TOLL FREE NUMBER: 1-800-528-9131 LIFTMASTER® FIVE-YEAR LIMITED WARRANTY LIFETIME MOTOR LIMITED WARRANTY The Chamberlain Group, Inc. ("Seller") warrants to comply strictly with new or factory-rebuilt parts at...TO PROVIDE REASONABLE AND NECESSARY MAINTENANCE, UNAUTHORIZED REPAIRS OR ANY ALTERATIONS TO THIS PRODUCT), LABOR CHARGES FOR REINSTALLING A REPAIRED OR REPLACED UNIT, REPLACEMENT OF BATTERIES AND LIGHT BULBS OR UNITS INSTALLED FOR NON-RESIDENTIAL USE.


