User's Guide
Page 28
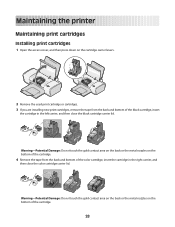
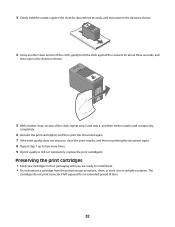
...on the bottom of the color cartridge, insert the cartridge in the left carrier, and then close the color cartridge carrier lid. Maintaining the printer Maintaining print cartridges Installing print cartridges 1 Open the access cover, and then press down on the cartridge carrier levers. 2 Remove the used ...print cartridge or cartridges. 3 If you are installing new print cartridges, remove the tape from the back and bottom of the cartridge. 28 Warning-Potential Damage: Do not touch the gold contact area ...
...on the bottom of the color cartridge, insert the cartridge in the left carrier, and then close the color cartridge carrier lid. Maintaining the printer Maintaining print cartridges Installing print cartridges 1 Open the access cover, and then press down on the cartridge carrier levers. 2 Remove the used ...print cartridge or cartridges. 3 If you are installing new print cartridges, remove the tape from the back and bottom of the cartridge. 28 Warning-Potential Damage: Do not touch the gold contact area ...
User's Guide
Page 29
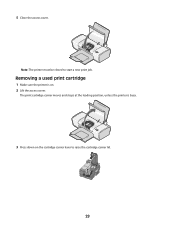
5 Close the access cover. Removing a used print cartridge 1 Make sure the printer is busy. 3 Press down on . 2 Lift the access cover. The print cartridge carrier moves and stops at the loading position, unless the printer is on the cartridge carrier lever to start a new print job. Note: The printer must be closed to raise the cartridge carrier lid. 29
5 Close the access cover. Removing a used print cartridge 1 Make sure the printer is busy. 3 Press down on . 2 Lift the access cover. The print cartridge carrier moves and stops at the loading position, unless the printer is on the cartridge carrier lever to start a new print job. Note: The printer must be closed to raise the cartridge carrier lid. 29
User's Guide
Page 30
..., select the check box, and then click Close. • If you purchased a new, genuine Lexmark print cartridge, but the Out of a refilled cartridge. If you aligned the cartridges to the printer. To prevent the message from a computer, click Learn more on the message. 2 Click... Report a non-Lexmark print cartridge. Lexmark does not recommend use Lexmark supplies. Refilling a cartridge can affect print quality and may cause damage to improve print quality, print your cartridge(s) with new Lexmark ...
..., select the check box, and then click Close. • If you purchased a new, genuine Lexmark print cartridge, but the Out of a refilled cartridge. If you aligned the cartridges to the printer. To prevent the message from a computer, click Learn more on the message. 2 Click... Report a non-Lexmark print cartridge. Lexmark does not recommend use Lexmark supplies. Refilling a cartridge can affect print quality and may cause damage to improve print quality, print your cartridge(s) with new Lexmark ...
User's Guide
Page 32
... then try printing the document again. 8 Repeat step 7 up to replace, clean, or store it in an airtight container. Preserving the print cartridges • Keep new cartridges in the direction shown. 5 With another clean section of time. 32 The cartridges do not print correctly if left exposed for about three seconds..., and then wipe in their packaging until you are ready to install them. • Do not remove a cartridge from the printer except to two more times. 9 If print quality is still not satisfactory, replace the print cartridge(s).
... then try printing the document again. 8 Repeat step 7 up to replace, clean, or store it in an airtight container. Preserving the print cartridges • Keep new cartridges in the direction shown. 5 With another clean section of time. 32 The cartridges do not print correctly if left exposed for about three seconds..., and then wipe in their packaging until you are ready to install them. • Do not remove a cartridge from the printer except to two more times. 9 If print quality is still not satisfactory, replace the print cartridge(s).

User's Guide
Page 33
... with water. Ordering supplies Ordering print cartridges Lexmark Z2300 Series models (except Lexmark Z2390) Item Part number Average cartridge standard page yield 1 Black cartridge 14A Black cartridge2 14 For page yield values, refer to www.lexmark.com/pageyields. CAUTION-SHOCK HAZARD: To avoid... may damage the finish of the printer. 4 Wipe only the outside of the printer, making sure to the printer before beginning a new print job. Declared yield value in accordance with ISO/IEC 24711 2Licensed Return Program Cartridge Lexmark Z2390 model Item Part number Average ...
... with water. Ordering supplies Ordering print cartridges Lexmark Z2300 Series models (except Lexmark Z2390) Item Part number Average cartridge standard page yield 1 Black cartridge 14A Black cartridge2 14 For page yield values, refer to www.lexmark.com/pageyields. CAUTION-SHOCK HAZARD: To avoid... may damage the finish of the printer. 4 Wipe only the outside of the printer, making sure to the printer before beginning a new print job. Declared yield value in accordance with ISO/IEC 24711 2Licensed Return Program Cartridge Lexmark Z2390 model Item Part number Average ...
User's Guide
Page 36
...cord from the wall outlet. 3 Gently remove the power supply from the printer. 4 Reconnect the power supply to the printer. 5 Plug the power cord into the wall outlet. 6 Press to turn the printer on . The USB port is damaged, use a new one. 2 Firmly plug the square end of the USB cable into ...the back of the printer. 3 Firmly plug the rectangular end of the USB cable into the USB port of the computer....
...cord from the wall outlet. 3 Gently remove the power supply from the printer. 4 Reconnect the power supply to the printer. 5 Plug the power cord into the wall outlet. 6 Press to turn the printer on . The USB port is damaged, use a new one. 2 Firmly plug the square end of the USB cable into ...the back of the printer. 3 Firmly plug the rectangular end of the USB cable into the USB port of the computer....

User's Guide
Page 37
...SETTINGS Using Windows 1 Do one or more of the following : CHECK MESSAGES If an error message appears, then resolve the error before trying to the printer and plugged into a known working electrical outlet that the power cord is completed, enable the security software again. CHECK CARTRIDGES 1 Remove the print cartridges.... b Click Control Panel. In Windows XP a Click Start. REMOVE AND THEN RELOAD PAPER CHECK INK Check the ink levels, and then install new print cartridges if necessary. c Under Hardware and Sound, click Printer. Page does not print These are possible solutions.
...SETTINGS Using Windows 1 Do one or more of the following : CHECK MESSAGES If an error message appears, then resolve the error before trying to the printer and plugged into a known working electrical outlet that the power cord is completed, enable the security software again. CHECK CARTRIDGES 1 Remove the print cartridges.... b Click Control Panel. In Windows XP a Click Start. REMOVE AND THEN RELOAD PAPER CHECK INK Check the ink levels, and then install new print cartridges if necessary. c Under Hardware and Sound, click Printer. Page does not print These are possible solutions.
User's Guide
Page 39
...does not appear automatically after you may need to turn on the computer screen to reinstall the software. Removing and reinstalling the software If the printer is the letter of your computer, do one of the following : In Windows Vista: a Click . b Type D:\setup.exe, where... the power supply from the list. 3 Select Uninstall. 4 Follow the instructions on the computer screen to remove the printer software. 5 Restart the computer before reinstalling the printer software. 6 Click Cancel on all New Hardware Found screens. 7 Insert the installation CD, and then follow the instructions on the...
...does not appear automatically after you may need to turn on the computer screen to reinstall the software. Removing and reinstalling the software If the printer is the letter of your computer, do one of the following : In Windows Vista: a Click . b Type D:\setup.exe, where... the power supply from the list. 3 Select Uninstall. 4 Follow the instructions on the computer screen to remove the printer software. 5 Restart the computer before reinstalling the printer software. 6 Click Cancel on all New Hardware Found screens. 7 Insert the installation CD, and then follow the instructions on the...


