User Guide
Page 60
... Magenta imaging unit Yellow imaging unit All countries and regions 21K3401 21K3403 21K3402 21K3404 Ordering staple cartridges Item Staple cartridges Part number 25A0013 Ordering a waste toner bottle Item Waste toner bottle Part number 72K0W00 Configuring supply notifications 1 Open a Web browser, and then type the printer IP address in the address...
... Magenta imaging unit Yellow imaging unit All countries and regions 21K3401 21K3403 21K3402 21K3404 Ordering staple cartridges Item Staple cartridges Part number 25A0013 Ordering a waste toner bottle Item Waste toner bottle Part number 72K0W00 Configuring supply notifications 1 Open a Web browser, and then type the printer IP address in the address...
User Guide
Page 62
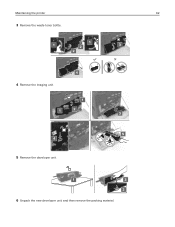
Maintaining the printer 62 3 Remove the waste toner bottle. 4 Remove the imaging unit. 5 Remove the developer unit. 6 Unpack the new developer unit, and then remove the packing material.
Maintaining the printer 62 3 Remove the waste toner bottle. 4 Remove the imaging unit. 5 Remove the developer unit. 6 Unpack the new developer unit, and then remove the packing material.

User Guide
Page 63
To reduce the risk of the printer might be hot. Maintaining the printer 63 7 Insert the new developer unit. 8 Insert the imaging unit. 9 Insert the waste toner bottle. 10 Close doors A and B. Replacing the fuser 1 Turn off the printer. 2 Open door B. CAUTION-HOT SURFACE: The inside of injury from a hot component, allow the surface to cool before touching it.
To reduce the risk of the printer might be hot. Maintaining the printer 63 7 Insert the new developer unit. 8 Insert the imaging unit. 9 Insert the waste toner bottle. 10 Close doors A and B. Replacing the fuser 1 Turn off the printer. 2 Open door B. CAUTION-HOT SURFACE: The inside of injury from a hot component, allow the surface to cool before touching it.

User Guide
Page 66
Maintaining the printer 66 2 Open door A. 3 Remove the waste toner bottle.
Maintaining the printer 66 2 Open door A. 3 Remove the waste toner bottle.

User Guide
Page 68
Replacing an imaging unit 1 Open door B. To reduce the risk of the printer might be hot. CAUTION-HOT SURFACE: The inside of injury from a hot component, allow the surface to cool before touching it. Maintaining the printer 68 8 Insert the imaging unit. 9 Insert the waste toner bottle. 10 Close doors A and B.
Replacing an imaging unit 1 Open door B. To reduce the risk of the printer might be hot. CAUTION-HOT SURFACE: The inside of injury from a hot component, allow the surface to cool before touching it. Maintaining the printer 68 8 Insert the imaging unit. 9 Insert the waste toner bottle. 10 Close doors A and B.

User Guide
Page 69
Maintaining the printer 69 2 Open door A. 3 Remove the waste toner bottle.
Maintaining the printer 69 2 Open door A. 3 Remove the waste toner bottle.

User Guide
Page 71
Replacing a toner cartridge 1 Open door A. 2 Remove the toner cartridge. 3 Unpack the new toner cartridge. Maintaining the printer 71 7 Insert the waste toner bottle. 8 Close doors A and B.
Replacing a toner cartridge 1 Open door A. 2 Remove the toner cartridge. 3 Unpack the new toner cartridge. Maintaining the printer 71 7 Insert the waste toner bottle. 8 Close doors A and B.

User Guide
Page 78
Maintaining the printer 78 Replacing the waste toner bottle 1 Open door A. 2 Remove the waste toner bottle. 3 Unpack the new waste toner bottle. 4 Insert the new waste toner bottle. 5 Close door A.
Maintaining the printer 78 Replacing the waste toner bottle 1 Open door A. 2 Remove the waste toner bottle. 3 Unpack the new waste toner bottle. 4 Insert the new waste toner bottle. 5 Close door A.

User Guide
Page 80
Maintaining the printer 80 4 Remove the waste toner bottle. 5 Open door A1. 6 Remove the transfer belt.
Maintaining the printer 80 4 Remove the waste toner bottle. 5 Open door A1. 6 Remove the transfer belt.

User Guide
Page 82
CAUTION-HOT SURFACE: The inside of injury from a hot component, allow the surface to cool before touching it. 2 Remove the transfer roller. Maintaining the printer 82 10 Insert the waste toner bottle. 11 Close doors A and B. 12 Turn on the printer. Replacing the transfer roller 1 Open door B. To reduce the risk of the printer might be hot.
CAUTION-HOT SURFACE: The inside of injury from a hot component, allow the surface to cool before touching it. 2 Remove the transfer roller. Maintaining the printer 82 10 Insert the waste toner bottle. 11 Close doors A and B. 12 Turn on the printer. Replacing the transfer roller 1 Open door B. To reduce the risk of the printer might be hot.
User Guide
Page 174
... 155 options firmware cards 150 174 memory card 150 ordering developer unit 59 imaging units 60 photoconductor unit 59 ordering supplies staple cartridges 60 waste toner bottle 60 organizing cables 12 P paper saving 31 Universal size setting 22 paper jam in door B 105 paper jam in the automatic document feeder ...131 mottled print and dots 132 repeating print defects 133 skewed print 133 solid color or black images 134 text or images cut off 135 toner easily rubs off 136 uneven print density 136 vertical dark lines or streaks appear on prints 137 white lines 138 white pages 124 print ...
... 155 options firmware cards 150 174 memory card 150 ordering developer unit 59 imaging units 60 photoconductor unit 59 ordering supplies staple cartridges 60 waste toner bottle 60 organizing cables 12 P paper saving 31 Universal size setting 22 paper jam in door B 105 paper jam in the automatic document feeder ...131 mottled print and dots 132 repeating print defects 133 skewed print 133 solid color or black images 134 text or images cut off 135 toner easily rubs off 136 uneven print density 136 vertical dark lines or streaks appear on prints 137 white lines 138 white pages 124 print ...
User Guide
Page 175
... printing held jobs from a Macintosh computer 28 from Windows 28 Push Button method 55 Q QR codes adding 20 R recycling Lexmark packaging 96 Lexmark products 96 toner cartridges 96 reducing a copy 31 repeat print jobs 28 printing from a Macintosh computer 28 printing from Windows 28 repeating print...the staple finisher 91 replacing the staple cartridge in the staple finisher 89 replacing the transfer belt 79 replacing the waste toner bottle 78 replacing transfer roller 82 reserve print jobs printing from a Macintosh computer 28 printing from Windows 28 restoring factory default ...
... printing held jobs from a Macintosh computer 28 from Windows 28 Push Button method 55 Q QR codes adding 20 R recycling Lexmark packaging 96 Lexmark products 96 toner cartridges 96 reducing a copy 31 repeat print jobs 28 printing from a Macintosh computer 28 printing from Windows 28 repeating print...the staple finisher 91 replacing the staple cartridge in the staple finisher 89 replacing the transfer belt 79 replacing the waste toner bottle 78 replacing transfer roller 82 reserve print jobs printing from a Macintosh computer 28 printing from Windows 28 restoring factory default ...
User Guide
Page 176
... storing print jobs 28 supplies conserving 95 supplies status checking 58 supplies, ordering developer unit 59 imaging units 60 photoconductor unit 59 staple cartridges 60 waste toner bottle 60 supply notifications configuring 60 supported file types 27 supported flash drives 27... 131 mottled print and dots 132 repeating print defects 133 skewed print 133 solid color or black images 134 text or images cut off 135 toner easily rubs off 136 uneven print density 136 vertical dark lines or streaks appear on prints 137 white lines on a page 138 white pages 124...
... storing print jobs 28 supplies conserving 95 supplies status checking 58 supplies, ordering developer unit 59 imaging units 60 photoconductor unit 59 staple cartridges 60 waste toner bottle 60 supply notifications configuring 60 supported file types 27 supported flash drives 27... 131 mottled print and dots 132 repeating print defects 133 skewed print 133 solid color or black images 134 text or images cut off 135 toner easily rubs off 136 uneven print density 136 vertical dark lines or streaks appear on prints 137 white lines on a page 138 white pages 124...
User Guide
Page 177
...setting 22 unlinking trays 25 updating firmware flash file 167 USB port enabling 115 USB ports 12 using genuine Lexmark parts 58 genuine Lexmark supplies 58 using Customer Support 19 using Google Drive 20 using QR Code Generator 20 using the ADF copying 30 using the control panel... mail setting up 35 voice over Internet Protocol (VoIP) fax setup 40 VoIP adapter 40 volatile memory 53 erasing 52 volatility statement of 53 W waste toner bottle ordering 60 replacing 78 white lines appear 138 white pages 124 wireless network Wi‑Fi Protected Setup 55 Wi‑Fi Protected Setup...
...setting 22 unlinking trays 25 updating firmware flash file 167 USB port enabling 115 USB ports 12 using genuine Lexmark parts 58 genuine Lexmark supplies 58 using Customer Support 19 using Google Drive 20 using QR Code Generator 20 using the ADF copying 30 using the control panel... mail setting up 35 voice over Internet Protocol (VoIP) fax setup 40 VoIP adapter 40 volatile memory 53 erasing 52 volatility statement of 53 W waste toner bottle ordering 60 replacing 78 white lines appear 138 white pages 124 wireless network Wi‑Fi Protected Setup 55 Wi‑Fi Protected Setup...

